
Hi all,
Most people just use a bucket, some kind of porous bag container to hold their tea mix, and a powerful air pump to aerate the brew, but I've decided on a slightly different approach since I think that I can improve on the traditional approach.
The trouble with using ordinary containers to hold your brew is that they are usually wide and shallow, which means that as a bubble rises through your tea, it only has a short time to give up it's oxygen. My bubbler in contrast is constructed from a 2.5 foot (73.5 cm) length of 4 inch (103.5 mm internal diameter) PVC pipe, so it's narrow and deep.
This is at least twice as deep as a bucket, so bubbles take twice as long to rise through the column as they would in a bucket, so in theory the same air pump should supply at least twice as much oxygen to the tea when used in this way. It means not having to spend so much on a powerful air pump, and also savings in electricity.
My design also ensures that the mix you use to brew your tea is very well aerated since it's held in place by a snuggly fitting "cage" and air is then forced through it. Forcing air through the cage and mix should also help to break larger bubbles up, increasing surface area, and therefore aeration.
There may still be a couple of minor bugs in this prototype which I hope to iron out later on, but the principal seems sound, so I'd like to share it with everyone, and a quick guide on how to build it.
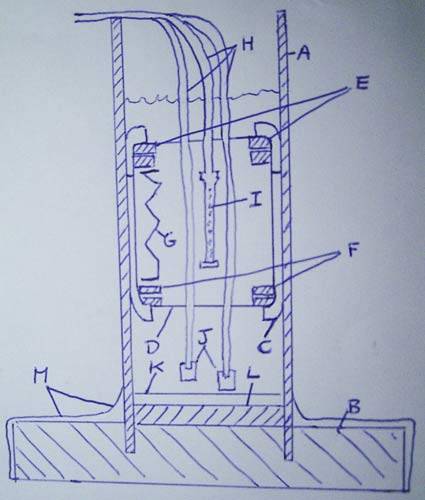
A - Pipe Wall
B - MDF Base
C - Cage (screw-lid tub)
D - Screen (anti splatter screen)
E - Screen holders
F - Washer
G - Spring (coat hanger wire)
H - Air hoses
I - "Bubble curtain"
J - Air stones
K - Wax
L/M - Silicone
Here's what the bubbler looks like

The bubbler itself was pretty straightforward to construct, and quite cheap. I checked a few hardware/plumbing supply stores until I found one that would sell me a pipe of the right size. Luckily I found one that had an offcut that they sold me cheap.
For the base I used some MDF that was leftover from when I built my cab.
The bubbler can make one gallon (4 liters) of tea which should be enough for my needs, but I think the design is good for larger volumes if slightly larger diameter pipe can be found, and the pipe is well set into it's base. Any taller than this probably makes it harder to construct/use.
Here's what I did:
1. Clean and cut the pipe. It was a bit uneven when I got it, and although I didn't have to (this part is mostly cosmetic, unless your pipe is in really bad shape), I carefully marked the are to be cut by slowly rotating the pipe on the carpet, held in place by a wall along it's length, and prevented from moving around length ways by a jutting out piece of door-frame.
I then placed a sharp object against the pipe, using the floor to brace/keep from moving too much, and rotated the pipe, leaving it scored along the area I wanted to remove. I then used a hacksaw to saw off this section.
Since the plastic melts easily when you are cutting it, you can't saw too fast, and I've found it's good to use different parts of the blade, and alternate them when that part gets too hot and stops cutting efficiently.
Repeat if necessary for the other end, although if it's only ugly there is no need to to anything since one end will be unseen and embedded in the base.
I left the final finishing off (sanding down) till last, since it's easier to do with the base attached.
2. I used a roughly A4 sized piece of MDF for the base, but If you use a longer pipe, an appropriately larger sized base would be necessary for stability. The fist stage is to place the pipe in the center of the base, and mark it all the way around with a pencil. I did this by eye, but if you want to be sure the the pipe is dead center, a tape measure/ruler to check is a good idea.
For the next stage you'll need some more tools - a hammer, some fine chisels if you have them, and a sharp knife. I also used a calliper to score the surface.

Using the caliper I found the center of the circle, and marked that spot by gouging a small hole with the sharp end. Next we need to find the thickness of wall of the pipe (or just judge it by eye like I did) and adjust the caliper so that it scores a circle that is just inside the circle drawn previously, but not more than the thickness of the pipe wall, or the pipe won't fit snuggly.
Give the caliper a good few turns (10-15), then check that the groove you've just created is not too wide - the goal here is to create a circular groove that is narrower than the wall of your pipe. As you finish it off, you can widen or narrow it, to make it fit snugly.
Now go around the edges of the groove (both inside and out) with your knife a couple of times, being careful not to place your fingers where they will be cut if the knife slips.
Taking your time, work the groove deeper with the chisels and hammer, followed by more knife, and so on. Keep checking all the way through that you're not making it too wide or narrow.
After a while, you should have a smooth circular groove that's nearly half the depth of your base, and it should be just a tiny bit too tight to push the tube in.
Now you want to go really slow, just taking off little bits using knife/chisel as needed, till you get to the point where the pipe can be pushed all the way into the groove.
3.
The next step is to attach the pipe to the base and secure,make it watertight with some silicone sealant (the type used for/window frames, aquariums, kitchens, etc). First I filed the entire length of the groove with sealant, then I pumped out a big dollop (nearly half the tube) so that it spread outwards from the center, flowing out and over the groove. I then inserted the pipe into the groove, went around the join with a bit of semi-stiff card to give a convex (sloping down, and away from the base) join, rather than the concave natural join the would have formed if I'd left it at that, which would be prone to collecting any fluids. I also spread some more silicone around the base, and sides, although I have yet to seal the underside.

Let it dry for at least 24 hours now. I sped things up a bit by sticking a few air hoses down there after 3-4 hours to bring in fresh air and help it dry.
Optional step
4.
I finished off with some medium-course grain sand paper which I duct tapped on all sides to a flat surface.
I splashed a little bit of water from a cup I had beside me on the sand paper to keep the dust down, then stood the pipe up on the sandpaper and holding it low down, used a slow and consistent round and round motion to smooth away the edge. It's important not to be to fast, or the pipe won't move smoothly across the sandpaper. If it starts to oscillate, slow down and keep it steady. It can take a while.
Optional step
5. Since the sealant I used contained fungicide, which I only discovered after having performed steps 1-5 and then read the label (doh!), I decided to seal the sealant with a layer of candle wax, for which I melted down a pair of white paraffin wax candles in a small cooking pot, and poured down the tube using a tube of rolled up and sticky-taped newspaper that was long enough to reach to the bottom of the pipe, plus a funnel also shaped out of newspaper.
I roped a helper into holding the funnel and tube while I pored the wax. I made sure the tube was vertical and in contact with the bottom/base of the pipe before poring the wax in quite quickly, and immediately lifting the paper tube, otherwise the hot wax would fly down the tube and splash the inner walls of the pipe, instead of forming a pool at the bottom.
Once the wax is all out, the paper tube can be carefully lifted out. Leave to cool for about half an hour, and it's ready to use, however you're not done yet!
Most people just use a bucket, some kind of porous bag container to hold their tea mix, and a powerful air pump to aerate the brew, but I've decided on a slightly different approach since I think that I can improve on the traditional approach.
The trouble with using ordinary containers to hold your brew is that they are usually wide and shallow, which means that as a bubble rises through your tea, it only has a short time to give up it's oxygen. My bubbler in contrast is constructed from a 2.5 foot (73.5 cm) length of 4 inch (103.5 mm internal diameter) PVC pipe, so it's narrow and deep.
This is at least twice as deep as a bucket, so bubbles take twice as long to rise through the column as they would in a bucket, so in theory the same air pump should supply at least twice as much oxygen to the tea when used in this way. It means not having to spend so much on a powerful air pump, and also savings in electricity.
My design also ensures that the mix you use to brew your tea is very well aerated since it's held in place by a snuggly fitting "cage" and air is then forced through it. Forcing air through the cage and mix should also help to break larger bubbles up, increasing surface area, and therefore aeration.
There may still be a couple of minor bugs in this prototype which I hope to iron out later on, but the principal seems sound, so I'd like to share it with everyone, and a quick guide on how to build it.
A - Pipe Wall
B - MDF Base
C - Cage (screw-lid tub)
D - Screen (anti splatter screen)
E - Screen holders
F - Washer
G - Spring (coat hanger wire)
H - Air hoses
I - "Bubble curtain"
J - Air stones
K - Wax
L/M - Silicone
Here's what the bubbler looks like
The bubbler itself was pretty straightforward to construct, and quite cheap. I checked a few hardware/plumbing supply stores until I found one that would sell me a pipe of the right size. Luckily I found one that had an offcut that they sold me cheap.
For the base I used some MDF that was leftover from when I built my cab.
The bubbler can make one gallon (4 liters) of tea which should be enough for my needs, but I think the design is good for larger volumes if slightly larger diameter pipe can be found, and the pipe is well set into it's base. Any taller than this probably makes it harder to construct/use.
Here's what I did:
1. Clean and cut the pipe. It was a bit uneven when I got it, and although I didn't have to (this part is mostly cosmetic, unless your pipe is in really bad shape), I carefully marked the are to be cut by slowly rotating the pipe on the carpet, held in place by a wall along it's length, and prevented from moving around length ways by a jutting out piece of door-frame.
I then placed a sharp object against the pipe, using the floor to brace/keep from moving too much, and rotated the pipe, leaving it scored along the area I wanted to remove. I then used a hacksaw to saw off this section.
Since the plastic melts easily when you are cutting it, you can't saw too fast, and I've found it's good to use different parts of the blade, and alternate them when that part gets too hot and stops cutting efficiently.
Repeat if necessary for the other end, although if it's only ugly there is no need to to anything since one end will be unseen and embedded in the base.
I left the final finishing off (sanding down) till last, since it's easier to do with the base attached.
2. I used a roughly A4 sized piece of MDF for the base, but If you use a longer pipe, an appropriately larger sized base would be necessary for stability. The fist stage is to place the pipe in the center of the base, and mark it all the way around with a pencil. I did this by eye, but if you want to be sure the the pipe is dead center, a tape measure/ruler to check is a good idea.
For the next stage you'll need some more tools - a hammer, some fine chisels if you have them, and a sharp knife. I also used a calliper to score the surface.
Using the caliper I found the center of the circle, and marked that spot by gouging a small hole with the sharp end. Next we need to find the thickness of wall of the pipe (or just judge it by eye like I did) and adjust the caliper so that it scores a circle that is just inside the circle drawn previously, but not more than the thickness of the pipe wall, or the pipe won't fit snuggly.
Give the caliper a good few turns (10-15), then check that the groove you've just created is not too wide - the goal here is to create a circular groove that is narrower than the wall of your pipe. As you finish it off, you can widen or narrow it, to make it fit snugly.
Now go around the edges of the groove (both inside and out) with your knife a couple of times, being careful not to place your fingers where they will be cut if the knife slips.
Taking your time, work the groove deeper with the chisels and hammer, followed by more knife, and so on. Keep checking all the way through that you're not making it too wide or narrow.
After a while, you should have a smooth circular groove that's nearly half the depth of your base, and it should be just a tiny bit too tight to push the tube in.
Now you want to go really slow, just taking off little bits using knife/chisel as needed, till you get to the point where the pipe can be pushed all the way into the groove.
3.
The next step is to attach the pipe to the base and secure,make it watertight with some silicone sealant (the type used for/window frames, aquariums, kitchens, etc). First I filed the entire length of the groove with sealant, then I pumped out a big dollop (nearly half the tube) so that it spread outwards from the center, flowing out and over the groove. I then inserted the pipe into the groove, went around the join with a bit of semi-stiff card to give a convex (sloping down, and away from the base) join, rather than the concave natural join the would have formed if I'd left it at that, which would be prone to collecting any fluids. I also spread some more silicone around the base, and sides, although I have yet to seal the underside.
Let it dry for at least 24 hours now. I sped things up a bit by sticking a few air hoses down there after 3-4 hours to bring in fresh air and help it dry.
Optional step
4.
I finished off with some medium-course grain sand paper which I duct tapped on all sides to a flat surface.
I splashed a little bit of water from a cup I had beside me on the sand paper to keep the dust down, then stood the pipe up on the sandpaper and holding it low down, used a slow and consistent round and round motion to smooth away the edge. It's important not to be to fast, or the pipe won't move smoothly across the sandpaper. If it starts to oscillate, slow down and keep it steady. It can take a while.
Optional step
5. Since the sealant I used contained fungicide, which I only discovered after having performed steps 1-5 and then read the label (doh!), I decided to seal the sealant with a layer of candle wax, for which I melted down a pair of white paraffin wax candles in a small cooking pot, and poured down the tube using a tube of rolled up and sticky-taped newspaper that was long enough to reach to the bottom of the pipe, plus a funnel also shaped out of newspaper.
I roped a helper into holding the funnel and tube while I pored the wax. I made sure the tube was vertical and in contact with the bottom/base of the pipe before poring the wax in quite quickly, and immediately lifting the paper tube, otherwise the hot wax would fly down the tube and splash the inner walls of the pipe, instead of forming a pool at the bottom.
Once the wax is all out, the paper tube can be carefully lifted out. Leave to cool for about half an hour, and it's ready to use, however you're not done yet!


