What's new
  • Happy Birthday ICMag! Been 20 years since Gypsy Nirvana created the forum! We are celebrating with a 4/20 Giveaway and by launching a new Patreon tier called "420club". You can read more here.
  • Important notice: ICMag's T.O.U. has been updated. Please review it here. For your convenience, it is also available in the main forum menu, under 'Quick Links"!

The "Beer" Fridge...

Suby

**AWD** Aficianado
Veteran
I though I might share a recent project, I have always wanted to try building one of these. :jump:

I have often read that these have been a flop but it's soo tempting because fridges are all over the place.
One of the issues that concerns any system of this type is heat, they are built insulated thus hold heat.
This is a problem if you live in say the desert but in my case it's freezing cold half the year... :badday:

I repainted the fridge in white and gutted it completely.
I painted the underside black to limit light leaks from the 2 x 6" intake holes.
I removed the door storage panel and replaced it with an acrylic panel for extra room.
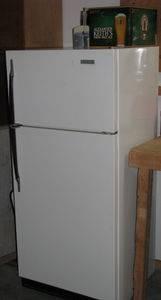


I'm running a 250W MH with reflector and NO hood, the fan is a 6" Elicent and it's passive intake.
The fan filters air through a homemade carbon filter, the setup also draws air over/around the ballast cooling it.
The beer box hides the fan to add a little stealthiness :friends:.
The fan has been hooked up to a solid state type ceiling fan dimmer which is pluged in to a thermal ON/OFF unit.
This allows me to use the light to keep the cab warm in winter and cool in the summer by adjusting the unit.
Both the fan unit and the light are plugged in to a power bar that is mounted with a timer, it shuts the fan and light off together.
This ensures that I maintain the cab heat through the dark cycle while trying to keep the cab toasty for awhile...I hope. :muahaha:


I am still sexing these but eventually I have a Rubbermaid tub and I'm going to SOG in there with about 12 clones.
So far so good, thanks to JJ Scorpio for the beans :respect:.


Peace
S
 
Last edited:
that is a great idea. the stealth beer box on top to hide the fan made me laugh. sounds like something i would do. i was really impressed by the thermal on/off unit. nice touch to a great setup. i just got rid of a fridge that would have worked for that type of a grow area. now im kicking myself for that.what strains are you running? do you have a grow diary? strong work anyway man. i myself do not have an abundance of space to grow in this tiny rented house, so i love to see cabinets and the like and how others think. good work.
 

FreezerBoy

Was blind but now IC Puckbunny in Training
Veteran
Dude, They'll see that thing a mile away. You need a disquise.


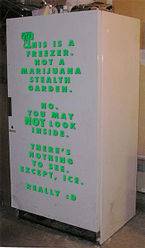
Seriously though, I also employ the hide in plain sight approach. No one has ever asked why the big metal box looks and sounds exactly like an old freezer. Sometimes I wish I'd thought it through more and done the double decker fridge as you have. Then again, I love that the freezer's built-in lock is required by law. One more thing for people not to ask about.

Keep cool :wave: FB


Suby

**AWD** Aficianado
Veteran
Hello Guys thanks for the replies.

I've had close friends 3 feet from that thing and they never realized what it was.
It's a secure locked location seperate from the house surrounded by large dogs so no worries, stealthness is a non issue.

The breaker box is next to the door so I can switch it off like a light when I walk in.

FB that second one is funny as hell :joint:

I have a freezer with lock on the way, I'll be adding a padlock hook to this one using rivets in a few days.
I got lucky with this double decker, I was able to revove the section in between easily.
I have another freezer with a lock on the way from a friend, I'll be making him a veg cab with a 150W HPS for eventual flowering.

I don't do grow diaries anymore, I don't have the patience to update and the rest of that stuff and my method changes.

The ones in the pick are Grapefruit Skunk gifted by JJ Scorpio, very vigrous and bushy with a nice indica structure, great for this tiny space.
 
Last edited:

fridge-farmer

New member
Nice fridge Suby - I'm doing a similar approach myself... 400w hps in a cool-tube tho - hot hot hot!

How did you remove the cooling coils and compressor without spraying Freon all over yourself? I ended up leaving mine in place. I too was able to remove the floor of the freezer - easy as pie. Once I took the doors off it almost slid right out.

What are you using for the thermal fan control? I use a line voltage programmable thermostat which is working great.

Looking good! Can't wait to see how this turns out
 

fridge-farmer

New member
Whoops - just looked at your pics a bit closer....

I see you're using the DuctStat thermo control. I tried the same product and found it to be pretty useless. The unit relies on air passing by the sensor hole on the back to take a reading. It's designed to be attached over a hole in ducting. I played with the settings for a week and then finally returned it to Home De Pot to get my $ back. Kept on thinking I had it dialed in, but then I'd check and either a) it'd be up to 90 degrees and no fan, or b) it be 70 degrees with the fan still blowing constantly. Much better luck and consistency with this product :

http://www.amazon.com/Lux-WIN100-Smart-Programmable-Thermostat/dp/B000E7NYY8/ref=pd_bxgy_hi_text_b

Plus this is programmable if you want diff. settings for night vs day.

Hope this helps! Heat control is def. an issue in these insulated boxes.
 

Suby

**AWD** Aficianado
Veteran
Hey FF,

Yup so far that unit has only been good to turn the fan on and placement is everything it seems, the minute I installed this at light level it's on all the time.
I got it for 5$ from a friend, it worked as a ghetto setup until I dial it all in 100%

I have one of these units that I was going to order from my friend's shop.


It's a 100$ though and the one you posted is like 40$ landed, I might buy that one instead if you say it's running nicely for you plus it has more options.

I pulled the unit outside and set it on a pan, clipped the hose and let it empty itself, worked fine and as such was able to put the passive intake holes where the compressor and other shit was.

The floor is solid but the divison came out easy as pie. :joint:
 

Suby

**AWD** Aficianado
Veteran
Thanks MrC,

I won't be paying the rent with what grows in there but for me those days are over lol.

Just an update, it's confirmed I have 3 females to work with :hotbounce:
Last run with these seeds I was left with 6 out of 6 males, I blame poor environment and low RH but I'm rocking now.

These have been flowering 14 days, they showed at the bent over LST tip but not at the new shoots.
These where transplanted into 2 gal pots from 2L soda bottles.
I put the rootmass to one side of the new pot and left it at an angle to lower the profile, I also planted the mass very high in the pot, it's a BOG thing I'm trying out.
I packed the soil around the rootmass and tied down the stem tip after securing the base of the stem,.
This is the first time I try any of this during flowering, so far so good.
They've been on nothing but water and the odd dose of liquid seaweed and very small amounts of molasses, the soil mix has been doing all the work.
I hit them with an activated tea 3 days ago, I foliar a few time with plain water and the odd dose fulvic acid.

Updates to come when I get the new heat unit and when the cold hits...we'll se :joint:
 
Last edited:

Suby

**AWD** Aficianado
Veteran
Temps took 3 weeks to get setup but it's now well under control :hotbounce
They've put on alot of weight since fixing temps, this soil mix is rocking out nicely.
I pulled the ductstat 2 weeks ago, it was just not accurate enough for my site as stated above.
Filter is going strong, I've cleaned the inside up nicely, I've got a veg cab and primary flower cab on the way when I get more time.

Day 35


Day 43


Suby

**AWD** Aficianado
Veteran
This thread was never meant to be a diary but it I've never really outlined my method so I guess I'll share some info here, plus I can pimp JJ's beans :hotbounce

This is the soil mix I am rocking:

4 parts Promix HP/recycled soil
2 parts Botanicare coco
1/2 parts perlite
2 parts worm castings

I ammended with dolomite at 1.5TBS per gallon.
I went very heavy on a new organic blend that's like 4-10-5, a mix of fish meal, rock phosphate, kelp.
I used about 1.5 TBS/gal on this run and added 1tsp/gal of both blood and bone meal to the soil.
I usually add 1 to 2 TBS/gal of kelp meal but it's been hard to source lately, I offset this by using alot of liquid seaweed when wetting the mix.
I added very little perlite, I've been trying different coco containing recipies out so I have cut the perlite out mostly.
I will be upping it back to 20% for the next round of clones, the plants didn't seem to mind but temps being lower it takes too long between watering so I have less control over their diet when I want to.
To compost the mix I make an activated compost tea to which I add 2 TBS/gal of both liquid seaweed and molasses to cook this mix, I let it sit 3 weeks give or take.

I'll post my tea recipe when I make my next batch in a week or so.
I like to use teas as opposd to fertilizer near the end of flowering to deplete the soil as much as possible while keeping the microherd strong.
I run 100% recycled soil, my last 3 grows have been fully recyled and the results are great, the soil has a much better consistency and it carries the soil biology from the previous plant.

I foliar feed ALOT, every day lately and I see a difference.
It keeps them clean and breathing well, I use rain water or melted snow.
I also use fulvic acid and Liquid Karma foliars a few times with plain water foliars in between.

I hit them with a guano tea misflowering and I use liquid kelp and molasses very lightly every second watering, I never water until runoff, I give them smaller amounts more often especially since cutting the perlite down.

More later.


:rasta:
 
C

cbf

Suby, your posts and projects are some of the best on IC, keep it up, great job. That fridge is sick! I think most people screw up on those by not getting the ventilation right..
 

Suby

**AWD** Aficianado
Veteran
Hey cbf thanks for the kudos.
I agree ventilation with these is crucial, it`s key to anysize grow but I think peeps underestimate how hard it is to get proper air circulation in these.
There is no room for a circulating fan so I didn`t feel the 6" elicient was overkill.
I always suggest that growers get a larger inline centrifugal fan than they need then set it up to a dimmer to lower output.
I've used bathroom fans occasionnaly but I always come back to my Italian built model.
I've been hitting high 70's by day and low 60's by night consistently for the last 2 weeks or so and they have thanked me for it :joint:

I'll be getting a standing freezer next week, I think that will be my new preflowering cab, I'll use it when I flip the lights for the first 3-4 weeks.

I like my 250MH as metal halides seem to keep internodal distance short and discourages stretch but I have one of these in a freinds garden under a 430WHPS and the main cola is much fatter across.
I feel HPS pack on alot more weight so having an intermediate cab should help outpout so I can harvest a grow every 4-5 weeks :rasta:

Now I just need to pack that space full of clones, seing all that empty space is frustrating but sexing is part of the game with a new strain.
 
Last edited:

Suby

**AWD** Aficianado
Veteran
Flowering Tea

Flowering Tea

I figured I might outline my compost tea method, it's quick and easy and works better than anything you can buy.
The shots are pretty self explanatory, you'll notice i use an electric mixer beatter in my drill, love that one :joint:

I keep temp low 80's, I bubble it for 2-3 days then use it all.
Anything I don't use goes into to remoisten the recyled soil and/or composting soil mix.
I used for 1.5gallons of fresh bubbled (thus dechlorinated) water.
I added: 1tsp molasses, 1TBS liquid seaweed, 1 TBS the fertilizer mix in the pic, and 4TBS of vermicompost.

It's not a fertilizer, it's a way of increase and diversifying soil biology which I think is suitable in late flowering so all the ferts in the soil get spent.


This pic shows my ghetto airstone rig, I used a square of rockwool, it disperses the air bubbles evenly, I secure the hose using a tie wrap and a stainles steel bolt to keep the cube at the bottom.
At day 2 this thing is holding up very well and is a cheap alternative to airstones, I can get a 50 cube pack for less than 5$.
You'll notice I'm cheap, keeps my cost and visibility down :rasta:


I'll have an update sometime this week on the girls.
 
Last edited:

Suby

**AWD** Aficianado
Veteran
Update day 5o

Update day 5o

Here they are at day 50 and still putting on weight.
They got a compost tea and a day later the difference is visible.
The side colas are thickening up and I have very few red hairs.
It will be plain water and some molasses from here on in, the fan leaves are lightening.
I've kept them green so I can reveg them, some clones didn't make it in the cold.
I figure 65 days before I chop, I have a mother plant of the 2nd pheno I like.


:joint:
 
Last edited:
D

Don Cotyle

Way to go Suby!!! Excellently exicuted fridge cab!!! Your plants look healthy and happy, keep up the great work!!!
 
Top