What's new

A NEW Bio-Bucket grow... 12-site/1KW

petemoss

Active member
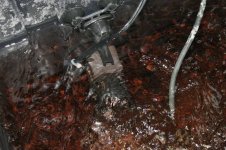
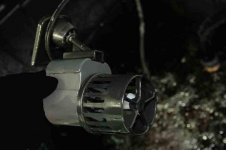
Let's see some bubbles! It's hard to see in your last pic because the res is so dark. Is the air tube sucking air from outside the res? I've always had trouble getting a decent stream of bubbles from a powerhead unless the unit is mounted high in the water. Maybe you do have a good stream of bubbling water shooting out, but I can't see it, but I do see a lot of surface turbulence. Check out these pics (and movies) of a KeepAlive aerator that fishermen use to keep their live bait wells oxygenated. http://keepalive.net/movies/ You won't see such dramatic results in fresh water, but still, I'd expect a big milky stream of bubbles from that big-ass powerhead!
 

angel4us

Active member
ICMag Donor
dont be scared !!!

dont be scared !!!

its like riding a bike !! you do everything like everybody tells you and your good to go .... till you hit the neighbors curb!!!! bad analogy but no need to be scared . it aint rocket science... but they do blast off !!!!! wow so i imagine keep everything in check and its smooth sailing ... cant wait till 28th possible vote at house of reps for medicinal in illinois , then the pics will fly!!!!
 
C

Casual

With the flow mod, the tubes doesn't have a place on the powerhead. I did quite a bit of reading on the powerheads and it seems the proper use to to have them far enough below the surface so they DON'T suck air in... then point them up so they create turbulence on the surface which promotes gas exchange. If you think I should raise it a bit to get some surface suction going on, it's easily done.

Caz
 
Very nice looking setup! really for a first timer, it's a big step up from nothing

Have you considered the location of your bio buckets? getting to the second row to maintain the plants is going to break your back.. I would have placed them in the middle of the area or spaced the buckets out more for easier access.
I'm just guessing based on the pics.. but it looks like it will be hard to get to the back row to pull dead leaves, or opening buckets to check on the roots.

I don't want to be the bringer of bad news here.. but it looks like a pain to come in the future.

Also.. you should have used sandpaper on the inside of the buckets before you glued the uniseals in... that stops the bond from breaking when moving around... I'm guessing you just glued since you have breaking.

Some whole setup pictures would clear things up... if you want to do that.
 
C

Casual

Hi PWS... Yes... in hindsight, I should have gone with one line of 5 buckets... I guess I fell into the 'Go Big or Go Home!' thing. You are correct, the back line of buckets is going to suck to get to. The reason it's like that... I'm a big guy. Had I put the setup in the middle of the room, I wouldn't be able to get down any side. I figure I'll get creative with doing maintenance on the back row. I tend to figure things out as I go, but you are correct... that back row is going to suck in 2 months.
I had originally siliconed in the drain side uniseals, but have come to realize that it's not necessary. The way they seal, they just need a nice, round hole with no burrs.
If things pan out, my next grow after this one will be in a 10x12 room! ;)

I'll get some more pics in the next day or two.

Caz
 

Raphael

Member
Raphael has given you good advice in this thread, but I must disagree with him about the need for screens. I've heard of several overflows in buckets with screened drains. Roots can get sucked against the screen and the beneficials often form a slime on everything. When the drain is obstructed, the water level rises and can overflow the bucket. Why take the risk of a disastrous flood just to insure that no roots grow down the drain? A few roots down the drain won't hurt you. It mainly happens early in the grow when the roots are short. The new roots tend to float up and get sucked into the drain tube, but when the roots grow longer, they stay down in the bucket. Roots growing down the drain can easily be pulled out when you lift up the lids to rotate the plant. So I vote NO to screens. And congrats on getting your bio buckets finished and ready to rumble on your first try. I know you're going to do well on this grow cuz ur doing everything right!

Well ya depending on the situation he should react one way or the other and not based solely on what someone says on these forums.

My drain tube
dscf3454_Modified_2_.jpg


I put the screen on after this so that the roots wouldn't clog the draining of the buckets...

Pete, yep, got her purring right along at 68.4f
I think this time around, I'll keep an eye on the roots... I have my drain setup with a removable end cap, so maybe twice a week, I'll kill the pump, unscrew the cap and peer down the tube and see if any roots have reached it. If I see anything, I'll know which bucket to mess with. Is there any harm in trimming off the few roots I'll find?
I have one empty bucket... waiting for roots on my last clone. If it doesn't go, I'll just have an open slot this time around. Next time around I'll run a few extra clones.

I want to thank everyone for the kudos and well wishes. I'm still VERY apprehensive and learning new stuff every day. You guys are an AWESOME source of info and confidence building and I appreciate it! Damn, now it's getting mushy!:grouphug:

Anyhow, that's it for now... I'm finally settling down a little bit...things seem to be steady, ambient air is sitting fine, humidity is good for now, and rez is SWEET now!

Cheers!

Caz

Sounds good Caz. The roots will stop growing the particular tips you cut off..but there are many more roots that will just grow up to it...sure is fun to watch and that end cap idea is what I did.

Nothing like the feeling of KNOWING the plants are loving their environment and that it is dialed.

Keep it up!
 

dachieftan

Active member
It seems that the return line manifold pvc line slants as it approaches the reservoir. I would think this is done to take advantage of gravity pulling the water toward the reservoir. Correct me if I'm wrong on that one. Either that, or I am just tripping by the optical illusion of linear perspective. Either way it seems that the return line is elevated by somethings to give it that slant towards the rez but the pictures don't give a good indication of what... it looks like either a self-constructed pvc stand or part of the intake water system... 1. Would you care to share what this stand is Caz?
2. What are those metal racks called that are placed on top of the cinder blocks?
3. How do you drain your system when it is all said and done?
 
C

Casual

Chieftain, Yes, the drain pipe is at an angle to let gravity pull the water back into the rez. Works very well. I made up a stand from PVC to elevate it to where I wanted it. Very cheap and plenty strong enough.
The metal racks are wire shelving that I found at Home Depot. I just cut the length down to what I needed, although they have them in shorter sections.
As far as how I drain the system... well, that's the part that's gonna suck. This go around, I got ahead of myself and filled everything before I put the drains in. I have all the fittings, just forgot. I've read the hell out of BigTokes thread and am going to do everything I can to not flush. If I have to, I'll use either a shopvac or a small pump and lift the lids up enough to get the hose in there and suck the water out. A small pump would be better, as I could just stick the other end of the hose in the bath tub.
If forgetting the drain valves is the worst thing I do this time around, I can live with that!! ;)

Caz
 
C

Casual

Ok... not too much of an update, just more ramblings and thoughts!

I included some new pics of the powerhead with the 2100gph mod on it, I did raise the powerhead to where it's just below the surface now and it seems to really be generating some bubbles and an ass-ton of turbulence (Yes, Ass-Ton is a new unit of measurement!)
I've noticed some white residue starting to build up on the walls of the rez... I'm guessing this is just salt build up from the water splashing above the waterline and drying out and is perfectly normal, yes?

I started out the system with 1/2 strength Lucas and will slowly increase the ratios. Included in this post are pics of the AH#3's that look sickly. All of the White Widow's look awesome. I'm resigned to the fact that the AH3's require a different feed regiment that the WW's. Since I have many more of the WW's in the system, I'll be catering to them. Maybe the AH's will come around, maybe not. I won't run mixed strains in a system like this again.

Also included a pic of the little PVC stand I made to support the drain pipe. It's not even glued together... just needs to support the pipe. The only leak I've discovered is very slight and is coming from the screw on 4" cover at the ass-end of the drain pipe. I want to be able to remove this intermittently to check on root growth into the drain, so I'll just deal with the little bit that it leaks.
Chiller is fantastic. NO regrets about buying it at all. It's worth the peace of mind!
I also included a pic of my latest meter readings. pH is rising a bit, EC is dropping a bit, which was to be expected. How often should I be adjusting/adding nutes?

I think that's about it for now. Any comments on anything, particularly the AH3 pics and what you all think they might need is appreciated!

Caz
 

Attachments

  • GRIMG_8564.jpg
    GRIMG_8564.jpg
    88.6 KB · Views: 6
  • GRIMG_8565.jpg
    GRIMG_8565.jpg
    79.6 KB · Views: 8
  • Meter_05192010.jpg
    Meter_05192010.jpg
    35.8 KB · Views: 6
  • GRIMG_8563.jpg
    GRIMG_8563.jpg
    30.4 KB · Views: 7
C

Casual

Plant pics...
Last one is of the drain pipe stand.
 

Attachments

  • GRIMG_8566.jpg
    GRIMG_8566.jpg
    70.9 KB · Views: 9
  • GRIMG_8569.jpg
    GRIMG_8569.jpg
    71.4 KB · Views: 6
  • GRIMG_8572.jpg
    GRIMG_8572.jpg
    38.4 KB · Views: 6

angel4us

Active member
ICMag Donor
what is your h2o source

what is your h2o source

hi casual nice going ,up and running !!! you can always use a small fountain pump with 1/2 inch thin flexible rubber hose , just lift lid alittle bit and drop in pump . it will get all but a few gallons in each bucket, just be gentle and bounce it down to bottom through roots to get to bottom of bucket. if the roots in these bb are anything like regular dwc then you might have problem with this technique due to A FULL BUCKET OF ROOTS!!!! oh so terrible!!
but hey thats why its nice to have the capacity of the rubbermaid tubs -10-18 gallon. give the roots plenty of room .

my only other suggestion for drainage is plain ol syphon. have a bucket with a gallon of water in it ,feed rubber hose down buckket start little pump till water going into bucket unplug and it will gravity feed back.......
what kind a water u startin with there ?????
 
C

Casual

Hi Angel. I've got an RO/DI setup on there now... water goes in pretty much neutral and 0 ppm.

I'm going to stick with BigTokes method of not having a bubbler in the bucket. About the only way I'm deviating from BT's method is having a short waterfall and using a Powerhead to compensate.

Caz
 

dachieftan

Active member
I'm going to stick with BigTokes method of not having a bubbler in the bucket. About the only way I'm deviating from BT's method is having a short waterfall and using a Powerhead to compensate.

Just thought i should chime in and mention that you Casual also chose to use uni-seals instead of bulkheads. Also, you chose to use PVC piping instead of a sump pump hose for the return lines.

1. Do you know if a sump pump hose can connect to a uni-seal because I would like to deal with the least amount of pvc pipe as possible b/c I don't have an electric saw & it would be a PITA to have to hack saw each individual return line if uni-seals are limited to fit PVC.


Also, after comparing and contrasting many bio-bucket threads, I've arrived at a major discrepancy b/w suggested feed line hose sizes that I think needs some clarification:
if you go any lower than a ¾ main supply line, you run the risk of not having enough water/nutrients to exchange-out your buckets 7 to 10 times an hour, and the same is true with the ¾ (feed) line to each bucket.
-Bigtoke

I would suggest you feed with a 1/2" line instead of 3/4". That way, the water will shoot out of the feed elbow with some force and circulate nute solution throughout the bucket.
-Petemoss

Bear in mind that Big toke is running one reservoir for a 32 bucket system which is significantly bigger than Casual's 12 bucket or petemoss' 6 bucket.
2. So what do you think it's better to feed-line with 1/2" hoses and have the advantage of more pressure in the lines to "shoot out" or to not take the risk of of having enough water/nutrients to exchange by using a 3/4" hose? (I will be attempting an 8-site bucket system with a total 1200W. 1 sun pulse MH and 1 HPS for flowering using the Lucas Formula). I'm still trying to decide whether to use a vertical light system similar to redsphaghetti's thread... https://www.icmag.com/ic/showthread.php?t=172577
or get some hoods and a light mover similar to Casual's set-up. I know the lightmover and hoods would be more expensive...
3. Which do you think would be more efficient weight wise ? light mover+hood v.s vertical lighting.
 

Raphael

Member
Everything looks and sounds awesome Casual. I top off nutes about once a week, or when the ppm has gone down about 20%.

EDIT: I like your drain pipe stand. I put the cardboard box my hood came in sideways for my drain pipe stand lol.
 
C

Casual

Chieftain...

1. You are correct, I did deviate, but that's more a preference, or perhaps an upgrade against leaks. I had actually completed all 12 of my buckets exactly as BigToke described, but noticed it was very easy to break a fitting loose. I'd found a reference in someones post about Uniseals and looked them up. They seemed perfect, so I wound up converting. The distances from the top of the bucket and all that are the same. I was unable to find sump hose like BT showed in his thread, (I've since located some) and the 1.25" hose I did have was VERY stiff and caused me to separate the two banks of buckets to the point where it was difficult to get down the one side of the room, and that was with nothing growing yet. The uniseals are specifically designed for a particular size of tubing. PVC, Copper, Aluminum, whatever, but it has to be smooth on the outside diameter to work.
There are PVC cutters that work up to 1", but are a hair too small for the 1.25". A hack saw makes very quick work of PVC though. I used a table saw with the stock blade, set up my fence, and just ripped off 12 pieces of a certain length. If you have access to a table saw, highly recommended! Even the cheapest table saw would suffice for this... I just looked at the local Craigslist and there are table saws for as low as $70. A miter saw would work fine for this as well.

2. As far as the size of fittings and such, even the MPB's use 1/2" feed lines, but with considerably more pressure than what I'm running. BT is running a huge pump. I could probably have gone larger with mine. My system, like BT's has valves at each inlet to adjust the flow to make them somewhat even. I'm not an expert at this part by any stretch of the imagination, although it seems there is quite a bit of leeway on what works. I don't believe it's possible to have TOO MUCH flow, so you may find it easier to simply go overkill... ;)

3. I'm probably not the best person to answer this, but I'll throw in my $.00005 worth of opinion! ;)
It seems to me from the reading I've done that vertical lighting works well if you have a lot of lights, and an ASS-TON of A/C!
As an experiment, I fired up my 1KW setup without the glass in the hood... holy crap did it put the heat out into the room!
That pretty much convinced me at this point that I am unable to run vertical lights. Vertical also requires more space between plants that what I have available. If I were in your shoes (This is hindsight on my part) I'd run a pair of 1KW sealed hoods ducted together, side by side. With what lightmovers cost, it's not that much of an increase, even better if you can find a 1KW setup on Craigslist. If you DO go the lightmover route, take my advice and buy a good one. I cheaped out and bought a $100 one off of ebay. It works, but I'm not at all thrilled with it.

Hope this helps more than confuses!! ;)

Just thought i should chime in and mention that you Casual also chose to use uni-seals instead of bulkheads. Also, you chose to use PVC piping instead of a sump pump hose for the return lines.

1. Do you know if a sump pump hose can connect to a uni-seal because I would like to deal with the least amount of pvc pipe as possible b/c I don't have an electric saw & it would be a PITA to have to hack saw each individual return line if uni-seals are limited to fit PVC.


Also, after comparing and contrasting many bio-bucket threads, I've arrived at a major discrepancy b/w suggested feed line hose sizes that I think needs some clarification:
-Bigtoke

-Petemoss

Bear in mind that Big toke is running one reservoir for a 32 bucket system which is significantly bigger than Casual's 12 bucket or petemoss' 6 bucket.
2. So what do you think it's better to feed-line with 1/2" hoses and have the advantage of more pressure in the lines to "shoot out" or to not take the risk of of having enough water/nutrients to exchange by using a 3/4" hose? (I will be attempting an 8-site bucket system with a total 1200W. 1 sun pulse MH and 1 HPS for flowering using the Lucas Formula). I'm still trying to decide whether to use a vertical light system similar to redsphaghetti's thread... https://www.icmag.com/ic/showthread.php?t=172577
or get some hoods and a light mover similar to Casual's set-up. I know the lightmover and hoods would be more expensive...
3. Which do you think would be more efficient weight wise ? light mover+hood v.s vertical lighting.
 
C

Casual

Thanks Raphael!
I had to pick up a couple of pieces to make the stand, but I had the T's and the piping.
Hoping the Haze's will perk up, but I think they just have completely different requirements that the Widows.

Caz
 

dachieftan

Active member
The uniseals are specifically designed for a particular size of tubing. PVC, Copper, Aluminum, whatever, but it has to be smooth on the outside diameter to work.
:bump:

well considering that copper oxidizes and produces a green substance in contact with moisture and aluminum rust... It seems I'm limited to using pvc with uni-seals. Unless I want to use bulkheads with the sump pump hoses....:cuss: 
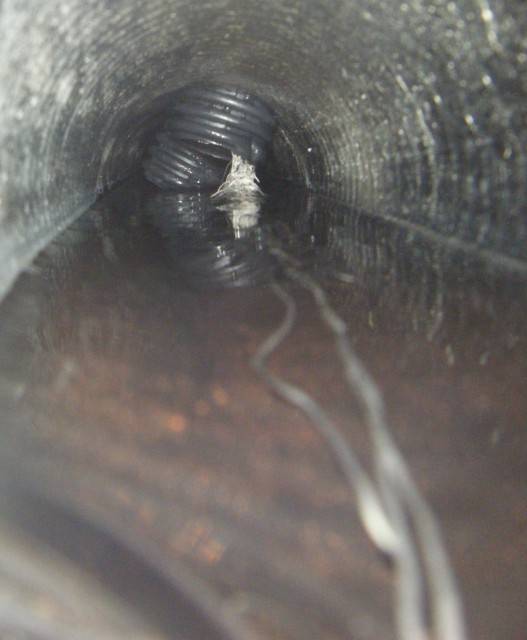
I'm not sure if these smooth adapters are included within a sump pump hose or you have to buy em separately... Please inform me if you know...

courtesy of BigToke

Casual, I like your idea to build a more resilient system by using pvc so i might just have to purchase a saw off craigslist like you suggested... Either that or hacksaw it up... We'll see how lazy I'm feeling. I wonder if an electric drywall saw will suffice for cutting pvc. :thinking:
1.Did you end up smoothing out the sawed ends of pvc with sandpaper or anything?
2. How did you figure out the measurements to cut the draining pvc pipes to fit into the sloping 4'' drain line? (measuring tape I assume but I'd rather know for sure than make a wild ass guess)
3. I know you use 1'' pvc main feed line b/c that is the size that is compatible with your pump. You use valves to balance out the feeding of water to each bucket via 3/4'' hose. What is the size of your PVC that exhaust into the 4'' drain line? I ask this b/c I would think that you would want to exhaust faster than you would intake to avoid overflowing the system but the capacity of the 4'' main drain line might compensate for equal sized intake/exhaust lines.
 
C

Casual

Ok... first off, when you find the right sump hose, it has that flat section molded into the hose about every 12" or 18"... I was unable to find this stuff at first, and then ran across it at the local Ace Hardware, although it was white hose.

1. Yes, I used some sandpaper/emery cloth to take off any burrs. I did find it considerably easier to get them through the Uniseal if you chamfer the outside edge, basically sand an angle on the outside edge of the PVC pipe. Makes a big difference, try it for yourself! ;)

2. You bet, I did use a tape measure to figure the drops to the drain pipe. You COULD sit down and figure it all out on paper, but I just put the drain pipe in place, the buckets in place and went and measured down the line.

3. Each bucket has a 1 1/8" PVC drain line that dumps into the big 4" pipe. I have 1/2" going in, 1 1/8" going out. It'll take an awful lot of roots to stop it up enough to get an overflow. I will be keeping an eye on them regardless! ;)
The 4" drain is far larger than it needs to be... it's not even 1/4 full with everything flowing. Some people have used 3" for the main drain.

Caz
 
C

Casual

Ya know... We ran out of our 'Green Crack' that we'd gotten a couple of weeks ago, went over and picked up some fresh dirt weed... I'm getting way more out of this shit than I did the GC... crazy.

I have very high hopes for what I'm growing. :dance013:
 

Latest posts

Latest posts

Top