
-
Happy Birthday ICMag! Been 20 years since Gypsy Nirvana created the forum! We are celebrating with a 4/20 Giveaway and by launching a new Patreon tier called "420club". You can read more here.
-
Important notice: ICMag's T.O.U. has been updated. Please review it here. For your convenience, it is also available in the main forum menu, under 'Quick Links"!
You are using an out of date browser. It may not display this or other websites correctly.
You should upgrade or use an alternative browser.
You should upgrade or use an alternative browser.
Blumat auto watering
- Thread starter sunnydog
- Start date
-
- Tags
- blumat drippers irrigation watering
Sticky
Sticky
Seeing as this is more than likely in the very short list of most popular technical grow threads in the WORLD (it is constantly in the top ten most replied to threads, and the ONLY technical thread in the top ten, and this is the biggest cannabis website..... ) I think this thread has helped MANY people grow MORE herb, with greater easy and predictability..... So... May I humbly request "sticky status"?
I am "retired" at least for now") , and would consider it a great honor.
, and would consider it a great honor.
Thanks for the fun,
sunnydog
Sticky
Seeing as this is more than likely in the very short list of most popular technical grow threads in the WORLD (it is constantly in the top ten most replied to threads, and the ONLY technical thread in the top ten, and this is the biggest cannabis website.....
) I think this thread has helped MANY people grow MORE herb, with greater easy and predictability..... So... May I humbly request "sticky status"?I am "retired" at least for now
, and would consider it a great honor.Thanks for the fun,
sunnydog
May I humbly request "sticky status"?
I am "retired" at least for now
Sounds like a slam dunk to me. This thread has helped me tremendously, and is responsible for me even being able to grow with my schedule.
Thanks a million, Sunnydog.

Thanks!
Thanks!
You're very welcome rives!
I'd like to make sure it continues to benefit people for as long as needed.
I'm not ditching my account, but probably won't be around very much.
Life interferes with life sometimes
Thanks!
Sounds like a slam dunk to me. This thread has helped me tremendously, and is responsible for me even being able to grow with my schedule.
Thanks a million, Sunnydog.
You're very welcome rives!
I'd like to make sure it continues to benefit people for as long as needed.
I'm not ditching my account, but probably won't be around very much.
Life interferes with life sometimes
Just a warning to people using 3mm tubing with knots tied in it for blocking unused T's - when I was checking my tent this morning, I heard water running. I have extra T's running down both sides of the tent for additional hook-up points, and use 2" pieces of the 3mm tubing with two knots tied in them to valve off the unused T's. On one of them, the tubing had failed on the pressure side of the first knot, and was in the process of draining the reservoir when I found it.
I think that Blumat makes some push-on plugs for this application. I will be checking them out!
I think that Blumat makes some push-on plugs for this application. I will be checking them out!
Thank you rives, I have two tie offs in my room, let us know what you find out about plugs.
Sustainable Village carries them for 10 cents each. Product code #IG15509. I obviously need to check out their site more frequently, they've added a bunch of goodies.
They also have some interesting filters for installation in the 8mm line. Does anyone have experience with these?
Caps -
http://www.sustainablevillage.com/index.php?route=product/product&path=59_69&product_id=112
Filter w/ clear bowl (a white bowl is also available) -
http://www.sustainablevillage.com/index.php?route=product/product&product_id=154
FYI - I bought the roughneck tote below, and it does just barely perfectly fit in my space, but it's not really sturdy enough to hold water. I'll give it a try, but don't feel very confident about it because the weight of the water distorts the plastic. I would have just bought a rain barrel but it wouldn't have fit in my area and would have cost 4x as much.
What's the best container, about 50 gallons, for a main rez? It needs to be longer than it is tall for my purposes. Would a Rubbermaid roughneck tote work well? http://www.homedepot.com/p/Rubbermaid-54-Gallon-Roughneck-Hi-Top-Tote-FG3A05H2MICBL/100673965
This is for an outdoor application. I love my constant water pressure system with one reservoir feeding another, but I won't be relying on a pump because it's outside, so I plan to elevate both and use a float valve, and I have limited height to work with, hence the need for a not very tall main rez.
I'm hoping to pick up the roughneck tote at home depot tonight barring any objection or better recommendations from you veterans.
Thanks so much!
Setting up in coco posted by Jimmy Luffnan 12-07-2013
Blumats will work perfect in coco
Ive been using Blumats in coco and airpots for years now and distribute them.
Like you said, some people understand them, some dont.
I will give you some golden advice for your setup.
#1. If you are using coco, you want to have them set at maximum saturation (wetness)
One of the biggest mistakes people make with coco/blumats is having the medium too dry.
Remember that coco has perfect air to water ratio, it can never be too wet.
If the medium is too dry, the carrot will dry out and cause problems like air in the cone. Coco is hydro, not soil, so treat it like hydro. people follow the 'clinging droplet' rule on the instructions, but this only applies to soil.
#2 Always have the dripper hose at least 8cm, not shorter. Some people say that shorter gives better response, but it serves no use. Longer dripper hose means a larger drop which in turn means better penetration throughout the pot. Use of a dripper hose stake is important also. Always insert the carrot right up to the green but keep the end of the hose at least an inch off the ground or roots will grow up and into the hose.
Best way to setup for coco is:
Hand water until roots show at bottom of pot.
Insert prepared Blumat halfway between the stem and the outside of the pot and position the dripper line half way as well.
Tighten the blumat adjustment firmly, but not tight.
Water the pot slowly and thoroughly until water starts to drip from the bottom of the pot. Watering slowly will properly saturate the coco and give minimal waste runoff.
Allow the pot to sit and drain for 15 minutes.
Bleed nutrient through to the end of the main nutrient line (The larger tube from the reservoir) to remove all bubbles.
Now loosen the blumat adjuster so that nutrient lightly streams out of the dripper line.
Pull the dripper line that goes through the top of the Blumat through about 1cm and pinch to make sure it is not stuck together. This common happens as the dripper line can stick shut from the factory as they generally tighten the Blumat in production.
Tighten the Blumat slowly until it drips every 8-10 seconds (watch for about 2 minutes and count the time it takes to drip)
Check every day but dont adjust unless over flow is imminent.
If it is flooding a little, adjust the Blumat tighter by 1 increment every 3 days
If the pot feels a little dry or you would like a little more moisture, DONT LOOSEN TO MAKE THE DROPS FASTER! Just pull the dripper line out a little further from 8cm to 8.5cm and so on.
The perfect saturation would be wet with just a tiny bit of runoff, just enough runoff that it will simply evaporate in the saucer under the pot.
It is still recommended that you actually use a bucket under the pot for the first 2 grows as you will tweak with it as we all did and you will have a few floods here and there. A bucket will buy you some time to correct your errors without having a giant watery mess
As a personal note, I would recommend the use of H&G Drip Clean to your mix. It's cheap and lasts a long time. Reduces salt buildup and keeps your Blumat lines clean throughout the grow
Cheers!
Jimmy Luffnan
I don't think that trying to set the blumats up based on drip timing is the best way to go - too many other variables come into play.
The most accurate way of setting them that I've found to put the coco into a large tub and mix it up with nutrient/water until you hit the moisture level that you want. The plants are then transplanted into air pots with the pre-moistened coco, and the spike is installed at the same time. The feed water is left off for several hours to allow the blumat to equalize with the coco's moisture content, the water is turned on and the spike adjusted to a clinging drip. The blumat will now hold the moisture content that you have set regardless of the plant size, temperature changes, etc.
The most accurate way of setting them that I've found to put the coco into a large tub and mix it up with nutrient/water until you hit the moisture level that you want. The plants are then transplanted into air pots with the pre-moistened coco, and the spike is installed at the same time. The feed water is left off for several hours to allow the blumat to equalize with the coco's moisture content, the water is turned on and the spike adjusted to a clinging drip. The blumat will now hold the moisture content that you have set regardless of the plant size, temperature changes, etc.
Well if his way works and so does yours and you both may or may not have to make minor adjustments in the following 7-10 days then it doesn't matter which way you get to point B. I tried his way and it still stopped dripping after 5 minutes and went cling drop so his way makes it set 1-2 arrows looser than the way Blumat says to set it for soil. I ended up setting it to cling drip + 1 arrow. Doesn't matter as I will get it set right by watching over the next week or 2. I kind of want a little over flow waste. So we'll see how it goes and I'll adjust as necessary. It's not rocket science.
No, it's not rocket science but they do have their own peculiarities. Blumats function by sensing moisture levels and will self-adjust to maintain the setting - that is what makes them unique. There are many other systems that work based on time intervals, and to my knowledge they all require adjustments as the plant gets larger or to compensate for environmental changes.
Understanding the way that something functions is key to optimizing it's usage. After you get your blumats set where you like, I would suggest that you try marking the cap with a white-out pen to keep track of the setting. My experience has been that it doesn't really change - plant size, pot size, temperature, harvesting a plant and leaving enough to re-veg, etc. are all irrelevant because the sensor is set to maintain a given moisture level. From what I've seen, any time that there is a sudden need for a higher setting it is due to crap in the 3mm line impeding the flow, almost always from a build-up at the pinch valve.
Also, I haven't had much luck with trying to keep a controlled level of run off. Once the media hits saturation levels, the sensors seem to be at the outer limits of control and get away once in a while. If you keep the EC levels down to a point where the plant is happy but not overfed and use Drip Clean at 1 ml/gallon, there is no longer a need for run off to purge salt buildup. YMMV.
Good luck.
RamCTD1027
Member
What's up ICMag?
Thanks to Rives and this thread, I set up a successful Blumat grow in 3 gal airpots filled with 100% coco and one Blumat per pot. Since that grow, I have moved to a different location and I am about to set up another grow with some big differences.
This time around, I plan to grow 12 plants, vegged from cutting for about 8-10 weeks, followed by a transplant into 8-gal airpots where the ladies will spend their time for flower. I plan to water using Blumats from they time they show roots all the way through flower.
I'm looking for thoughts on how many Blumats I should use per 8-gal pot. I currently have a bunch of regular blumats that I would like to use, but should I also incorporate Maxi's as well? Two standard and one maxi per pot? Three standard per pot?
Any help would be greatly appreciated.
Thanks,
Ram
I can't help you with your specific question, I've never used anything bigger than 3 gallon air/smart pots. However, from my recent experience, I think that you might be getting carried away with the container size - I've gone the other way, and have had better luck with runaways as a result of the roots "locking in" the blumat. I also found, conventional wisdom notwithstanding, that there is no correlation between the pot size and yield, at least when using coco, blumats, and air pots.
A couple of runs ago, I had a Tsi Fly that I had let veg for 3-4 months from a seedling. I didn't do it intentionally, I had sprouted some seeds and then got too many projects going, so the plants were largely ignored. I was using the 5-liter air pots (the ones with the red bottom), and had cut about the top 1-1/2" off because they fit in my mom cab better and I had planned on just using these plants for moms after I sexed them. Then they got far too big for my mom cabinet....
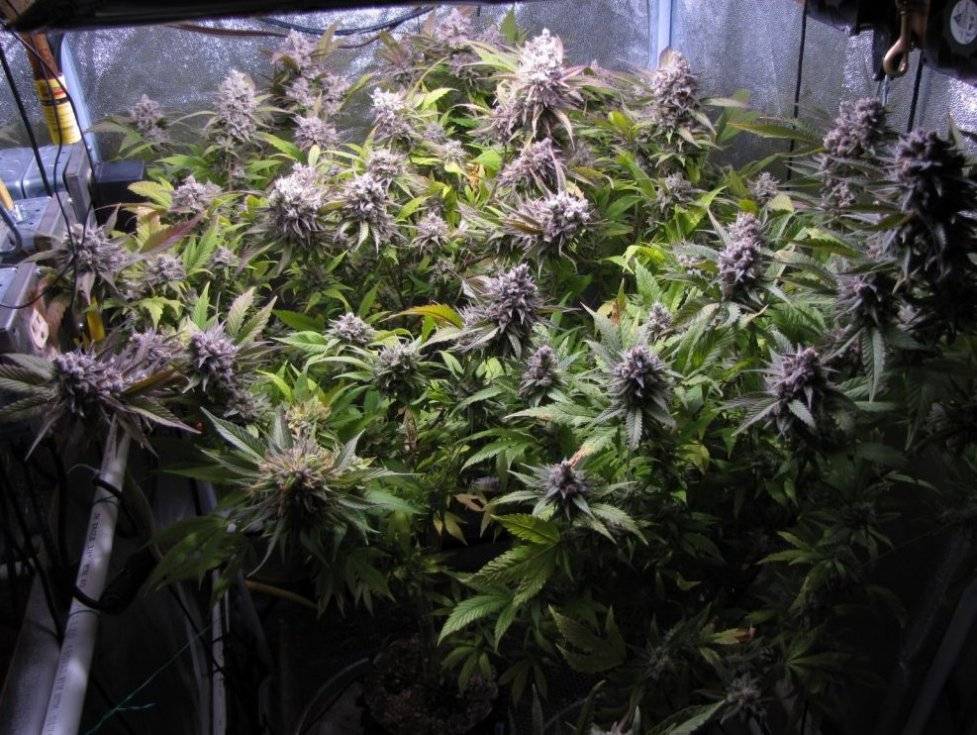
As it turned out, one of the two plants is far and away the highest yielding plant that I've ever grown indoors. It yielded 8.3 ozs, the stem was over 1-1/4" in diameter, and it looked so damn weird in that little pot that it was hilarious. In the picture below, the big plant is on the left and takes up almost the whole tent. There is a second plant that only yielded 2.5 ozs on the right, squeezed into the corner. They damn sure didn't turn out like I expected!
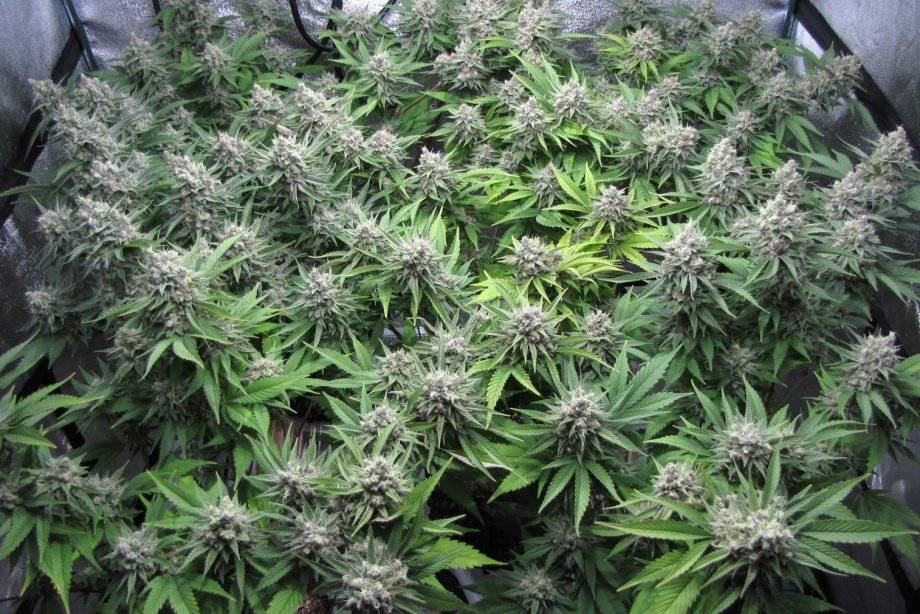
This picture is my current run at day 46, 5 plants in a 4x4 tent, again in 5-liter airpots,
A couple of runs ago, I had a Tsi Fly that I had let veg for 3-4 months from a seedling. I didn't do it intentionally, I had sprouted some seeds and then got too many projects going, so the plants were largely ignored. I was using the 5-liter air pots (the ones with the red bottom), and had cut about the top 1-1/2" off because they fit in my mom cab better and I had planned on just using these plants for moms after I sexed them. Then they got far too big for my mom cabinet....
As it turned out, one of the two plants is far and away the highest yielding plant that I've ever grown indoors. It yielded 8.3 ozs, the stem was over 1-1/4" in diameter, and it looked so damn weird in that little pot that it was hilarious. In the picture below, the big plant is on the left and takes up almost the whole tent. There is a second plant that only yielded 2.5 ozs on the right, squeezed into the corner. They damn sure didn't turn out like I expected!
This picture is my current run at day 46, 5 plants in a 4x4 tent, again in 5-liter airpots,
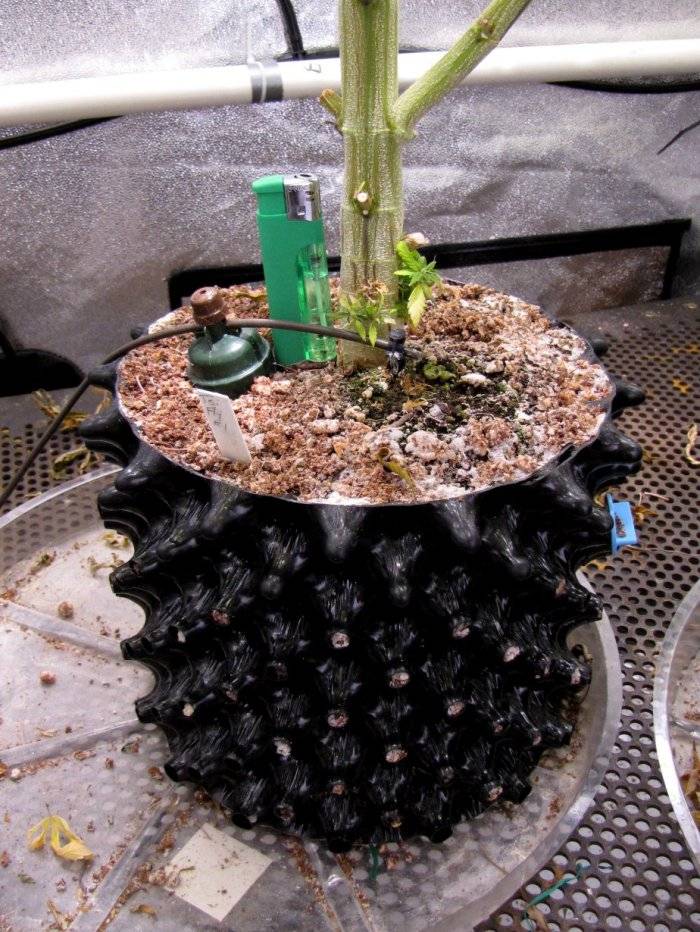
I've been running blumats for about 5 days now on 2 plants and they've maintained a pretty constant amount of moisture in the soil. However overnight they both let out so much water that my drip pan thing had a like an 8th of an inch sitting in it. Could this be because I overwatered when I installed the sensors?
Could be that, or a number of other things. If you don't get all of the air purged out of the spike when you assemble it, the blumat response can get "mushy", taking longer to both turn on and off. If you hold the cap under water and use a syringe to squirt into the holes in the bottom of the cap, it seems to help. Also, if the media isn't pretty snug up against the spike or if you have chunks of perlite up against it, it can interfere with the response.
Sadhu Sciences
Member
Setting up in coco posted by Jimmy Luffnan 12-07-2013
Blumats will work perfect in coco
Ive been using Blumats in coco and airpots for years now and distribute them.
Like you said, some people understand them, some dont.
I will give you some golden advice for your setup.
#1. If you are using coco, you want to have them set at maximum saturation (wetness)
One of the biggest mistakes people make with coco/blumats is having the medium too dry.
Remember that coco has perfect air to water ratio, it can never be too wet.
If the medium is too dry, the carrot will dry out and cause problems like air in the cone. Coco is hydro, not soil, so treat it like hydro. people follow the 'clinging droplet' rule on the instructions, but this only applies to soil.
#2 Always have the dripper hose at least 8cm, not shorter. Some people say that shorter gives better response, but it serves no use. Longer dripper hose means a larger drop which in turn means better penetration throughout the pot. Use of a dripper hose stake is important also. Always insert the carrot right up to the green but keep the end of the hose at least an inch off the ground or roots will grow up and into the hose.
Best way to setup for coco is:
Hand water until roots show at bottom of pot.
Insert prepared Blumat halfway between the stem and the outside of the pot and position the dripper line half way as well.
Tighten the blumat adjustment firmly, but not tight.
Water the pot slowly and thoroughly until water starts to drip from the bottom of the pot. Watering slowly will properly saturate the coco and give minimal waste runoff.
Allow the pot to sit and drain for 15 minutes.
Bleed nutrient through to the end of the main nutrient line (The larger tube from the reservoir) to remove all bubbles.
Now loosen the blumat adjuster so that nutrient lightly streams out of the dripper line.
Pull the dripper line that goes through the top of the Blumat through about 1cm and pinch to make sure it is not stuck together. This common happens as the dripper line can stick shut from the factory as they generally tighten the Blumat in production.
Tighten the Blumat slowly until it drips every 8-10 seconds (watch for about 2 minutes and count the time it takes to drip)
Check every day but dont adjust unless over flow is imminent.
If it is flooding a little, adjust the Blumat tighter by 1 increment every 3 days
If the pot feels a little dry or you would like a little more moisture, DONT LOOSEN TO MAKE THE DROPS FASTER! Just pull the dripper line out a little further from 8cm to 8.5cm and so on.
The perfect saturation would be wet with just a tiny bit of runoff, just enough runoff that it will simply evaporate in the saucer under the pot.
It is still recommended that you actually use a bucket under the pot for the first 2 grows as you will tweak with it as we all did and you will have a few floods here and there. A bucket will buy you some time to correct your errors without having a giant watery mess
As a personal note, I would recommend the use of H&G Drip Clean to your mix. It's cheap and lasts a long time. Reduces salt buildup and keeps your Blumat lines clean throughout the grow
Cheers!
Jimmy Luffnan
Thanks for the tips! much appreciated.
Blumats do not sense time, they sense moisture content. It has been stated in this thread hundreds of times that timing the drips is not the best way to set them up - you may get lucky and have it work, or you may not. For consistent results, set them up in a way that takes into account how they actually function.
These are the next three posts from the thread that the above post came from -
These are the next three posts from the thread that the above post came from -
I don't think that trying to set the blumats up based on drip timing is the best way to go - too many other variables come into play.
The most accurate way of setting them that I've found to put the coco into a large tub and mix it up with nutrient/water until you hit the moisture level that you want. The plants are then transplanted into air pots with the pre-moistened coco, and the spike is installed at the same time. The feed water is left off for several hours to allow the blumat to equalize with the coco's moisture content, the water is turned on and the spike adjusted to a clinging drip. The blumat will now hold the moisture content that you have set regardless of the plant size, temperature changes, etc.
Well if his way works and so does yours and you both may or may not have to make minor adjustments in the following 7-10 days then it doesn't matter which way you get to point B. I tried his way and it still stopped dripping after 5 minutes and went cling drop so his way makes it set 1-2 arrows looser than the way Blumat says to set it for soil. I ended up setting it to cling drip + 1 arrow. Doesn't matter as I will get it set right by watching over the next week or 2. I kind of want a little over flow waste. So we'll see how it goes and I'll adjust as necessary. It's not rocket science.
No, it's not rocket science but they do have their own peculiarities. Blumats function by sensing moisture levels and will self-adjust to maintain the setting - that is what makes them unique. There are many other systems that work based on time intervals, and to my knowledge they all require adjustments as the plant gets larger or to compensate for environmental changes.
Understanding the way that something functions is key to optimizing it's usage. After you get your blumats set where you like, I would suggest that you try marking the cap with a white-out pen to keep track of the setting. My experience has been that it doesn't really change - plant size, pot size, temperature, harvesting a plant and leaving enough to re-veg, etc. are all irrelevant because the sensor is set to maintain a given moisture level. From what I've seen, any time that there is a sudden need for a higher setting it is due to crap in the 3mm line impeding the flow, almost always from a build-up at the pinch valve.
Also, I haven't had much luck with trying to keep a controlled level of run off. Once the media hits saturation levels, the sensors seem to be at the outer limits of control and get away once in a while. If you keep the EC levels down to a point where the plant is happy but not overfed and use Drip Clean at 1 ml/gallon, there is no longer a need for run off to purge salt buildup. YMMV.
Good luck.

