What's new
  • Happy Birthday ICMag! Been 20 years since Gypsy Nirvana created the forum! We are celebrating with a 4/20 Giveaway and by launching a new Patreon tier called "420club". You can read more here.
  • Important notice: ICMag's T.O.U. has been updated. Please review it here. For your convenience, it is also available in the main forum menu, under 'Quick Links"!

1 sq. ft. Mirco Grow Box - Total Cost < $205

This will be for my first grow and the goal of this project is to be cheap, safe, stealthy, and productive. Additionally, I tried to buy as much as possible from "big-box" stores.

Initially I'll be using the 12/12 from seed method and in the future may try several weeks of vegetative growth with aggressive low stress training, FIMing, and trimming/pruning before switching to the flower stage.

Below is the shopping list:

Walmart
$4.67 - Gorilla Tape
$6.47 - 4" Dryer Duct
$8.94 - Environment Sensor; Temperature and Humidity
$11.88 - 3 pack of 23 watt, 6500K CFL bulbs
$3.94 - Bulb socket extensions (2); $1.97 each
$17.54 - 42 watt, 2700L CFL bulb (2); $8.77 each
$3.97 - Light Timer
$2.88 - Black foam board
$60.29 - Total

Lowes
$27.44 - ClosetMaid Single Door Cabinet
$4.88 - 4" Dryer Vent
$2.42 - Foam seal; 3/8" x 17'
$11.63 - Clamp Light
$46.37 - Total

Amazon
$12.99 - 4 socket adapter
$25.00 - 4" 100cfm Inline Duct Fan
$38.98 - Carbon Filter, 4" 210cfm
$5.09 - USB adapter
$15.98 - USB fan (2)
$98.04 - Total

$204.70 - Grand Total

*Note* Prices are estimates as they always change and I couldn't find the exact bulbs I got on the Walmart website. Additionally, the Inline Fan I got is quiet and "works" but doesn't move a lot of air. It's designed as a booster fan rather and a stand alone fan. Knowing this going in, I got it because it was cheap and does what I need. Also, I already had a power strip and extension cord, so those aren't reflected in the cost.


I chose this cabinet because it's cheap, already white, the back is cardboard so it can be cut with a knife, and the light height can be easily adjusted using the predrilled shelf height holes. I put the 3/8" foam around the edge of the door to act as a light seal.


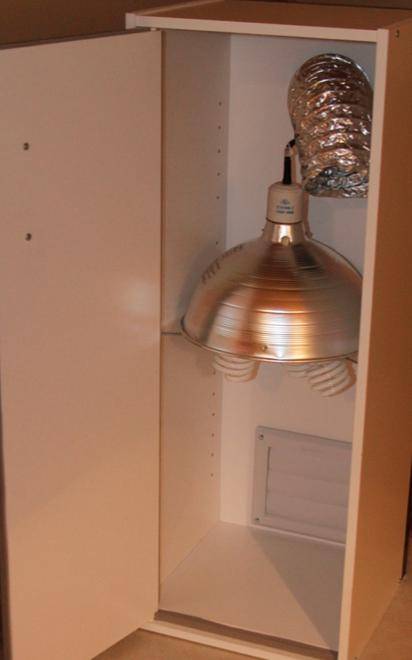
The back was attached with the gorilla tape to ensure a good seal and is way better than the nails it came with. Also kept me from needing a hammer or making hammering noise.


The carbon filter will live in a cardboard box stacked on top of the cabinet. *nothing to see here*


The work light is rated for 600 watts (the one linked is 300 watts I think) so it's safe for 4 of any bulbs I could fit.


All said and done, it just looks like a uninteresting closet full of s#it.


Any thoughts or questions?

This is my first post and I'm totally new at this, so go easy.
 
Thanks!:tiphat:

I'm debating about doing a grow diary but I'm not sure if I should do it "live" or wait until the end and post everything at once.

Any security issues with doing a live diary?

Well, let's be honest, the first rule of growing is "tell no one" ... everyone on this board with a grow thread is violating that to one degree or another. You're over ssl, the server is in NL ... it's pretty safe all things considered. Still not as safe as just doing it and not posting anything.
 
Well, let's be honest, the first rule of growing is "tell no one" ... everyone on this board with a grow thread is violating that to one degree or another. You're over ssl, the server is in NL ... it's pretty safe all things considered. Still not as safe as just doing it and not posting anything.

Here goes nothing.
 

fatigues

Active member
Veteran
Can't see the pics here or on your diary thread either. Will have to see the pics but it appears to read like a reasonable setup. If there was anything I would have changed based on your list it would have been:

Lights: 2x55w PL-L mounted vertically with a Fulham 5 Workhorse (1x6500, 1 x 4100 1x3000 & switch out the 6500 for 3000 depending on veg/flower) $12.40
2 x 2G11 socket: $3.00
Fulham Workhorse 5 Ballast: $31.23

For a net increase of about $14.00. Much better light and with the ballast mounted outside on the back of your cab, better temp control too.

The duct fan sounds a little cheap and loud -- but if you are okay with that, then alrigh - assuming it otherwise does the job under static pressure. Based on your description (because I cannot see your pics), it sounds like you are pushing through the filter outside of the cab. You should be pulling through a filter rather than pushing through it. Especially a cheapie Amazon filter. If there is no prefilter on the inside of it (and let's face it -- you don't know that there is and at that price, there probably isn't ) you will clog your carbon in a month or two and you may run into problems when you least want it. At the very least, make sure you pull through a HEPA filter towards your fan before you push it out into that carbon filter. Just sayin.

If you find your fan is not equal to the task, get yourself a S&P TD 100 for $80.00 off Amazon (or elsewhere).

I didn't see any silicone sealant in your list, but it might be you handled it all nicely with foil or duct tape.

Bring on the pics! Let's see what you got.
 
Last edited:
Try the pics again maybe its just me but I can't see them and I would love to see it

I think I got the picture issue fixed, care to let me know? They were always working for me.

fatigues:

I will definitely keep that lighting in mind, I'm weary of adding even more light at this point since I already burned them once.

The fan is definitely cheap but it's quiet, I just need something stronger in future.

You're correct that I'm pushing through the carbon filter, but due to the space, there wasn't really another option. I know there isn't a pre-filter in either the carbon filter or the fan and I currently don't have one and don't really expect to need one, everything is pretty clean.

I appreciate all the advice though :thank you:

Hopefully the pictures are working now.
 

fatigues

Active member
Veteran
You're correct that I'm pushing through the carbon filter, but due to the space, there wasn't really another option. I know there isn't a pre-filter in either the carbon filter or the fan and I currently don't have one and don't really expect to need one, everything is pretty clean.

Pics are working!

The lights I suggested were instead of that you have, not in addition to. You are into it now, so use what you got for a run and see how you like em.

As for the air... no, it's not clean - it just looks that way. All the normal dust, spores and dead human skin and hair that you see in the air when the sun streams through the window at the right angle is in every home we live in. Our own skin creates much of it so unless you are an alien species? It's there, I promise you.

It will clog your carbon if you don't pre-filter it. If you have pets in your home? That all increases by a factor of 10. If you are a smoker? Even more. I promise you, no matter how clean it looks - the dust is there and there is a lot of it. All the air in your room -- and beyond it will be drawn through that fan time and time again and blasted through your carbon bed. And the carbon will clog up with all of that crap, FAST, so that it isn't able to filter out the smells that you installed it to do.

Just add a square piece of HEPA filter -- hell -- even cotton / polyester fabric or some panty hose if you must to the intake side of your duct you have in your cab. Tape it on if need be or install a square dryer duct mount on your cab, attach your duct to that mount. On the inside of the cab before the dryer duct mount -- put the filter right over that. That will cut down a lot on the large dust particles and block out most of the crap you are blasting at your scrubber 24/7 from ever reaching your carbon bed.

Then you just clean your intake filters every 30 or 60 days with a vacuum or wash and dry it if you have a polyester fabric filter like on the outside of your scrubber.
 
Last edited:

fatigues

Active member
Veteran
What are you using for a light trap?

It looks like you have a dryer vent installed at the bottom of the cab. 1 to 1 passive intake is not enough. You should be at 2:1. Did you add PVC elbows on the back for a light trap or did you create one out of foam board?

Never mind the trap -- have you tested it for light leaks right now? Your hinge side of the cab looks to be a prime area for light leaks. You can fix that by buying a cheap bicycle tire inner tube, cut it open with a box cutter so it is lying flat. Trim it to fit the length of your door, and then install that cut-open tube to the back of the entire door all alongside where the hinge is and to the side of the cab with your gorilla tape :) It will bend when you open and close the door and work perfectly to stop any light leaking in or out of your box. It will also help with odor control. It should cost you only a few dollars.
 
Last edited:
True, I don't live in a sterile room, but it is clean enough that I'm not worried about it. My fan isn't strong enough to have to pull through a filter as well.

I did build a light trap with the foam board and taped around the door much like you described only without a bike tire tube. While the box does have some very minor light leaks, they aren't enough to worry about.

I'm not sure what you mean about the 1:1 vs 2:1 intake. Do you mean that I should have twice the intake volume capacity than exhaust volume capacity? Currently, with the fan I have, I'm not even utilizing the maximum intake capacity so I can't imagine adding more intakes I don't need.

Thanks for the information and replies!
 

fatigues

Active member
Veteran
I'm not sure what you mean about the 1:1 vs 2:1 intake. Do you mean that I should have twice the intake volume capacity than exhaust volume capacity? Currently, with the fan I have, I'm not even utilizing the maximum intake capacity so I can't imagine adding more intakes I don't need.

Your fan is strong enough to pull through a panty hose, I'm sure. But, as you will...

And yes, you absolutely should have at least a 2:1 ratio for a passive intake.

Ventilation 101

It's not about how strong your fan is. You are using a fan -- and that's stronger than any passive intake. It's physics.

Add another 4" intake of the same size you have in your cab now (which looks to be a 4" as well) and you are good. Yes, you'll need to build another light trap for that one too.
 
Try the pics again maybe its just me but I can't see them and I would love to see it

Your fan is strong enough to pull through a panty hose, I'm sure. But, as you will...

And yes, you absolutely should have at least a 2:1 ratio for a passive intake.

Ventilation 101

It's not about how strong your fan is. You are using a fan -- and that's stronger than any passive intake. It's physics.

Add another 4" intake of the same size you have in your cab now (which looks to be a 4" as well) and you are good. Yes, you'll need to build another light trap for that one too.

Thanks, but absolutely is a strong word and it depends on the set-up and needs.

I understand physics and the reason it's suggested here to have twice as much intake area over exhaust area is to lower the pressure difference between the grow area and atmosphere. That allows the fan to operate at as close to the rated CFM as possible which will in-turn increase the number of times the air in the grow area is replaced per minute. If you have large grow room or a temperature problem it's good, but otherwise unnecessary.

I'd probably get better airflow by taking out the 90* bend followed immediately by a 180* bend in the duct work than by adding more intakes.

When I suggested I might need a stronger fan, I was referring to the amount of static pressure and frictional losses it can work against. Since my cab volume is only ~2.5 cubic feet, even if my booster fan was only able to move 1/4 of the rated volume it would still replace all the air in the cab 10 times a minute.

Temperature isn't much of an issue at this point and I'd rather trade in the efficiency of the fan for a lower pressure in the cab so I'm sure I don't get any scent leaks.

Plus the box isn't 100% sealed.. it leaks around the door some and around the exhaust duct, so the intake is already bigger than the exhaust. I don't need more holes!

Hope that made sense! :good:
 

slomocean

Member
a good amount of info for those of us just getting started and building our own small cabinets. good to see how you put it all together thanks! :D
 
Top