What's new
  • Happy Birthday ICMag! Been 20 years since Gypsy Nirvana created the forum! We are celebrating with a 4/20 Giveaway and by launching a new Patreon tier called "420club". You can read more here.
  • Important notice: ICMag's T.O.U. has been updated. Please review it here. For your convenience, it is also available in the main forum menu, under 'Quick Links"!

DIY 250w small cab build log

Hello everyone. I'm currently building a small cabinet for a 2-3 plant grow. What I have so far is a closetmaid stackable cabinet 2'x3'x1' approximately. The going is somewhat slow because I've only been spending my weekly bud budget on getting parts and equipment. Let me show you what I've got so far.

attachment.php


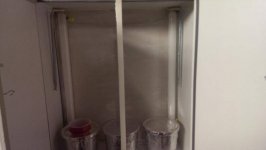
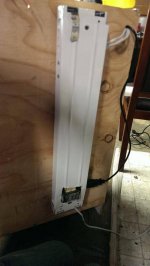
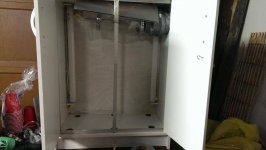
This is the cabinet itself. Currently there is only 40w of flouro tube cool white installed. The frame you see in front is made out of aluminum and covered in weatherstripping. The springs hanging on the walls are to keep the doors shut tight against the frame and help with light proofing. The springs were just today moved to the bottom of the cabinet into a better position that will allow me to hang a good sized reflector at the top.

The lightproofing is not 100% at the moment, I would love some ideas on how to light proof these doors better. Im thinking about trying the magnetic fridge seal stuff, because weatherstrip and springs ate a crappy solution :(

attachment.php


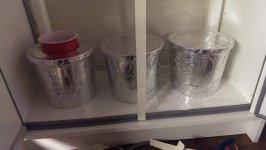
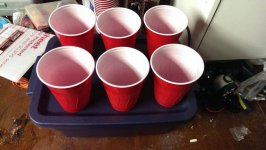
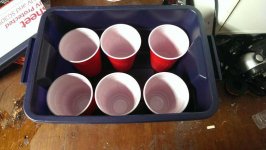
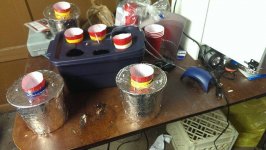
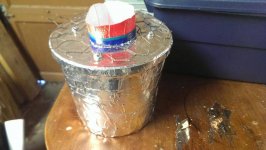
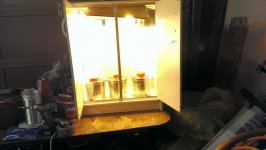
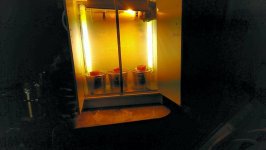
These are my dwc buckets. They are 2.5 quart paint mixing buckets (not used!) Covered in foil tape and I'll be using red cups for net cups. This is my first go at hydro, but I have 4 soil grows under my belt.

attachment.php


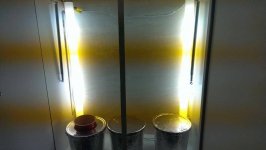
Here it is lit up. My camera does not like taking pictures of lights apparently.

attachment.php


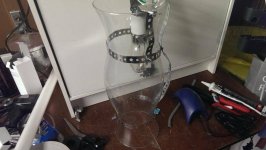
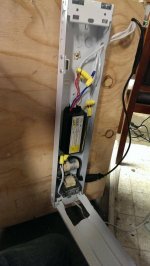
This is my comically oversized diy cool tube. The only hurricane glass I could find anywhere was this 6" beast at a local thrift shop. The socket in there now is for a 70w hps made from a security light. I will be putting a 100w mh in the other side. I have the ballast installed inside the flouro fixture, as well as the ballast for the flouro tubes themselves.

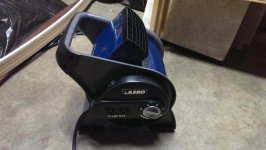
The next item on my list to get is a fan for ventilation. I haven't cut any holes or run any duct yet, it made more sense to wait for the fan before getting started on that. There arent any plants yet anyway so there is no rush.

I still need to get a 100w my, and another flouro fixture to get up to make it 250w in here, but I will get that in the next couple of weeks.

So, yeah. That's what I have and I'll post updates as I make them. I'll answer any questions and gladly listen to any advice in this threadcas well :)
 

Attachments

  • IMAG0009.jpg
    IMAG0009.jpg
    16.6 KB · Views: 10
  • IMAG0010.jpg
    IMAG0010.jpg
    32.9 KB · Views: 10
  • IMAG0011.jpg
    IMAG0011.jpg
    27.1 KB · Views: 10
  • IMAG0026.jpg
    IMAG0026.jpg
    42 KB · Views: 8

hazydreams

Active member
Water temp will play a huge part in your success or failure. If you don't have the means of cooling the water via chiller you will need to ensure the temps are in the low 70's at all times. Air turn over via a large exhaust fan will be mandatory. The problem with water is it tends to get warm and stay warm in enclosed enviroments. Just a thought. Cab looks good I like the setup so far!

Keep em green.


Hazy
 
attachment.php


I picked up a fan last night, I figured the Stanley blower mod would do the trick. I haven't picked up the rest of the parts yet, only the fan. Friday I'll be doing a home depot run, and hopefully I'll get enough of the cab put together for a more interesting update this weekend.

Hazy: I'm pretty sure that this fan can keep temps in my tiny cab at or near ambient tempurature, which should help keep the rez cool. I looked at water chillers, those are not cheap. I can't justify dropping 200$ for one on a grow this small. I have an idea though if the rez temps become a problem. I can get a radiator for PC water cooling, and a cheap pump for 30$.

If I have to go that route though I'll probably just switch to a low pressure aeroponic system. I originally planned to do LP aero at first but I decided on DWC because if hydro doesn't work out for me, I can always put drain holes in the bottom of the mixing buckets and switch back to soil.

I'm reading through your thread when I can. I'm on the 4th or 5th page right now. Did you ever get your root rot problem taken care of?
 

Attachments

  • IMAG0032.jpg
    IMAG0032.jpg
    41.1 KB · Views: 8

hazydreams

Active member
I purchased a chiller and was innoculating the reservoir with beneficial bacteria. Once those were added things got much easier. Hydro requires more initial set up costs then soil. I won't say you can't run a dwc hydro system with out a chiller as many have accomplished the feat. What I will say is that from experience its possible, but not stable. You could run the system many times and not have a problem. Or you could have problems right from the start. Once I added the chiller a lot of issues fell into place like ph drift, plant vigor and dissolved oxygen. You should also test your water. Shotty water will cause you to go mad dealing with nutrient lock up.

I'm not trying to scare you away from hydro. I'm just giving you some insight. Hydro requires that you play by hydro's rules. Enviroment must be spot on in order to ensure repeat success. Hope this helps. If you interested check out the vest documented mini run to see the effects of adding a chiller vs what I was pulling with out it in the rdwc build thread. There is a huge difference in over all quality and quantity.
 

hazydreams

Active member
One other suggestion, If you were to put a reservoir outside and connect the buckets to a pump, an RDWC set up. The external res would not be subjected to the same temps as the interior buckets. There is a chance that with that type of set up and the computer Radiator you could run with no problems. I feel that would be the best chance of success. Are you planning to run those paint buckets as stand alone (freedom) buckets?
 
Yeah I planned on having them as stand alone buckets. I will eventually build a second cabinet and have one for flower and one for veg/moms. It'll be easier to transfer plants if they are stand alone. But thats down the road somewhere so nothing is set in stone yet.

Hell, I might just build an outside reservoir anyway, I've had an idea kicking around in my head for a control bucket that uses arduino and water level sensors that would be easier to put together than the current diy control buckets (whether it would work better is a completely different question haha).

Don't worry, you aren't scaring me away from hydro :) The best part about this hobby is tinkering, and figuring out what works and what doesn't. And if things don't go horribly wrong from time to time then life will just get boring lol ;)
 
I was hoping to have an update this weekend, unfortunately I've had a minor set back. I broke a couple bones in my hand lol.

I'm still gathering parts though, today I got the fittings and stuff I need to make a carbon scrubber and a neighbor gave me a bit of chicken wire that he was going to throw out.

Can't wait till I'm unbroken again and can keep working on this box.
 
Since I broke my right hand I haven't been able to properly use a dremel or a hand drill, so I haven't been able to modify the cabinet much. But today I found a 3.5 gallon Rubbermaid container in my closet and thought I would put it to use.

attachment.php


attachment.php


attachment.php


The plan is to start 6 seedlings in diy netcups filled with vermiculite. The netcups will sit in the Rubbermaid container and water will fill the bottom inch of the container with airstones placed between the cups. The polycarb will be used as a humidity cover (second picture). After the seedlings are strong enough for light nutes I will cut holes in the container lid and turn it into a 6 site DWC bucket. The lights will be flipped to 12/12 until sex shows. Males will be culled and the three strongest females will be transferred to the three DWC buckets and lights switched back to vegging cycle.

Total cost for this piece of equipment: 0$ :)

I found everything laying around, and already had an air pump and stones for the DWC bucket.

Its not the big update I was hoping for but I'll be able to start construction again in a couple weeks or so when I get this cast off.
 

Attachments

  • IMAG0036.jpg
    IMAG0036.jpg
    46 KB · Views: 10
  • IMAG0035.jpg
    IMAG0035.jpg
    54.9 KB · Views: 9
  • IMAG0034.jpg
    IMAG0034.jpg
    45.4 KB · Views: 8
DWC system is complete. It was the easiest thing about the cabinet to build, but a small victory is still a victory!

attachment.php


attachment.php


In the second picture you can see that I bolted chicken wire to the top of the buckets. That is so I have something I can tie down to for LST.

This is probably the most ghetto hydro setup ever built, but its just so I can try out hydro and see how it compares with soil. If I like it, I'll build something bigger and better for my next grow space.

The plan is for this cab to eventually become a mom and cloning cab. After I move, which will be in the next couple of months, I will have a loft to grow in, so this cab will probably only do one complete run while I'm building out the loft.

That's also why some things, like this DWC system, are constructed out of crap and good intentions, its not going to be permanent since the boxes role will change in the near future.

Many beer cups were seriously harmed in the making of this post.
 

Attachments

  • IMAG0040.jpg
    IMAG0040.jpg
    54.7 KB · Views: 11
  • IMAG0041.jpg
    IMAG0041.jpg
    44.2 KB · Views: 11
I got a lot done today. I repurposed the flouro fixture into an electrical box to hold both ballasts and the starter. I need to get a couple wing nuts or thumbscrews or something to close the box up right, but right now a bent piece of steel hanger tape is simple and easy.

attachment.php

attachment.php


I decider that I should also hang the cool tube up which required getting out the jigsaw and cutting a hole for the reducer. I also took a piece of semi-rigid duct and cut it to be a reflector. I also drilled out six 1.5" holes in the floor for passive intake, which you might be able to see in the pictures.

attachment.php


With lights on:

attachment.php


And this one shows off how much space I have to grow in.

attachment.php


Almost there now! Still need the other lights and a couple ducting pieces to get the fan hooked to the cool tube.
 

Attachments

  • IMAG0042.jpg
    IMAG0042.jpg
    44.3 KB · Views: 8
  • IMAG0043.jpg
    IMAG0043.jpg
    32.6 KB · Views: 9
  • IMAG0044.jpg
    IMAG0044.jpg
    32.4 KB · Views: 9
  • IMAG0045.jpg
    IMAG0045.jpg
    38.1 KB · Views: 11
  • IMAG0046.jpg
    IMAG0046.jpg
    30.4 KB · Views: 8

Epiphyte

Member
I love the setup!...I rock a 400 dimmed to 250+...and my cab is about the same size, so I'd really like to see how this turns out....Here is a touch of criticism, take it or leave it! Those floros on the side will not increase your yield as much as spreading the canopy more in a way that it won't get burned if it touches the floros... I would suggest using every inch of horizontal space and if you want to add light, then hang something around the hood! Maybe one of the 65= 300 watt cfls? I know you want the light for your lower buds but lower buds aren't worth the time, space, yield, or potency.... Increase the size and potency of the primary buds and trim off the rest....I hope that helped and nice build nonetheless!
 

BigSteve

Active member
Those little buckets will fill with roots in a few days and be drinking a bucket full of nutes, real quick. That just doesn't look like a big enough space for a hydro root ball. Hydro roots explode.

Sorry if I'm a stupid!
 

Garhart

Member
Coco might be a easier way to go. I deal with higher heat than I would like to at times, and coco has been a been blessing for me .
 

Latest posts

Latest posts

Top