What's new
  • Happy Birthday ICMag! Been 20 years since Gypsy Nirvana created the forum! We are celebrating with a 4/20 Giveaway and by launching a new Patreon tier called "420club". You can read more here.
  • Important notice: ICMag's T.O.U. has been updated. Please review it here. For your convenience, it is also available in the main forum menu, under 'Quick Links"!

Portable Rubbermaid mini grow - 100W UFO LED

Hi everybody!

I'd like to show my latest grow cabinet & test grow. It's a bit different from standard because I live in a very small apartment and I have to make many compromises. I was still finishing/upgrading the cabinet during the grow and I made a few mistakes, so the results aren't perfect. However, I think my approach has potential and might also be interesting for somebody else…

Here are details of the grow cabinet construction:


CABINET:

Not only do I live in a VERY small rented apartment, it is also fully furnished and I can't modify the furniture at will. So drilling a few ventilation holes in the existing cabinets for clothes is out of the picture, unfortunately. And since the place is so small, it would look unusual to have another (locked!) cabinet, and there is barely any space. Plus I occasionally get visitors that should not notice any signs of growing or smoking, which makes stealth a priority…

So my idea was to use a very small box for growing, and when I get visitors, inventory controls or announced repairmen, I can simply put the whole grow box in one of the existing clothes cabinets to hide it from view.

Since wooden boxes would be expensive, heavy, and difficult to get in exact size, I searched all the local shops for a suitable sized Rubbermaid tub. I found one that fits the dimensions of my clothes cabinet perfectly, so I bought two of them. If I flip one Rubbermaid tub over the other, I get a growspace roughly 50 cm (width) X 35 cm (depth) X 90 cm (height) in size, with approx. 1.8 square foot growing surface. That should be enough for a few nice homegrown buds!

Here is a picture of the tubs, with 0.5 L Algamic bottle for size comparison:

picture.php


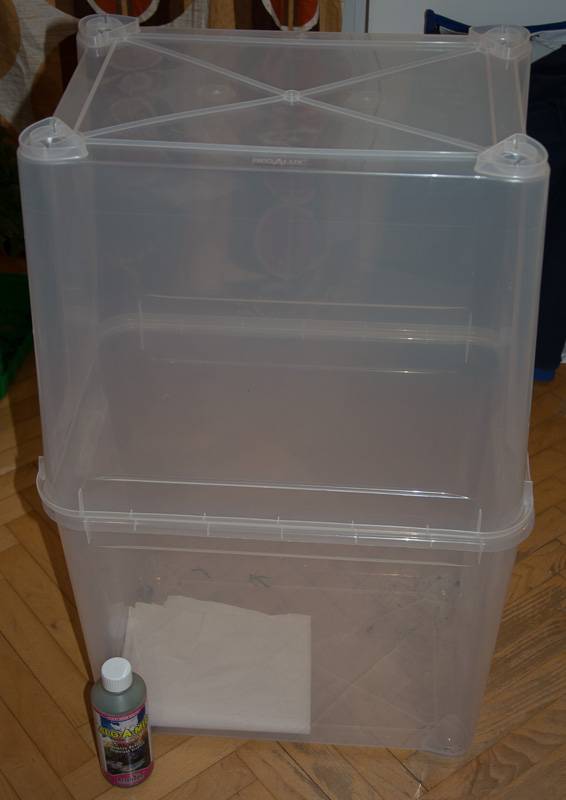
I could only find transparent tubs in the correct size, so I intended to spray-paint the tubs with black and white to stop the light leaks, but I was too lazy to do it yet... :smokey:
Instead, I keep the growbox in a bathroom with no windows. It will have to be sufficient for this grow... And it’s very nice to be able to observe the plants through clear plastic!
 
LIGHTS:

Since the cabinet is so small and I can't have a real ventilation system, heat is my big enemy. I used to grow with CFLs and 250W HPS in the past, and I think that even 75W HPS or 6 x 23W CFLs would be too much to effectively keep cool inside the Rubbermaids.

So I decided to try my luck with a LED lamp. I've read and searched around a lot, and in the end I bought the 100W UV Blackstar light. Reasons:

- I didn't want 3W LEDs, because my cabinet is very low and the light will be very close to plants.

- The Blackstar had the best (IMHO) spectrum at the time, for relatively good price. Some other lights didn't have the UV. Some had even better spectra, but were too expensive. And I wanted to buy locally to skip the customs, and local selection of LED lights was relatively poor.

- I wasn't hoping for HPS-like results, I just wanted to replace CFL's with something cooler.

- I realize that the 100W LED light actually uses only aprox 66W of energy, but that should hopefully be OK for my small grow, especially since the spectrum is optimized for plants (unlike CFL and HPS).

- I hoped one UFO will be able to cover the whole grow area. It turned out it doesn't cover it well enough, but more on that later.


Here is the box with the LED light on top (that's too far for growing, just for display):

picture.php
 
VENTILATION:

Using the LED light simplified my ventilation system considerably. I use one Noctua 12 cm fan for moving the air inside the box, one 12 cm fan for outtake on top of the box and two 12 cm sized holes for passive intake at the bottom. The outtake fan is mounted inside a small plastic box that can be filled with activated carbon (+ optionally another 12 cm fan) if I want to have a carbon filter. To run the fans I use a small AC power supply with variable output, so I can adjust the fan speed.

This system works perfectly and is incredibly quiet! Temperature in the box is approx. 1 degree Celsius above the ambient temperature (which is currently around 23 – 25 deg. C), and the fans are running at 7 Volts out of 12 V.

Here is a photo of the not fully finished carbon filter box:

picture.php


To attach the fan I cut the hole in the plastic box using the Dremel tool, attached some thin rubbery foam between the box and the fan and then glued everything together with a lot of hot glue.

I still have to put some activated carbon inside a nylon mesh bag and squeeze it in the box, so the air goes through the carbon. But, there was very little smell during the grow and I just didn't have to do it yet.

Here is the top Rubbermaib tub with the outtake fan/filter attached:

picture.php
 
PLANTS:

Since this grow was mostly intended to test and adjust the growbox, I decided to use clones from a mother I grew earlier out of a single freebie Black Russian seed I got from Delicious seeds. I didn't grow this strain before (except to create a mother) so I don't know what to expect.

I decided to grow in SCROG style to maximize the limited penetration power of my 100W LED light. Foolishly, I used 6 clones in 3 L pots (the maximum that fits inside the growbox), but it soon became apparent that fewer plants would be better…

I used a mix of old soil from previous grow (50%) + new Compo Sana soil (50%), and I think there were some problems because of that. Next time, I’ll try with two plants and fresh soil…

Here is how it all looked like in the beginning - this is the Black Russian mother and her 6 clones:

picture.php


And here are the clones in the newly constructed growbox. At the time, I didn't yet make the ventilation holes, it wasn't really needed yet:

picture.php
 
FINAL BOX:

Here is a (bad) photo of the growbox when it was finally finished:

picture.php


I didn't yet figure out how to mount the LED light most optimally, so currently it just hangs supported by those cardboard boxes on the top. Not very neat, but very easy to adjust height. And I still have to spray-paint the boxes with black&white color… But I love to watch my plants grow every time I go to toilet! :biglaugh:


Positives:

- Portability: I can disconnect the cables, pick up the tubs with plants and easily move them somewhere out of sight. If I cover the intake/outtake holes, no smell is noticeable.

- Low noise: the 8 cm fan from LED light is currently the loudest component of the growbox, but is not very loud. I intend to switch it for a Noctua fan in the near future, which should further silence the growbox.

- Flexibility: It's very easy to make new holes, cover the old ones, get a replacement Rubbermaid tub, or even convert the grow to hydroponics: just add a new tub!

- In extreme situations, I can put the whole grow in a car and move it someplace else. Or just take it to a friendly neighbor…


Negatives:

- A bit on the small side: doesn't fit many plants, limited height. But it's still quite larger than a PC growbox.

- A bit difficult to get to individual plants to water them, and very inconvenient for judging when to water based on weight of the pot. For watering I use a long and narrow funnel that I made by cutting the bottom off of a juice bottle.

- Yes, the light could be stronger. But, I can always add another 100W UFO, or even bigger rectangular LED panels that would illuminate the whole area. But I will wait for newer models with better spectra and lower price. There are still many other things to optimize first...


Costs:

- 10 € per “Rubbermaid” tub sized 50 cm X 35 cm X 90 cm

- 20 € per Noctua 12 cm fan

- 140 € for Blackstar 100W UV LED light

- 2 € for plastic box sized 13 cm X 13 cm X 6 cm (for carbon filter)

- 2.5 € for 500 g of activated carbon


Tools:

- Sticky tape! (you don’t need strong duct-tape, some simpler tape will do fine)

-
Something to cut holes in the hard plastic (electric drill, Dremel tool)

-
Hot glue gun for fixating the carbon filter fan

-
Some thin foam to put between fan and the tub, for reducing vibrations

-
Something to hang the light on

-
AC adapter for fans: preferably with selectable output voltage for changing the fan speed, but many old phone power adapters might work

-
A few wires to connect the fan to the adapter

-
Lots of sticky tape to hold it all together


Improvements:


- Adding some r
ubber foam between the two tubs, to better seal the box. I purchased two meters of insulating foam for hot water pipes, it fits nicely to the top edge of the tub.

-
Some netting for the intake holes, to prevent dust&dirt from entering the box and depositing on your precious trichomes.

-
Adding a “Bud guard”: a special scientifically developed device for prevention of inadvertent bud crushing during uncontrolled closing of the lid. It might look like four pieces of cardboard glued with sticky tape to the tub sides, but I assure you, it is much more complex than that… :) I suggest you invest in one of those as soon as your plants reach the top edge of the tub! I'll post pictures later on, but you can see it in the photo above.

-
Paint the tubs with black&white spray, but leave a small vertical strip unpainted (use sticky tape to mask it). This see-through strip can be used for checking on plants or adjusting the light, and then covered with some black tape on the outside of the box when not needed. This is still TODO...

-
Adding 2 CFL lamps in late flowering should improve things a bit if the 100W light is not enough, and should still be manageable with the existing ventilation.
 
THE GROW:

The plants were planted in a 50/50% mix of old soil from previous grow and new Compo Sana soil. This turned out to be a bad decision. The clones were made from a flowering mother and when I transplanted them they kept flowering, probably also under influence of flowering nutrients from the used soil. Anyway, after a few days of confusion they started growing normally. I tried topping all the plants, but it only resulted in one new growtip on each plant.

Here is the situation after 11 days of vegging under a pair of CFLs and a failed topping attempt:

picture.php


picture.php


Please consider that the photos were taken with flash and I didn't do manual white balance correction, so the plants look much brighter green than in reality.
 
*** EDIT of the above post: I mistakenly wrote that plants were vegged under a pair of CFLs. They were under CFLs only until I transplanted them and put them in the box on day 1. Since then they were under the Blackstar 100W UFO.


Veg day 13:

I added the SCROG net. It’s just the right size so I just had to push it slightly downward and it sits quite firmly approx. 10 cm above the pots.

In retrospect, I think I should put the net a little higher. 15 – 20 cm above the pots would be better, because it was hard to keep all the shoots so low. But I didn’t know how tall the plants will get in the end, so I tried to keep everything very short.

picture.php
 
Veg day 16:

The girls are growing nicely. So far I gave them two light feedings of some generic N-P-K: 4-4-4 fertilizer + a bit of BioBizz BioHeaven and Algamic. I’m trying to feed the plants once a week and give them plain Britta filtered water every 2 – 3 days. Occasionally I also give them foliar feeding with 1 mL Algamic per 1 L water. And each evening I tuck the tallest shoots back under the net.

picture.php


And this is how the cabinet looked at the time: no real ventilation yet, just some passive holes for air exchange. The LED light was positioned so that all the plants were nicely illuminated.

picture.php
 
Veg day 19:

The screen is filling up, I started thinking about when to flip the lights to 12/12. Looking back, I think I should have started flowering earlier…

picture.php
 
Veg day 21, flower day 1:

After 21 days of vegging I finally set the timer for 12/12 lighting and started the flowering phase. The screen was almost filled and I hoped the plants will stretch a little to fill the screen completely and also grow upwards a bit.

I also gave them their first feeding for flowering: 11 mL NPK 4-4-4 fertilizer, 5 mL Hesi Bloom, 3 mL BioBizz BioHeaven, 3 mL BioBizz Algamic in 1.5 L Britta filtered water. I was trying to use up various fertilizers I have at home, so I didn't skimp with the additives (but I did consider the "50% dosage rule"). In retrospect, I think I massively overfertilized them...

picture.php


picture.php
 

Dingofriar

Member
Hey merry. It's nice to see ya doing a journal not long after just introducing yourself. Keep at it and you'll be nipping these buds soon enuff. Lol.
Also just be aware that maybe your nose scent factor may be getting descensative (sp) do to living in small quarters. I found that cooking bacon or pan fried fish prior to unwanted guest arrival has helped somewhat masks ordors also. Good vibes on your grow my lady and be safe.
 

Yigtchelpleth

New member
Paint the tubs with black&white spray, but leave a small vertical strip unpainted (use sticky tape to mask it). This see-through strip can be used for checking on plants or adjusting the light, and then covered with some black tape on the outside of the box when not needed. This is still TODO...

DGD88YdYIOPB0HDM6sKyVnwS3JzyfdH6OyhoyUzYKG23TK_Vwfko_IygWQa0uBE9gshfv3BoUxXOEBedOXyZqIFyqP_hV9XXXtta3ju-dTOngmCEMf1T-fU22lk_5YkZS6x7wGXwXBoxzj6qBXjTdFmGOvRjdwpaquNo=s220-c


It will take multiple coats of paint to light proof those containers. Go get a roll of foil tape to get the same effect with less effort.
 

weedl3af

New member
I really like the effort you are putting into the project. There is a "father" of rubbermaid tote grows lurking around the micro section and his name is "lifeless". I once did a tote grow based on his findings it would be worth a peek for you.

Irrigation is always a challenge for these compact grows..
if you can get a hand pump sprayer and remove the sprayer nozzle from the tip you instantly have a portable watering hose for small plants.
Eventually I like the idea of pooling the water up on the bottom of the tote and using a small hydro pump to irrigate the water to a bucket- this would speed up watering time because you wont have to remove each plant to drain it properly.

When you do the painting, I recomend using a fine grit sand paper to rough up the surface of the plastic and then using spray paint primer made for plastic and then painting white paint inside that is rated for bathrooms. You can even use a mildew-icide paint to deter fungus. Thats how I did my tote and 5 years later it still doesn't peel.

The ladies are liking the love I can tell.
 
Hi everybody, thank you for stopping by!

Hey merry. It's nice to see ya doing a journal not long after just introducing yourself. Keep at it and you'll be nipping these buds soon enuff. Lol.
Also just be aware that maybe your nose scent factor may be getting descensative (sp) do to living in small quarters. I found that cooking bacon or pan fried fish prior to unwanted guest arrival has helped somewhat masks ordors also. Good vibes on your grow my lady and be safe.

Thanks for good wishes! And using cooking to mask the smell is a great idea, I sometimes peel an orange before visitors!


It will take multiple coats of paint to light proof those containers. Go get a roll of foil tape to get the same effect with less effort.

Well, I already have two cans of water-based indoor acrilic paint, suitable for toys: "matt deep black" and "glossy pure white". I was planning to spray with black first, wait a few days and then spray with white. I'm hoping that white would stick to matt black and that it would be enough to stop the light... But you're right, I have to test it first, if 2 layers aren't enough, then I will probably try to cover the inside with pieces of mylar that I should have somewhere... And if I can't find it, I'll get a silver tape, good idea!


I really like the effort you are putting into the project. There is a "father" of rubbermaid tote grows lurking around the micro section and his name is "lifeless". I once did a tote grow based on his findings it would be worth a peek for you.

Irrigation is always a challenge for these compact grows..
if you can get a hand pump sprayer and remove the sprayer nozzle from the tip you instantly have a portable watering hose for small plants.
Eventually I like the idea of pooling the water up on the bottom of the tote and using a small hydro pump to irrigate the water to a bucket- this would speed up watering time because you wont have to remove each plant to drain it properly.

When you do the painting, I recomend using a fine grit sand paper to rough up the surface of the plastic and then using spray paint primer made for plastic and then painting white paint inside that is rated for bathrooms. You can even use a mildew-icide paint to deter fungus. Thats how I did my tote and 5 years later it still doesn't peel.

The ladies are liking the love I can tell.

Thanks for the information, I'll look up lifeless's posts! That pump idea is great, this could work very nicely together with the idea of submerging the pots fully in water/nutrients for a few minutes! I know that last bit sounds strange, but I was just reading about it a few weeks ago... the main benefit is in how the gasses are exchanged in/out of soil.

And I agree about the sanding of the plastic container, I will do it. But I'm already stuck with the paint I've got, I don't feel like buying different ones, although the idea of fungus deterring is very tempting. If the paint won't stick to the plastic enough I'll just cover the inside with something shiny...


Hi and welcome! Enjoy the show!


Awesome simple and hi-tech setup..
Chapeau my friend

Thanks! I like to keep things simple, then I can at least imagine I have some control over them! :biggrin:


Hehe, thanks, I hope there will be something to show at the end!


i like your mini grow! :lurk:
Good luck!

Thank you, a little luck is always welcome! :)
 

Yigtchelpleth

New member
In a scrog, you fill the screen with the stretch moving things about to get grow tips to grow towards empty space. You essentially have one plant per hole. What you're going to end up with is the plants stretching and the shoots growing far above the screen, rendering it totally useless.

Tbh I'd remove that screen now, as it will be a pita to do it later.
 

Latest posts

Latest posts

Top