
-
Happy Birthday ICMag! Been 20 years since Gypsy Nirvana created the forum! We are celebrating with a 4/20 Giveaway and by launching a new Patreon tier called "420club". You can read more here.
-
Important notice: ICMag's T.O.U. has been updated. Please review it here. For your convenience, it is also available in the main forum menu, under 'Quick Links"!
You are using an out of date browser. It may not display this or other websites correctly.
You should upgrade or use an alternative browser.
You should upgrade or use an alternative browser.
Building New Panels - Sharing the Process
- Thread starter rrog
- Start date
Update: My completely biggest screw up was the damn silver grease. It has taken me forever to take off just half of all of those stars, carefully wipe with Iso, re-grease and re-attach. Wow.
I use about 1/2 a BB size droplet of the stuff and it still squeezes out a tad. Insidious how it spreads and spreads. I use latex gloves and small 2" square pieces of paper towel.
I have avoided completely un-soldering and taking the star over a bowl of iso and taking a toothbrush to it, but not sure too much iso-diluted silver grease flowing all over the star is a good idea. I may un-solder and clean gently.
I guess there's nothing wrong with un-soldering them all?
luvdemshrooms
Member
You could unsolder. I wouldn't.
Use a scraper (or single edge blade) to scrape of as much as possible before the iso.
If you don't get it all, that's OK. Just use less for the second application.
Use a scraper (or single edge blade) to scrape of as much as possible before the iso.
If you don't get it all, that's OK. Just use less for the second application.
insidious how it spreads
which is actually what it's supposed to do
i tried to just get as minimal a little smear of it off the nozzle of the tube as i could and even that tiny amount was more than enough
the general idea is that even a well machined surface will have microscopic irregularities which present an airspace {insulating and preventing optimum heat transfer} bear in mind the scale of this is microscopic the thermal paste is intended to be displaced and allow contact while filing these irregularities {probably think of the 'irregularities' as "scratches"}
~so; the point of the stuff is to flow/spreadout/be 'displaced' to some degree while tensioning the component down to the heatsink surface
in PC building; i have seen people use inordinate amounts and have surplus w/o any adverse effect
actually shouldn't need to scrape it off or use solvent just drag the excess off w/ your finger or wipe around the stars w/ your paper towel pieces {as luvdemshrooms says however it may be convenient to use a blade to get excess out of corners}
clamping them down should press the excess out <that just isn't 'optimum'
LDS- Thanks for that. Just curious, what would the specific concern be with the removal? Too much heat at once or is there some potential collective effect from several heatings?
Thanks-
EDIT- Thanks also xmobo- I've probably been cleaning these more than I need to, but whatever at this point.
Cool!
Thanks-
EDIT- Thanks also xmobo- I've probably been cleaning these more than I need to, but whatever at this point.
Cool!
luvdemshrooms
Member
It's just more work.
There is little chance of damage, even from repeated heating (the star takes the heat). Unless you are cooking the bejesus out of those you won't damage them.
There is little chance of damage, even from repeated heating (the star takes the heat). Unless you are cooking the bejesus out of those you won't damage them.
great stuff indeed
I am just too impatient for diy
but love watching and following along with others who attain actual patience for shit like this lol.
keep up the great work brother,
the aardvark
I am just too impatient for diy
but love watching and following along with others who attain actual patience for shit like this lol.
keep up the great work brother,
the aardvark
As I finish up on my silver grease cleanup, I'll be wiring up the drivers. Per Rives advice, I'd like to run one power cable in, then power a strip (I suppose), which will in turn power the Drivers. Only one driver will be switched. None dimmed.
The European strips from Radio Shack don't appear to have a means to power the entire side of the strip, so how to neatly split the hot and neutral single power cable into 5 hot and 5 neutral leads for the 5 drivers?
The European strips from Radio Shack don't appear to have a means to power the entire side of the strip, so how to neatly split the hot and neutral single power cable into 5 hot and 5 neutral leads for the 5 drivers?
The European strips from Radio Shack don't appear to have a means to power the entire side of the strip, so how to neatly split the hot and neutral single power cable into 5 hot and 5 neutral leads for the 5 drivers?
Cut pieces of wire approximately 1" long and strip both ends. Fold them in half and use them to connect two adjacent terminals. Continue this for as many terminals as you need.
Seems simple enough! Thanks! So typically there's a hot and a neutral bar, I assume.
I'd put the fuses on the AC side right after I split, then the MOVs very close to the fuses. I'll cross that bridge later. Would the MOVs be installed in separate Radio Shack Euro strips also?
I'd put the fuses on the AC side right after I split, then the MOVs very close to the fuses. I'll cross that bridge later. Would the MOVs be installed in separate Radio Shack Euro strips also?
Yeah- other than my being silly with the grease, the build has gone well.
don't get no funny ideas with the grease now mate haha
")
Yeah, I have a pile of torn up tissues with grease all over them. What shall I tell the wife?
Hamstorg- Thanks for the kind words. I liked this video to get a visual on this. There are a small series of these videos, and he also shows how to pre-tin wire and the stars.
http://www.youtube.com/watch?v=guAmksDzq6I
Hamstorg- Thanks for the kind words. I liked this video to get a visual on this. There are a small series of these videos, and he also shows how to pre-tin wire and the stars.
http://www.youtube.com/watch?v=guAmksDzq6I
Finally, after maybe 6 hours of cleaning and re-installing 50 LEDs, I installed the hanging hardware.
The nut on the bottom protects the LED side so I can set this on a table, LED-side down.
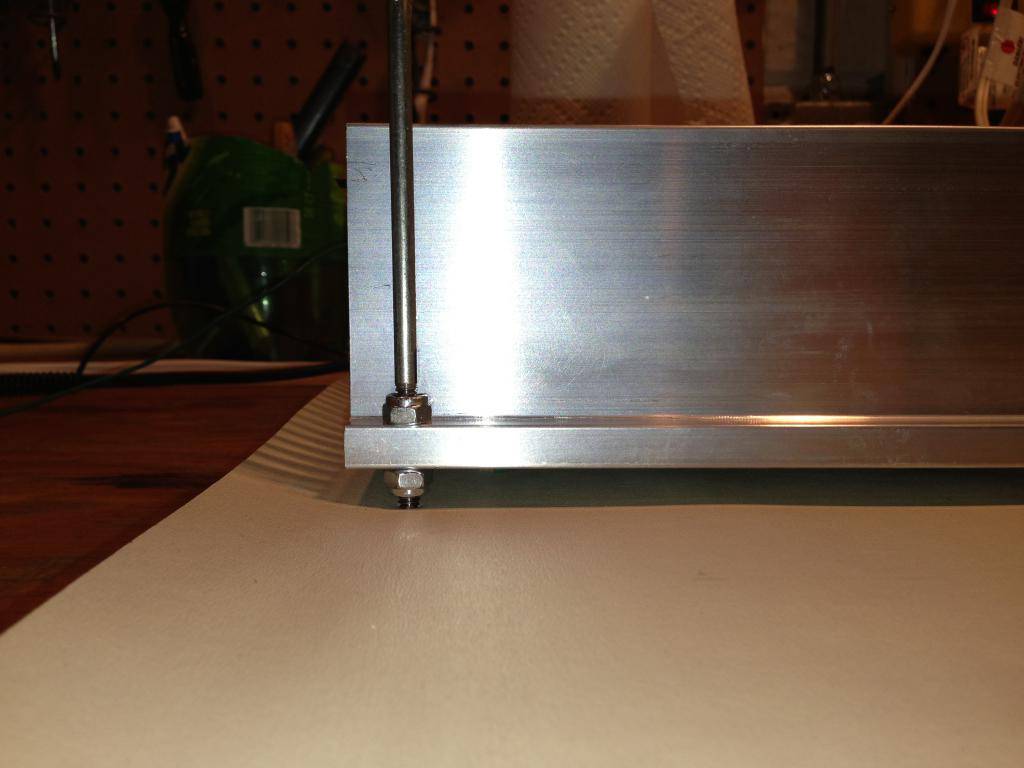
The other end is for the yo-yo hangers:
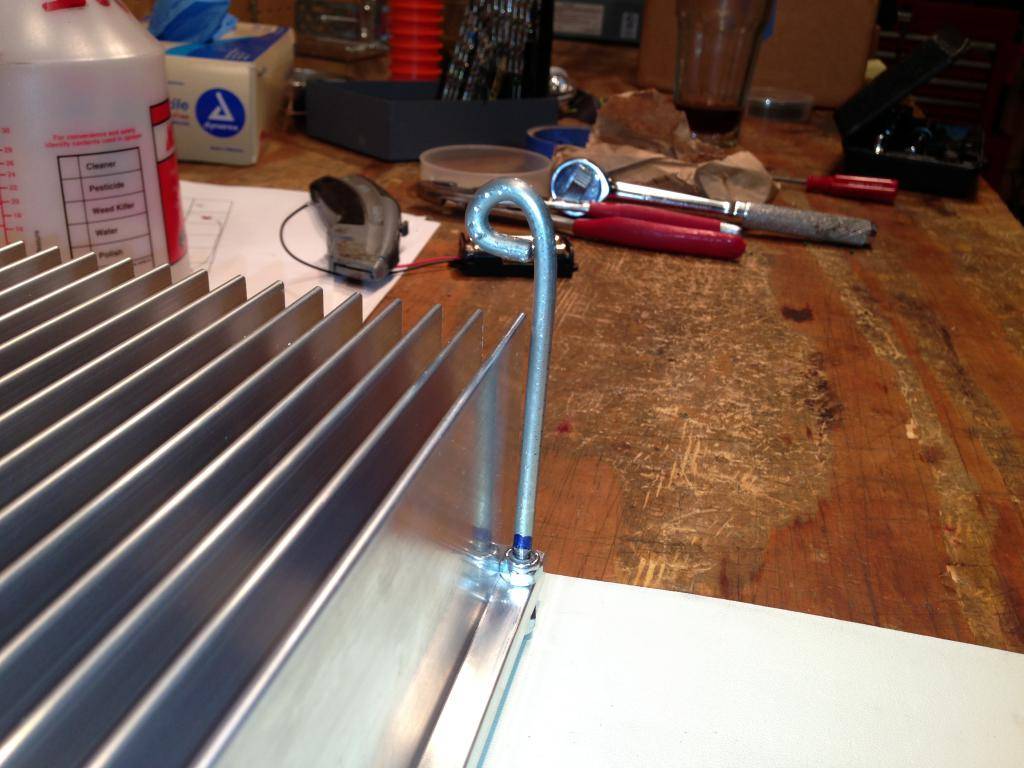
I machined these from rolled steel stock. That's a fancy way of saying I crudely bent them on a vice and threaded the other end...
Now on to the Drivers, fuses and fun.
EDIT: Rives- These Radio Shack European style terminal strips can't fit much wire in each port. As I understand your directions, on one side of the block I'd have the 1" wires running from one port to the next to the next, meaning each port is hosting two wires. Looks like all that would fit would be 20ga. That seems light to power the drivers. Thanks for an opinion
The nut on the bottom protects the LED side so I can set this on a table, LED-side down.
The other end is for the yo-yo hangers:
I machined these from rolled steel stock. That's a fancy way of saying I crudely bent them on a vice and threaded the other end...
Now on to the Drivers, fuses and fun.
EDIT: Rives- These Radio Shack European style terminal strips can't fit much wire in each port. As I understand your directions, on one side of the block I'd have the 1" wires running from one port to the next to the next, meaning each port is hosting two wires. Looks like all that would fit would be 20ga. That seems light to power the drivers. Thanks for an opinion
Last edited:
OK so here's where I'm at.
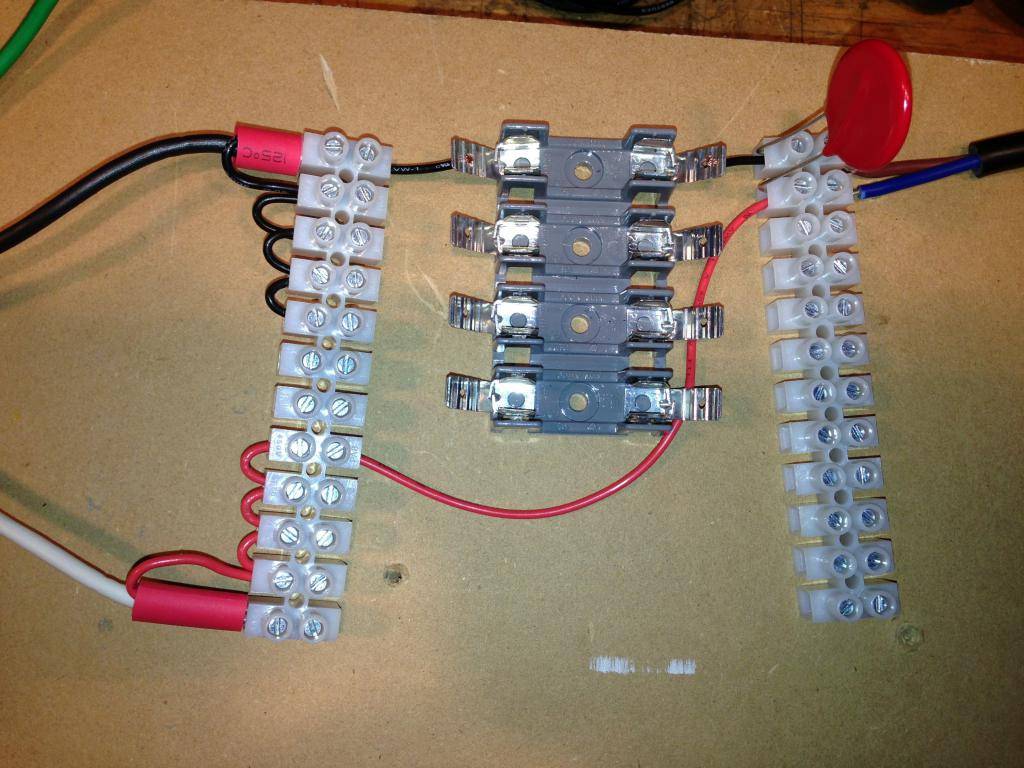
On the left is the 14 ga power cable. This is a mock-up of what I understand the AC side looks like.
Note the red and black wires are only 20ga Hook-Up Wire. I hope this is OK. Also, the little loops are not soldered together, though they could be.
Note the MOV sharing a terminal with the hot lead (after fuse). On the far right is the AC leads to the driver. For operation I would heat shrink the MOV legs.
Does this look correct? Thank you!!
On the DC side, I understand how the Zeners get soldered together, but are they then placed in a similar configuration across the + and - like I did with the MOVs? (Assuming I have that pictured correctly above)
Last edited:
EDIT: Rives- These Radio Shack European style terminal strips can't fit much wire in each port. As I understand your directions, on one side of the block I'd have the 1" wires running from one port to the next to the next, meaning each port is hosting two wires. Looks like all that would fit would be 20ga. That seems light to power the drivers. Thanks for an opinion
20 gauge is pretty light, I think that I used 18 on mine. What amperage are you planning on fusing them at? You can drive open conductor wiring substantially harder than wires that are grouped together in a cable, and basically get away with murder over short distances like that. I still like to stay on the reasonable side, though!

Take a pair of needle-nose pliers and tug on each end of your jumpered wiring to make sure that you have a solid connection on each one. The MOV is correctly placed, and heat shrink would be a good idea. And yes, the zeners are placed the same way on the DC side.

Latest posts
-
 420 Vault Promo for 2024! X10 Free Seeds* + Win x5 Seeds
- Latest: FletchF.Fletch
-

-
-

-

Latest posts
-
420 Vault Promo for 2024! X10 Free Seeds* + Win x5 Seeds
- Latest: FletchF.Fletch
-
-
-
-
