What's new
  • Happy Birthday ICMag! Been 20 years since Gypsy Nirvana created the forum! We are celebrating with a 4/20 Giveaway and by launching a new Patreon tier called "420club". You can read more here.
  • Important notice: ICMag's T.O.U. has been updated. Please review it here. For your convenience, it is also available in the main forum menu, under 'Quick Links"!

My Micro Grow (GHS Green-o-Matic), 188W CFL, Need Advice

DIYnewbie

Member
Greetings all,

Thanks for stopping in and taking an interest in my grow journal!

I recently (after making some delicious cookies with cannabutter) decided it was time to dust off my growing hat and try my hand, for the 3rd time, at cultivating this fantastic plant. Here is some info on my grow:

Strain:
Green House Seeds Green o Matic
Feminized autoflowering strain
Very compact
Seed to Chop in 60ish days

This was not my first choice, i had my heart set on Sour60 after reading about it a year ago, but the size limitations is what made me go with this one, as well as my good experience with GHS in the past.
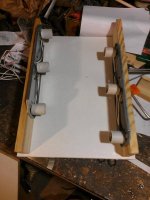
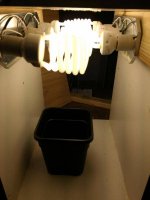
Lights:
2x 42w 2700k CFL Bulbs
4x 26w 2700k CFL Bulbs

Total watts: 188W

Soil:

FF Ocean Forest

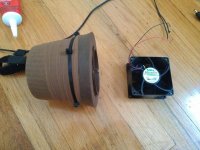
First time using soil, my first two grows were using an ebb and flow hydro system i built, will be sure to post pics of that to for those interested.

Nutrients:

Superthrive (from my cloning attempts)
thrive alive B (same)

I will need some assistance from more experienced growers in this department, soil is new to me, and I could use all the help i can get.
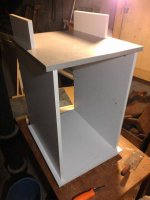
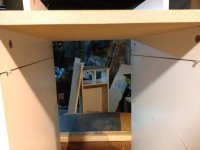
Grow space:

20" D x 14" W x 23.5 H (this is WITHOUT the lights being installed as of yet)


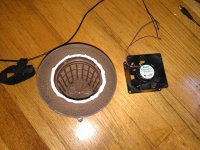
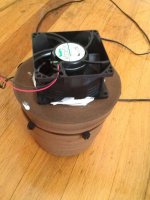
Alrighty, those are the stats, and now time for pictures!
:thank you:
 

DIYnewbie

Member
As promised, here are a few pictures. The first picture is of the cab itself, in its current state. I am in the process of working out an air intake system, or rather thinking of how to light proof it. Walls will be lined with mylar as soon as i finish the interior build.

The second is of my light system, which consists of 2x 3 light bathroom vanity fixtures stripped to just the light sockets, and wired into a grounded (former) power supply cable.

On top, i will cut a hole for a 120mm pc fan, connected to a 12v 1a adapter (adjustable voltage to regulate fan speed) to suck the heat from the lights.

Issue i have with this: This might hurt my positive pressure that i want to generate by using my fan with a carbon scrubber on the other end of it.
Suggestions?

On that topic, I am going to build a micro scrubber for this grow, using 2 net pods, one 5" outer and a 3" inner. This makes me wonder what size fan i should use to pull out through it. An 80mm would be just a bit larger than the 3" pot, having majority of the carbon around it, possible making it easier to pull the stinky air through it, where as a 120mm fan would be just the size of the 5" outer pot, having that 1" ring of carbon obstructing the fan.

Suggestions welcome!

That is all for now i guess. Will be updating as i continue the build. Thanks for checking in!


Seeds should be coming in this week sometime!
 

Attachments

  • IMAG0436.jpg
    IMAG0436.jpg
    39.2 KB · Views: 11
  • IMAG0437.jpg
    IMAG0437.jpg
    48.9 KB · Views: 14
  • IMAG0439.jpg
    IMAG0439.jpg
    59 KB · Views: 12
  • IMAG0440.jpg
    IMAG0440.jpg
    68.4 KB · Views: 14

audioguy

Member
Hey, I'd definitely use the biggest fans you can... the smaller the box the harder it will be to keep temps down, and carbon filters restrict airflow bigtime. That's what I'm currently struggling with anyways in my micro grow. I'd recommend making sure your airflow and temps are dialed in before you start any seeds.

Issue i have with this: This might hurt my positive pressure that i want to generate by using my fan with a carbon scrubber on the other end of it.
Suggestions?

"positive pressure" kind of threw me off, the typical micro build utilizes negative pressure using an exhaust fan + carbon filter and passive intake so that smelly air can't escape anywhere but through the layer of carbon.. is this what you meant? It looks like that's what your design is leading towards.

But your setup is def looking good so far, can't wait to see some ladies in there!
 

DIYnewbie

Member
Alrighty! got a bit of work done today. Mounted the lights and the PC fan for ventilation on top. Came to the conclusion that with the pots i am using now, i only have 8" from the end of the pot to the lights. GRRRRRRR>

So, either i need to look for a wider and shorter pot to use, or LST the plant to keep it away from the hot lights.

Other problem.

I need to come up with a way to set up my exhaust and my intake, because these lights will get pretty warm in there. My ideas!

1. Attach a rubbermaid on the top of the box, paint it black and light proof it, and have the exhaust fan, with the carbon scrubber in there, as well as the power strip and all the timers. Will look into this idea. Still looking for some feedback from you all about what size fan to use for the exhaust.
2. Make an attachment to go onto the back that will be my intake light trap. This would free up the interior space for me to play around in and not take those valuable 3-4 inches that i would need to devote to blocking aout the light leaks. Will play around with this idea, and hopefully a trip to home depot will help me figure this one out.


Will have to look into a door as well. I have some good plywood around the house that i need to cut, hopefully that will work. Need to figure out a locking system of some kind...
Also, i think it might be worth painting this box black on the outside, going to be keeping it somewhere in the basement (keeps temps down and wife from seeing it )and the black won't arouse too much suspicion

Alright! progress pics!

OKAY ! NEED SUGGESTIONS ON FANS !

80mm:
http://www.newegg.com/Product/Produc...82E16835706041

120mm:
http://www.newegg.com/Product/Produc...82E16835213010
 

Attachments

  • IMAG0444.jpg
    IMAG0444.jpg
    31.9 KB · Views: 10
  • IMAG0441.jpg
    IMAG0441.jpg
    32.5 KB · Views: 11

DIYnewbie

Member
Hey, I'd definitely use the biggest fans you can... the smaller the box the harder it will be to keep temps down, and carbon filters restrict airflow bigtime. That's what I'm currently struggling with anyways in my micro grow. I'd recommend making sure your airflow and temps are dialed in before you start any seeds.


"positive pressure" kind of threw me off, the typical micro build utilizes negative pressure using an exhaust fan + carbon filter and passive intake so that smelly air can't escape anywhere but through the layer of carbon.. is this what you meant? It looks like that's what your design is leading towards.

But your setup is def looking good so far, can't wait to see some ladies in there!

Yes! Negative pressure! Sorry for the mistake, i work in a clean room and all we ever talk about is the positive pressure in the room to keep the air clean, so the term is always on my mind. But yes, negative pressure!

Thanks for catching that, don't want to throw anyone off. Will continue work on the box tomorrow once i get my hands on a saw to cut the door and the back panel.
Purchased 2 90 degree PVC elbow pipes (is that what they are called? will have to do)

this will help me with my passive intakes light leak problem. 2x 3" diameter ones should do the trick, unless i go for a 120mm fan, then i will have to throw in another one to have the ratio of 2:1.
Thanks redgreenry for the detailed write up.
 

audioguy

Member
I used 90 deg elbows on my veg cab and it's not enough to completely lightproof. There's a glow underneath my cab like it's some sort of japanese car with neons underneath! You need at least 180 degrees I'd say.

What I used on my flower cab was a set of four boards.. let me try to ascii it out here..
Side view, pretend the "oo"'s are open space...
oo______
______oo
oo______
___oo___

Does that make sense? The light would travel up through the bottom, then has to do a couple of 180 degree bends before it gets to the top. Maybe someone else can explain it better.
 

DIYnewbie

Member
I used 90 deg elbows on my veg cab and it's not enough to completely lightproof. There's a glow underneath my cab like it's some sort of japanese car with neons underneath! You need at least 180 degrees I'd say.

What I used on my flower cab was a set of four boards.. let me try to ascii it out here..
Side view, pretend the "oo"'s are open space...
oo______
______oo
oo______
___oo___

Does that make sense? The light would travel up through the bottom, then has to do a couple of 180 degree bends before it gets to the top. Maybe someone else can explain it better.

I completely understand that, no worries. I can try that, but am a bit hesitant to get the air from the floor though. I also have a light grate that the light will be filtered through, and the inside of the pipes will be painted matte black, as well as coming from the back of the cab, angled downwards.
 

DIYnewbie

Member
GOT THE SEEDS!

GOT THE SEEDS!

Got the seeds in the mail!

Also, went out and bought some FF nutes for this grow. Got the three set of them:
1. Grow Big
2. Big Bloom
3. Tiger Bloom

So, now it is time for me to finish up my growbox and throw the seeds in! Still stuck on what kind of exhaust fan to get to run it through my DIY carbon scrubber. Will have to make the scrubber tomorrow as well as test a few things out.

Also, putting in the back and from of the chamber on, checking lightproofness and pressure seal.
 

Attachments

  • IMAG0449.jpg
    IMAG0449.jpg
    54.1 KB · Views: 12

DIYnewbie

Member
C02 is heavier then air my friend, Having your intake on the floor would utilize this fact. More Co2 = bigger buds.

Why were you initially hesitant?

Was worried about sucking up all the crap that is on the floor. This fear is from my mushroom growing days where i always had to keep everything off of the floor.

I can throw the intakes on the floor, but my initial idea was to have the intakes come off of the back wall with a 90degree PVC elbow pointing downwards towards the floor of the box, which would move the air around there as well i would imagine. Any thoughts? Or should i reconsider the floor intake idea?
 

DIYnewbie

Member
ORDER PLACED FOR FAN!

I decided that i would go with the 80mm fan due to it being the perfect size to fin the filter around. It moves a little over 100CFM, and Air Pressure: 1.51 inwg.

This should at least suck the air out of the box and keep the temps somewhat low in my opinion. Lets hope it all works out, otherwise i will have to send it on back to NewEgg and just go with a 120mm version.

I won't be cutting the wire like i do on my other fans, and will just use the actual 4-pin connector, and have the connector spliced onto a 12v 2a adapter i got on ebay

It is on the upper end of the noise category, in the high 50's, hopefully the fact that it will be in the basement will keep people from going "What is that?" Will just wait and see when it arrives. Not going to need a carbon scrubber for a few more weeks, so i can test some fans before the day comes

http://www.newegg.com/Product/Product.aspx?Item=N82E16835706041
 

TonyGreenHand

Active member
Intake from the floor to your canopy = happy girls. That is the way it has been written.

Do not worry about your floor debris being sucked into your grow unless there are dust bunnies everywhere.. which I would just vacuum in that case.. if you start noticing a dusty room you can also slap some pantyhose on your vent, just make sure you're not clogging it with all that lint or whatever you were initially worried about.

Make sure see's sealed tight like a butthole, no light in or out.
 

DIYnewbie

Member
Intake from the floor to your canopy = happy girls. That is the way it has been written.

Do not worry about your floor debris being sucked into your grow unless there are dust bunnies everywhere.. which I would just vacuum in that case.. if you start noticing a dusty room you can also slap some pantyhose on your vent, just make sure you're not clogging it with all that lint or whatever you were initially worried about.

Make sure see's sealed tight like a butthole, no light in or out.

I will try my best to figure out a way to make the intake on the bottom, without taking away any of the space inside the cab. It is already a little tight with those tall pots.

Hey! Can i go for shorter and wider pots instead of the traditional tall ones? Will this effect the growth in a negative way, knowing that the roots generally want to go down and not out.

Would REALLY help me if this was only a minor thing
 

TonyGreenHand

Active member
Depending on the plant you are using for your grow. Feeder roots build up on the top of your soil, so in theory a wider based pot would give you a larger yield, because there would be more roots.

basically, yes you can go for wider pots it shouldn't hurt.
 

DIYnewbie

Member
Carbon Scrubber

Carbon Scrubber

Well, here we are, sorry about the lapse in communication. Finished building the scrubber, attached the fan. Fuck me it is loud, but it does move a ton of air.

Fan is attached to a 12v 2a adapter (fan requires 12v 1.6a), so it is going at full speed. I will need to find a way to mount the fan so that the scrubber does not fall off....

duct tape! going to get on that right now, but here are the pics of the progress. Will probably start seed germination by the end of the week, gives me time to find a nice container that is shorter and wider.

QUESTION!

Should i start the seedling in one of those "plugs" that they sell at home depot and other places? I have a few from my tomatoes and it came with an auto watering tray, so that helps. Or is it better for me to just plop the germinated seed straight into the FFOF soil?

Thanks for your help

TonyGreenHand thanks for being here and helping me out!
 

Attachments

  • IMAG0470.jpg
    IMAG0470.jpg
    59.5 KB · Views: 11
  • IMAG0472.jpg
    IMAG0472.jpg
    89.9 KB · Views: 13
  • IMAG0473.jpg
    IMAG0473.jpg
    55.5 KB · Views: 10
Last edited:

TonyGreenHand

Active member
FFOF (FoxFarms Ocean Forest right?) is way to hot to start your seeds in. A rooting plug works great. If they are the root plugs that look like dirt cones you can put that seed in them, rip off a little of the plug and jam it in the hole you made with the seed, there shouldn't be air directly available to the germinating seed. They need to be kept constant in moisture and temperature. A good way to do this is to flip the plug upside down, and set it on its flat side (the side you created a hole for your seed) in a plate of slightly above room temperature water.

But before you start these, where are they going to go after they are germinated? The FFOF? I hope not.
 

DIYnewbie

Member
FFOF (FoxFarms Ocean Forest right?) is way to hot to start your seeds in. A rooting plug works great. If they are the root plugs that look like dirt cones you can put that seed in them, rip off a little of the plug and jam it in the hole you made with the seed, there shouldn't be air directly available to the germinating seed. They need to be kept constant in moisture and temperature. A good way to do this is to flip the plug upside down, and set it on its flat side (the side you created a hole for your seed) in a plate of slightly above room temperature water.

But before you start these, where are they going to go after they are germinated? The FFOF? I hope not.

Yes, FFOF is FoxFarms Ocean Forest. I was going to set it in there after they germinated, but will gladly and very willingly take any advice as to what i should plant it into before throwing it into the FFOF.

I just want to point out hat this strain will be done in 55 - 60 days, so i assumed that i may as well just give it the best right off the bat, and not knowing much about soil, i thought that the FFOF would be a gentle release of nutrients. I was planning on starting to feed it with the FF nutrients at about.

These are the grows i am using for my guides in case you were curious:

http://treatingyourself.com/vbulletin/showthread.php?t=40026

http://forum.grasscity.com/indoor-m...48-first-cfl-grow-autoflower-greenomatic.html
 

TonyGreenHand

Active member
I don't know bro, I've had terrible luck with the FFOF on smaller plants.. I would at least amend it down 1:3 with a good coco or perlite. I have recently had great success starting plants right in royal gold basement mix and if I was going to recommend a soil from the begining it would be that, but again amended with 1:3 perlite, not pure.

Too much of a good thing too soon for a seedling can be it's death. Best to start them nice and easy your first time.

How many do you plan on doing in your cab? What kind of pots are you using?
 

gr8fulbud

Member
Hey
DIYnewbie
! I too lack a lot of ceiling height so for my modular scrog I'm running now I use a Tupperware container which is shorter and wider than a typical pot. I think its about 1.5 liters. I too use Fox Farm Ocean Forest with added perlite and ewc. Here's a pic with the scrog set in a plastic cake pan to catch the drippings. Good luck with your grow!


Top