What's new
  • Happy Birthday ICMag! Been 20 years since Gypsy Nirvana created the forum! We are celebrating with a 4/20 Giveaway and by launching a new Patreon tier called "420club". You can read more here.
  • Important notice: ICMag's T.O.U. has been updated. Please review it here. For your convenience, it is also available in the main forum menu, under 'Quick Links"!

'Rubbermaid' Grow Box

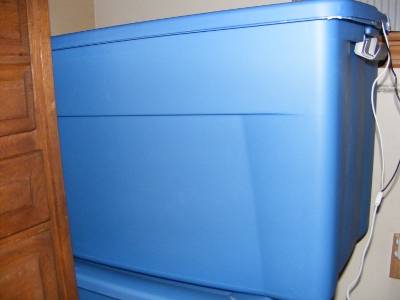
I've making a 'rubbermaid' grow box with two 35 gallon totes. The plan is to keep them stacked, cut the lid out of the bottom tote, and cut the bottom out of the top tote then cable tie together.

Right now I am working on the painting after that will be cutting the holes for intake and exhaust, attaching the lights, adding fan and filter combo.

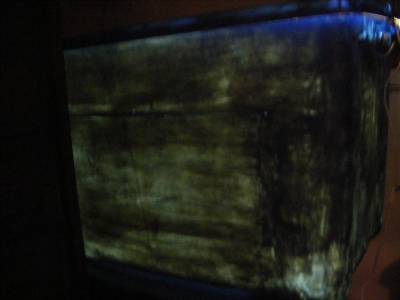
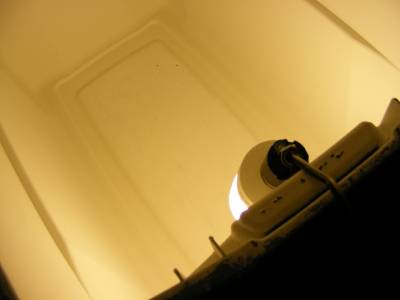
I need some advice. These totes are covered in 6 coats of white paint and with one 42 watt cfl inside it is showing tremendous amounts of lighting shining through. I only have so much white paint left, not enough I believe to light proof these totes by itself.

Buy more white and keep painting? Black paint, then more white paint?

picture.php


picture.php


picture.php
 
Thanks dude. I've actually been through that thread. I literally searched all over the internet for rubbermaid grow box threads before I took the plunge. There is a lot out there.

Besides a final decision to make on intakes my design is done, just don't know what to do about the paint situation. I would like to add some coats of black paint then finish it off with some white or just keep using white until its light proof (how much will this take?). Walmart has some foil tape for $7 a roll. What would you guys think would be the best option?
 

Tilt

Member
Maybe to late. I started with a black rubbermaid. I sanded the inside slightly then used plastic primer paint then flat white = no glow
 
So I found some extra paint and plan to cover up what i've done so far with black spray paint, then go over that with some white primer paint (1/2 gallon) I found then I will finish up with the rest of my flat white paint (1/2 qt). Hopefully that should do it, if not I will buy another quart.

I will update the thread when I finish said task.
 

WasntMe

Member
Krylon plastic paint with primer ... has worked like a charm since it came out. even coverage and no light glow when multiple thin layers are applied. Been using this since around the time Nimby, on OG, first designed the 65w cfl rubbermaid tube .... and then with his 150hpsdouble stacked tub.
 
I spray painted the totes black today; took 2 cans, it's about 90% light proof now. Afterwards I thought it would of been easier to paint the outside black instead. Tomorrow I will be going over the black with white, will update with pictures then.

I'd recommend anyone planning to make grow tubs to lightly sand the tote first and to use spray paint for your first layer atleast. The coverage is a lot better than with a brush and a lot more light will be blocked.
 
The paint is all done, except in one tub it cracked in several spots, not too worried about it as I will most likely be upgrading to some foil tape in the future instead of repainting them. They make the room they are in smell like paint.
 
hey man. they will smell like paint for a while. put it outside with your ventilation system running for a while if possible, that may help. as for the paint, a few layers of black and then a few layers of white should do the trick...don't be afraid to buy new tubs and start over.
 
I just finished up painting the black and white layers actually, thanks though.

Might be able to update with pics tomorrow. Next should be cutting holes, making filter, and mounting and wiring lights.
 
Hey guys, the project is progressing slowly but surely. I wanted to run this by some people who have done this before I go ahead with my idea.

This is how my lighting will be setup 8 lamp bases zip tied to the top tote lid.


This is how I am guessing these would be wired parallel series. Am I right? The wire coming off the top left lamp base would go to a surge bar sitting outside the box.


P.S: There is 1 silver and 1 gold plate & screw each lamp base, I have silver leading to silver and gold to gold.

Once I get the fan and lights wired up it should just be cutting intake and exhaust holes, cutting bottom tub lid tracing onto top tub floor and cutting out, zip tie together and perhaps add some sealant, mount exahust fan then pvc pipes for passive intakes.
 

basspirate

Member
...a bit late, but it's cheap to throw up a little mylar/emergency sleeping blanket in there too. can work well for adding reflectivity and blocking light.
 
Thanks basspirate, I will be upgrading to foil tape when the time comes.

Made some more progress today, cut out and stacked the tubs. Zip tied them with 8 zip ties and sealed it up with kwik seal. Unfortunately you can see the caulking from the outside a bit. Utility knifes are the best for cutting these things, don't bother with drills or dremel tools for cutting.


Also painted six 2" pvc elbows black for passive intakes.


Next up is wiring and mounting lights, hopefully I get time for that later. Then cutting holes for exhaust and intakes, attaching pvc elbows & fan. Last thing will be the carbon filter, still working on a way to attach to pc fan. Filter will be made out of mesh pencil cups like found here.

Until next time...
 

WasntMe

Member
you should search for Nimby's design threads (Some of these may even be in the old OG FAQs, not sure)... all these details I see you and others stumbling over trying to figure out for themselves have all been worked out by us in Nimby's old Rubbermaid design threads, circa 2002 or 2003.


Painting
light traps
stealth airflow
stacking
timer integration
mods for dwc or soil
mini scrog integration
it's is all in there ... ready to go .... I still use the ver 1 setup for mothers and veg ... has worked like a charm for ~7 years.
all with K.I.S.S. design
 
Top