What's new

a bench cabinet design

touchofgrey

Active member
Seems like I just finished my last cabinet and I'm already thinking about the next one. I've been inspired by some of the designs I've seen around here (Anti and gdbud among others) that use cavity walls for ventilation between the chambers and as light traps. I was also thinking a bench would be a less conspicuous thing out in my garage. I wanted something a little bigger than what i've got to better utilize the 2500 HPS I've got, more like 2'x2'.

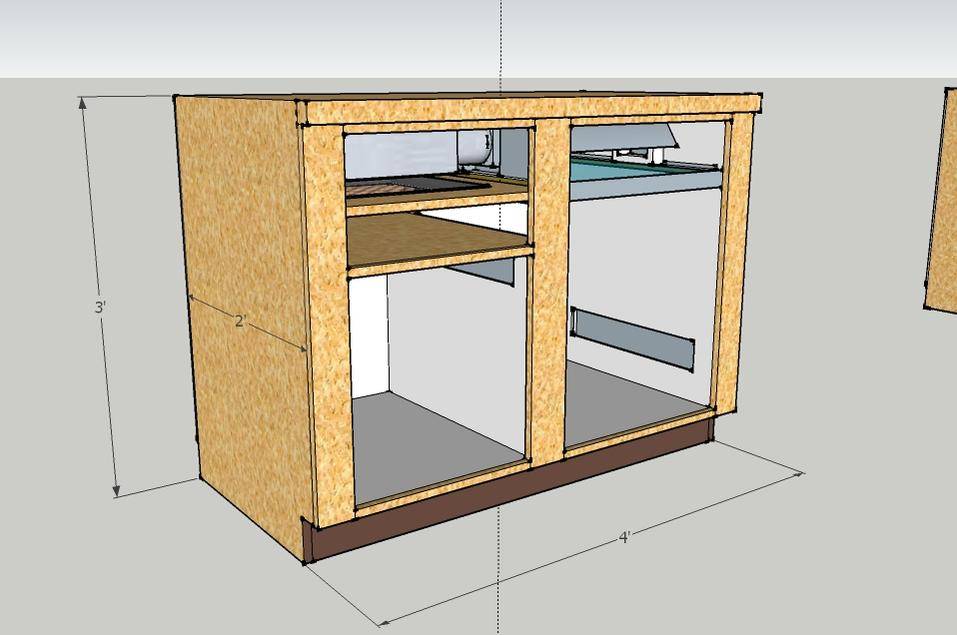
So I came up with a 4'L x 2'D bench with 3 cavity walls. There's room for mothers and clones on one side and a flowering chamber on the other.

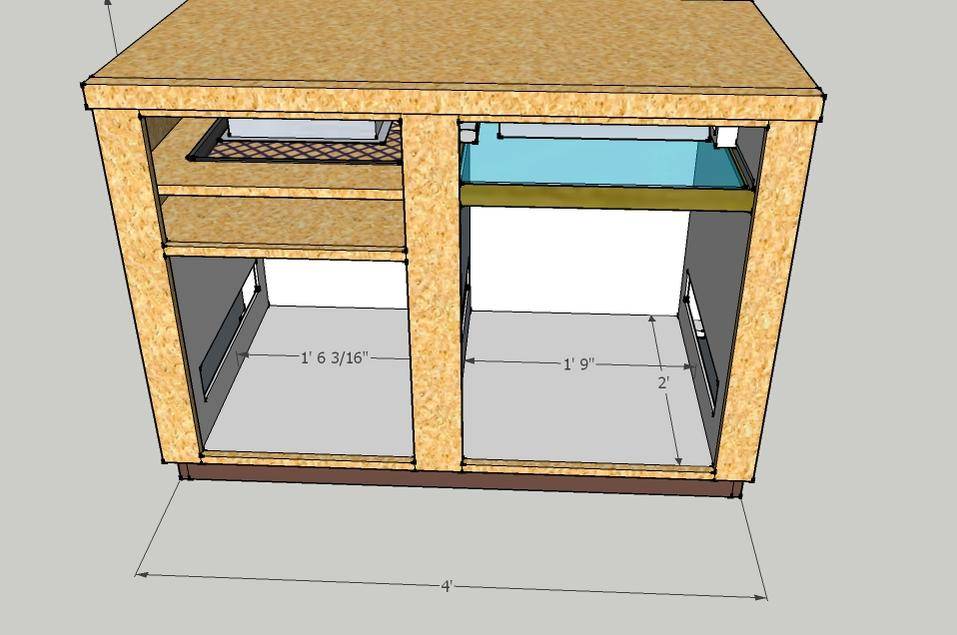
Passive inlets are open to the cavity walls and noles in the floor. The ventilation is designed to draw from the space under the floor up through the small chamber into the large. The added inlet in the flowering chamber is designed to proportion more air in that chamber, about 2/3-1/3 relative to their size.

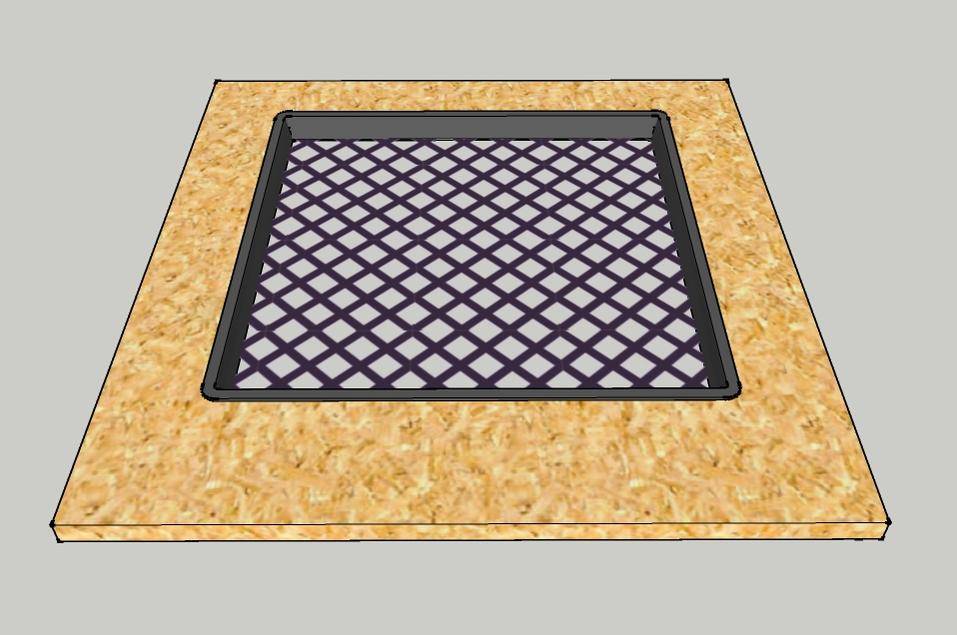
The exhaust is drawn through a filter tray. I use plastic nursery flats, glue a screen on the bottom then just fill with charcoal. They come in different sizes and I've got a pile of the 17" square variety that is just right.

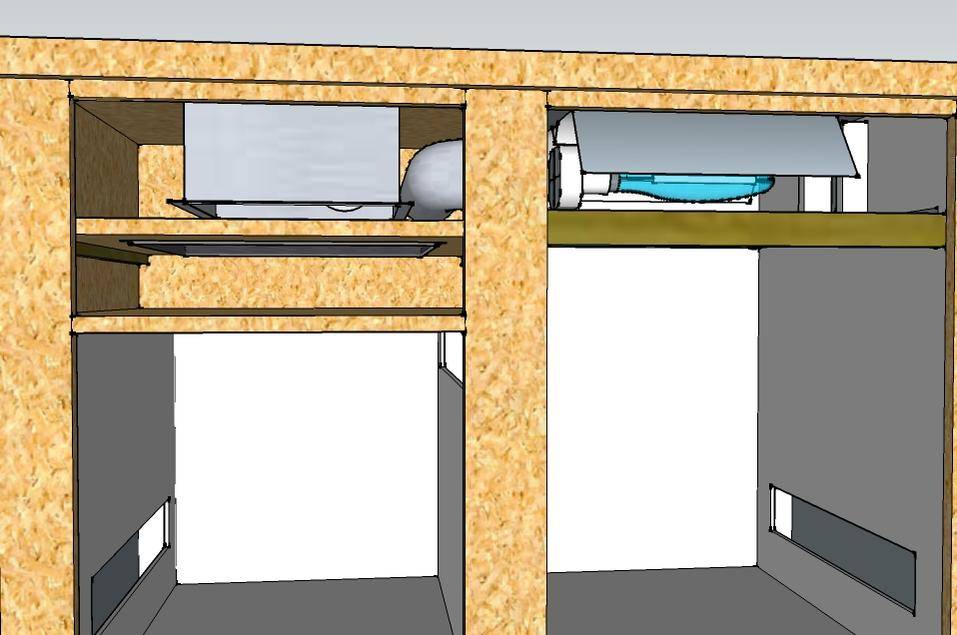
Above the filter tray is a Panasonic Whisper fan. I've got one in my box now and I'm real happy with it. The filter and fan chambers will have a front panel to seal them up and create a negative pressure zone. Along side the is a duct for the hood ventilation out the back.

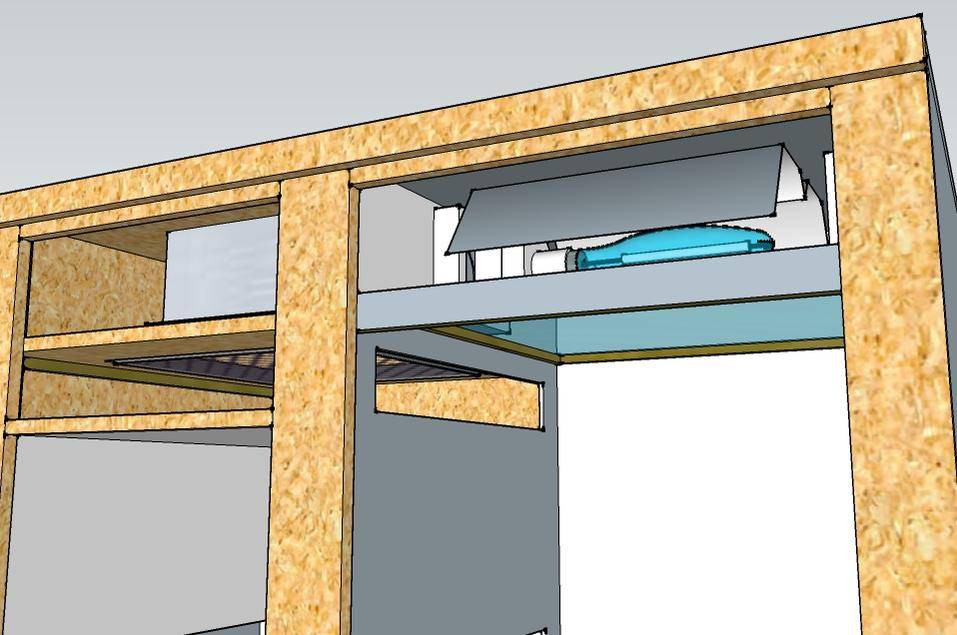
For the light I'm planning a simple gull wing hood with a glass panel set below to seal off the space. Like the fan/filter chamber, I'll also have a removable panel to seal the front. After trying to keep my current box warm this winter I'm working on a flap to divert the air from the hood to space the below the floor where the passive air intakes draw from.

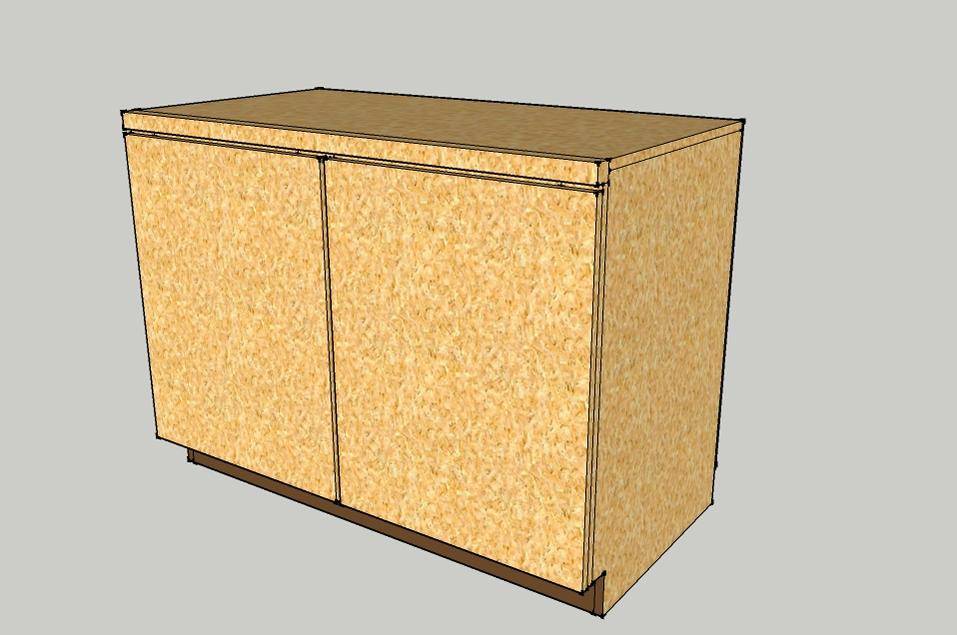
Put a couple doors on and it will blend in to the garage very nicely.

Whadoyathink? It's something to start from. My wife won't let me build another box before some things on the "honey do" list get taken care of so it will be a while before I get around to it.
 

ScrubNinja

Grow like nobody is watching
Veteran
Looks great buddy - I like the hollow wall idea too. One thing though, if you look at the centre hollow wall, you have the veg exhaust hole on the left wall, but you also have the flower cab exhaust hole virtually opposite it on the right side of the centre wall, so if I'm picturing it right, light would leak through?

Also, the intakes don't seem like they would block light enough? Depends on the ambient lighting I guess, but imagine if you put your head in the centre of the flower cab and looked down through the intake. You would be looking through that hole, and through the holes in the floor, and be looking at the garage floor, no?

You know me, I'm picky, but I like it. :tiphat: Peace.

Edit: Sorry, I see now you have that skirting effect around the bottom for the intakes. So I guess ultimately it would intake from holes in the back wall?
 

touchofgrey

Active member
Looks great buddy - I like the hollow wall idea too. One thing though, if you look at the centre hollow wall, you have the veg exhaust hole on the left wall, but you also have the flower cab exhaust hole virtually opposite it on the right side of the centre wall, so if I'm picturing it right, light would leak through?

Also, the intakes don't seem like they would block light enough? Depends on the ambient lighting I guess, but imagine if you put your head in the centre of the flower cab and looked down through the intake. You would be looking through that hole, and through the holes in the floor, and be looking at the garage floor, no?

You know me, I'm picky, but I like it. :tiphat: Peace.

Edit: Sorry, I see now you have that skirting effect around the bottom for the intakes. So I guess ultimately it would intake from holes in the back wall?

Hey Scrub, thanks for the comments. Yes, I was planning on venting the base through the back. It might be good to separate the intake from the exhaust so I was thinking of a 1-1/2" intake slot above the baseboard in the front. Or raise it up an inch on casters, I wanted casters anyway.

But in any case you're right about the light leak at the passive intakes, I'll have to work on that.
I could put a baffle in the base.

I think I'm OK on the veg exhaust though, it's sealed off by the veg ceiling. The flower exhaust is just above the veg ceiling, aka the filter chamber floor.
veg ceiling flower exhaust

I still need to calculate the intake and transfer vent sizes but I sure am having fun with sketchup.
 

ScrubNinja

Grow like nobody is watching
Veteran
Ah cool cool! I think I get it now - I was just seeing it wrong. So do I understand right that once the air gets pulled through both cab sections, and through the filter, and through the fan, that it then blows to the right and cools the light hood section? And then it goes into a separate section of the right hand cavity wall, and ultimately exhausts out the back? (until you channel it back to intakes as mentioned for winter)
 
B

banjobrain

Interesting! I look forward to watching this thread! Good luck!
 

Green Smoke

Member
Your sketchup skills are evident, well done indeeed. Maybe add some arrows to show us the air flow. Also, the best thing about Anti's cab (besides the mad stealth) is the independent exhausts for the lights and the grow chambers. I would definately incorporate that. Cavity walls and indepentent exhaust are in my opinion, the two greatest advances in micro boxes.
 

gdbud

Member
Great design job touchofgray and use of sketchup. Sketchup is a great tool to use in the design and the work out of any problems before you even make a single cut.
One thing I was told when I was working as a HVAC designer was that you do not want to make any of your ducts any narrower than 3". Any narrower than that the static pressure required to move the air goes up greatly. I used that advice in the design of my cabinet and the total static pressure measured across the fan runs at .35 -.45 inches of water.
Make sure that the flat bed scrubber is easy to access. My flat bed scrubber which has 1 1/2" of carbon was starting to letting odors escape during the last week of my grow.
 

touchofgrey

Active member
Thanks for all the responses and ideas.

So do I understand right that once the air gets pulled through both cab sections, and through the filter, and through the fan, that it then blows to the right and cools the light hood section? And then it goes into a separate section of the right hand cavity wall, and ultimately exhausts out the back? (until you channel it back to intakes as mentioned for winter)

Hey Scrub, you got the airflow path but I was planning to get fresh air to cool the hood. If I ran the cabinet exhaust through the hood then recirculated through the cabinet I'd worry about humidity problems. Best I think to bring in fresh and exhaust the old.

Maybe add some arrows to show us the air flow. Also, the best thing about Anti's cab (besides the mad stealth) is the independent exhausts for the lights and the grow chambers. I would definately incorporate that. Cavity walls and indepentent exhaust are in my opinion, the two greatest advances in micro boxes.

I totally agree about separating out the light. If nothing else it cuts down the size of charcoal scrubber needed. And here's some arrows..... with color.

The cool air is drawn in from the base, the tempered air transfers from veg to flower and the warm air is exhausted through the scrubber tray and out the back. The light will be a totally separate system that draws fresh through the back wall and exhausts into the divided cavity wall on the right.

One thing I was told when I was working as a HVAC designer was that you do not want to make any of your ducts any narrower than 3". Any narrower than that the static pressure required to move the air goes up greatly.

Thanks for the comment. I've got them at 2" right now trying to save space. I've had the engineers also tell me not to flatten ducts greater than 2:1 but I was hoping with the air moving only about 300 fpm the impact wouldn't be too bad.

I could add the space, I was wanting more square inches on the flower side because I've decided to split that wall cavity. Half to the flower intake and the other half to the light exhaust. A simple sliding flap will either divert it out the back or down into the base and take care of my winter heating needs.

I used that advice in the design of my cabinet and the total static pressure measured across the fan runs at .35 -.45 inches of water.

Wow, that's great! Pretty low pressure for a scrubber. I'm curious, did you have access to to a manometer or did you make one? Seems like you could make something with clear plastic tubing.

Make sure that the flat bed scrubber is easy to access. My flat bed scrubber which has 1 1/2" of carbon was starting to letting odors escape during the last week of my grow.

I was thinking some heavy duty magetic catches for the panels that close off the fan/filter space. How big is your tray. I've got 1" in the 200 sq in tray I'm using now and just barely get a smell when flowering. I was going to bump up the thickness for the current crop. In this box I'm going to use the larger nursery tray that is 290 sq in.
 

gdbud

Member
Wow, that's great! Pretty low pressure for a scrubber. I'm curious, did you have access to to a manometer or did you make one? Seems like you could make something with clear plastic tubing.
I have a magnehelic differential pressure gauge the low pressure side is at the intake side of the fan and the high pressure side is in the bottom side if the scrubber.
Yes you can make one using a clear plastic tubing and red food coloring come out of the duct bend the tubing down 3" then "U" bend the tubing up for 5" leave the end open then add colored water until you have about 1 1/2" above the "U" bend now mark the water level, turn on the fan and measure the difference.

REMEMBER THESE MEASUREMENTS ARE FOR A FAN WITH 1" W.C. OR LESS. WHEN USING A LARGER FAN YOU NEED IT ADJUST THESE MEASUREMENTS.

Use at your own risk and do not hold me responsible if you suck the water into your fan or blow it all over your room.


I was thinking some heavy duty magetic catches for the panels that close off the fan/filter space. How big is your tray. I've got 1" in the 200 sq in tray I'm using now and just barely get a smell when flowering. I was going to bump up the thickness for the current crop. In this box I'm going to use the larger nursery tray that is 290 sq in.
My filter is about 160 sq in and 1 1/2 deep, But knowing my static pressure now I know that I could increase my depth to 2 to 2 1/2".
 
Top