What's new

MPD's Russian Roulette Grow

mpd

Lammen Gorthaur
Veteran
I did this grow last year and I am building out a new cabinet right now and will christen it with the Russian Roulette.

Russian Roulette
Genetic Predisposition: Mostly Sativa influences.
Strain Lineage: AK47 x Romulan (backcross to White Rhino)
Flowering Period: 50 - 65 Days (higher the temps, the shorter photo period)
Yield: 50 to 125 grams (finished/dry weight) per plant @ 35 watts/SF
Potency: 10 (if there is stronger out there, I feel for whoever has to smoke it)
Medical Efficacy: chain the fridge, power slam buzz, good for pain relief, but not restful. Head buzz with major disruption of coordination. Moderate tolerance build-up. Overdose danger.
System: 4-station DWC using Lucas Formula Nutes. 30-day Veg/58-65 Day Bloom. Moderate Feeder. Care in Veg.

Background
This strain came to me from a friend on OG who, like me, was/is a medical grower. My chief complaint is migraine pain. I'm a chronic pain patient (daily-daily) so I need something that hits hard and stands up to tolerance issues. My friend sent me a taste along with some seeds. No warnings, no hints towards moderation. Just some bud and some seeds in a small seed bag. He claimed it was AK47 by Romulan, but admitted that prescription drug abuse and heavy duty doses of this pot had clouded his judgment and made memory a rather dicey proposition. I took it on face value that he was just another lightweight, a punk who thought he knew what old school pot was all about. My contempt overflowed and I blew him off.

Then I smoked the pot.

Have you ever been sick - as in puking sick - and knew it was coming and there was nothing to be done about it? You just knew that sometime in the next hour you were going to be hurling your guts out? I took the time to clean the bowl in the bathroom and get some comfortable pillows and towels so the ordeal would not be any more than it had to be.

I took four hits. Just four lung fulls of eye-popping poison that went right to my brain and obliterated all thoughts other than the fact I would be sick and that was exceedingly funny. I was about to die and yet it was so funny I couldn't help myself from laughing at my sorry condition. And so it went. I threw up for an hour and was too stoned to fall asleep so I had to ride it out over the next four hours.

This is what happens when you decide to purge your system of cannabis and clean everything out, then go smoke weed...

To say this was the most powerful weed I have ever smoked would be like saying Mt. Everest was a good-sized hill.

Since then, I ended up with some feminized seeds and I think it was accidentally crossed with some White Rhino I was growing at the same time. Oh well, it makes a nice smoke.

That's the story, so let's turn the page.
+++++++++++++++++++++++++++++++++++++++++++++++++

The Construction Program

The focal point of this thread is the construction of the ultimate stealth grow cabinet - one designed to look exactly like a chest of drawers, but with a fold-down front and top that flips open.

Basic Cabinet Shell...
[IMGhttp://www.icmag.com/ic/picture.php?albumid=11968&pictureid=238874[/IMG]

The cabinet is under construction. I've built the shell and painted out the inside (note photos). The cabinet measures 4-'0" wide by 2'-0" deep by 3-'0" high. As you can see from the photos, it has a fold-down front and a flip-open top. When the cabinet is done, the top will close down over the top lip of the fold-down front and provide a seal. All seals have been doubled so there will be no air leaks, no light leaks and no sound leaks.

Cabinet Opposite Angle...
picture.php


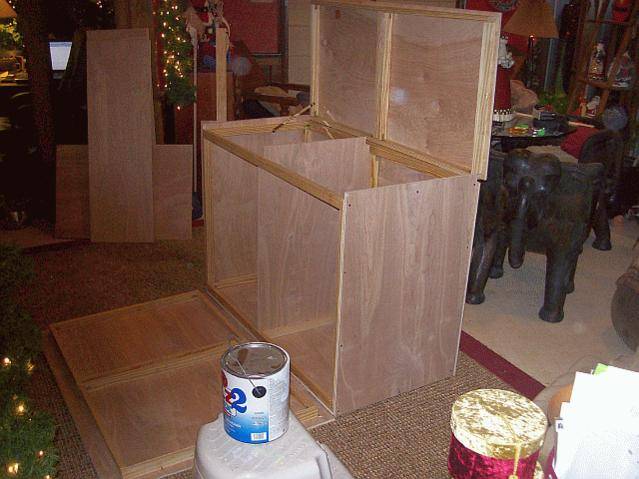
I'll be doing lights tomorrow and then the extraction system. The bloom chamber is roughly 4 square feet of space with an inside headspace of 30", so I will be looking at plants with buds in the 20" if I do the SCROG approach. This is designed to have a pull-out "SCROG module" that slides in and out to allow for plant maintenance (right side). The lighting will consist of six (6) 42-watt CFLs, giving me around 65 watts/SF of bloom sunshine.

Joint Detail - Note Double-Lapped Joints Construction...
picture.php


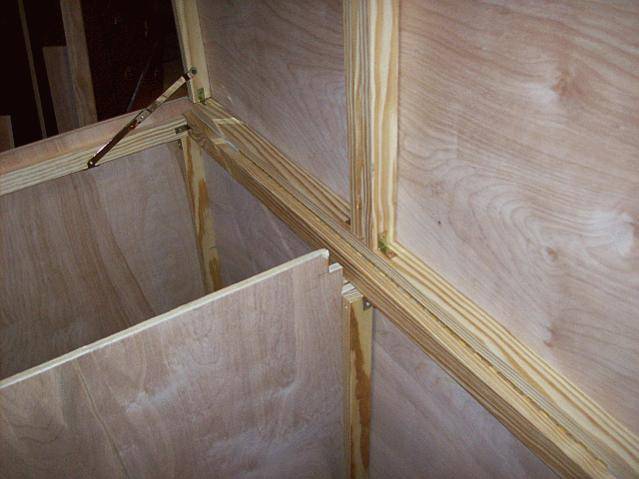
The left side is the mom area and veg area. I may add a cloner, but I like things simple, so I will probably just use a drink cup of H2O and let nature take its course on cloning. Veg area will have two (2) 26-watt CFLs to give me some really good sunshine. The wall on the left side of the box will provide (hopefully!) space for no less than four (4) moms. The final area within the left side will include the ventilation unit (175 cfm Vortex fan and 4" air filter) in a felt lined box to make sure noise is eliminated.

Hinge Detail Photo - Note Piano Hinge...
picture.php


That's the starting point. Let's see where it all goes...
 

mpd

Lammen Gorthaur
Veteran
Today I put the light set together, mounted the panel and tested the setup. We have the seeds (cracked) in clay pots and they will sit overnight in the cabinet bloom chamber and then tomorrow we'll work on the vegging/mom side of the shop and see how that goes.

Light Panel Construction...
picture.php


Light Panel Wiring Access Hole Detail...
picture.php


The first set of photos shows how I designed, cut, drilled and built the light sets. The lights are 42-watt CFLs, giving me just a bit more than 70 watts/SF for the bloom area. The bloom area dimensions are 23.25" wide by 21.25" deep by 34" high (net); so that works out to approximately 73 watts/SF. Allowing for the light sets, the net inside headroom is 31". If we allow 8" to 10" for the pot, that gives us 21" to 23" plant finish height - perfect for SCROG!

Mounted Light Panels...
picture.php


Lighting System Installation (Temporary Tape Used for Wiring)...
picture.php


Bloom Chamber Lighting System Complete (In Battery)...
picture.php


Let's see what else we can do now that things are looking up.
:window:
 

mpd

Lammen Gorthaur
Veteran
The second set of photos shows operations of the lights themselves. These were shot in the same light as the others, but blew out the detail of the rest of the photo in the frame as a result of the intense sunshine coming out of the box. This is starting to look good!

Bloom Chamber Lighting On...
picture.php


Reverse Angle of Bloom Chamber Lighting...
picture.php


Bloom Chamber Lighting Energized w/Box Closed Up...
picture.php
 

mpd

Lammen Gorthaur
Veteran
Today I worked on wiring of the cabinet to get things started. I had to install a grounded power line to power the cabinet, replace the tape that was used to hold the bloom chamber wiring in place with wiring nails so they never move again and then retest the lighting system to make sure everything worked as advertised.

Lighting Test...
picture.php


Once that was done I made sure that even though the wire was a tight fit, that the hole was completely puttied shut so we would have no unwanted house guests.

Power Cord Installed...
picture.php


Close Up of Power Cord Showing Puttied Wiring...
picture.php


And then the mounting of the sliders. The cabinet is heavy and is sitting on an expensive rug ($19.95 at Casa DePot), so sliders make sense and are necessary to allowing the fold-down front to extend without digging too deeply into the floor.

Slider Detail Photo...
picture.php
 

mpd

Lammen Gorthaur
Veteran
The next task was to get it on with the shelving for the cabinets, so I tooled on over to Casa DePot and dropped a Benji on some shelving rails and and supports. They were already white, so that was alright. I then took some of the scrap paneling and cut the shelves for the units. Now each plant will have an individually adjustable shelf for the bloom period, this makes plant maintenance (especially since we will be using the SCROG method) a whole lot easier.

Shelving System - Bloom Side.
picture.php


Speaking of easier, my order from worm's way arrived and I had ordered some grow bags and coir. The coir came in a wafer in its own grow bag. Here's the killa' part; the size of the wafer is 8" by 8" by 6", making it perfect for this box design (just as I intended). We will end up with individual SCROG screens that are 10" by 10" and I will set them 3" above the plants and that will account for a total of 9 inches out of my net headspace limitation of 29 inches. This means 20" colas can be done if my growing skills do not desert me.

Shelving System - Bloom Side Reverse Angle.
picture.php


Tomorrow I plan on finishing the shelving in the mom side and then start the decoration of the exterior of the cabinet so that it looks just like the real thing. Once the ventilation unit arrives (175 cfm 4" Vortex fan) and 4" air carbon air filter I will be done.

Shelving System Painted Out.
picture.php
 

mpd

Lammen Gorthaur
Veteran
Today I worked a bit on the left side of the cabinet that contains the vegging/mom chamber. I hung the mom shelving system and that gives me up to four (4) moms. I hung the top tier lights and I still have to hang the bottom tier lights, then I need to move to the other side of the mom cabinet so I can do the vegging shelf system. This will allow me to clone on one level and veg on the other.

What's the practical output? This is an important question as many people build cabinets and grow rooms and never consider the practical implications of what they are doing. How will the system be managed? It's not just the all-important "max out the grow room space" issue. How you use the space makes a big difference.

In my case, I have four independent shelves that will be used to run four (4) 10" by 10" SCROG "cages" I am designing. These units will be "plug and play", so they can be easily lifted out from the top or through the front of the unit. This means my grow plan is divisible by 4 and that means a 60-day strain (the average) will be harvested twice a month and that means there will always be at least two (2) ounces of bud being cured per month, or 24 ounces per annum. My current condition means I go through an ounce every 3 weeks. This means I can't run a strain that requires more than 12 weeks to finish (3 week use rate multiplied by four (4) total stations equals 12 weeks), unless the output for the strain is greater than one ounce per 21" to 24" plant (in which case it can be extended based upon the same formula). My experience has shown that I can get a minimum of 2 ounces per plant with 45 watts/SF of HID. My new cabinet has six (6) 42-watt CFLs in the bloom compartment. This gives me 252 watts and around 73 watts/SF; but my output is only 65% of what I can get out of the HID, so I multiply my CFL output by 0.65 and get 47 watts/SF. This means my growing abilities should match up exactly with those when I was using almost twice as much wattage (that being a 400 watt vertical kool-tube configuration).

Now I compare this to running the HID-based RDWC system once a year and see what we get:

System runs 115 days. 45 days of 24/0 and 65 days of 12/12. To this tally we have to add all the various pumps, fans, etc. This system puts out 8 ounces to 12 ounces and I have to make that work for a whole year, regardless as my old lady used to have kittens if I suggested running that "giant thing" more than once a year, but I always ended up running out of bud in 6 months. This meant I had to make 2 ounces last a month if it was a good harvest and only 3/4s of an ounce if it was a lean harvest to go just six months. The new approach is designed to give me a minimum (bare minimum!) of 2 ounces per month on a perpetual basis and my guess is that it will double that output and I will be "banking" weed in no time (always a good outcome to contemplate!).

The SCROG cage is going to be (more than likely) parts from a crab trap - the kind you catch blue crabs in - as they have the perfect dimensions (10" by 10") and are made of a fairly tough wire that should give me years of satisfaction. I will build a simple frame and bottom to support the planter, seal the planter with paint and caulk so it can take water seepage that will inevitably find its way there and we will have a complete "plug-n-play" "SCROG cage" that I can use on a fully independent basis.

So tomorrow's job will be to finish out the veg/mom cabinet lighting and shelving systems and then turn my attention to the ventilation system so that I can shut the cabinet up and let the plants do their thing, as so far they haven't done a thing.
 

mpd

Lammen Gorthaur
Veteran
Today had its ups and downs. I got the lighting system shit in hand. I am short one cord for one of the lights, so I will pick them up tomorrow at Walmart. My two adjustable shelves in the mom cab now have underslung lights that can be used for the other two moms which will rest on the floor of the box. The lights for the top tier are set as close to the top as I can get them. So I have the one light to wire up and then I have the cloning and vegging lights to rig. I'll use a single cord for those lights as well. That's a total of five (5) light cords in the box - a very manageable outcome. The fan system brings the set-up to 6. So we will have a timer for the bloom lights and a timer for the fan system (it won't need to run all the time until summer).

The ventilation equipment arrived, but the fan mounting bracket did not have the right size screws and that meant the mounting bracket wasn't a solution. My original idea was to hang it a few inches above the filter and connect the two components with duct hose or a baffle system to kill the output noise. That will now be more problematic, but I suspect I can get to the same place (now that I am thinking about it) without the fucking bracket. I'll build a wood cradle and line it with felt. The fan will sit in the cradle. Below it will be three (3) felt baffles that are also lined with foam to absorb those sound waves. The fan is a Vortex Model 100. It is rated for 175 cfm. and is supposed to be only 47 Decibels, but 47 Decibels inside the cabinet sounds like I stuffed a vacuum cleaner in there, so I will need to baffle both the intake side and the output sides to ensure the unit does the job without making any appreciable noise. It will be a job. My solution will be to put a flip top on the filter cradle so it can be opened for servicing (maybe, have to think on that a bit). Above the cradle top will be a baffle system that forces the air to bound off of at least three wall systems before it can get into the fan itself and I think this will isolate the noise. If you have an idea on how this can be done more efficiently/easily/cheaply/etc. please let me know.

The SCROG cage mystery is at an end. I picked up some hardware cloth that had 1/2" square holes for $6 at Casa DePot. It will take me no time to cut and put in place, so I should be able to do the SCROG cages tomorrow in the a.m. if everything works out according to plan.

This will leave me with the following tasks to still complete:

1. Finish out the ventilation system.

2. Finish trimming the cabinet drawers.

3. Finish trimming the cabinet itself. An idea just came to me on that which will make life a lot easier. I'll pin the cabinet through a brass bracket mounted with a fake screwhead covering it. This will make sure the flip-down front stays in place.

4. Stain the box and trim.

5. Urethane the box and trim.

6. Finish the SCROG cages per above.

7. Nail down the wiring and mount all wiring to the walls out of the way.

I know I missed something, but what would it be?
 

mpd

Lammen Gorthaur
Veteran
Okay, it is picture time. First, here are some shots of the front trim package being installed on the cabinet.

Faux Drawers - Cabinet Front.
picture.php


Faux Drawers - Cabinet Front Reverse Perspective.
picture.php


I cut the faux drawer blanks using a table saw and then laid them out. To this I added the top trim board and side trim board and bottom trim board (note detail and the wide piano hinge used to anchor that flip-down front). Finally, I added knobs to the drawer blanks and they are ready to be trimmed out. For the trim I used simple screen door wood that is fairly cheap. This turned out to be a PITA for me to estimate and cut to the right sizes.

Faux Drawers w/Knobs Shown.
picture.php


Four (4) of the drawers have the grain going up and down while the other two (2) have the grain going side to side. The production model will have all drawers going side to side, while this model will have vertical grains for all faux drawer fronts. This meant I had to recut two (2) faux drawer fronts and cut and affix two (2) more sets of drawer trim. ;)

Drawer Detail Photo.
picture.php
:smokeit:
 

mpd

Lammen Gorthaur
Veteran
The next series is on the ventilation system layout and construction. This turned into a debacle as the register had a 5" throat instead of the 4" throat I needed, so the cut was not needed and is in the wrong place. No matter, I decided I would work with what I have and if it doesn't work I can always turn right around and cut a new divider and have a go at it all again.

Ventilation Unit Assembled (fan and filter).
picture.php


Insulated Plenum Photo - Wrong Plenum Shown.
picture.php


Fan & U-Frame Filter Cradle Shown.
picture.php


Ventilation Unit w/Left Wall Baffle Shown.
picture.php


Crossed fingers and toes.
 

mpd

Lammen Gorthaur
Veteran
More baffle construction.

I used 1/2" plywood, covered it with felt and then attached strips of foam to it. I will also pack in some fiberglass insulation to keep things extra quiet when I'm done.

Prototypical Baffle Construction - Felt Liner & Foam Detail.
picture.php


Baffle Installation - Second Wall Detail.
picture.php


The next step was to put in the second wall that forms the other wall the sound will bounce off of on the discharge side of the filter/fan combination. You can also see in this picture the two (2) light sockets on the lefthand side of the photo. These are the lamps for the top shelf mom plants (I can easily fit two moms here, maybe three). Their shelves have light sockets mounted to the bottom so that the mom plants sitting on the floor of the box can get their own light source.

Complete Exhaust/Lower Plenum Detail w/Fiberglass Packing Shown.
picture.php


This gives me at least four (4) moms and I will need them because I intend to work with some of the Greenhouse Seed classics (Trainwreck, Super Silver Haze and White Widow) to see if I can find a migraine "silver bullet" in that genetics pool or I may die trying; so if you have to go... :eggnog:

The trim is the next thing...
 

mpd

Lammen Gorthaur
Veteran
I spent most of the day on trimming out the cabinet. The drawer blanks could not go "as is", despite what the photos show. I had to cut and measure trim to go around the edges of all the faux drawers so I would have drawers with space in back of them. '

Faux Drawer Blanks Awaiting Trimming.
picture.php


The space will allow me to mount the drawers and have them "jiggle" when people grabbed them, so they would feel real, but would appear to be stuck shut. The only way to create the space and leave it covert would be to trim out the drawer edges with oversized trim to create the space needed behind the drawers. So I spent the day, cutting (lots of mistakes there because I don't know what I am doing, but I learned pretty quick), measuring, cutting some more, drilling pilot holes and tacking the trim on with finishing nails to get the final look (note the picture).

Faux Drawers - Trim Complete.
picture.php


Cabinet Front - Trim Detail.
picture.php


It's getting done, but it is taking time. I can't wait to stain this baby, as it is looking really primo.:xmasnut:
 

mpd

Lammen Gorthaur
Veteran
Thank you kaotic. Coming from you that is high praise indeed. I hope I actually do something that actually earns that praise, but time will tell.

The first issue I dealt with was the locking system for the fold-down front panel. The real issue was that someone would come along, yank on the drawers (trying to open them to see what was inside - goddamn busybodies) and the front would be yanked down, ripping the moulding off the front and exposing everything that was going on inside.

Cabinet Lock - Plug/Key and Lock "Hole" Shown.
picture.php


The solution had to be a cabinet lock that prevented the front from moving when someone yanked on those knobs. The knobs don't allow for much leverage, but we needed something that would make sure the flip-down front would appear to be as solid as any other dresser. This standard meant there could not even be a quiver, so I needed a real good lock.

My initial solution (stupid-assed me, failing to look before I leaped into action) was to drill through the side of the cabinet, through the outer wall, through the vertical cabinet frame and thence through the vertical flip-down door frame member. The problem was how I would hide this feature. While I was contemplating that issue, I realized I didn't even have to do it.

Oops! Already drilled the hole because I am a dumbass. Another important lesson learned that won't apply to the production model, to be sure! :deadxmas:

Lock In Situ on Box Front Frame & Flip-Down Door Top Lateral Rail.
picture.php


The solution was to "mount" the lock inside the box, so that it can only be made to flip down by first flipping open the top. So (note the pictures) I used my 1/2" bit to drill out a hole on the lateral cabinet frame and lateral flip-down door frame on each side (one "lock" on the bloom chamber side and one lock on the vegging/mom chamber side).

This proved to be an excellent solution and now the flip-down front would be firmly "locked" in place and would not even quiver if someone yanked on the drawers. (Editor's Note: eventually, it was discovered that the front of the flip down front would tend to bow at the edges, so an additional set of locks were installed closer to the edges of the box flip-down front to ensure a tight fit and any remaining schlerp was sanded away to get a tight fit for the trim package...)

Next, we come back to the ventilation system and close-out the cutting cycle.
 

mpd

Lammen Gorthaur
Veteran
The ventilation system was finished today and that brought an end to the construction program for this cabinet. It took me a full week and a day to complete the construction, but I wanted to check field dimensions and make adjustments on the fly; all the while having to work my consulting business and work on moving my new book forward.

The first thing to do was to create a frame for the exhaust side of the apparatus (note first photo). This chamber is made up of 1/2" plywood that is covered with felt and foam strips to act as noise reducers. I created a simple U-frame for this purpose and connected the resulting sides as shown.

U-Frame Cradle
picture.php


I created a top frame and a bottom frame. The frame would hold together a "plenum chamber" - the area where the noise associated with the roar of the fan could be dramatically reduced by using a system of baffles and felt linings that would continually deaden the sound by absorbing some of the sound energy (note second photo).

Ventilation System w/Wall Baffle Shown
picture.php


Once the frame was in place, the next thing to do was to pack the fan space with fiberglass bat insulation to prevent vibration and help kill sound that would otherwise echo in any open space at the exhaust side (note third photo). I packed in pretty tight.

Lower/Exhaust Plenum Complete - Fiberglass Batting Pack Shown
picture.php


Then I built the plenum box itself that sits on top of the exhaust chamber. The top of the plenum box was drilled with a series of 1/2" holes and then the top was wrapped with felt on both sides. As the fan is way oversized for the size of cabinet involved, the reduction due to the increase of internal static pressure caused by the felt doesn't matter one whit. The plenum box was completed and screwed in place with angle braces so that it can be taken apart when it comes time for servicing the unit (note fourth photo).

Complete Lower/Exhaust Plenum
picture.php


Now we have to connect this up to the bloom side through the gaping hole I cut yesterday when I thought the aluminum plenum box would be the way to go, so I had to do some stoner engineering to get this done.

:tree:
 

mpd

Lammen Gorthaur
Veteran
The intake plenum is completed by connecting it up to the sidewall that connects the two sides of the box together.

The last series of photos shows the sides being measured, covered with felt and then screwed in place so that we have a tightly fit box that will suck all the air we need and do it very, very quietly. All we need to do is turn on a clock radio or run an aquarium and nobody will ever know the difference. We went from 47 dB down to almost zero. On the production models I will use a baffle system that more closely resembles the intake plenum design of holes and felt to completely kill that noise.

Plenum w/Transition Top Cut & Mounted
picture.php


Upper/Intake Plenum Wall Cut, Padded & Mounted - Note Padded Transition
picture.php


Upper/Intake Plenum Two Walls Cut, Padded & Mounted
picture.php


Plenum w/Upper/Intake Side Covered & In Place
picture.php


Tomorrow we start the final tasks that remain:

1. Drill the bottom of the box for the intake air.

2. Plumb the fresh air feed that runs from the veg side to the bloom side.

3. Hang the faux drawer fronts and final trim pieces.

4. Stain the box and trim.

5. Urethane the box (I think I need six (6) coats to get it right, but we will see).

By the by; I'm almost out of space for photos. Is there a fix for this or am I going to have to cannabalize some of the earlier ones? If anyone knows, please shoot me a PM or just post it in front of God and everyone so we can all laugh at my ignorance of these matters... :eggnog:
 

mpd

Lammen Gorthaur
Veteran
Got started early and smacked two coats of KILZ primer on all surfaces of the box. Now the plenum is painted out and the individual shelves are being painted out. Note the pictures.

First Primer Coat
picture.php


Wide Angle Second Coat Shot
picture.php


Final Coat Photo of Inside Area of Cabinet
picture.php


Once I have this done, I will go back with one more coat of elastomeric roofing paint to give me that ultra-white color that will make me have to wear sunglasses every time I open the box.
 

mpd

Lammen Gorthaur
Veteran
Agreed. At this stage of the game it doesn't make sense to start taking half measures. I appreciate the kind words...
 

Latest posts

Latest posts

Top