What's new

Bio bucket freak show

h.h.

Active member
Veteran
With all due respect to the innovators and those building quality buckets. I've came up with a few slap together versions. In all honesty they haven't worked that well. Close but no banana. Success in my book though. Anybody can follow instructions.
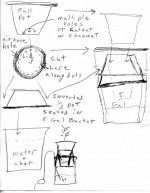
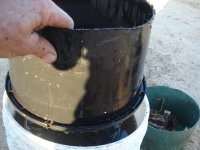
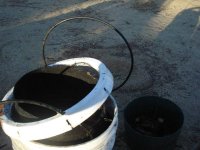
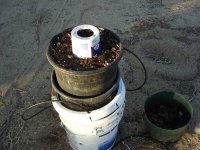
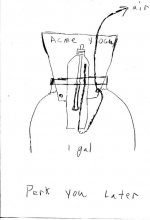
The first involves a water pump. Good for tea, bad for air injection. The second attempt was 2 buckets stacked with aeration holes in the top bucket and the air hose in the bottom bucket. Leaked air like my last girlfriend. Placing the air directly in the top bucket gave maximum injection. The lower bucket remains as a reservoir. To drain simply pull apart and dump lower bucket. An innertube around the top bucket holds it up and provides a semi seal. Overflow is the top of the bottom bucket.
Too complicated.
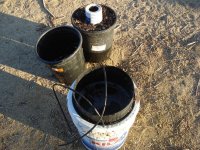
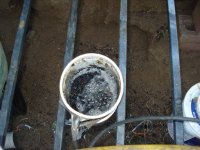
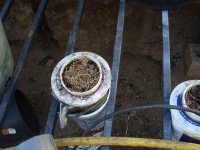
A simple plastic pot with a bio bucket mix and an airstone at the bottom set in a 5 gallon bucket as a reservoir. The innertube us nice, but probably not neccassary.
So much fun. Again with due respect to serious builders of the box, this is my toy that I can deconstruct, reconstruct, or break. It allows me to tweak and refine what I've been doing for 40 years as a gardener.
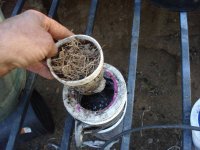
My bio mix at this point consists of MG organic soil mix, perlite, palm tree fiber, yucca fiber and bark and some ewc. The volcanic rock was gathered in my backyard. It's all about cheap and recycling what I can. I'm looking at ground oyster shells sold for birds instead of lime. Lime is not sold locally which is a stipulation I've placed on myself as well.
Will it all work? I don't know. Will I learn something. I already have.

Club bio...
https://www.icmag.com/ic/showthread.php?t=137656
 

h.h.

Active member
Veteran
Took a quart yogurt container. First I stuck a couple of holes around the bottom, then two in the lid. Airhose in the bottom with lava and bio box influenced medium. The airhose was strung out the lid. Duck tape around everything for darkness and to seal the lid. Pencil shoved through second hole to make space for cutting and dipped cutting inserted, slightly scrunching the container to pack mix around cutting. Container set in bowl with water added to desired height(1") and some poured through cutting hole. The air comes out around the cutting.
Three plus days and it seems to have have perked up a bit and still looks good. At least it hasn't died. When it does I'll let you know.
 

h.h.

Active member
Veteran
I wanted to share my starting pots. I use styrofoam coffee cups with the bottoms cut out. Used coffee filters are inserted and filled. Set them in a tray to water. The filter lasts just long enough and can be left on when you plant.
Made a second mini box for cuttings. This time using a 50 cent airstone and not sealing the lid. I'm hoping the air prevents the stem rot. I'll either be back here bragging if these work or this post will simply fade away...
My next attempt with a yogurt container will cutting a hole in the lid to accommodate my styrofoam starting pots.
Instead of bowls for reservoirs everything will go into a common transparent storage container.
 

h.h.

Active member
Veteran
Day 7 on the first cutting, still perky. The second cutting seems to be taking a little slower. I was messing with the air when it was first started. Every time I disconnected the cuttings sank down as the medium lowered. I also at the time placed them in a common water tray along with pots containing a stronger mix. They didn't like it. They now have a separate tray and are recovering.
The larger airpot is in a clear storage container for a reservoir with a water pump recirculating and creating fall. A squished up banana and a little blackstrap in the water...It's like a gnat paradise without the gnats.
 

h.h.

Active member
Veteran
Dead cuttings.
Too much sediment. Fine material causing anaerobic conditions turned the bath sour. Waiting for a new mother.
Using a roll of tape as a template, I cut a hole in the lids large enough to fit my styro cups. An inlet hole at the bottom covered by the piece cut out of the lid as a sort of one way valve. The lid is replaced with the air hose inserted through a second small hole. The bottom of the yogurt/cottage cheese container is then filled with char just below where the bottom of the cup will sit. These sit in a reservoir of some mild brewing tea to which larger pieces of char have been set afloat. Cup is then snugly inserted prepared as described. Waiting for sprouts.
 

river rat01

Member
hey hh,
you sound like me, an inventor.
we just cant leave well enough alone can we?

i get bored when ive been doing the same thing for a while, so i think of a new way of doing it.

its always exciting to invent something, its my purpose.
if i only had the money to patent some of my shit.

here's to the adventurous spirit, keep having fun hh!
 

h.h.

Active member
Veteran
Thanks for the heads up. If you read the bio box thread, a fine job has already been done. I'm simply reinventing what already is or perhaps coming up with what they threw away. I think I do have a viable prototype.
Another yogurt container can be used for the reservoir or the hole eliminated at the bottom for a small self contained unit.
 

h.h.

Active member
Veteran
I took a 3.5(?) plastic pot and cut it roughly on half. Top and bottom. The top half was inverted, rim down, into a 5 gallon bucket, sticking about 4-5" out the top.. A lid to the bucket was cut about 1/4" inside the rim(hoop) to fit over the inverted half pot(collar) and on the bucket. A hole is drilled through the lid for an air hose as well as a notch in the rim of the pot. Tubing was wrapped around the collar to form an "O" ring between it and the lid. Silicone could also be used. The bucket is filled 1/3 full of char. The bottom of a second pot is drilled/cut out and inserted into the raised collar. It should nest in the char while fitting snugly in the collar. Add water until bubbles comes into pot.
All these plastic pots are different manufacturers making exact details and measurements difficult.
 

h.h.

Active member
Veteran
Bad sketch...
 

Attachments

  • declare035.jpg
    declare035.jpg
    50 KB · Views: 15

h.h.

Active member
Veteran
Now I have two pieces left over. The circular piece cut from the lid and the bottom half of the inverted pot.
The lid piece,perhaps with a little trimming, and a hole cut in the middle should fit inside the upper pot. Using a roll of tape for a template for the middle hole will allow a styro cup to sit in the middle for starting seed. I haven't tried this yet, but it should wick from the soil below. I'll have to figure how to seal it as my cutting is pretty bad. Perhaps a piece of sliced tubing around the edge.
The bottom of the cut pot can be drilled and used as a basket on top of the char for adding to the brew.
 

h.h.

Active member
Veteran
The lid piece trimmed up nicely with a pair of garden shears. It fits snugly, in the pot and over one of it's ridges giving me a pretty good seal.
I used a jigsaw for most of the other cuts. A keyhole saw could be used.
The cup fits in and I'm thinking I can just leave it and let it root out the bottom, though perhaps I should have inverted it fitting the pot lid over it, instead of under it, so the lid could be removed easily. The mix in the cup will not be as hot as the mix below. By time the roots hit the seedling should be hardened and ready as well as the soil cooked.
 

h.h.

Active member
Veteran
Does it hold water?
With the top pot full of saturated medium and water all the way to the top, there is good bubbling with slight air leakage between the bucket lid and the collar, driblets of water. Silicone would help but not really necessary. In 1/2 hour the water has dropped less than a 1/4". Normally the water would be below the rim of the bucket.
This does bring another possibility. Loading the bucket with nutes and the top pot full of char. Using the leftover half pot bottom as top basket with a third pot set into it. Filled with water it would send a constant charge of buffered nutes to the roots. All in all it's also pretty stable.
 

h.h.

Active member
Veteran
Char at bottom of bucket with basket on top. Smaller pot inserted into collar then another layer of char in bottom of small pot. Larger pot fit snugly into smaller pot. 1/4" tubing as an "O" ring.
 

h.h.

Active member
Veteran
pictures
 

Attachments

  • Picture 061.jpg
    Picture 061.jpg
    133.8 KB · Views: 16
  • Picture 064.jpg
    Picture 064.jpg
    53.9 KB · Views: 16
  • Picture 066.jpg
    Picture 066.jpg
    57.4 KB · Views: 19
  • Picture 069.jpg
    Picture 069.jpg
    88.7 KB · Views: 16

h.h.

Active member
Veteran
and more pictures...
 

Attachments

  • Picture 070.jpg
    Picture 070.jpg
    76 KB · Views: 19
  • Picture 071.jpg
    Picture 071.jpg
    62.5 KB · Views: 19
  • Picture 072.jpg
    Picture 072.jpg
    66.9 KB · Views: 18

h.h.

Active member
Veteran
air perculator

air perculator

air perculator
 

Attachments

  • declare037.jpg
    declare037.jpg
    26 KB · Views: 19

h.h.

Active member
Veteran
Now if I capped the yogurt cup, I'm thinking I could recapture the air and send it to a bucket. Depending on the tea it could contain a good dose of CO2 as well.
 

h.h.

Active member
Veteran
Trying to recapture the air causes too much back pressure.
A 2nd yogurt container and a seedling cup on top of the percolator is showing some large primary leaves.
The buckets have been running about 5 days with the coconut milk tea with a good amount of fungus showing on one cup. It has the smallest seedling though. While the pots stay moist, the perc is preferably for water supply to the seedlings. If I had used the official bucket mix it might be different.
The cup with the fungus had several nailholes in it. Now they all do.
 

h.h.

Active member
Veteran
The roots if the seedlings in the large buckets are starting to reach into the main grow pot where a richer mix is waiting.
I'm liking the peculator. Bubbling up through alfalfa and char a seedling on top shows dramatic improvement over it's siblings.
 
Top