What's new

octagon growketel project 800w

Mr.Jones

Active member
Mr Jones, Thanks for the pic of the dripping system. That's a lot better and simpler than my idea. The reason I suggested the adjustable light is because I read Northern Farmer raises his lights as the grow progresses.

Keylime

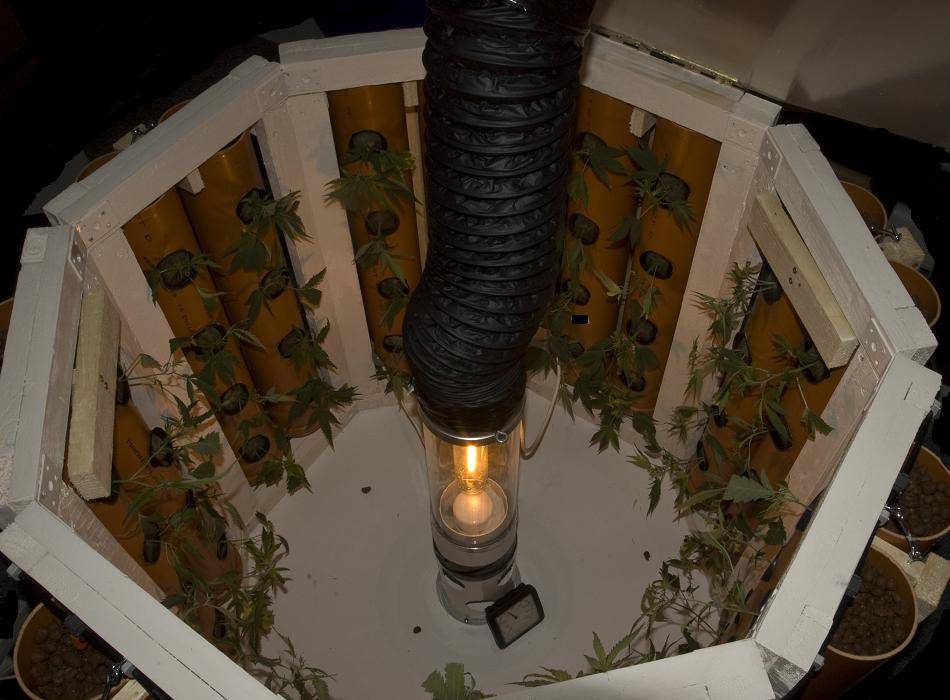
yeah i like the drippers - they seem to work very well (i forgot about to plan in a main valve so i can keep stopin them from dripping while im workin with the plants!
hopefully the raisable lights wont be necessary

so now all 64 plant sites are filled with plants and the whole system is working now (the plants that were put in yesterday doing fine and are rising :yoinks::


20xwhite widow
16xchronic
15xshiva skunk
13xsuperskunk

take care! :woohoo:
 
T

Teeg420

mr. jones wow, it came out really nice. set up looks really clean, why did you put the fan at the bottom pushing up? No fan underneath the light?
 

Carboy

Active member
MJ~
There is a cap that is made for temporary blocking of a pipe (i believe for keeping dirt out while someone is putting it in a ditch). Shaped kinda like a dish and the rim uses the pipe as a shoulder ---- if that makes sense. Less than a buck a piece and would work great.
Curious why you didn't pull the light cooling air from bottom outside the cab.

Later --- CB

Happened to be at Lowes to day and took a look.

The correct name is "Test Cap" 88 cents for the 4".

Going to fun to watch. Let her rip !!


CB
 

smoke1sun

What Goes Around Comes Around. But Am I Comming Or
Veteran
Id keep it here with all the the rest of the good info. This could inspire alot of us small light useres, to get that weight up.
 

Rainman

The revolution will not be televised.....
Veteran
Mr Jones - Great thread and much respect for you building your own! You got skills and ideas which makes for excellent end products. Doing a super job on the system and I would love to see you pull major weight with your baby! Good luck and I will be tagging this one for sure!! Respect!
 

Mr.Jones

Active member
mr. jones wow, it came out really nice. set up looks really clean, why did you put the fan at the bottom pushing up? No fan underneath the light?

thanks dude - i push thru the cooltube because the vent is a cheap one and if its sucking hot air i fear that its overheating and maybe even the blades are melting or the electronics fail and my plants might die :nanana:

Happened to be at Lowes to day and took a look.

The correct name is "Test Cap" 88 cents for the 4".

Going to fun to watch. Let her rip !!


CB

im gonna search them - want to make the whole thing as close to perfect as i can get

Id keep it here with all the the rest of the good info. This could inspire alot of us small light useres, to get that weight up.

yeah thats what im hoping - that system could push the 250w to the limit!

Mr Jones - Great thread and much respect for you building your own! You got skills and ideas which makes for excellent end products. Doing a super job on the system and I would love to see you pull major weight with your baby! Good luck and I will be tagging this one for sure!! Respect!

thanks alot - i appreciate you stepping by (since you got my respect with your catpiss vertical)

so i wont be online for 2 weeks now maybe even more - but by then i should be a solid week into 12/12 or 64 dead plants :nanana:
 

Carboy

Active member
so i wont be online for 2 weeks now maybe even more - but by then i should be a solid week into 12/12 or 64 dead plants :nanana:

MJ
If you catch this post before you hibernate, would you mind reviewing the dimensions of your set-up?

Thanks --------- CB
 

2stoge

Member
Mr. Jones thanks for sharing this, just realized you're using 250watt lights! Pretty good, cant wait to see how this turns out. Just so happens I have a couple 250watt lights laying around.

This is inspirational.
 

sackoweed

I took anger management already!!!! FUCK!!!
Veteran
MrJ
Howzit..?? Man genius ideas yet simple.. I really dig this ill be chillen watching this grow... Great work..peace...

sack
 

calaman

New member
Good work Mr Jones! I'm seriously thinking of changing from horizontal after looking at this.... more money...
 

sackoweed

I took anger management already!!!! FUCK!!!
Veteran
kinda anxious to see whats happening in that octagon... taps foot like an old 3rd grade teacher... bbl peace.

sack
 

Mr.Jones

Active member
so now im back with an update - everything is still looking good and i already have gained some experience on how to pattern the plants better than i did ...

pictures are following :nanana:
 

Mr.Jones

Active member
MJ
If you catch this post before you hibernate, would you mind reviewing the dimensions of your set-up?

Thanks --------- CB

i would guess its about 5 feet tall (with the reservoir below) - 3 feet without the reservoir - about 3 feet diameter ...

Mr. Jones thanks for sharing this, just realized you're using 250watt lights! Pretty good, cant wait to see how this turns out. Just so happens I have a couple 250watt lights laying around.

This is inspirational.

thanks!

MrJ
Howzit..?? Man genius ideas yet simple.. I really dig this ill be chillen watching this grow... Great work..peace...

sack

kinda anxious to see whats happening in that octagon... taps foot like an old 3rd grade teacher... bbl peace.

sack

haha hopefully you can stop tapping now - imagine me not seeing the system for about 2 weeks :nanana:

Good work Mr Jones! I'm seriously thinking of changing from horizontal after looking at this.... more money...

hopefully this project will actually support my thought about a bigger system too if not i will build a rotary garden! :nanana:

so now the real part:
2weeks all over - 1. week of flower - whole thing:


wall (this is a sucky one because it didnt get enough water - fixed it today):


enjoy - and thanks for the positive vibes!

so another thing is the real octagon growketle i want to build:

is aluminum a suitable material for hydroponic systems? does it corrode or harm the plants in any way?
 

Mr.Jones

Active member
looking good man, is that top row getting enough light?

not yet - when the lights switch on i have to bend down the whole thing :nanana: ... but well much to learn for me!

... i think the biggest problem is that i use 18x ww which is shooting really bad at the moment and might even grow too tall -

by the way the new plant count is:
18xwhite widow
16xchronic
15xshiva skunk
13xsuperskunk
2xsensi star
 

Gunnarguchi

Active member
ICMag Donor
Veteran
really nice and inspirational grow

i get many ideas for my future room from this even though i might do it a little different

the section idea is cool and its easy to put in another section or 2 if you switch to larger wattage bulb etc

i have a shit load of pots and no pumps so i might make the sections with wooden frame and then some white plastic and netting
then i can hang the pots with some kinda hocks on the netting

dunno
havent decided yet but i like looking around in good threads and getting ideas
 

sackoweed

I took anger management already!!!! FUCK!!!
Veteran
mrJ
Howzit brother..?? Looking awesome up in there.. And i can wait to see the nugsz and what comes out of there.. I hit ya with some K+ and hit the enter button to quick so its says MrJ... lol... bbl peace..

sack
 

2stoge

Member
Thanks for the update! What size of pipes are you using? I just started looking around for pipes to put one together. Im just scavengering broken pieces of storm drain pipes.
 

Carboy

Active member
I didn't really know where to post this and didn't think that it would really rate its own topic ---- so by default it goes here.

Instead of Wyes, drill holes w/ a 2 3/8" hole saw. That is the exact diameter of 2" PVC. If you want the pipe angling up, use a drill press. Works great. Set the angle you want, mark your spacings and start drilling. Cut the 2" to the length you want.
Same game plan if you go w/ 3" "branches", only this time you need a 3 1/2" hole saw. To review, the ODs of 2 and 3 inch PVC are exactly 2 3/8" and 3 1/2" respectively. They'll make a water tight fit when glued in place w/ regular pvc cement glue.

Few other helpful hints: If you go this route, do yourself a favor and get quality hole saws -- Dewalt, Millwaukee, Rigid or a brand of that level. They'll last you a lifetime and save you all sorts of grief. Compared to the cost of wyes, this will save you a ton of money regardless of hole saw cost. The makers of Gorilla glue also make a terrific product for gluing PVC. It's not the regular stuff, but special pvc glue. No priming is required even for pressure fittings. Requires longer to setup. For me that's a huge plus -- you can adjust w/o being so rushed. Dries white, if anybody gives a damn. Love this shit !! This method will also work for DWC -- instead of just holes cut into the pipe, glue in appropriate stand-up pipe and drop you plant in there. (Check Heath Robinson Vertical DWC for reference.)

Hope this helps someone and if the powers that be want to move this to a more appropriate place ---- feel free.

CB
 

Mr.Jones

Active member
really nice and inspirational grow

i get many ideas for my future room from this even though i might do it a little different

the section idea is cool and its easy to put in another section or 2 if you switch to larger wattage bulb etc

i have a shit load of pots and no pumps so i might make the sections with wooden frame and then some white plastic and netting
then i can hang the pots with some kinda hocks on the netting

dunno
havent decided yet but i like looking around in good threads and getting ideas

i like the handling of my system so far ... its kinda stupid that i have to stuff the plants back into the ketle when i opened the walls up - but well its not soo bad! im starting to plan on my next bigger and better version soon :nanana:
you gonna report on your system? i think going with pots could be better in some ways cause i have the feeling that the plants on the last row below the light get less nutes than those growing the top row!

mrJ
Howzit brother..?? Looking awesome up in there.. And i can wait to see the nugsz and what comes out of there.. I hit ya with some K+ and hit the enter button to quick so its says MrJ... lol... bbl peace..

sack

yeah they kinda start to bud now after pretty much 13days of flowering - im so excited! thanks for the k+

Thanks for the update! What size of pipes are you using? I just started looking around for pipes to put one together. Im just scavengering broken pieces of storm drain pipes.

should be around 5'' ... 110mm

I didn't really know where to post this and didn't think that it would really rate its own topic ---- so by default it goes here.

Instead of Wyes, drill holes w/ a 2 3/8" hole saw. That is the exact diameter of 2" PVC. If you want the pipe angling up, use a drill press. Works great. Set the angle you want, mark your spacings and start drilling. Cut the 2" to the length you want.
Same game plan if you go w/ 3" "branches", only this time you need a 3 1/2" hole saw. To review, the ODs of 2 and 3 inch PVC are exactly 2 3/8" and 3 1/2" respectively. They'll make a water tight fit when glued in place w/ regular pvc cement glue.

Few other helpful hints: If you go this route, do yourself a favor and get quality hole saws -- Dewalt, Millwaukee, Rigid or a brand of that level. They'll last you a lifetime and save you all sorts of grief. Compared to the cost of wyes, this will save you a ton of money regardless of hole saw cost. The makers of Gorilla glue also make a terrific product for gluing PVC. It's not the regular stuff, but special pvc glue. No priming is required even for pressure fittings. Requires longer to setup. For me that's a huge plus -- you can adjust w/o being so rushed. Dries white, if anybody gives a damn. Love this shit !! This method will also work for DWC -- instead of just holes cut into the pipe, glue in appropriate stand-up pipe and drop you plant in there. (Check Heath Robinson Vertical DWC for reference.)

Hope this helps someone and if the powers that be want to move this to a more appropriate place ---- feel free.

CB

thanks for sharing this - very interessting to see how other people build their systems (maybe i will use those techniques for version 2)

so now update - day 13 of flower:


thanks for the positive feedback!
 

Latest posts

Latest posts

Top