What's new

Can someone do a new write-up on Flip Flop Relays?

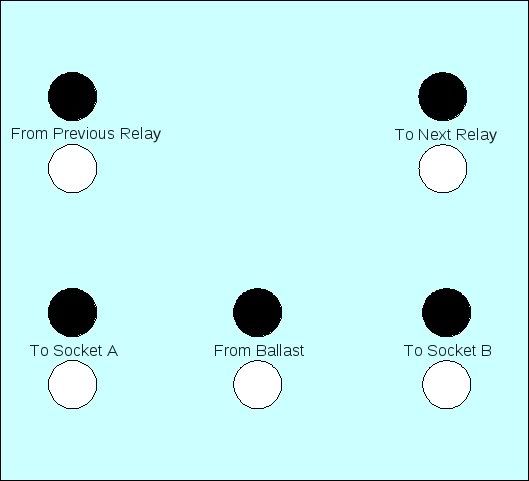
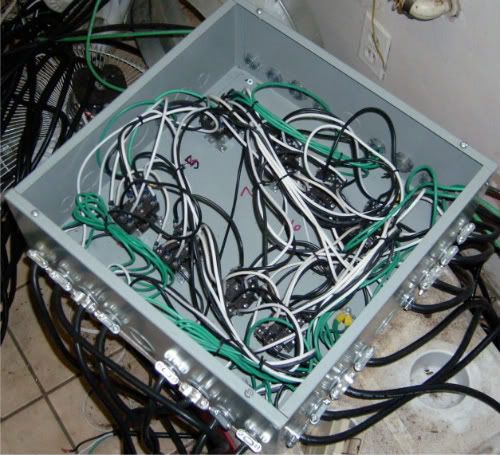
I would like to wire one up, and get some talk going on this.

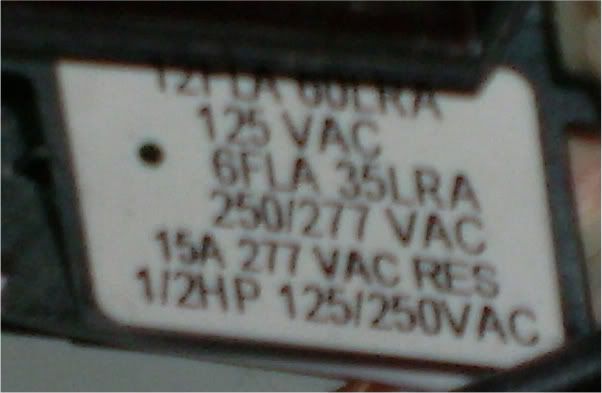
It seems some relays are preferred over others.

Some think they are safe while others dont.

Is anyone currently or recently used one?

Thanks!
 

Squeeky

Member
I second this request, I know I will need something similar in the near future in order to run one bulbs at 12/12 while the others are on 18/6. I figured setting up a relay that gets its signal from the other ballast which will be running all it's bulbs at 12/12.
 

ShroomDr

CartoonHead
Veteran
3rd request.

there are a couple write ups but none really flow nicely. Kungpow did a good job but his is hard to follow, and im pretty sure he said his pictures didnt match his words at some point.

A simple 1 or 2 ballast flip flop would be a lot easier to follow (and the idea would then be easy to expand on).
:2cents:
 
I built a flip box, was there something in particular you're wondering or are you just looking for a general how-to DIY?

Mine is pretty basic. The ballast(s) are plugged in normally and have power all of the time, or you could use a timer if you wanted. The line from the ballast to the socket is sent through the switch box.

The switch box has one wire of it's own and if that wire is plugged in, power from the ballast is sent to one socket. If not, power is sent to the other socket. My ballasts are 240v but the switch box's wire uses 120v. I plug it into one of those cheap wall timers to control 12/12.

For instance, one timer on the ballast itself could be 18/6 and the timer for the switch box could be 12/12, creating 12 hours of light in one room and 6 hours of light in another room, and 6 hours of darkness for both rooms. I'm not sure why you would want to do that, I just used it as an example of multiple timers creating any combination of on/off times as long as the result is one bulb per ballast at any given time.

I'll attach a 10 megapixel photo so you can see all the tiny details and inner workings. There are 8 relays in the box, I only drew one to simplify things. The real box has a lot more wires. The relay line (top) trips all of the relays at the same time.


I don't have part numbers for the relays but if this is what you were looking for I could take some (real) photos if it would help.
 
Pictures would definitely help! How long have you been using it, and how has it been working?

If you can see the relays/contactors you should be able to pull off a part number or take a pic of it.

Thanks.
 
It works great as long as you only need a very specific lighting schedule. If you need to use one space for bloom and one for veg you will wish you simply had more ballasts.

It became impractical for me to keep 2 spaces blooming at all times (dirt totes + downstairs veg room = owww) so I stopped using my flip box and went back to separate ballasts and timers for separate spaces.

It's pretty much indestructible though, I'll bet it would work for a long time. I'll take a couple pictures later today and post them here.
 
Ok here's a picture of the timer cord. It can plug directly into a household wall outlet or any cheapo 120v timer.

dsci0180.jpg


This is the complete box from the top. I scavenged some of the wires from one side after I stopped using it, but you can see the clamps and figure out where they USED to be.

dsci0179.jpg

dsci0178.jpg


And a close-up of the label on the relay.

dsci0177.jpg


If I get some free time and there's enough interest I could rebuild it and take step-by-step pictures, but right now I'm also experimenting with a hydro system so my priorities lie elsewhere.

When I salvaged some of the wires I just clipped them off inside the box and didn't spend any time trying to make it look pretty. I didn't expect to use this box again, let alone photograph it for someone else to make sense of. Hopefully it's not too insane. ;) Feel free to ask questions.
 
Here's a high quality drawing to illustrate what the wires on the relays are actually doing.

Relaywiresexplained.jpg


The top 4 wires labeled "From Previous Relay" and "To Next Relay" are 120v, one is positive one is neutral.

The bottom 6 wires are 240v, so all of them are positively charged. The 240v neutral wires are connected together. I think this image will probably be more helpful than the pictures of the actual box.
 
That would be cool if you get time in the near future to do a nice write-up.

Those relays look a bit different than the ones Im used to seeing, but perhaps there better. Do you see a make or model on the relays?

Im scared to go out and buy all the parts, so im holding off until I get diy info. I think a lot of others are in the same category...
 
I don't remember where I originally got them, but if you search for "240v type 91 relay" several sites are selling identical models for $10-20 apiece. Here's one such site:

http://www.azpartsmaster.com/Products/Fan-Relay---Type-91-208-240V__CP342.aspx
https://keithspecialty.com/k/73-540.htm

I think I found mine at a local electronics store. The keithspeciality link above has a PDF that details the relay specs. It would be smart to make sure you get a relay with the proper voltage and you should check how many amps it can handle.
 
I believe mine are rated at 15a, more than enough for a 1k lamp. The print on the side of my relay is identical to what is on the keith PDF - http://www.white-rodgers.com/wrdhom/pdfs/04_Cat_pages/04_Cat_pg_107.pdf

It says the contacts are rated at 15 amps @ 277v, I'm running 240v but still plenty. A 1k lamp is about 4.5 if I recall correctly. My box never gets warm, and although I've never touched the relays while they were on, they don't emit much heat from a few inches away. If I had a IR thermometer I'd check it, but no such luck.

The link Brother Bear posted looks good but he talks about shutting his ballasts off before switching them, because he saw scorch marks on his relays. I don't have any marks on mine and never shut them off before switching. I didn't search his relay to see what the power ratings are but I suspect they are too low or there's a loose wire if he's getting scorch marks.

edit - looks like he's using 30 amp 120v relays. Because they are 120v a 1k lamp will pull about 10 amps so it should be well within manufacturer tolerances.
 
So...

To flip or not to flip.

Seems like it works well for some, but not others.

About turning the ballasts off for 5 min every 12 hrs... i donno...
 

ShroomDr

CartoonHead
Veteran
The ballast(s) are plugged in normally and have power all of the time. The line from the ballast to the socket is sent through the switch box.

The switch box has one wire of it's own and if that wire is plugged in, power from the ballast is sent to one socket. If not, power is sent to the other socket. My ballasts are 240v but the switch box's wire uses 120v. I plug it into one of those cheap wall timers to control 12/12.

I'll attach a 10 megapixel photo so you can see all the tiny details and inner workings. There are 8 relays in the box, I only drew one to simplify things. The real box has a lot more wires. The relay line (top) trips all of the relays at the same time.


Great explanation (i think).

So you buy 3 sets of 'ballast to lamp' cords per relay (or possibly 1.5 cords per relay)?

I think my confusion has always been the plugging into (and out of) the flip flop. Your style is what i would call 'an octopus' where the other mock ups were more 'plug and play' (functionally they are the same, yours seems less expensive and complicated).
 
If you use stock plugs then yes, I guess you would have 3 'ballast to lamp' cords per relay. 1 going from the ballast to the box and another 2 going to the sockets. You could add a female plug to the socket sides of the flip box if you don't want to cut your socket cords, and I think that would be a good improvement.

I had some bargain bin ballasts with cut cords, so I just replaced all of my ballast and socket connectors with 120v household style cords. I SHOULD have put plugs on the sides of the flip box, but I went the "easy" route and just brought the wires into the box instead. Now, what I have is an octopus with 8+8+8, 15-20' wires coming out of it which is a total beast to move around.

Here's a close up of the plugs I used.
dsci0181.jpg
 

ShroomDr

CartoonHead
Veteran
you have definitely explained things better than most. I thank you again.

but im afraid this thread falls into the same category as the others. All the information is here, but it is scattered though out. This is compounded by the many options available for the flip flop.
 
Y

yamaha_1fan

I believe the issue is the ballast is putting out close to 500 volts. I know I have measured voltage off the transformer and it was in the high 400's. I believe the voltage at the socket is the same.

So you are switching 500 volts, not 240. You need to make sure your relays can handle that
 
That's a good point, the power coming into the ballast is only 240 volts, but the transformer probably steps it up and reduces the amps before sending it on to the socket. I don't have any way of checking what the actual ballast-to-socket volts are, but after taking the cover off and switching a few of these from 120v to 240v, and seeing as how my relays are rated to 15 amps @ 277v, I'm pretty comfortable they won't be the weak point in my system.

I had a transformer go nuclear on a 1 month old ballast with no tricky wiring and no flip box, after seeing that I believe the ballasts themselves are the real weak point. To combat that possibility I'm trying to build a smoke detector that will shut off power to my ballasts if it goes off. Not done yet, but if I get it working it would be much more DIY worthy.

That said, I'd like to repeat I no longer use my flip box. It worked fine, but it was more trouble to keep 2 areas flowering at all times than it was worth. If you ever need to veg in either of the areas you will wish you spent the couple hundred extra to just buy additional ballasts.

If you're doing a SOG or flowering really small plants then a flip box would probably be perfect, but the medical laws in my state make that impractical and I obey the law to the letter.
 
Top