What's new
  • Happy Birthday ICMag! Been 20 years since Gypsy Nirvana created the forum! We are celebrating with a 4/20 Giveaway and by launching a new Patreon tier called "420club". You can read more here.
  • Important notice: ICMag's T.O.U. has been updated. Please review it here. For your convenience, it is also available in the main forum menu, under 'Quick Links"!

First Grow - 250W Cab - Hydro drip system - F13 from seed

greenpenguin

Active member
Cloning!

Cloning!

:muahaha: I have begun the process of cloning!

I actually did this on friday but have been too busy to do any updates to this thread, I took a few pics though.

So I did a bunch of reading on cloning and wrote up a cloning plan, I like to write out plans everything I'm going to do to try to minimize mistakes and keep good documentation for future uses. I'm not putting the plan in here but here's a brief overview of what I did...

On wednesday December 3rd I started soaking 12 rockwool starter cube in brita water pH downed to 4.1. By the end of the day it was at 6.0pH so I downed it back to 4.8.


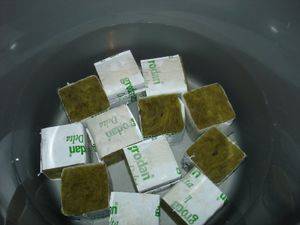
On Thursday I checked the water and it was at 5.5 pH so I dumped out the water and mixed a nute solution of 2-2-2 GH 3 part Flora. pH Downed it to 5.5 and dropped the starter cubes in.


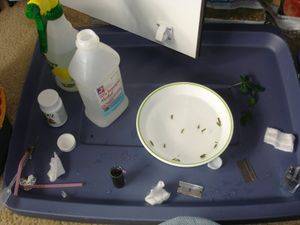
Friday I was ready to clone so I gathered my supplies and setup a cloning station on top of a rubbermaid lid.
Supplies:
1) rubbing alcohol
2) cotton pads
3) razor blades
4) a little plastic container that came with my pH dropper test kit that I don't use.
5) olivias cloning gel
6) a straw
7) foliar spray bottle filled with faucet water
8) A bowl of water
9) propogation tray
10) rubbermaid 10 gallon rubberneck tub
11) propogation dome


I had come up with some basic criteria for selecting branches to cut. I was basically looking for branches with 3 to four nodes, healthyish looking leaves, new growth on the top, and not too thin of stem.

My process was for each cut was:
1) pull out rockwool cube and shake excess water/nute solution out.
2) sterilize razor blade with rubbing alcohol
3) cut off bottom leaves on the bottom two node of the branch selected
4) straight cut just below the bottom node
5) quickly drop stem in the water bowl
6) cut bottom of stem at a 45 degree angle under water with the razor.
7) drop stem in olivia's cloning gel which I filled the pH drop tester vile with. Swirl the stem around and get it nice and covered
8) drop it into the rockwool cube and pinch the opening a bit to surround the stem.


I took 3 cuttings of each of my 4 plants, if all 3 survive, then 1 will go into the flower room for sexing, and the other two will be used for either flowering or who knows.

Now for some more pictures....

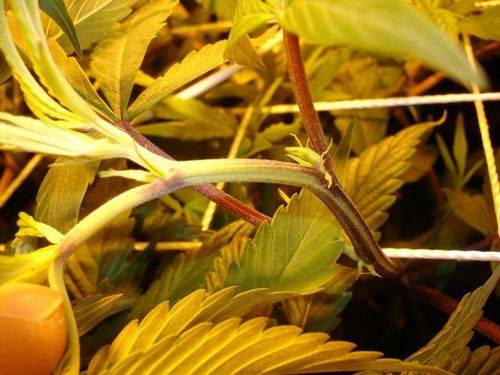
Here's #3 precloning


#3 post cloning


Cuttings from #4 and #3


This is a cutting from #2 dipping in olivias cloning gel.


#1 getting ready to get cut
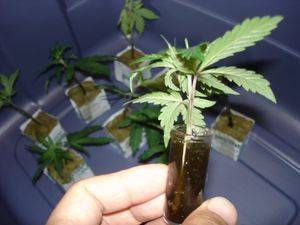


12 cuttings done


Here's my workstation after all that work was done.


Leaf clippings...


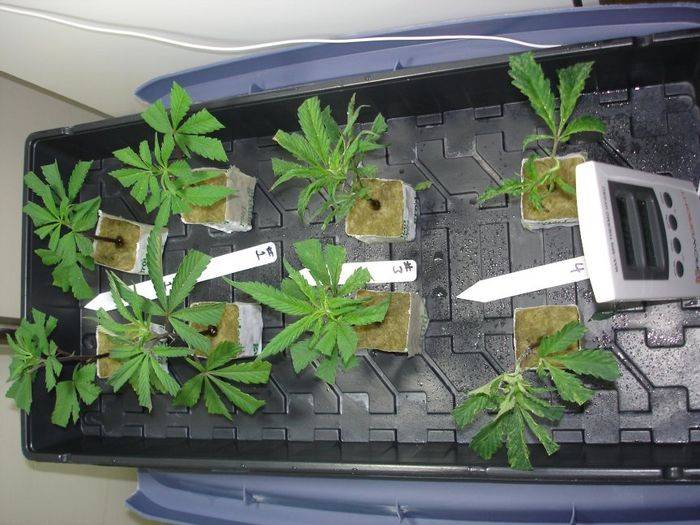
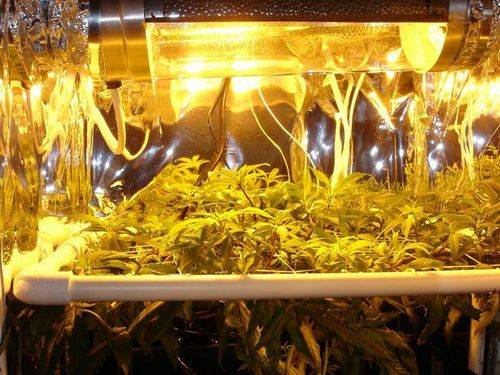
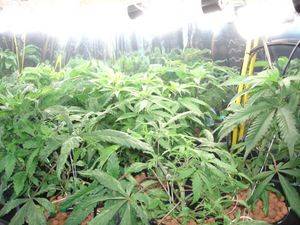
My Garden shot after being cut for clones


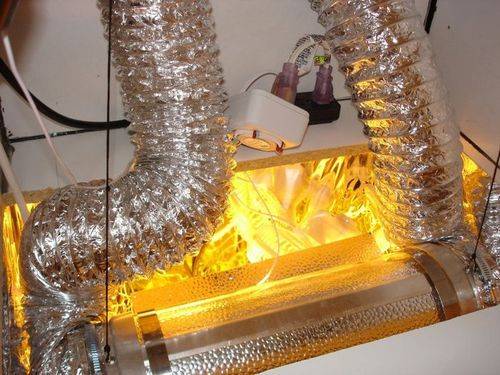
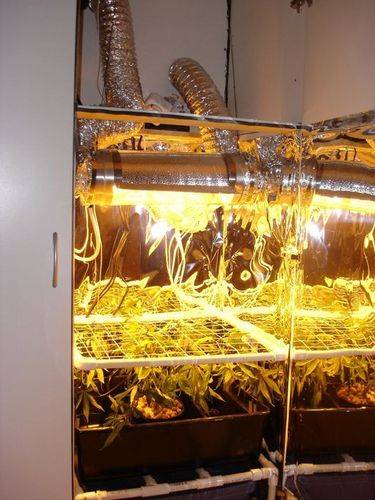
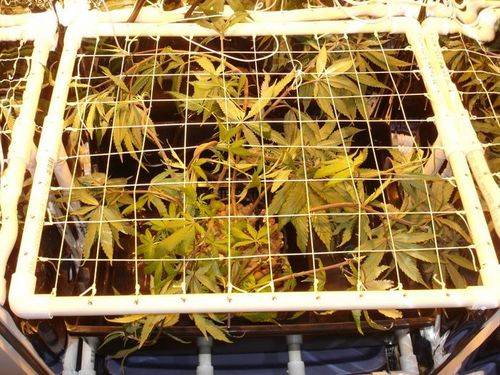
At first I put them under my HPS in the flower room because I didn't have space in the veg room for them. I put them under the dome and misted the hell out of the dome.


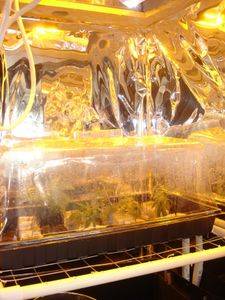
Unfortunately it got way too hot under the HPS. I dont know wtf I was thinking but for some reason i thought I wanted the temps around the 90degree mark which the HPS got me at, but then I looked back at my notes the next day and realized it was the humidity I wanted at 90-95% and the temps I wanted at around 70-75. Well here's my clones the next day after the HPS....


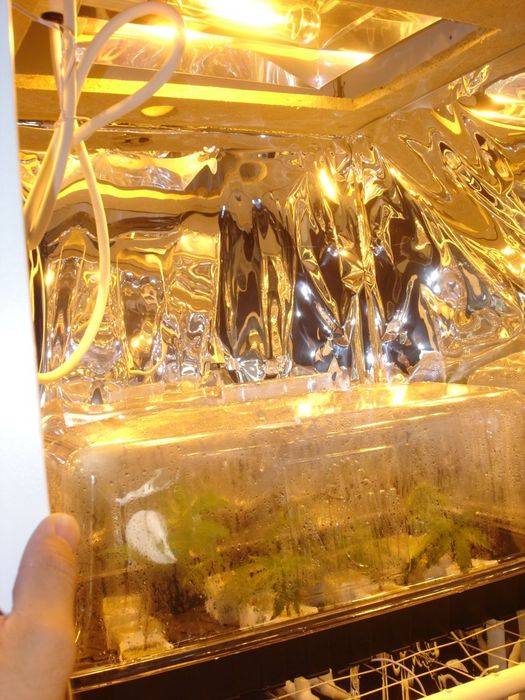
I know they're supposed to look like crap the next few days but I'm pretty sure the temps killed most of the clones from #4 and #3. I've since put a single 27watt (100watt equiv) CFL in there to give them a bit of heat and some light and the temps around here stay perfectly in the 70-75 degree range. Since doing that a few of the clones have already sprung back up but some of them are still completely knocked over and drooping.

For maintenance I'm removing the hood twice a day for like 10 minutes each time and remisting the hood prior to replacing it. That's all for now! hopefully by the end of the week I'll have a better idea of what will live and what will die. :violin:
 

greenpenguin

Active member
So unfortunately the mistake I made with the temperatures proved to be costly. I lost 5 clones to rotting leaves and just overall deadness, many other clones caught some of the leaf rot but weren't completely consumed like others so I just clipped off the rotting areas.

The whole rottingness is troublesome as I'm worried that it will spread more even though I clipped away and tossed everything I could that was rotting. We will see, I will have to begin preparations to make more clones but this time I wont make the temperature mistake. If rotting continues to spread I may just junk everything I have under the propogation dome, disinfect everything and just start cloning anew.

I have 7 clones still alive, lets see if any of them root.
 

one Q

Quality
Veteran
Under strong lighting, always put a sheet of paper on top of the dome to defuse light. This will help wilting and yellowing too. Yah, and maybe CFLs might have been a better choice.

Peace
 

justanotherbozo

Active member
Veteran
hey green, sorry i've not posted recently, i've just been tryin' to catch up
after losing my access for a while.

i just re-read your thread from cover to cover and i'm very impressed!
anyway, sorry you're having troubles with cloning but shit man, you do
learn fast! i mean really dude, for a first grow, your whole set-up is very
ambitious!

heres a link to a great cloning thread that will give you a shitload of info,
then, i've also included another link to a thread for making a cheap-ass
cloner that seems to work like a charm! i actually got the idea from my
pal cellerdweller who got it from IPiT who, i'm certain, got it from this
thread.
Cloning with JJScorpio
Tube cloner new at walmart

to give you an idea what i mean, last week cellerdweller and IPiT gifted me
with some old cuts, all had been in the fridge in stasis for at least a week.
they gave me 17 cuts total and i put them in my fridge for 2 more days while
i tracked down the ice tray you make the cloner from, then i put them in to try
it out. well, it's been about 5 days now so i don't know for sure yet but i've
cloned enough cuts to know that they look like they are rooting well, i only
had 2 that definately shit the bed and they were almost a month old when i
put them in so no big whoop!

another thing too man, don't be afraid of DWC, it's actually a lot easier than
what you are doing right now! check out my imaginary garden and watch this
noob learn how to grow hydro, lol, what a blast!

here's a pic from a guy over on can.com, it's a DWC in what looks like a 10
gallon res with a scrog, looks very similar to what i invision you'd like to have!


anyway, keep up the good work man, you're a true inspiration to every noob
out there looking for someone to hold there hand! you didn't do that, you sat
your ass down and did your homework and you planned and built your cab and
only then did you start asking questions, and all were relevant questions!

you deserve kudos for that man, and respect! keep up the good work!
 

one Q

Quality
Veteran
That was NIMBY and that's not 10g dwc, I think it was like 3-5g dwc... Cant remember exactly but it was small. NIMBY was/is the MAN!
 

justanotherbozo

Active member
Veteran
one Q said:
That was NIMBY and that's not 10g dwc, I think it was like 3-5g dwc... Cant remember exactly but it was small. NIMBY was/is the MAN!

i'm glad you recognize it man, it looks like a fekkin beast! the growth in
those DWC's is phenomenal, and it's soooo easy! lol, no moving parts so
very little to go wrong, mechanically at least!
 

greenpenguin

Active member
justanotherbozo: Wow, those are some extremely kind words from you. Thanks for all the compliments, it means a lot to me. I think I probably spend way too much time scouring icmag for info, in fact, I've read both of those cloning threads you pasted before. I've also read your imaginary grow thread more than once. I didn't notice that you started a new grow though, now I know and I'll be following it for sure!

I really liked that cloner you made in the imaginary garden thread, why did you switch to the vermiculite cloner if the other one was working for you? Is this one working better?

Currently my remaining cuttings are looking alive, I have no idea how the root forming is going though, that's what I like about your previous cloner, you could just lift the lid and look instead of waiting for it to grow through medium.


OneQ:
Interesting idea, that would have probably helped a lot. At least it was a good learning experience.


Also this cloning incident has me thinking about my flower room temps, I need to do something about it. I think I have two options:
1) get a fan with higher CFM and add more intakes
2) cooltube

Right now I have an 80 CFM fan for a 38 cubic foot cabinet which means in ideal conditions I"m replacing all the air in my cabinet twice per minute... the recommended amount is 2-3 times so I'm not too bad off right now but temps are still kinda high.
I really think the cooltube is the way to go for me right now. Unfortunately I'm really don't have the time to DIY a cooltube so I'll probably just buy one from HTG and run some ducting into the utility room with a fan hooked to the ducting to provide negative pressure and pull air in from the flower room to cool the light.
 

greenpenguin

Active member
Good news, it's been 9 days since I took cuttings and two have rooted for sure.

One from #1


And one from #3


And heres the group of them


One issue I've been having with these clones is leaf rot, which is most likely partially due to the initial overheating I gave them and the humidity being high. I think for the future I"ll be spraying cuttings with neem oil, and of course not putting them under an open HPS light.

I've also been having issues with the smell in my grow itself. Either there is an air leak somewhere in my cab, or my carbon scrubber sucks ass. So looks like I'm going to be buying a cooltube and a new carbon scrubber.

So what's next? I'm gonna give things till about friday and see what i have in the way of rooted clones, I'll pull the clone tray out of the cab and let the ones that haven't rooted keep trying for a little while outside of the cab under flouros. The ones that did root I'll transfer to 4" cubes and flower them to determine their sex. I need to start acting quick with the sexing because my veg room is getting rather crowded and tougher to manage.
 

greenpenguin

Active member
12 days since cloning and I have 4 confirmed rooted clones, I threw away one that wasn't making it at all and I have 2 more cuttings which look promising but I can't see roots growing out the bottom yet. Of the 4 confirmed, 2 are from #1 and 2 are from #3.


I was having issues with odor stinking up the room so I decided my DIY carbon filter wasn't cutting it. My fan is 80 CFM so I opted for a CAN 2600. So far its working really well, smell immediately disappeared. Here are some shots of the carbon filter install:


Prepping the 4" flange with the weather stripping


screwing on the flange


And lets jump to... INSTALLED. I used duct clamps and weather stripping to make the connections air tight, also used black caulk on he opening in the cab for the exhaust duct.
 

greenpenguin

Active member
It's been a while since my last update and a lot has happened since.

1) Got a cooltube installed with separate ventilation.


The cooltube I got from HTGsupply, it was a lot large than I expected, currently it's soo large especially with the ducting it can't go into the lower portion of the flower room. I dont mind soo much now as i'm just trying to sex my clones. But when I"m done with that I'll have to cut the shelf more to allow it the pass through.

Just a bit of info on my DIY ducting job... The cooltube is 6" Diameter but I didn't want to use 6" ducting. Because of the size of the cooltube I didn't have room to use a 6" to 4" reducer so I made one myself using aluminum foil and aluminum foil tape. I basically got a sheet of foil, folded it in half, covered it with aluminum foil tape to give it strength. I wrapped it around the opening and used foam weather stripping and duct clamps to create an airtight seal to the cooltube. I cut 2 slits in the foil on opposite sides and wrapped it around the opening of some 4" ducting and taped it together. I cut 2x 4" holes out the back of my cab and used black silicon caulking to secure it.

I then bought a 95CFM axial fan (and eventually a fan speed reducer cause that sucker is loud as hell) and created a DIY fan mount using a male plastic ducting coupler. I cut off one end and sanded it down smooth using a hacksaw and a metal file. It had a plate attached to it with screw slots which aligned perfectly with my 4" axial fan.

Prior to this setup my temps were at around 95+ degrees F with the HPS on, now it's around 77-83 degrees F, huge improvement.

2) Ended up with 4 healthy clones, three of which I switched to 12/12 to flower/sex
Here are 5 clones, I killed one of them on purpose because it wasn't showing any new growth even though roots have grown.


Here is a shot of them in the flower room


3) Ran into an issue with clogged drippers, one of my plants basically wasn't watered for a few days, got new 2gph flag drippers which seem to work much better than my previous drippers which I think were 1gph pressure drippers. The new drippers are not pressure drippers.
4) My pH probe on my nutradip tri-meter stopped working right, I spent an hour trying to get it to calibrate, no love, bought a new one and recalibrated.
5) flooded my flower room today due the the drain hose not sitting in the reservoir right, used towels, a blow dryer, and a hot iron to clean up and dry out the cab. My air pump died because of this but I've cleaned it out and am leaving it out to sit to hopefully dry out completely, hopefully it'll work again otherwise I'm gonna be buying a new one.


Finally here's a shot of both veg (left) and flower (right) rooms
 
Last edited:

greenpenguin

Active member
It's a boy!

It's a boy!

Happy New Year! New year new clones!

I did some cleaning today of the veg room, washed out the grow tray... I had some mold along the bottom edges of the tray, also have some on my roots an a bit on the top of the rockwool. I don't think it's a big deal, it's white mold and it hasn't touched the leaves at all. I've been mostly ignoring it for a while now.


Also since I pretty much put all my rooted clones into flower I figured I would cut some new clones so when I find out the sex of all my babies I'll have clones to work with.

While inspecting my clones in the flower room I noticed one of them had already started growing flowers, it was #2. Unfortunately they looked like male flowers but were rather small, I took a look at the #2 "mother" while cutting new clones and discovered flowers on #2! Autoflowering? That sucker is under 18/6 light schedule! Anyhow, here's a not soo clear glimpse of what I saw...


Looks like a boy to me :violin:

But it's all good, I still have 3 other plants which haven't shown sex, one of them is bound to be female. I'll probably cut down #2 for good this weekend. It'll be good because I'm really hurting for space in the veg room. I've pretty much stopped LST because I really don't have anymore horizontal space available for growth.

Here's my new clones cut on 1/1/2009


I have 2 cuts of #4; 2 cuts of #3; and 4 cuts of #1. This time no crazy 90+ degree heat so I'm hoping to get all 8 clones to root, if anything this is good practice. Anyhow that's all the updates for now.
 
Hi gp, Nice job on your cab, looks like you did alot of reasearch before getting started! Looks like your well on your way. On your cloneing chamber you might want to cut some 3" holes in both sides mid way up, this will let alot of the heat out and allow easy access for misting to keep em moist, just a thought. I hope you get a good mother out of those to keep in your veg chamber!!!
 

greenpenguin

Active member
sticky scissors: Thanks for the compliments and tips.


Updates:
I've been flowering my clones for 2 weeks now to sex them. I've already killed off the male clone I had and it's father to make room in the veg room. I still have clones of #1 and #3 in the flower and they are both girls! #1 is the one I've been really hoping was female as it's been growing the fasted and looking the prettiest. #3 was partially mutant and I wanted to grow #3 out as well however now I've run into issues with it.

The issue with #3.... it's auto-flowering!! #3 mother auto-flowered in my Veg room under 18/6 light schedule. I'm seeing female buds growing all over. And then from my clippings of #3, I'm seeing auto-flowering on those as well, and I don't they even have roots yet! Check this photo of a #3 clipping

It's been about 10 days since I made the new cuttings


It's hard to see but you can see the female flower if you look closely. I've been thinking about what to do about these and I think i know the answer but I don't like the answer. I'm gonna have to kill off #3, if I'm gonna be doing SCRoG I have to be able to control when the plant flowers so I can fill up the screen properly, and I currently don't have a #3 that hasn't started flowering either so I think I'll have to do the painful task of killing #3 :violin:


So the plan moving forward now is as follows:
1) kill flowering clones as I don't need them anymore
2) re-attach screen for the SCRoG
3) Cut flower room shelf more to allow my cooltube light to be able to come closer to the plant (this is gonna suck since I pretty much have to use a handsaw for this.
4) move #1 mother into flower room and SCRoG her down.
5) switch flower room timers for veg time so I can fill up the screen the way I want before I flower.
6) veg my other #1 clone from my first cloning run and begin LST training on it to get it ready for the flower room after my first harvest.


I'm using my #1 mother for flower to save time waiting for the clone to grow out to fill the screen.
 

greenpenguin

Active member
Hey all... or nobody hehe.

So a few days ago I did what I said I was gonna do in my previous post, plus a little more...

I killed my flowering clones as they had shown their sex and I didn't need them anymore. I also killed #3 and #4 mothers. I selected #1 as my plant of choice, it has shown the best growth and no auto-flowering, plus I had two clones of it so I could kill the flowering clone and veg out the other clone for the next harvest.

I had to do some cutting the other day too to allow space for my cooltube light to lower down below the upper chamber of the flower room. It was really tiring because I used a handsaw to do this and didn't have much leverage at all.

Here's what it looks like now:
39951dsc05801-med.jpg


Anyhow, I put #1 mother into the flower room and re-installed the screen for SCrOG. I left it in veg for a few days to fill the screen a bit more, but now that I think about it... I really dont need to. Currently it's running 18/6 light schedule, tonight I will flip it to 12/12 and start the fun part of the grow. That means tomorrow will be day 1 of flower as my dark cycle is during the day. Flowering for F13 is 7 - 9 weeks so I'll be harvesting in March sometime.

Here are some shots of #1 vegging in the flower room (NOT FOR LONG!):
39951dsc05800-med.jpg
39951dsc05802-med.jpg


For the shot below, I have since filled up the bigger netpot with hydroton and distributed the drippers better.
39951dsc05804-med.jpg
 

greenpenguin

Active member
timers in the flower room have been switched to 12/12 and an adjusted feeding schedule to match the light period. I am now officially on day one of flowering!!!
 

greenpenguin

Active member
It's now day 7 of flower and I have some photos from day 5 of flower. The canopy is really started to fill out in the last few days it's pretty crazy. I've also got flowers starting to grow, I thought I would have to wait at least a week and a half for anything to show but a few sites are growing flowers, I can see tiny calyx and stigma. Anyhow on with the pics!


Day 5 side view of SCRoG
39951dsc05805-med.jpg


Comparison of Day 1 (top) vs Day5 (bottom)
39951dsc05802-med.jpg

39951dsc05806-med.jpg

Oh the magnificent wonders of LST and SCRoG... see why I'm a believer? I don't think I could ever not SCRoG or LST after seeing these kinds of results. I really can't wait till I really have some flowers going.


Day 5 - tiny calyx and stigma, you can see the stigma, hard to see calyx

39951dsc05808-med.jpg
 
Last edited:

justanotherbozo

Active member
Veteran
very nice man, glad to see you're in flower and glad to see FreezerBoy
has been by, i was actually gonna point you in his direction, lol.

anyway, the SCROG looks great, just keep poking those tall ones back down!

peace bro, and stay safe!
 

greenpenguin

Active member
very nice man, glad to see you're in flower and glad to see FreezerBoy
has been by, i was actually gonna point you in his direction, lol.

anyway, the SCROG looks great, just keep poking those tall ones back down!

peace bro, and stay safe!

I'm actually running out of room to poke the tall ones back down, There's not much free real estate in my screen anymore. That plus I think I need to trim the undergrowth too. This F13 is growing really fast. I'll throw up more pics when I start seeing more prevalent flowers.
 

greenpenguin

Active member
flowers!

flowers!

Hey folks, this grow is really going well so far, it's really hard to wait for this thing to finish, I can't believe it's only been 14 days since I switched over. That means I still have to wait another 5-7weeks, this is going to be brutal.

Here's some infos:
Weeks in flower: 2
pH: 5.8
EC: 2.1 (1060ppm 0.5)
Using the lucas formula and hydroguard


Now to the photos...

Here's the top view of the SCRoG, lots of budsites. The screen has really filled up. I'm also thinking of trimming some of the fan leaves that are blocking some of the budsites but I don'tt know how that will affect the budsites it's attached to. I don't want to stunt the development of the flowers. If anyone has any tips on this let me know.
picture.php


Here's a side view of the SCRoG, you can see my ring of drippers setup.
picture.php


This is a shot with the light as I have it set now. The cooltube allows me to get really close to the tops, I think this is extremely advantageous and will help with my yield, but who knows.
picture.php


And now for some flower shots, as close up as my shitty camera will allow...
picture.php

picture.php

picture.php


Coming up, I'm thinking of adding a UVB light to the flower room. I'm also curious about using anything to boost flowering, I'm currently using the Lucas Formula so it'd need to be something that works well with that... so yeah, just thinking out loud, I'll be doing some research.
 
Last edited:

greenpenguin

Active member
An update that noone will read

An update that noone will read

Hello there, still playing the waiting game but I'm starting to see trichomes! Needless to say I'm excited.

Also my UVB research has led me to decide to stray away from that for this grow. My research for flowering nutes to use with my current lucas formula has me looking at liquid koolbloom from GH.

Onto the pics...

So as of today I'm on day 19

Current SCRoG cannopy:


Here's a side view:


And I mentioned I was getting some trichomes so here's a flower shot:


And a zoomed in version of the same shot:
 

Latest posts

Latest posts

Top