swampskunk
Member
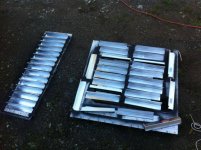
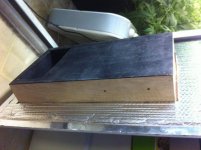
So I went to Home DePot yesterday inspired by the first few pages of this thread, and thought I was clever when I found the galvanized drip edge in the roofing section. It is super thin and what's better super cheap, like $1.50 for a 12' piece. I also grabbed a piece of corner molding that measured about .32" to cut up for spacers.
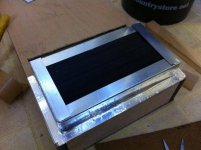
I got the stuff home, painted it with some leftover BBQ flat black, cut it to length with an old pair of tin snips, dabbed some liquid nails on the spacers and squeezed the whole thing together at the ends with some foil tape. Having some rubber bands on hand to hold the pieces while you're working is a really good idea too.
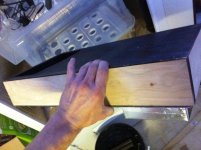
The only drawback to this thin material is that, well, it's so thin it's flexible. It's best to make sure everything is straight and square before you start assembling the thing. I was thinking about seeing if I could get away without gluing but I figure it's cheap insurance to keep it together if it gets bumped or maybe even bent a little so I can tweak it back into place without the whole contraption coming apart.
It's not 100% but the way I'm using it they're by far and away not only the best option in terms of performance and space but economical to boot. Thanks for the ideas, bros.
I got the stuff home, painted it with some leftover BBQ flat black, cut it to length with an old pair of tin snips, dabbed some liquid nails on the spacers and squeezed the whole thing together at the ends with some foil tape. Having some rubber bands on hand to hold the pieces while you're working is a really good idea too.
The only drawback to this thin material is that, well, it's so thin it's flexible. It's best to make sure everything is straight and square before you start assembling the thing. I was thinking about seeing if I could get away without gluing but I figure it's cheap insurance to keep it together if it gets bumped or maybe even bent a little so I can tweak it back into place without the whole contraption coming apart.
It's not 100% but the way I'm using it they're by far and away not only the best option in terms of performance and space but economical to boot. Thanks for the ideas, bros.


")