
Welcome fellow DIYers! As much as I love the grow store... F&$% 'em! I refuse to pay so much for mediocre products! Hopefully through showing my little project I can help spark some collective brainpower and new ideas.
I'm sure many of you are familiar with embedded microcontrollers, but I know there are many who are not because I don't see many posts regarding this subject. To briefly sum it up, embedded microcontrollers provide a way to programmatically apply logic to the physical components of our grow areas. In more practical terms what this means is that by using a microcontroller and the plethora of available IC's out there we can do almost anything that needs to be done in your garden. This includes, but is not limited to...
-Turning appliances on/off
-Controlling the speed of things like a fan or pump
-Monitoring all sorts of data(temp, humidity, light levels, etc)
-Most importantly, reacting to data received from sensors (turn fan on when temp/humidity reaches a certain point)
Clearly a microcontroller is a powerful tool, but I know that many of you are scared off by the intricate details involved in electronics and/or programming. That is how I felt when I first got started (about a month ago), but in reality it doesn't have to be very complicated at all! Fortunately, there are solutions developed specifically to cut down the cost and learning curve.
Enter... the Arduino! The Arduino is an open-source, small but powerful, embedded microcontroller which can be programmed through a computer over a USB connection. Here is a good quote to summarize the Arduino...
"The goal of the Arduino project is to make tools available that are accessible, low-cost, low capital investment, flexible and easy-to-use for artists and hobbyists, particularly those who might not otherwise have access to more sophisticated controllers that require more complicated tools" (Wikipedia)
I won't go into to much detail on the specifics of the arduino. There are many good resources that already cover this. A good place to start is here or here. You really do not need to know much to get started with the Arduino, many of the sensors & add-ons have tutorials and guides available to help with most of the intricate details.
A basic overview of the process goes something like this. You plug the Arduino into your USB port, and then using the free Arduino software you upload code onto the unit. This code that gets uploaded is what controls input & output ports on the Arduino. So, if I plug a temperature sensor into the Arduino's input 1 and a relay plugged to output 1, the code I upload to it might look something like this...
1) Get temperature from temp sensor(Input 1)
2) If temperature greater than 80F or lower than 60F then
3) Turn fan (Output 1) on
This is psuedo code so it doesn't look exactly like this, but the above code gets the point across. The actual code for the arduino is based on C++ but the important thing to remember is that there are TONS of existing examples and libraries of code already out there; If you need to do something, someone else has probably already done it and posted a code example. Here is a good source for some of the sensors available for the Arduino, and the best thing about this retailer is that many of the sensors have guides/tutorials listed in the details section.
Now that you have a general Idea of how things work, I'll show you the system that I have been piecing together. Keep in mind, while I do have a background in programming I have only been doing the microcontroller thing for about a month....

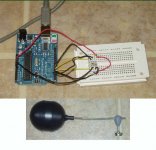
The first thing in the picture above is the Arduino itself with USB cable still attached. To the right of the Arduino is a solderless breadboard (which is for testing & laying out a circuit before permanently mounting it). The highlight here is the little clear chip in the middle of the breadboard. Chips normally aren't clear, and the reason this one is, is because it is a light intensity sensor. This sensor will let me measure the exact output of my bulb so I can record the data over time and determine when the bulb needs changing. On the bottom of the picture you can see the ghetto reservoir level sensor. Its a simple toilet float arm attached to a potentiometer using plumbers epoxy putty. Simple, but effective, it gives a different resistance reading depending on the position of the float arm, which I measure with the Arduino of course.

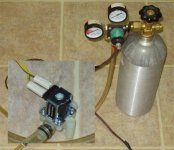
Above is a $15 solenoid valve, sourced off of ebay, attached to a 5lb Co2 cylinder/regulator. The tank was left over from my beer brewing days.

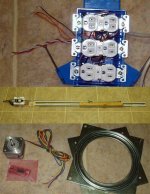
Lots of stuff here... Top pic is a 3 socket enclosure, each socket is hooked to a relay which gets attached to the Arduino. You can see the relay board behind the sockets in the back of the enclosure. Coming out of the enclosure you have a 120V cord to power the sockets, 2 (red/white) +5V wires to power the relays and 3 (orange/orange/black) +5V wires to trigger each of the relays. This lets me turn on & off 3 appliances running on 120V. The relays are rated at 10A 240VAC, so they can handle a lot of juice, probably even enough for a 1kW HPS, but thats pushing it because you should always overrate your relays by a lot.
Below that is a REALLY ghetto light mover, constructed in about 90 mins using crap laying around the house. The main rail is a rail from a sliding closet door. The rollers are also from the donor door and they are attached to a block of wood which is also attached to a long threaded rod. The end of the threaded rod is plumbers epoxy puttied to a screwdriver bit which is inserted into an old screwdriver which had a bad battery but now runs off of an old 12V wall adapter, and the other end threads into a nut which is epoxied onto a L bracket screwed into the wood block light carrier.
The sliding door light mover works, and works well actually, but it is probably going to be scrapped for a circular light mover built out of the stepper motor and lazy susan bearing (Lowes).
The small chip is a driver board for the stepper motor so I just have to connect wires and I don't have to deal with all the electronics details of running a stepper motor.

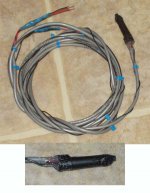
Last but not least we have one of my many temperature probes. If you look closely, that is a pen cap with the end drilled out. In the end hole there is a small chip surrounded by hot glue. The chip is a simple 3-wire $4.25 temperature sensor. Inside the cap, the three wires coming off the chip are extended and sealed in hot glue to make the entire contraption waterproof.
So to sum it up, I now have the ability to monitor my light's output, multiple temperatures, my resevoir level, move my light around, control my Co2 release, control 3 120V outlets, and much much more to come! Most importantly, I can also record copious amounts of data about each grow cycle, the system is highly expandable and modifiable, and overall it cost much less than your average grow controller! Here are some of the prices, just to get an idea.
Arduino: $29.95
Relay: $2.74
Temp sensor: $4.25
Co2 Tank: $84.99
Co2 Regulator: $59.95
Co2 Solenoid: $13.99
Light Sensor: $5.95
Stepper Motor: $14.95
Stepper Motor Driver: $14.95
Any way you slice it; even if you don't want to get as complicated as I have, you could just use an Arduino & relays as a configurable timer for MUCH less than those expensive grow store units.
Phewww... that was a lot of typing! There's my $.02, anyone one else that has some experience with the Arduino please feel free to chime in and throw some ideas out there!
I'm sure many of you are familiar with embedded microcontrollers, but I know there are many who are not because I don't see many posts regarding this subject. To briefly sum it up, embedded microcontrollers provide a way to programmatically apply logic to the physical components of our grow areas. In more practical terms what this means is that by using a microcontroller and the plethora of available IC's out there we can do almost anything that needs to be done in your garden. This includes, but is not limited to...
-Turning appliances on/off
-Controlling the speed of things like a fan or pump
-Monitoring all sorts of data(temp, humidity, light levels, etc)
-Most importantly, reacting to data received from sensors (turn fan on when temp/humidity reaches a certain point)
Clearly a microcontroller is a powerful tool, but I know that many of you are scared off by the intricate details involved in electronics and/or programming. That is how I felt when I first got started (about a month ago), but in reality it doesn't have to be very complicated at all! Fortunately, there are solutions developed specifically to cut down the cost and learning curve.
Enter... the Arduino! The Arduino is an open-source, small but powerful, embedded microcontroller which can be programmed through a computer over a USB connection. Here is a good quote to summarize the Arduino...
"The goal of the Arduino project is to make tools available that are accessible, low-cost, low capital investment, flexible and easy-to-use for artists and hobbyists, particularly those who might not otherwise have access to more sophisticated controllers that require more complicated tools" (Wikipedia)
I won't go into to much detail on the specifics of the arduino. There are many good resources that already cover this. A good place to start is here or here. You really do not need to know much to get started with the Arduino, many of the sensors & add-ons have tutorials and guides available to help with most of the intricate details.
A basic overview of the process goes something like this. You plug the Arduino into your USB port, and then using the free Arduino software you upload code onto the unit. This code that gets uploaded is what controls input & output ports on the Arduino. So, if I plug a temperature sensor into the Arduino's input 1 and a relay plugged to output 1, the code I upload to it might look something like this...
1) Get temperature from temp sensor(Input 1)
2) If temperature greater than 80F or lower than 60F then
3) Turn fan (Output 1) on
This is psuedo code so it doesn't look exactly like this, but the above code gets the point across. The actual code for the arduino is based on C++ but the important thing to remember is that there are TONS of existing examples and libraries of code already out there; If you need to do something, someone else has probably already done it and posted a code example. Here is a good source for some of the sensors available for the Arduino, and the best thing about this retailer is that many of the sensors have guides/tutorials listed in the details section.
Now that you have a general Idea of how things work, I'll show you the system that I have been piecing together. Keep in mind, while I do have a background in programming I have only been doing the microcontroller thing for about a month....
The first thing in the picture above is the Arduino itself with USB cable still attached. To the right of the Arduino is a solderless breadboard (which is for testing & laying out a circuit before permanently mounting it). The highlight here is the little clear chip in the middle of the breadboard. Chips normally aren't clear, and the reason this one is, is because it is a light intensity sensor. This sensor will let me measure the exact output of my bulb so I can record the data over time and determine when the bulb needs changing. On the bottom of the picture you can see the ghetto reservoir level sensor. Its a simple toilet float arm attached to a potentiometer using plumbers epoxy putty. Simple, but effective, it gives a different resistance reading depending on the position of the float arm, which I measure with the Arduino of course.
Above is a $15 solenoid valve, sourced off of ebay, attached to a 5lb Co2 cylinder/regulator. The tank was left over from my beer brewing days.
Lots of stuff here... Top pic is a 3 socket enclosure, each socket is hooked to a relay which gets attached to the Arduino. You can see the relay board behind the sockets in the back of the enclosure. Coming out of the enclosure you have a 120V cord to power the sockets, 2 (red/white) +5V wires to power the relays and 3 (orange/orange/black) +5V wires to trigger each of the relays. This lets me turn on & off 3 appliances running on 120V. The relays are rated at 10A 240VAC, so they can handle a lot of juice, probably even enough for a 1kW HPS, but thats pushing it because you should always overrate your relays by a lot.
Below that is a REALLY ghetto light mover, constructed in about 90 mins using crap laying around the house. The main rail is a rail from a sliding closet door. The rollers are also from the donor door and they are attached to a block of wood which is also attached to a long threaded rod. The end of the threaded rod is plumbers epoxy puttied to a screwdriver bit which is inserted into an old screwdriver which had a bad battery but now runs off of an old 12V wall adapter, and the other end threads into a nut which is epoxied onto a L bracket screwed into the wood block light carrier.
The sliding door light mover works, and works well actually, but it is probably going to be scrapped for a circular light mover built out of the stepper motor and lazy susan bearing (Lowes).
The small chip is a driver board for the stepper motor so I just have to connect wires and I don't have to deal with all the electronics details of running a stepper motor.
Last but not least we have one of my many temperature probes. If you look closely, that is a pen cap with the end drilled out. In the end hole there is a small chip surrounded by hot glue. The chip is a simple 3-wire $4.25 temperature sensor. Inside the cap, the three wires coming off the chip are extended and sealed in hot glue to make the entire contraption waterproof.
So to sum it up, I now have the ability to monitor my light's output, multiple temperatures, my resevoir level, move my light around, control my Co2 release, control 3 120V outlets, and much much more to come! Most importantly, I can also record copious amounts of data about each grow cycle, the system is highly expandable and modifiable, and overall it cost much less than your average grow controller! Here are some of the prices, just to get an idea.
Arduino: $29.95
Relay: $2.74
Temp sensor: $4.25
Co2 Tank: $84.99
Co2 Regulator: $59.95
Co2 Solenoid: $13.99
Light Sensor: $5.95
Stepper Motor: $14.95
Stepper Motor Driver: $14.95
Any way you slice it; even if you don't want to get as complicated as I have, you could just use an Arduino & relays as a configurable timer for MUCH less than those expensive grow store units.
Phewww... that was a lot of typing! There's my $.02, anyone one else that has some experience with the Arduino please feel free to chime in and throw some ideas out there!
")


