What's new
  • Happy Birthday ICMag! Been 20 years since Gypsy Nirvana created the forum! We are celebrating with a 4/20 Giveaway and by launching a new Patreon tier called "420club". You can read more here.
  • Important notice: ICMag's T.O.U. has been updated. Please review it here. For your convenience, it is also available in the main forum menu, under 'Quick Links"!

Cloning in Worm Casting and River Sand Mix = 100% success

Tynehead Tom

Well-known member
I'm at nearing 52north in western canada and we have red wigglers and big earth worms. By big I mean up to 1/4inch thick and 3 to 6 inches long when they are not stretched out.
If I put an object on the ground , covering a section of grass like say a piece of plywood, and I wait a couple weeks. When I lift that plywood there will be big worms everywhere and they leave surprisingly large casting clumps. Silly me I have never put my mind to collecting the castings. Our ground here is so alkaline I figured the castings would be too?
I also hunt deer as I only eat wild meat and the pics posted of castings above are not from any deer species I have become familiar with thru hunting or simple research.

cool thread..... I just might have to try this.
 

need4weed

Well-known member
Veteran
@greyfader and @Swamp Thang both you guys have my respect. Ganja growers are innovative that's for sure. 90% humidity in a grow room is super high, I'm assuming that's why you don't need domes as it has the the same RH as under a dome? Both methods are good, but if using a wick system and not having to mist at all is pretty cool. I wonder how this would work with a cup inside a cup, lower cup has water in it, upper cup has holes in the bottom and sits in 1cm of the water
 

Swamp Thang

Well-known member
Veteran
i lived in Puerto Rico for 15 years and they do have completely different types of earthworms. that's about 330 miles north of the equator.

in the US they typically only use 2-3 types of worms to farm for castings. non of them have that clumped-up look.


it is a recirculating closed loop soilless hydro system known as the PPK. i am also known as Delta9nxs and i'm the inventor of the system. it's not a specific build but rather a flow pattern that can be built to any scale.

the first 2 pics are from a 10k sq ft cbd facility i designed, built, and supervised the operation of in Nashville, Tn.

the second two are from my personal thc facility of about 3500 sq ft in Oregon.

both are PPK systems.


Holy Toledo, Greyfader, this facility of yours is a quantum evolutionary step in high-tech industrial farming. That vista of pristine ripening spears stretching out into the distance is indeed a sight for sore eyes. This hydroponics facility you've devised is a take-no-prisoners grow the likes of which I'm yet to visit in real life.

My hat is off to you sir. You've earned credentials as a grow meister extraordinaire, and I imagine that your consultancy for this technique has earned you some serious income over the years. I find myself frequently reminded that among the mundane hobby growers like myself who frequent the IC mag forum, there are a few gentle giants quietly pulling down 6 figures in green gold annually. God bless America!
 

Swamp Thang

Well-known member
Veteran
@greyfader and @Swamp Thang both you guys have my respect. Ganja growers are innovative that's for sure. 90% humidity in a grow room is super high, I'm assuming that's why you don't need domes as it has the the same RH as under a dome? Both methods are good, but if using a wick system and not having to mist at all is pretty cool. I wonder how this would work with a cup inside a cup, lower cup has water in it, upper cup has holes in the bottom and sits in 1cm of the water
The humidity in my grow room is sauna high up in the above 90% range, but I still mist my new clones twice a day for a few days after planting them in the castings/sand mix, and thus far the success rate has been night and day compared to my various attempts at cloning in the past.
 

Alitolla

Well-known member
i lived in Puerto Rico for 15 years and they do have completely different types of earthworms. that's about 330 miles north of the equator.

in the US they typically only use 2-3 types of worms to farm for castings. non of them have that clumped-up look.


it is a recirculating closed loop soilless hydro system known as the PPK. i am also known as Delta9nxs and i'm the inventor of the system. it's not a specific build but rather a flow pattern that can be built to any scale.

the first 2 pics are from a 10k sq ft cbd facility i designed, built, and supervised the operation of in Nashville, Tn.

the second two are from my personal thc facility of about 3500 sq ft in Oregon.

both are PPK systems.
Wow.....lo voglio anch'io.....
 

greyfader

Well-known member
Wow.....lo voglio anch'io.....
here is a long, detailed thread on the operation in Oregon. full of theory and pics if anyone is interested.

sorry, it's not in Italiano!

 
Last edited:

Entusia

Active member
Swamp Thang you too are a grow meister of your own kind. More of an artist than a scientist :artist:

Never get tired of your grows and advices. I will try the worm casting technique and i will let you know if it works for me too. Thank you very much for sharing!

greyfader, care to explain better how the wicking for clones work? I'm really interested in trying that as well. Could it work with some sort of rope for the wicking part, so that the clones don't sit in a layer of water? I would really like to automate my propagation box and use both techniques!

I've also bought everything i need for the PPK a few months ago, if not a year ago: i wanted to try a square reservoir and "root-holder" (i forgot how you called it...). I just had other things to try before that and practicing my botanics first, now i just need to find the time to build it and test it after i move to the new home.

Also, now i really have to read that thread with the current state-of-the-art of the PPK and plumbing! Thank you for sharing the knowledge!

Very interesting guys to find in a single thread! Hats off to both of you :tiphat:
 
Last edited:

greyfader

Well-known member
@Entusia

"greyfader, care to explain better how the wicking for clones work? I'm really interested in trying that as well. Could it work with some sort of rope for the wicking part, so that the clones don't sit in a layer of water? I would really like to automate my propagation box and use both techniques!"

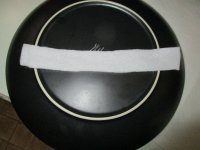
the first pic shows a 1"x 8" piece of 100% polyester fabric known as Thermolam Plus. it is available anywhere they sell fabrics and is sold by the yard. it is an insulation material for quilt making. very cheap and has excellent wicking ability. there are 2 types, fusible and non-fusible. you want the non-fusible as it moves water better.

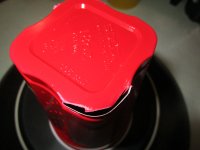
second is a standard 18oz solo brand cup. showing how to cut the corners out with a pair of scissors. just cut the slightest amount you can and it will open up like you see here.

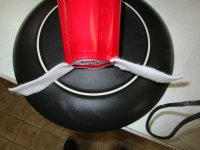
third pic shows how to thread the wick through the bottom of the cup so that it lays flat on the inside bottom.

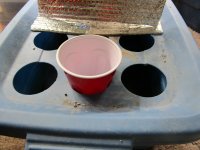
fourth pic shows how the cups sit in a 3" hole.

start by wetting the wicks after installing in the cups. this makes them hang straight down into the solution and provides a hydraulic path.

use any lightproof container you want. i use these a lot because i can get 12 cuts into one but i have made single clone ones and 6 clone ones, etc.

fill the tub or container to 1/2" below the cup bottoms with a 300 ppm nutrient solution and ph correct it to about 5.4-5.6 initially. this is because it will tend to rise during the rooting process.

then fill the cups with your choice of media. i have used perlite, turface, and pumice successfully. for the lasr few years i have been using perlite mixed about 30% by volume with worm castings. this has a capillary rise potential of about 7".

i wet the media thoroughly with a turkey baster using the solution from the tub.

then make a hole for the cutting all the way to the bottom dead center so the cutting sits all the way down onto the wick. i usually use a piece of round wood dowel about 5/16-3/8" in diameter for this.

it is important to cut the clone off square not tapered or diagonally as all the cloning guides recommend.

this puts the square bottom of the clone in direct contact with the wick with maximum surface contact.

i don't mist or do anything else to them during the rooting process as long as the humdity is around 75-80% in the room. i like 80F for temperaure.

you'll have roots showing coming out of the bottom with the wicks at approx 10 days but at 14 days you will have a lot of roots showing. i like to leave them in the cups for about 3 weeks to get a big strong clone for transplant.

you will have a lot of roots growing out of the bottom by then but i cut the roots and wicks off at the outside bottom of the cups and just transplant the interior root ball. cutiing them all off evenly makes them all grow out the same from there.

you will have a small piece of the fabric from inside the cup still attached to the root ball but i don't try to remove it. i just transplant it along with the root ball.

i hope this clarifies the process for you. good luck!
 

Attachments

  • IMG_2024.JPG
    IMG_2024.JPG
    4.2 MB · Views: 34
  • IMG_2027.JPG
    IMG_2027.JPG
    3.5 MB · Views: 28
  • IMG_2030.JPG
    IMG_2030.JPG
    4.3 MB · Views: 25
  • IMG_2034.JPG
    IMG_2034.JPG
    4.9 MB · Views: 24
Last edited:
Top