Vandenberg
Active member
This Wiki Sty le basic information format is a good place to start a "what the hell is Bokashi and what is used for in horticulture?" Type of a discussion, so here we go. ")
Bokashi is a process that converts food waste and similar organic matter into a soil amendment which adds nutrients and improves soil texture. It differs from traditional composting methods in several respects. The most important are:

A soil ball with indigenous worms in soil amended a few weeks previously with bokashi fermented matter.
Other names attributed to this process include bokashi composting, bokashi fermentation and fermented composting.
The name bokashi is transliterated from spoken Japanese (ぼかし).

A household bokashi bin with a supply of fermentation starter, namely bran inoculated with Lactobacilli.
The basic stages of the process are:
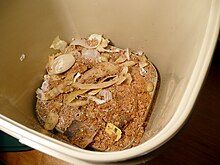
Inside a recently started bokashi bin.
Food scraps are raised on a perforated plate (to drain runoff) and are partly covered by a layer of bran.
The process is typically applied to food waste from households, workplaces and catering establishments, because such waste normally holds a good proportion of carbohydrates.
It is applied to other organic waste by supplementing carbohydrates and hence lactic acid production.
Recipes for large scale bokashi in horticulture often include rice, and molasses or sugar.[6][7] Any carbohydrate-poor waste stream would benefit from this.
Homolactic fermentation
can process significantly more kinds of food waste than home composting.
Even items such as cooked leftovers, meat and skin, fat, cheese and citrus waste are, in effect, pre-digested to enable soil life to consume them.
Large pieces may take longer to ferment and concave surfaces may trap air, in which cases cutting down is advised in support literature.
Pieces of input are discarded if they are already badly rotten, or show green or black mould. These harbour putrefying organisms which may overwhelm the fermentation.
Emissions
It is a mildly endothermic reaction, emitting no energy; the fermentation vessel remains at ambient temperature.
These are in marked contrast to decomposition, which emits the majority of its input carbon and energy within greenhouse gases (carbon dioxide and methane, in proportions determined by the method of decomposition) and as heat (in aerobic decomposition).[9]
Decomposition also loses the key plant nutrient nitrogen (in the potent greenhouse gas nitrous oxide and in ammonia).[10]
The liquid leaches out a valuable fraction of proteins, nutrients and lactic acid. To recover them, and to avoid drowning the fermentation, runoff is captured from the fermentation vessel, either through a tap, into a base of absorbent material such as biochar or waste cardboard, or into a lower chamber. The runoff is sometimes called "bokashi tea".
The uses of bokashi tea are not the same as those of "compost tea". It is used most effectively when diluted and sprinkled over a targeted area of soil to feed the soil ecosystem. Dilution makes it less acidic and thus less dangerous to plants. Dilution also causes more acid to convert into lactate which is an attractive food for soil microbes. Other uses are either potentially damaging (e.g. feeding plants with acidic water) or wasteful (e.g. cleaning drains with plant nutrients, feeding plants with nutrients in a form they cannot take up).
Household containers ("bokashi bins")
typically give a batch size of 5–10 kilograms (11–22 lb). This is accumulated over a few weeks of regular additions. Each regular addition is best accumulated in a caddy, because it is recommended that one opens the bokashi bin no more frequently than once per day to let anaerobic conditions predominate.
In horticultural settings batches can be orders of magnitude greater.[6][10]
Silage technology may be usable if it is adapted to capture runoff.
An industrial-scale technique mimics the windrows of large-scale composting, except that bokashi windrows are compacted, covered tightly and left undisturbed, all to promote anaerobic conditions.
One study suggests that such windrows lose only minor amounts of carbon, energy and nitrogen.[10]
The typical approach that is usually recommended by suppliers of household bokashi is along the lines of "dig a trench in the soil in your garden, add the waste and cover over."[16]
In practice, regularly finding suitable sites for trenches that will later underlie plants is difficult in an established plot.
To address this, an alternative is a 'soil factory'.[17]
This is a bounded area of soil into which several loads of bokashi preserve are mixed over time.
Amended soil can be taken from it for use elsewhere.
It may be of any size. It may be permanently sited or in rotation. It may be enclosed, wire-netted or covered to keep out surface animals.
Spent soil or compost, and organic amendments such as biochar may be added, as may non-fermented material, in which case the boundary between bokashi and composting becomes blurred.
A proposed alternative[18] is to homogenise (and potentially dilute) the preserve into a slurry, which is spread on the soil surface. This approach requires energy for homogenisation but, logically from the characteristics set out above, should confer several advantages: thoroughly oxidising the preserve; disturbing no deeper layers, except by increased worm action; being of little use to scavenging animals; applicable to large areas; and, if done repeatedly, able to sustain a more extensive soil ecosystem.
This traditional form ferments waste directly in soil, relying on native bacteria and on careful burial for an anaerobic environment.
A modernised horticultural method called Korean Natural Farming includes fermentation by indigenous micro-organisms (IM or IMO) harvested locally, but has numerous other elements too.
A commercial Japanese bokashi method was developed by Teruo Higa in 1982 under the 'EM' trademark (short for Effective Microorganisms).[19]
EM became the best known form of bokashi worldwide, mainly in household use, claiming to have reached over 120 countries.[19]
While none have disputed that EM starts homolactic fermentation and hence produces a soil amendment, other claims have been contested robustly. Controversy relates partly to other uses, such as direct inoculation of soil with EM and direct feeding of EM to animals, and partly to whether the soil amendment's effects are due simply to the energy and nutrient values of the fermented material rather than to particular microorganisms.[20] Arguably, EM's heavy focus on microorganisms has diverted scientific attention away from both the bokashi process as a whole and the particular roles in it of lactic acid, lactate, and soil life above the bacterial level.
Alternative approaches
Some organisms in EM, specifically photosynthetic bacteria and yeast, appear to be logically superfluous, as they will first be suppressed by the dark and anaerobic environment of homolactic fermentation, then killed by its lactic acid. Consequently, practitioners have sought to reduce costs and to widen the scale of operations. Success has been reported with:
In Europe, food and drink material that is sent to animal feed does not legally constitute waste because it is regarded as 'redistribution.'[26] This may apply to bokashi made from food, because it enters the soil food web, and furthermore is inherently pathogen-free.
A side effect of diverting organic waste to the soil food web is to divert it away from local waste management streams and their associated costs of collection and disposal. To encourage this, for example most UK local authorities subsidise household bokashi starter kits through a National Home Composting Framework.[27]
Another side effect is to increase the organic carbon content of the amended soil. Some of this is a relatively long-term carbon sink – insofar as the soil ecosystem creates humus – and some is temporary for as long as the richer ecosystem is sustained by measures such as permanent planting, no-till cultivation and organic mulch. An example of these measures is seen at the Ferme du Bec Hellouin [fr] in France.[22] Bokashi would therefore have potential uses in enabling communities to speed up the conversion of land from chemical to organic horticulture and agriculture, to regenerate degraded soil, and to develop urban and peri-urban horticulture close to the sources of input.
The anti-pathogenic nature of bokashi is applied to sanitation, in particular to the treatment of faeces. Equipment and supplies to treat pet faeces are sold commercially[28] but do not always give prominence to the hygiene risks.[29] Treatment of human faeces for soil amendment has been extensively studied, notably with the use of biochar (a soil improver in its own right) to remove odours and retain nutrients.[30] Social acceptability is a major obstacle, but niche markets such as emergency aid sanitation, outdoor events and temporary workplaces may develop the technology into a disruptive innovation.
}}}}}}}}}}}}}}}}}}}}}}}}}}}}}}}}}}}}}}}}}}}}}}}}}}}}}}}}}}}}}}}}}}}}}}}}}}}}}}}}}}}}}}}}
KOREAN NATURAL FARMING IS A NATURAL RELATIVE TANGENT FROM HERE;
}}}}}}}}}}}}}}}}}}}}}}}}}}}}}}}}}}}}}}}}}}}}}}}}}}}}}}}}}}}}}}}}}}}}}}}}}}}}}}}}}}}}}}}}}}}}}}}}}}}}}}}}}}}}
EM-1 (Effective Microorganisms)
This Microbial Inoculant converts organic matter into soil humus and improves soil structure by producing high levels of polysaccharides, beneficial enzymes and organic acids.
The end product is amended soil that is better able to absorb and retain moisture, as well as cycle nutrients.
EM-1®, is a liquid bacterial product comprising three groups of microbes: Yeast, Photosynthetic Bacteria, and Lactic Acid Bacteria.
EM-1®is a trademarked name, I have bought the same thing on Etsy marketplace marketed sold and labeled as "accelerator"@ a much better price. EM "Serum" is anther popular name.
Manure Management for Fly and Odor Control! Apply EM-1 to manure, areas of heavy urination and compost piles to accelerate the breakdown of organic matter resulting in fewer breeding sites for flies and other insects.
Suggested Uses:
Apply to soils and lawn areas, on crops and ornamentals, around animal housing areas, and for bioremediation indoors.
EM-1 is excellent for managing manure piles and areas where animals urinate or are washed.
General Application Rate: 1 oz. (2 tablespoons) per gallon of water.
}}}}}}}}}}}}}}}}}}}}}}}}}}}}}}}}}}}}}}}}}}}}}}}}}}}}}}}}}}}}}}}}}}}}}}}}}}}}}}}}}}}}}}}}}}}}}}}}
Any experiences utilizing these practices?
My experience level is rated cherry on this one, after receiving my first bottle a week or so ago which I am currently expanding the volume of , recipe to follow.
The first thing with my supply of EM accelerator was to pour some down into the ol' septic tank for some party food for these anaerobic condition loving microbes.
Vandenberg
Bokashi is a process that converts food waste and similar organic matter into a soil amendment which adds nutrients and improves soil texture. It differs from traditional composting methods in several respects. The most important are:
- The input matter is fermented by specialist bacteria, not decomposed.
- The fermented matter is fed directly to field or garden soil, without requiring further time to mature.
- As a result, virtually all input carbon, energy and nutrients enter the soil food web, having been neither emitted in greenhouse gases and heat nor leached out.

A soil ball with indigenous worms in soil amended a few weeks previously with bokashi fermented matter.
Other names attributed to this process include bokashi composting, bokashi fermentation and fermented composting.
The name bokashi is transliterated from spoken Japanese (ぼかし).
The Process;

A household bokashi bin with a supply of fermentation starter, namely bran inoculated with Lactobacilli.
The basic stages of the process are:
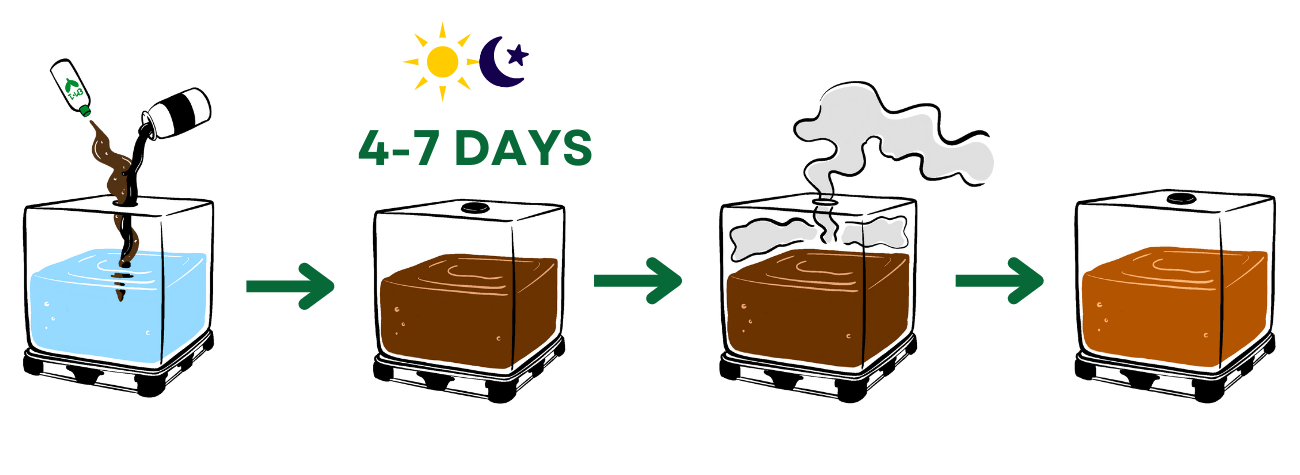
- Organic matter is inoculated with Lactobacilli. These will convert a fraction of the carbohydrates in the input to lactic acid by homolactic fermentation.[3]
- Fermented anaerobically (more precisely, microaerobically)[4] for a few weeks at typical room temperatures in an airtight vessel, the organic matter is preserved by the acid, in a process closely related to the making of some fermented foods and silage. The preserve is normally applied to soil when ready, or can be stored unopened for later use.
- The preserve is mixed into soil that has naturally occurring micro-organisms.
- When water is present (as in the preserve itself or in the soil) the lactic acid progressively dissociates by losing protons to become lactate – the acid's conjugate base or ion salt.[5] Lactate is a fundamental energy carrier in biological processes. It can pass through cell membranes and almost all living organisms have the enzyme lactate dehydrogenase to convert it to pyruvate for energy production.
- Suffused with lactate, the preserve is readily consumed by the indigenous soil life, primarily the bacteria, 'disappearing' within a very few weeks at normal temperatures. Earthworm action is typically prominent as bacteria are themselves consumed, such that the amended soil acquires a texture associated with vermicompost.

Inside a recently started bokashi bin.
Food scraps are raised on a perforated plate (to drain runoff) and are partly covered by a layer of bran.
The process is typically applied to food waste from households, workplaces and catering establishments, because such waste normally holds a good proportion of carbohydrates.
It is applied to other organic waste by supplementing carbohydrates and hence lactic acid production.
Recipes for large scale bokashi in horticulture often include rice, and molasses or sugar.[6][7] Any carbohydrate-poor waste stream would benefit from this.
Homolactic fermentation
can process significantly more kinds of food waste than home composting.
Even items such as cooked leftovers, meat and skin, fat, cheese and citrus waste are, in effect, pre-digested to enable soil life to consume them.
Large pieces may take longer to ferment and concave surfaces may trap air, in which cases cutting down is advised in support literature.
Pieces of input are discarded if they are already badly rotten, or show green or black mould. These harbour putrefying organisms which may overwhelm the fermentation.
Emissions
Carbon, gases and energyEdit
Homolactic fermentation emits no gas; its overall equation is C6H12O6 → 2 CH3CHOHCOOH (carbohydrate to lactic acid).It is a mildly endothermic reaction, emitting no energy; the fermentation vessel remains at ambient temperature.
These are in marked contrast to decomposition, which emits the majority of its input carbon and energy within greenhouse gases (carbon dioxide and methane, in proportions determined by the method of decomposition) and as heat (in aerobic decomposition).[9]
Decomposition also loses the key plant nutrient nitrogen (in the potent greenhouse gas nitrous oxide and in ammonia).[10]
Runoff
When fermentation begins, physical structures start to break down and release some of the input's water content as a liquid runoff. Over time this constitutes more than 10% of the input by weight. The quantity varies with the input: for example cucumber and melon flesh lead to a noticeable increase.The liquid leaches out a valuable fraction of proteins, nutrients and lactic acid. To recover them, and to avoid drowning the fermentation, runoff is captured from the fermentation vessel, either through a tap, into a base of absorbent material such as biochar or waste cardboard, or into a lower chamber. The runoff is sometimes called "bokashi tea".
The uses of bokashi tea are not the same as those of "compost tea". It is used most effectively when diluted and sprinkled over a targeted area of soil to feed the soil ecosystem. Dilution makes it less acidic and thus less dangerous to plants. Dilution also causes more acid to convert into lactate which is an attractive food for soil microbes. Other uses are either potentially damaging (e.g. feeding plants with acidic water) or wasteful (e.g. cleaning drains with plant nutrients, feeding plants with nutrients in a form they cannot take up).
Household containers ("bokashi bins")
typically give a batch size of 5–10 kilograms (11–22 lb). This is accumulated over a few weeks of regular additions. Each regular addition is best accumulated in a caddy, because it is recommended that one opens the bokashi bin no more frequently than once per day to let anaerobic conditions predominate.
In horticultural settings batches can be orders of magnitude greater.[6][10]
Silage technology may be usable if it is adapted to capture runoff.
An industrial-scale technique mimics the windrows of large-scale composting, except that bokashi windrows are compacted, covered tightly and left undisturbed, all to promote anaerobic conditions.
One study suggests that such windrows lose only minor amounts of carbon, energy and nitrogen.[10]
Hygiene
Bokashi is inherently hygienic in the following senses:- Lactic acid is a strong natural bactericide, with well-known antimicrobial properties.[11] It is an active ingredient of some toilet cleaners.[12] As more is produced, it eventually suppresses even its own makers, the acid-resistant lactobacilli, such that bokashi fermentation eventually slows and stops itself. There is also evidence that mesophilic (ambient temperature) fermentation kills eggs of the Ascaris worm – a parasite of humans – in 14 days.[13]
- The fermentation bin does not release smells when it is closed. A household bin is only opened for a minute or so to add and inoculate input via the lid or to drain runoff via the tap. At these times the user encounters the sour odour of lacto-fermentation (often described as a "pickle") which is much less offensive than the odour of decomposition.[14]
- When closed, an airtight fermentation bin cannot attract insects.
- Bokashi literature claims that scavengers dislike the fermented matter and avoid it in gardens.[15]
Addition to soil
Fermented bokashi is added to a suitable area of soil.The typical approach that is usually recommended by suppliers of household bokashi is along the lines of "dig a trench in the soil in your garden, add the waste and cover over."[16]
In practice, regularly finding suitable sites for trenches that will later underlie plants is difficult in an established plot.
To address this, an alternative is a 'soil factory'.[17]
This is a bounded area of soil into which several loads of bokashi preserve are mixed over time.
Amended soil can be taken from it for use elsewhere.
It may be of any size. It may be permanently sited or in rotation. It may be enclosed, wire-netted or covered to keep out surface animals.
Spent soil or compost, and organic amendments such as biochar may be added, as may non-fermented material, in which case the boundary between bokashi and composting becomes blurred.
A proposed alternative[18] is to homogenise (and potentially dilute) the preserve into a slurry, which is spread on the soil surface. This approach requires energy for homogenisation but, logically from the characteristics set out above, should confer several advantages: thoroughly oxidising the preserve; disturbing no deeper layers, except by increased worm action; being of little use to scavenging animals; applicable to large areas; and, if done repeatedly, able to sustain a more extensive soil ecosystem.
History
The practice of bokashi is believed to have its earliest roots in ancient Korea.[citation needed]This traditional form ferments waste directly in soil, relying on native bacteria and on careful burial for an anaerobic environment.
A modernised horticultural method called Korean Natural Farming includes fermentation by indigenous micro-organisms (IM or IMO) harvested locally, but has numerous other elements too.
A commercial Japanese bokashi method was developed by Teruo Higa in 1982 under the 'EM' trademark (short for Effective Microorganisms).[19]
EM became the best known form of bokashi worldwide, mainly in household use, claiming to have reached over 120 countries.[19]
While none have disputed that EM starts homolactic fermentation and hence produces a soil amendment, other claims have been contested robustly. Controversy relates partly to other uses, such as direct inoculation of soil with EM and direct feeding of EM to animals, and partly to whether the soil amendment's effects are due simply to the energy and nutrient values of the fermented material rather than to particular microorganisms.[20] Arguably, EM's heavy focus on microorganisms has diverted scientific attention away from both the bokashi process as a whole and the particular roles in it of lactic acid, lactate, and soil life above the bacterial level.
Alternative approaches
Some organisms in EM, specifically photosynthetic bacteria and yeast, appear to be logically superfluous, as they will first be suppressed by the dark and anaerobic environment of homolactic fermentation, then killed by its lactic acid. Consequently, practitioners have sought to reduce costs and to widen the scale of operations. Success has been reported with:
- Self-harvested micro-organisms, tested for lacto-fermentation;[21][22]
- Lactobacilli alone, i.e. without other EM micro-organisms;[23] one such source is acid whey from yogurt;[24]
- Alternative substrates for inoculant, such as newsprint;[24]
- Home-made airtight fermentation vessels;
- Larger scale than a household, for example a group of small farmers.[25]
- No intentional addition of microbes at all, similar to the original Korean method. The resulting mixture will smell worse as acetic acid, propanoic acid, and butyric acid can form instead of lactic acid, but works equally well as soil amendment.[4]
Uses
The main use of bokashi that is described above is to recover value from organic waste by converting it into a soil amendment.In Europe, food and drink material that is sent to animal feed does not legally constitute waste because it is regarded as 'redistribution.'[26] This may apply to bokashi made from food, because it enters the soil food web, and furthermore is inherently pathogen-free.
A side effect of diverting organic waste to the soil food web is to divert it away from local waste management streams and their associated costs of collection and disposal. To encourage this, for example most UK local authorities subsidise household bokashi starter kits through a National Home Composting Framework.[27]
Another side effect is to increase the organic carbon content of the amended soil. Some of this is a relatively long-term carbon sink – insofar as the soil ecosystem creates humus – and some is temporary for as long as the richer ecosystem is sustained by measures such as permanent planting, no-till cultivation and organic mulch. An example of these measures is seen at the Ferme du Bec Hellouin [fr] in France.[22] Bokashi would therefore have potential uses in enabling communities to speed up the conversion of land from chemical to organic horticulture and agriculture, to regenerate degraded soil, and to develop urban and peri-urban horticulture close to the sources of input.
The anti-pathogenic nature of bokashi is applied to sanitation, in particular to the treatment of faeces. Equipment and supplies to treat pet faeces are sold commercially[28] but do not always give prominence to the hygiene risks.[29] Treatment of human faeces for soil amendment has been extensively studied, notably with the use of biochar (a soil improver in its own right) to remove odours and retain nutrients.[30] Social acceptability is a major obstacle, but niche markets such as emergency aid sanitation, outdoor events and temporary workplaces may develop the technology into a disruptive innovation.
}}}}}}}}}}}}}}}}}}}}}}}}}}}}}}}}}}}}}}}}}}}}}}}}}}}}}}}}}}}}}}}}}}}}}}}}}}}}}}}}}}}}}}}}
KOREAN NATURAL FARMING IS A NATURAL RELATIVE TANGENT FROM HERE;
}}}}}}}}}}}}}}}}}}}}}}}}}}}}}}}}}}}}}}}}}}}}}}}}}}}}}}}}}}}}}}}}}}}}}}}}}}}}}}}}}}}}}}}}}}}}}}}}}}}}}}}}}}}}
EM-1 (Effective Microorganisms)
This Microbial Inoculant converts organic matter into soil humus and improves soil structure by producing high levels of polysaccharides, beneficial enzymes and organic acids.
The end product is amended soil that is better able to absorb and retain moisture, as well as cycle nutrients.
EM-1®, is a liquid bacterial product comprising three groups of microbes: Yeast, Photosynthetic Bacteria, and Lactic Acid Bacteria.
EM-1®is a trademarked name, I have bought the same thing on Etsy marketplace marketed sold and labeled as "accelerator"@ a much better price. EM "Serum" is anther popular name.
Manure Management for Fly and Odor Control! Apply EM-1 to manure, areas of heavy urination and compost piles to accelerate the breakdown of organic matter resulting in fewer breeding sites for flies and other insects.
Suggested Uses:
Apply to soils and lawn areas, on crops and ornamentals, around animal housing areas, and for bioremediation indoors.
EM-1 is excellent for managing manure piles and areas where animals urinate or are washed.
General Application Rate: 1 oz. (2 tablespoons) per gallon of water.
}}}}}}}}}}}}}}}}}}}}}}}}}}}}}}}}}}}}}}}}}}}}}}}}}}}}}}}}}}}}}}}}}}}}}}}}}}}}}}}}}}}}}}}}}}}}}}}}
Any experiences utilizing these practices?
My experience level is rated cherry on this one, after receiving my first bottle a week or so ago which I am currently expanding the volume of , recipe to follow.
The first thing with my supply of EM accelerator was to pour some down into the ol' septic tank for some party food for these anaerobic condition loving microbes.
Vandenberg
Last edited: