What's new
  • Happy Birthday ICMag! Been 20 years since Gypsy Nirvana created the forum! We are celebrating with a 4/20 Giveaway and by launching a new Patreon tier called "420club". You can read more here.
  • Important notice: ICMag's T.O.U. has been updated. Please review it here. For your convenience, it is also available in the main forum menu, under 'Quick Links"!

The Guerrilla irrigation thread: Automatic systems, selfwatering planters and more!

BACKCOUNTRY

Mourning the loss of my dog......
Veteran
I thought it might be a good idea to get a thread going specificly for guerrilla irrigation. Feel free to share experiences, ideas, etc. Lets have a good resource for newer and older growers.
Some of us are simply worried about summer droughts, and some of us depend entirely on water supplied artificially.

Here I'll start out with the basic outline for a basic gravity fed, resivour based system-
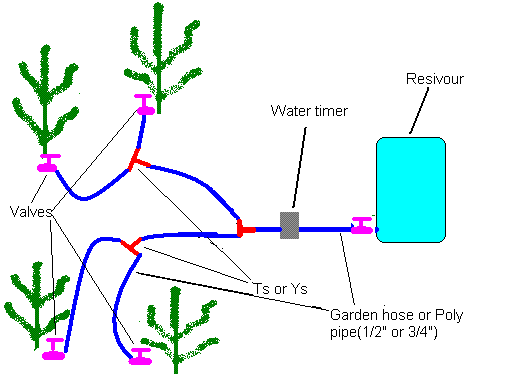
7710Basic_irrigation_system_design.GIF


This crude paint picture shows the main components:
#1. Resivour: This could be a barrel, a garbage can, a rough tote, a water bed matress, or a water bladder.

#2. Hose or pipe: This could be Garden hoses, Poly pipe(the two best), PVC, Vinyl, etc.

#3. Water timer: Many brands exist, look near the garden hoses in your favorite Home center/dept. store/gardening store.

#4. Line spitters, Ts and Ys: Use these to split your lines off to multiple plants. If you are using garden hose, you'll use Ys or other multi spliters found near the garden hose dept.
If you are using a type of pipe, like poly, you will use Ts made for the specific type of pipe you are using.

#5. Valves: In a gravity fed system, it is important to make sure flow is even at each plant, a appropriate valve at the end of each plants line will give you control over the flow getting to each plant, allowing you to turn down or turn up the waterflow for each plant, until each recieves a roughly equal flow.
If you plan to leave the system to work on its own for weeks at a time, being able to know exactly how much water will be used will allow you to arrive to refill the rez before it runs out.
Also, I like the idea of using valves rather than emitters for controlling flow, emitters have a tendency to become plugged, especially when used with "wild water" collected in the bush. Valves are more ajustable, and are easily cleared if you find one plugging up.


System therory
Basicly, when the timers programming tells it to open the valve, water flows down from the rez to the rest of the system. As the sytem fills, water starts flowing from the valves at each plant. By ajusting the time the timer leaves the valve open, and by ajusting the valves at each plant, each plant will get its alloted ration of water.

Its best for the rez to be placed "uphill" from the plot, most water timers require at least a small amount of water pressure. My Gilmour timers require that the resivour is at least 2 feet higher than the timer to operate correctly, I have seen systems built online that had almost zero pressure, but I am not sure what brand of timer they used. At any rate, it is good for the rez to be as high above the grow as possible, but a huge difference in elevation is not a absolute requirement.
 

BACKCOUNTRY

Mourning the loss of my dog......
Veteran
Building a resivo

Building a resivo

Building a rez
The most difficult part of building one of these systems is setting up a resivour that won't leak. Lots of cheap containers could make great resivours if they are properly modified.
The main thing you need to do is provide a way to tap water from the resivour. This involves drilling a hole in the wall of the container a couple inches from the bottom of the container, and using threaded parts with washers or heavy duty epoxies to attach a threaded pipe nipple to the resivour in such a way that it will not leak. Then you will be able to hook up the system.
7710Creating_a_resivour.GIF

Here are the basic parts and a diagram of what you need to do this, a trip to your local building supply and a little imagination should get you the parts you need. Its possible that your local plumbing supply might carry "Bulkhead addapters", these are plumbing parts specificly for this purpose, there should be no problem asking for one of these, but if you need a excuse, tell them you are building a rain barrel for catching water(basicly almost the same thing).
You could also just take a threaded pipe nipple, dill a hole just big enough to push it through the wall, and then just use a marine grade epoxy or cement/sealant to glue it in place. I don't think this is the best way, but it can work, just be carefull not to accidently step on or kick it, you could loose all your water fast.

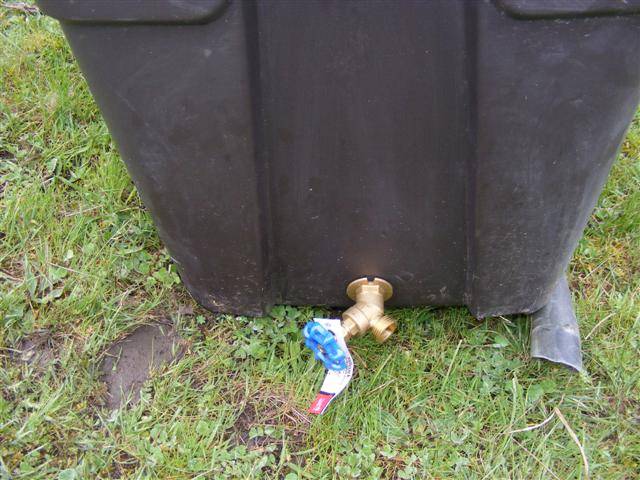
Here is a example of a homemade guerrilla rez that I made:[/red]

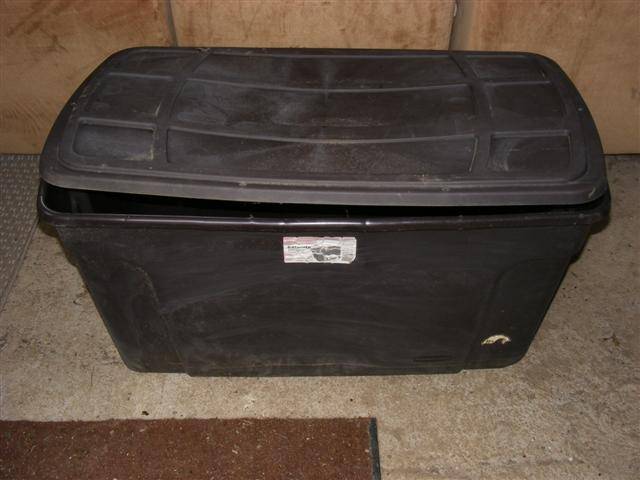
Here we have a 50 gallon rough tote-
7710Making_a_resivour_001_Small_.jpg


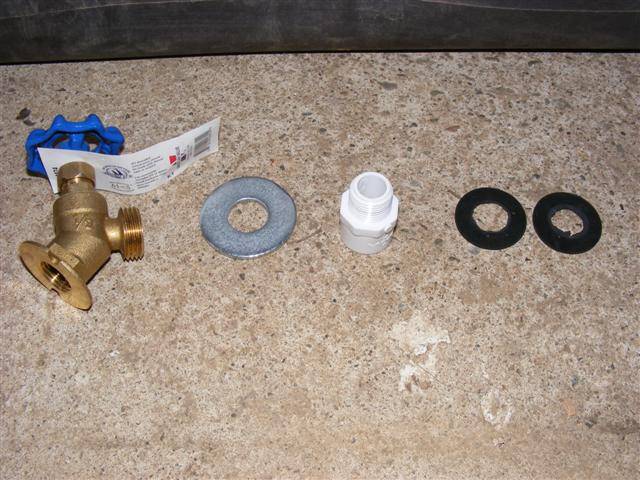
And here are some plumbing parts picked up at the local home improvement super store-
7710Making_a_resivour_003_Small_.jpg

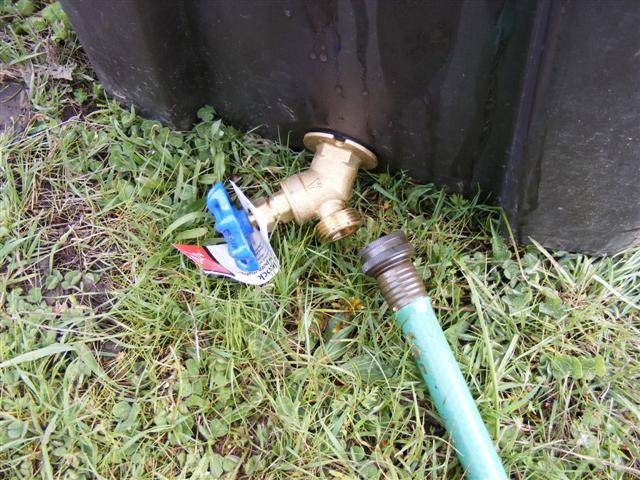
From left to right: 1/2" faucet, fender washer 1/2" Inside diameter, 1/2" threaded PVC addapter(used to addapt from glued PVC to threaded pipe), and two rubber washers that fit the threaded PVC part.

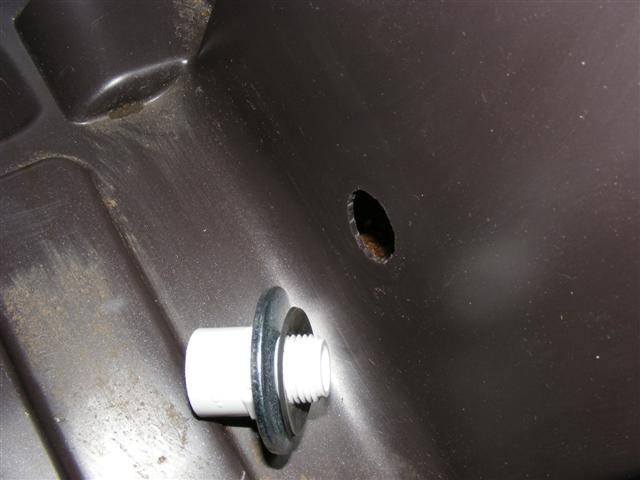
7710Making_a_resivour_005_Small_.jpg

I cut a 1/2" hole near the bottom of the tote on the end, I put the fender washer and one of the rubber washers onto the threaded end of the PVC part, and put the assembly through the hole frm the inside of the tote.

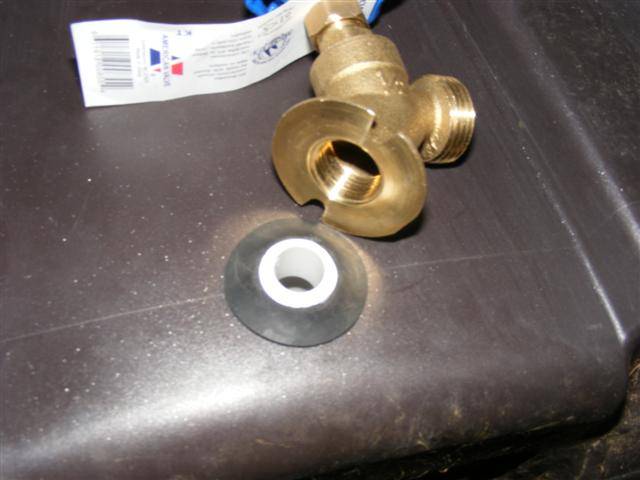
7710Making_a_resivour_006_Small_.jpg

Now I placed the other rubber washer onto the threaded PVC part sticking through the wall of the tote, then I screwed the faucet onto the part and using wrenches I carefully tightened everything nice and secure.

7710Making_the_rez_Small_.jpg

Almost finished!

7710Making_a_resivour_010_Small_.jpg

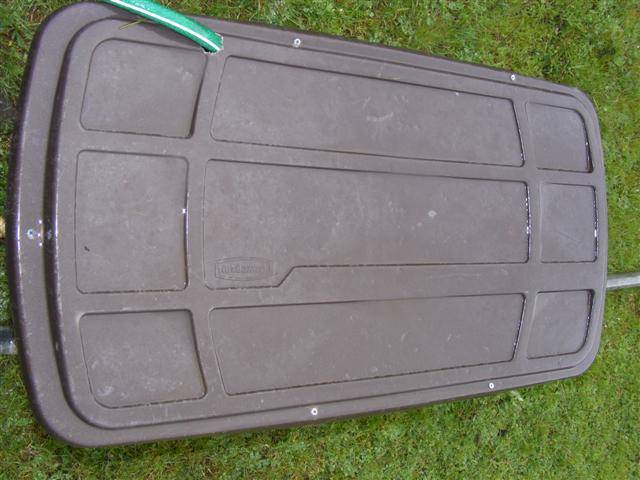
I drilled some holes throgh the lid and lip of the tote, and installed some bolts, this will help keep larger animals from getting into the rez, and also helps the rez keep its shape while filling.
I also cut a hole just large enough for a garden hose for filling, this hole will be covered when not in use.

It would be ideal for this rez to be at least partially burried to help support the sides of the tote when filled, although I have never had a tote split under the weight of the water it contains.
 
Last edited:

BACKCOUNTRY

Mourning the loss of my dog......
Veteran
Building a basic automatic system from gardenhose parts

Building a basic automatic system from gardenhose parts

Building a basic automatic irrigations system
Here I show how to build a basic automatic irrigation system from garden hose parts, most of the parts came from Wal-mart, and from old parts laying around the garden.

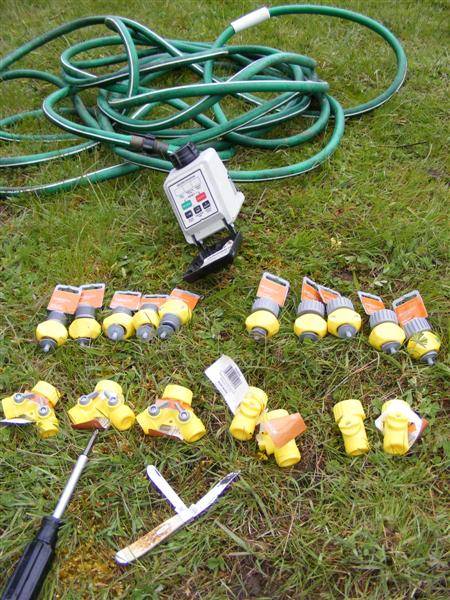
7710Garden_hose_irrigation_003_Medium_.jpg

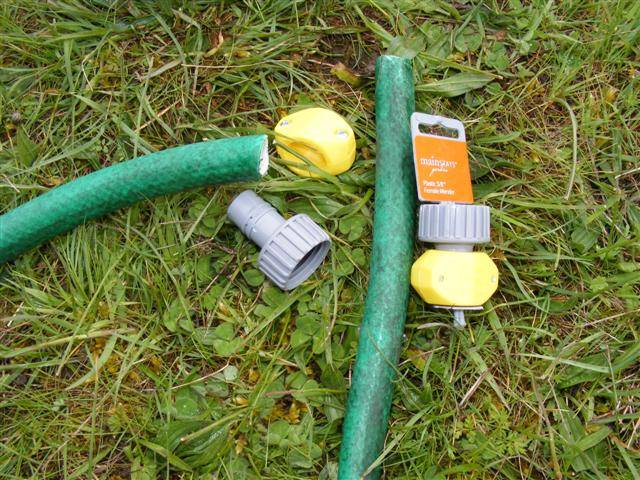
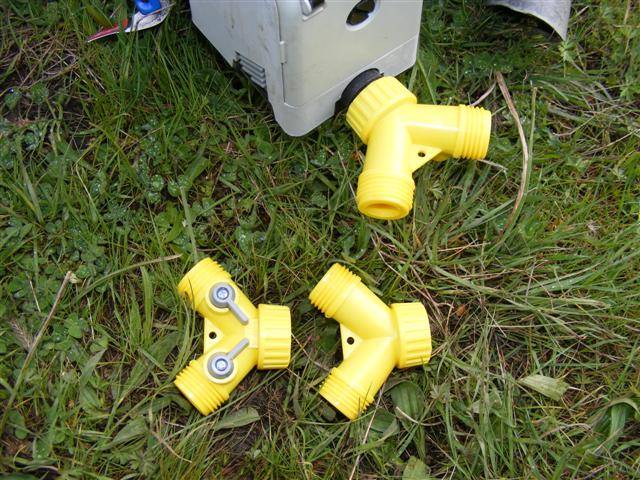
Here is a picture of most of the parts: A old beat up 50' garden hose, a Gilmour water timer, 3 garden hose "Y"s, 4 garden hose shutoff valves, a bunch of male and female hose ends meant for repairing garden hoses(I show more in this pic than were actually needed for this project), a pocket knife, and a screw driver(not shown is a new 10 to 50 foot garden hose).

7710Garden_hose_irrigation_004_Small_.jpg

I start by cutting the old 50' hose into 4 roughly equal length sections.

7710Garden_hose_irrigation_005_Small_.jpg

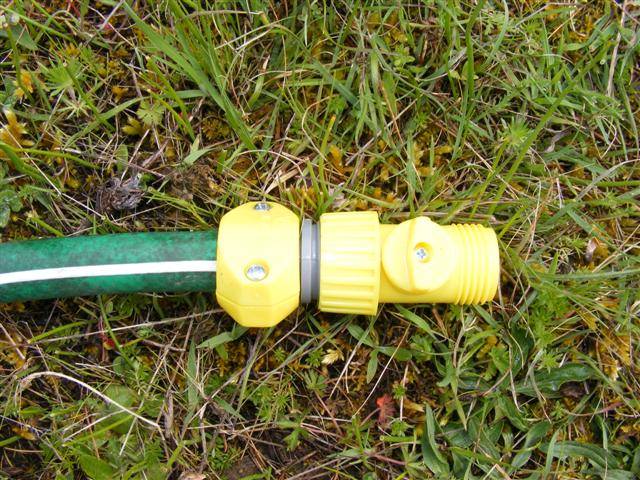
One of the hose sections will have a male end already attached, and one will have a female end attached. Each section needs a male and a female end, so I use the hose end repair parts to install the needed ends.

7710Garden_hose_irrigation_013_Small_.jpg

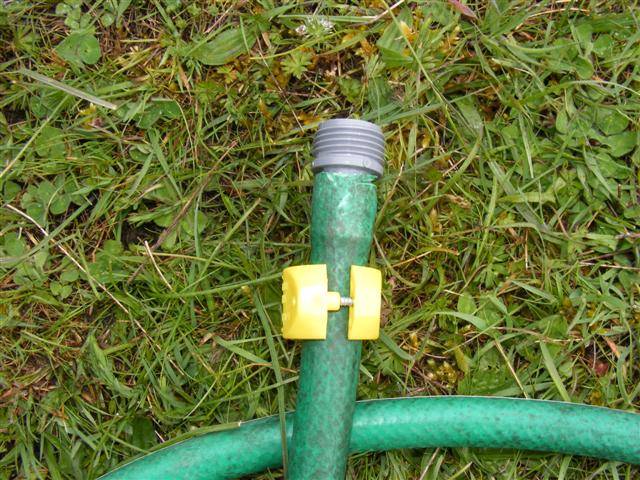
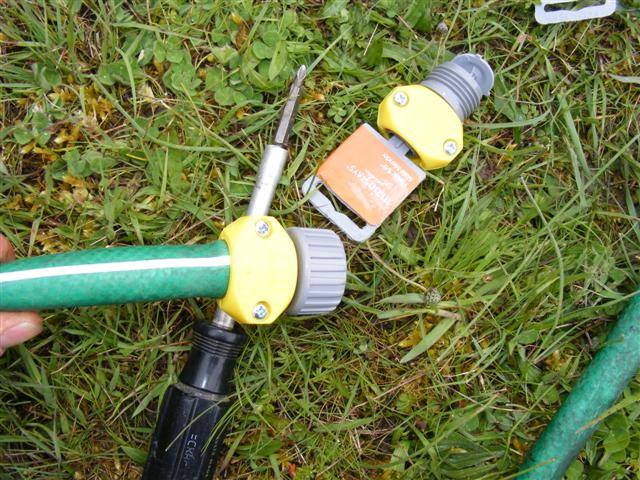
I first loosen the screws on the collar, and slide it on the hose, then I shove the male or female end into the hose end, this takes a bit of pressure and can be helped by lubing it with soap.

7710Garden_hose_irrigation_015_Small_.jpg

Once the end is shoved in, I slide the collar back up the hose onto the bulge caused by the installed end, and tighten it.

7710Garden_hose_irrigation_016_Small_.jpg

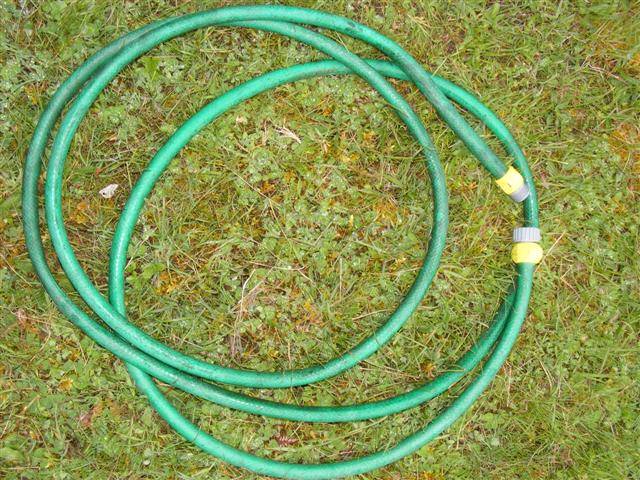
When I am done, I will have 4 new shorter hoses that look like this.

7710Garden_hose_irrigation_016a_Small_.jpg

7710Garden_hose_irrigation_017_Small_.jpg

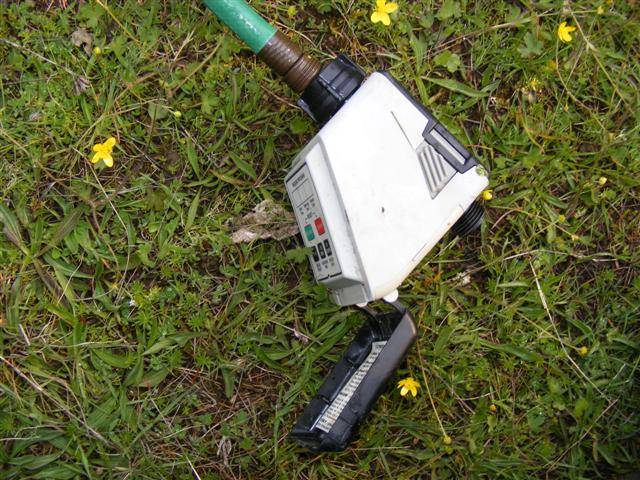
Now I connect the new(not leaky) hose to the rez, and to the Timer. Its important that this connection be absolutly leak proof, thus the need for a garden hose in excelent condition, you don't want to find your system leaked all it water after returning to visit after 1-3 weeks.
The water timer should be placed at least 2 feet below the faucet on the rez, to insure there is addequate pressure to opperate the timer, and the lower beneath the faucet you can get it the better, more pressure will ensure smooth operation of the system.

7710Garden_hose_irrigation_018_Small_.jpg

7710Garden_hose_irrigation_019_Small_.jpg

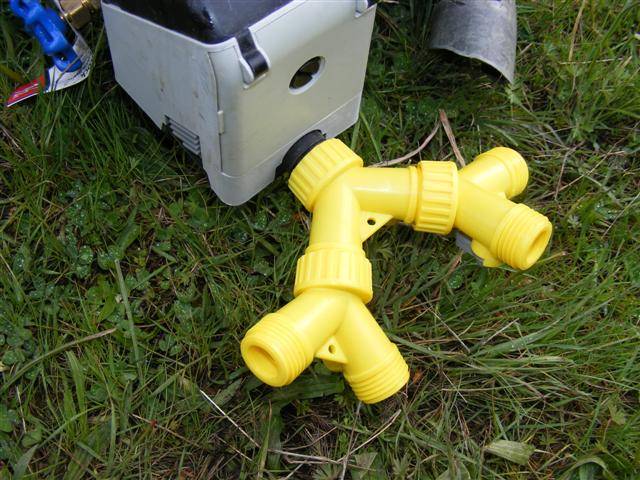
Now I take the 3 "Y"s and connect them to the timer as shown. The 4 homemade gardenhoses I made earlier are connected to the 4 male ends on the "Y"s.

7710Garden_hose_irrigation_020_Small_.jpg

Now I connect a hose shutoff valve to the male ends of the garden hoses.

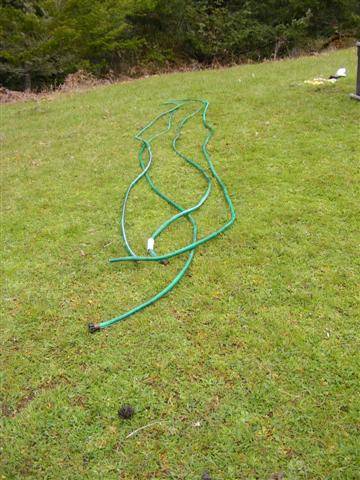
7710Garden_hose_irrigation_021_Medium_.jpg

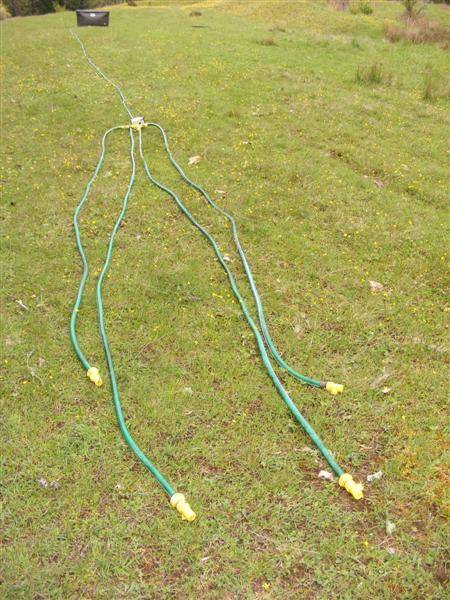
Here is a pic of the system completed and layed out. My water timer is about 6 feet below the faucet on the rez in this set up. I have the hoses all laying together, but in a real set up you would direct the ends to their individual plants.
Its best for the plants to be lower than the timer, and roughly at equal elevations to each other, this will make ajusting the flows easier.

7710Garden_hose_irrigation_022_Small_.jpg

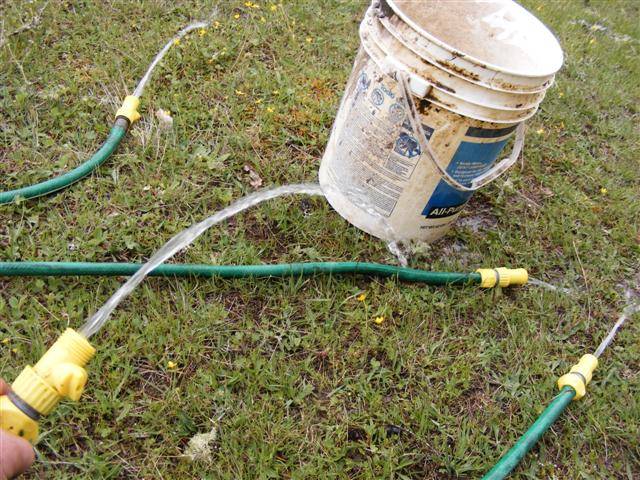
Here you see water flowing through the shutoff valves, the valves are about half open.

7710Garden_hose_irrigation_023_Small_.jpg

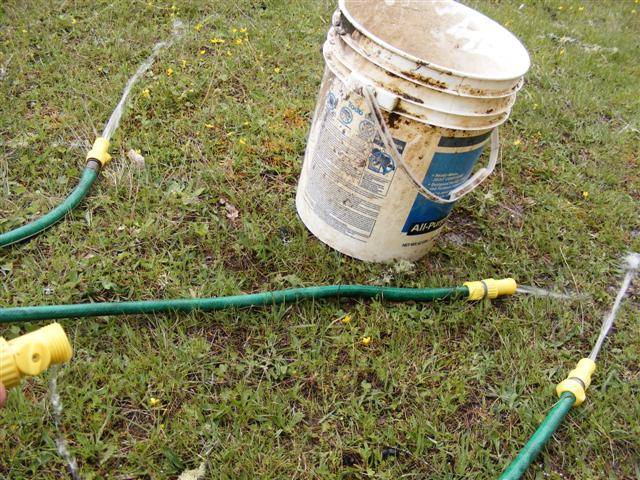
Now I have closed the valve on the one I am holding to about a quarter open, notice how the other ends are emmiting more volume in water?

Ajusting the flow
Now we need to ajust the flow of water, so that each plant gets a equal ration of water, and so you can ajust the system to give the ammount of water needed. This way you know how long the water will last between waterings

On this system I have four places to ajust flow: The faucet on the rez, the water timer, the "Y"s, and finally the shutoff valves at the end of each plants hose.
In most situations you will do most ajustments at the hose end valves and at the water timer.
My Gilmour water timers, and most other timers are designed to be used for watering lawns and vegie/flower gardens, so it is designed to be opened in 15 minute increments, 1-7 times a week, some of the more expensive digital timers allow even more ajustments and will allow you to program the timer to open up for smaller increments of time.

To ajust the system, place the hose ends at each plant site, and place each end in a bucket or jug larger than the ammount of water to be given. Close the valves on the ends to about a quarter open, and turn the water timer on, since mine opens in 15 minute increments only I program it to open for that period of time.
When the valve has closed after 15 minutes, I check the containers at each hose end and see how much water flowed, I take note of which ones got too much water or too little and ajust the valves accordingly. I pour the test water back into the rez and try again and again until the flow is right.

How much water?
This depends on your climate, and soil conditions. Most growers in North America will probably need 1-5 gallons per plant per week. If you live in a area where rains fall occaisionally in summer and/or the temps stay coolish(70-low 80s) a gallon 1-2 times a week may be all that is needed. Those in very dry areas may want to give 5 gallons per week divided into 2-3 waterings.
I give about 3-4 gallons per plant per week, divided into 2 waterings, depending on how sun exposed and hot the location is. I have highs in the upper 90s most weeks in July and August, sometimes higher.

Enriching your soil with Peat moss or Coco coir, and water holding crystals can help the soil retain more water between waterings, and may help you reduce frequency and volume of waterings. In exteme climates, lining the sides of the holes with sheet plastic or garbage bags can further reduce moisture loss, but make sure excess water can get out through the bottom or you may set up a situation for drowned roots and dying plants.
 
Last edited:

BACKCOUNTRY

Mourning the loss of my dog......
Veteran
Other possibilities
Another great idea I have seen invovles using Terracotta pots hooked up by hoses to resivours, and burried in the ground to seep water slowely to the plants, the idea is that the pots only give water as it is needed.

Here is a link to a website that sells these-Wateringsystems-Wetpots

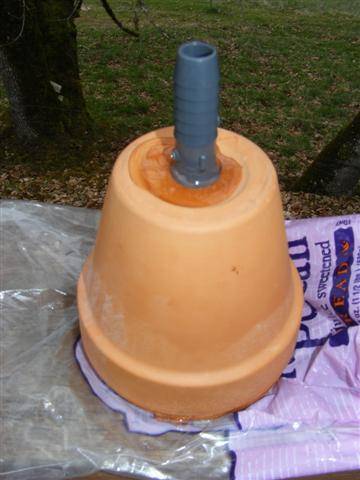
I have been working on and off on making my own wet pots from Terracotta planters, basicly sealing the open end and attaching a nipple to attach a hose to. I'll try to get more about this up online as it developes.

Here are a few pics where I put the "wet pot" together-
7710Cultivation_3-10-2008_004_Small_.jpg

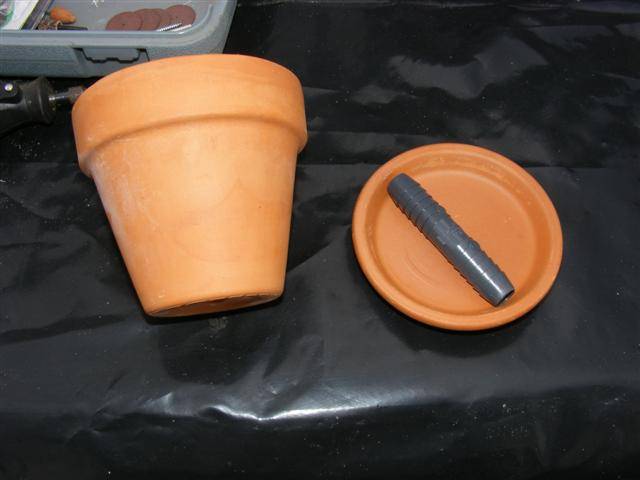
Here are the parts I used, a 4" Terracotta pot, a terracotta drip dish, a 1/2" Poly nipple.

7710Cultivation_3-10-2008_005_Small_.jpg

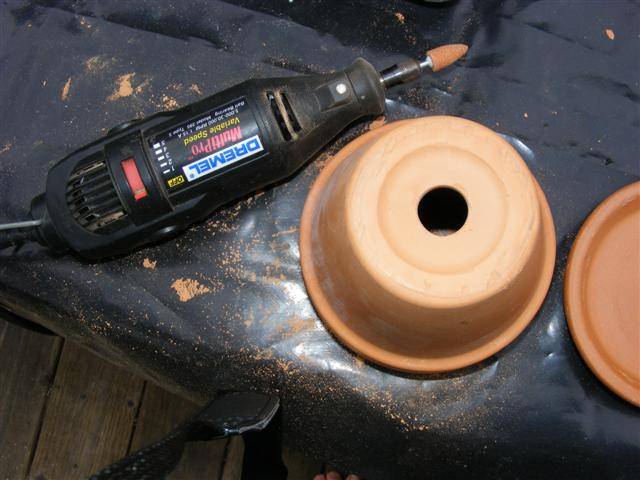
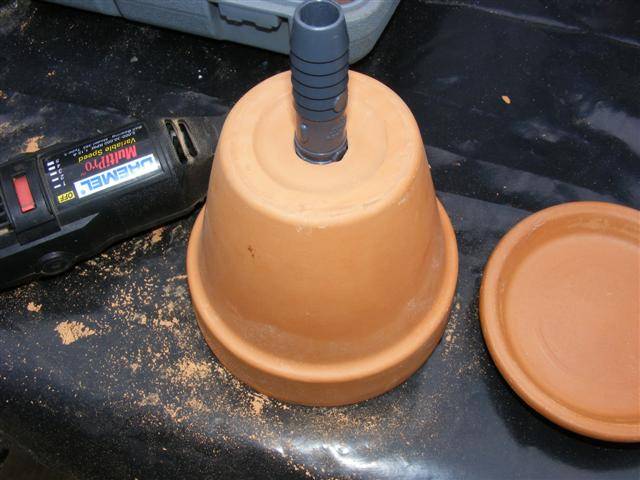
Here I am using my dremel tool to grind the drain hole larger so a 1/2" Poly nipple will fit.

7710Cultivation_3-10-2008_007_Small_.jpg


7710Cultivation_3-10-2008_008_Small_.jpg

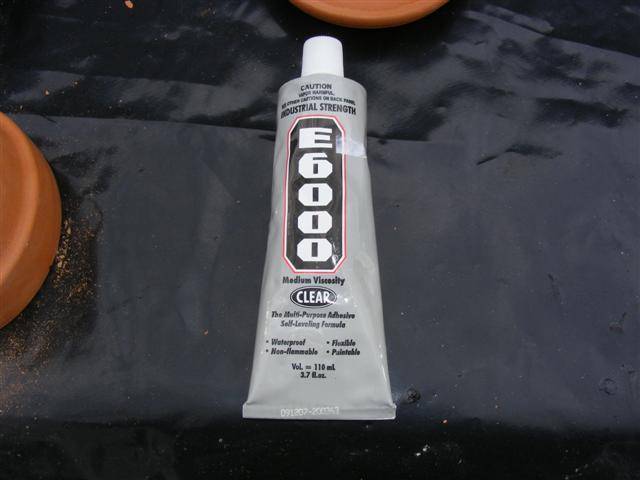
Here is the heavy duty cement/sealer I used to glue the parts together, E6000.

7710Cultivation_3-10-2008_009_Small_.jpg

And here is a picture of it all glued together.

I soaked the pot overnight in a container of water to saturate it and allow the capillary action to start, then I filled the pot with water by hand through the nipple, and indeed, water began to sweat through the pot.

A couple things:

1. I think a pot 2-4 times the size of this one would work much better.

2. I should not have glued the nipple so it was so far inside, the pot won't fill with water past the end of the nipple :down:

I'm going to get some bigger ones made, maybe from some 6-8" pots, and do more experimantation, I wish I could find a good source of Terracotta bottles or jars, they would be much easier to convert.

----------------------------------------------------------
Selfwatering planters
This is another approach, selfwatering planters are already fairly common, so this isn't anything new, although the water and soil capacities are rarely up to par.
Selfwatering planters are fairly easy to build, basicly you have a planter section mounted over a resivour, a tube filled with pure peat moss or coco hangs through the bottom of the planter and rests on the bottom of the rez, this will bring moisture up through the peat it contains to the planters soil by capilary action.
7710Basic_self-watering_planter.GIF

^This pic is just a rough outline for a planter, the basic princable could be applied in many ways^

The possibilties are endless for various containers that could be made into self watering planters, for example a 20-30 gallon garbage can could be modified to contain the soil in the top part, with a divder that allows the bottom part to contain the water.
Various combonations of buckets,barrels,totes, etc could be used. Hell you could dig a hole, line it with black plastic, fill it with water and suspend a bucket over it.

I imagine these would take a few seasons to get the planter and methods just right in each climate, but I think this is the best option for people who only need a personal number of plants.
It is the most reliable system you could use, no machines to loose power or jam, no pipes or hoses to plug up. Just some containers, some potting soil, water and a plant.

Here are some links to site about the most popular selfwatering planters today, the "Earthbox":

The commercial version- Earthbox.com

A example of a homemade version- DIY Earthbox
 
Last edited:
How long does the PREP work take bc?The reason i ask is because it takes me about 2 hours to set up a irragted 30 plant plot,i've always used a sub pump that feeds the 1/2 inch poly header hose from a lake or river that's runs of a small 1000watt Honda gen,it works great but i can't stagger my plants because it has to be a square style setup with lines going down the middle and my plants are in rows.
 

BACKCOUNTRY

Mourning the loss of my dog......
Veteran
For a personal sized plot, prep work doen't take long, its easy. Two hours isn't bad for a 30 plant commercial plot, good job.

Keep in mind that this thread is meant more for helping self-providers with personal sized grows, I am sure you commercial growers are pros with this stuff already.
 
Last edited:

ScrubNinja

Grow like nobody is watching
Veteran
Hey there BC, I have a bunch of questions for anyone who's interested. I have bought all the stuff and am part way to constructing the following pic on a remote dry high mountain slope. The res is 100 litres and buried into the slope. I can get water there fairly easily from a creek nearby but there's no sun at the creek, hence using the mountainside. So I hope to have a system that I don't have to visit very often apart from checking for males and harvesting. :D Too many snakes around.


After reading your post though, I think I'm being a bit optimistic about how long that 100 litres is going to support 12 plants though. They probably won't get any significant rainfall (I'm in outback Australia) but I'll dig drains leading into the reservoir regardless. Soil will be trenches dug into the hard clay and backfilled with good moisture retaining potting mix, and mulched heavily.

So, should I scale down the number of plants? Half will go as males don't forget so I can block those drippers when needed.

How many drippers do you actually need for satisfactory watering coverage of one large growing plant?

Would those mini sprayer things be a better option than drippers?

Is digging trenches leading into the (clean plastic container) reservoir a good idea or is that going to clog up the drippers?

The hole for the res is dug but I haven't laid anything down or dug the plant trenches yet, so I am super open to any ideas or total re-workings, guys. I know next to nothing about this stuff. The drippers I bought are 4 litres per hour. I thought they were adjustable but they're not :badday: Well, thanks for any info. :rasta:
 

ScrubNinja

Grow like nobody is watching
Veteran
Also, if you were to just have one long pipe coming off the water timer and running maybe 30 metres down the slope, with drippers all along it, so the height of each dripper is very different....Is that going to affect the rate of flow comparing the top to bottom? If so is there some way around that effect? Adjustable drippers perhaps?

And I promise I won't ask any more questions after this, haha :D but what are people's thoughts on going the el-cheapo route and cutting out the timer. Just delivering a slow constant drip. Is that workable at all or just a bad idea?

Cheers.

Oh yeah and to any Aussies - Bunnings have 500 litre plastic water tanks for sale at $99. In a convenient shade of bush green ;)
 
Last edited:

BACKCOUNTRY

Mourning the loss of my dog......
Veteran
I don't like the idea of "drip" systems for guerrilla use, drip systems need lots of pressure and very clean water to keep from clogging up.

The system I lined out here should be pretty resistant to clogging, and very ajustable......

If you are pretty set on using a drip system, make sure you put your rez a good distance above the plot, and use screens to keep debris out of your lines, or you'll come back and find drippers plugged often.

One emitter per plant should work, I would stick with the plan you showed in the drawing and not try to do one long line(it would be hard to ajust flow), put a valve at each branch off the main line to help ajust flow further.

100 liters is about 26.5 US gallons, I give about 1.5 Gallon per plant per watering minimum(and I have a feeling most regions of Oz are warmer than here) twice a week , so if I were growing your 12 plants in my territory, I would get just a little more than one watering from your 100 liter rez.
For me, I'd want a rez that will sustain the plot for at least a 2 weeks, your rez would support 4 plants for 2 weeks OK for me.

All this said, my ultimate advice would be to put in three or four seperate plots, each with its own 100 liter rez, and use a simple, easy to use, ajust, and setup system like I show above.
 
Last edited:

ScrubNinja

Grow like nobody is watching
Veteran
Man, you're a legend, thanks a lot. So I take it you're watering as more of a quick flood than a slow drip. I somehow missed that. Makes sense to avoid clogging. I'm going to go stand on site today with my newfound knowledge and redesign.

I'm way up North close to the equator so I believe we can grow all year round to some degree. Judging by your thread in your sig, you would understand it a lot better than me. I never even paid attention to seasons until I started reading this forum, lol. Learning a lot here, slowly!

As my much more experienced friend says, anytime I ask him when the ideal time to plant...."Right now is the ideal time to plant, right now". :wave:
 

rusto

Beast
Thank you very much this is a very good setup and idea. Backcountry thanks for all of your help.
 
ScrubNinja said:
Hey there BC, I have a bunch of questions for anyone who's interested. I have bought all the stuff and am part way to constructing the following pic on a remote dry high mountain slope. The res is 100 litres and buried into the slope. I can get water there fairly easily from a creek nearby but there's no sun at the creek, hence using the mountainside. So I hope to have a system that I don't have to visit very often apart from checking for males and harvesting. :D Too many snakes around.
use a float valve in the res that feed yur plants from an other res fed from the creek ...
 

Mr Celsius

I am patient with stupidity but not with those who
Veteran
Thanks BC, I personally like what wallyduck has done with a 12v 25f of head electric pump. Its inline and the one from harbor freight is 65w and 5 AH. If you brought a fully charged 200 AH deep cycle out there and watered for only 15 mins, well you can do the math :D You also need a 12v digital timer, but those are pretty cheap. The cool thing is you can integrate a solar panel if you want extra insurance.

http://www.harborfreight.com/cpi/ctaf/displayitem.taf?Itemnumber=94790
http://www.harborfreight.com/cpi/ctaf/displayitem.taf?Itemnumber=90599
http://www.harborfreight.com/cpi/ctaf/displayitem.taf?Itemnumber=9576
http://www.windsun.com/Batteries/Battery_FAQ.htm
http://www.cetsolar.com/batteries.htm

Theres ^ everything you need, you would never have to visit your plot.


I also like the res idea and its good for just a few plants and have used it many times. Last year we had 5 - 30 gallon trashcans that we're grid tied together (to overall increase the amount) and had to refill them once a month. Our water timers were from lowes, $20 and you could set the frequency of watering from 1min-15mins, it was an analog control interface. Luckily the trashcans were on a north facing hill (south would have been better) so the plants were lower and gravity did the job.
 

hamstring

Well-known member
Veteran
BC
Great thread and great pics. They really help with the understanding of the res. I think (no real experience) that removing the drip emitters is a great idea because I have filtered my water for my bug sprayer and it still leaves a lot of sediment after filtering. SO clogging would seem problematic with drip emitters using creek/river water.

Great job.
 

BACKCOUNTRY

Mourning the loss of my dog......
Veteran
Thanks guys!

Mr Celsius- 12volt pumps are the bomb in flat country, but I prefer to just use gravity to power my systems in the hills, cuts out the expense of pumps and batteries when you aren't really growing to make money in the first place. Also cuts out lots of extra exipment that can malfunction, etc, etc.

I'm also critical of the idea of using solar panels to power guerrilla grows, they aren't as reflective as a mirror of course, but it is a sheet of glass pointing at the sky, the guys in the helicopters may take notice.......
 
Last edited:
So if i were to build a self watering pot could i still use my tea's in the basin?
I saw on the earthbox site they recomend only dry ferts in the soil.
But in the diy i think the soil will suck up whatever you put in the basin right?
Also do you think perlite would be a better wicking medium to fill the basket with or will it draw 2 much water? JS
 

Latest posts

Latest posts

Top