Jackerspackle - Designing an air-cooled reflector (Saved from OG)
For those interested in building an air-cooled hood, here is the method i use for designing them.
(The full story is at: http://www.overgrow.com/iss4/aircoo...reflector1.html )
Hood building may seem a little daunting at first, but after doing 1 or 2 it's a piece a cake!
The example here is for the triangular design - a great shape for long/rectangular gardens. The 4-sided pyramid (excellent for square gardens!) is similar as far as planning goes, except all 4 sides are triangles, instead of 2 being rectangles.
Use graph paper to draw it out, so there are no funny surprises when trying to fit the parts together later.. We want to try to work within 1/4" tolerances.. ideally 1/8".
Each box here represents 1". (Usually you want it to be less than that, like 1 cm.)

The first step is to measure the diameter of the bulb. If you have trouble doing this, just tie a string around the bulb, measure the string, and divide by 3.1 to get the diameter.
Start by drawing a circle equal to the diameter of your bulb (3.5" in this example). Also draw a line 1.5" below the circle. This is where the glass plate will be. Don't worry about the length of the line, just draw it across the page for now.

Next draw a vertical line through the center of the bulb. Also draw 2 arcs 1.5" away from bulb (2" from a 1000w HPS) at the 10-o-clock and 2-o-clock position, like in the diagram. You'll see why in a second.
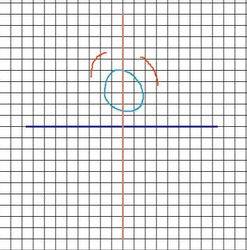
Now take a square card (it must be exactly square) and align the top and bottom corners with the vertical line on the paper. Then - keeping the corners aligned - slide the card up or down until it meets the 2 arcs. Now just trace the outline of the card with a pen. This is where the sides of the hood will be.
Now measure the lengths and height.. To measure the 2 diagonal sides, you can use a second piece of graph paper.. or use the Pythagorean theorem, heheh.
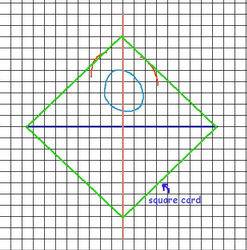
Cool, so now we have a side view of the hood. We also have the dimensions of the 2 triangular panels - 16" wide by 9" tall.. 12" will be the height of the adjacent panels.

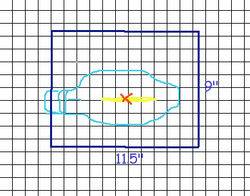
Now we just want the dimensions of the other 2 panels. To do this, first draw a side view of the bulb in it's socket. Try to get the sizes pretty accurate, including the position of the inner arc tube. We're going to center the hood around the middle of the arc tube (the red X). This probably isn't the middle of the bulb. Some hoods on the market aren't centered around the arc tube. Shame on them.
So draw a rectangle centered around the red X.. 9" high (in our example), and 1.5" between the bulb and bottom plate..
So, these panels will be how big?.. Yup, 11.5" long by 12" tall.. Got that? The height of the panels = the length of the adjacent side in the diagram.
That's it - now we're ready to cut the panels, cut holes for the vents and socket, pre-drill the screw holes, and fasten the panels together.. Feel free to make a cardboard model first, just to make sure you measured everything right.
The 4-sided pyramid is a little trickier since there's no vertical surface to mount the socket to.. you have to make a supporting bracket for it. No big deal really, just make it rigid enough so the bulb can't slap against the glass plate when you accidentally bonk your head against the hood (stoned of course)..
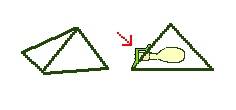
Remember you can use whatever materials are available to you.. as long as it's metal.
I'll try to get some photos up of some nice 4-sided's.. In the mean time, if anyone has questions just ask..
jacker
Btw, the above plans are just rough samples - do not use them! Bulb sizes vary too much.
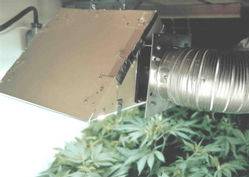
The finished product:
---
MK2 posts
A little more info please jackerspackle.
Thanks for posting about your reflectors again. I think a lot of us get stuck in the forums and forget about some of the great articles that are available on OG.
Got a few Questions for you...
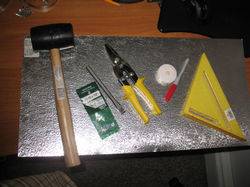
1 - What tools (ALL of them) does one need to take on this project? Tin snips, power drills, speciality bits, etc?
2 - What order should one follow if they are going to take this project on? Build the ballast & buy the socket first and then move on to building the reflector?
3 - Do you have any pictures you could post that focus on how you attached/mounted the socket to the reflector? This seems to be the biggest grey area to the whole project. A few different angles on that would be helpful to those who are going to attempt to take this project on.
4 - I can't think of a way to put this into words but...Did you use one sheet of metal - make your cuts - and fold it into the shape you wanted (i.e. one piece)? Or, did you cut out various pieces from the sheet - and just assemble them using metal screws, brackets, and foil tape (i.e. multiple pieces)? Hope you understand what
I'm trying to ask.
5 - For this question let's assume the triangular reflector is being built. Assuming the socket is on one side of the reflector and the exhaust vent is on the other side - where does one connect the intake hose to insure air passes over the bulb before being exhausted? For AF's purposes this will be in a 30"D x 48"L x 72"H cabinet with a 400/430 watt HPS lamp.
BTW, the links at the end of your article on air cooled reflectors are not working. Error 404?
Thanks bro.
MK2
---
Chronic Man posts
A question or two....
I think I'm going to convert my existing hoods to air cooled. I'm going to use two fans, one to push and one to pull. I'm wondering why you use only one fan. Aren't you afraid of burning your plants or your bulb? And another question, do you know how many lights you can run in series? You know using two fans to cool several hoods. Someone posted a good diagram in the image gallery, but it's gone now. I would think that would be the way to do it with several hoods, what do you think? I mean that's a hell of alot of fans. Do you like the inline fans better, or the squirrel fans? You seem pretty knowledgable....nice article btw.
Thanks...
cHrOnIc man
---
Jackerspackle posts
MK2, you said:
.....................
What order should one follow if they are going to take this project on? Build the ballast & buy the socket first and then move on to building the reflector?
....................
It definitely helps to have all parts on hand before starting. Most bulb sockets are the generic ceramic type with 2 mounting screws in the back, but you may find other arrangements out there. Plus there's several kinds of junction boxes too, and since these usually attach right to the hood, you'll want it nearby so you can see how it attaches..
......................
What tools (ALL of them) does one need to take on this project? Tin snips, power drills, speciality bits, etc?
.....................
Just tin snips and a power drill, bro. Regular drill bits work fine, but it helps to make a small pilot hole first.
....................
Did you use one sheet of metal and fold it into the shape you wanted? Or, did you cut out various pieces from the sheet?
....................
They're 4 separate panels. Photos coming up..
Hey Chronic Man,
I used 1 fan for that 250 watter in the article because the heat wasn't so bad. But for anything higher in wattage it's 2 fans..
I don't run them in series so i can't really say.
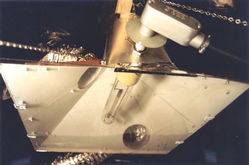
Ok, here's the first 4-sided pyramid.. A couple of things to note..
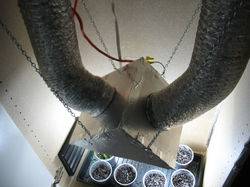
> The intake is on the bottom right of one side, and the exhaust is at the very top of the opposite side. This seems to be the ideal location for this kind of hood.
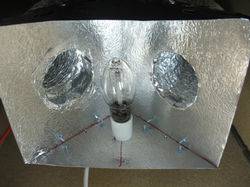
> The junction box is held with a large strip of metal across the top and a smaller piece on the bottom.
> The socket/junction box combo makes the hood heavier on one side, so the mounting hooks were moved over a little to put them near the center of gravity. This evens out the weight on the chains and prevents the hood from hanging lopsided.
> 28 guage sheet metal.
> 14 x 16" and 9" tall.
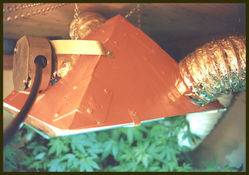
Here's a 4-sided around a 600 HPS .
> Again, the exhaust is at the top.
> The socket support is just some piece of metal i found in the duct section of my hardware store.
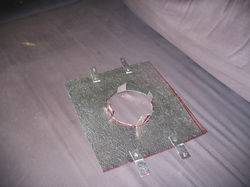
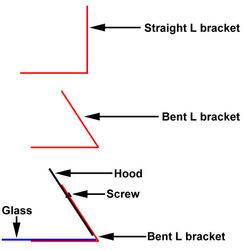
> The 5 supports for the glass are 1" hardware brackets, bent to the proper angle with a monkey wrench.
> Each of the 4 panels is actually 2 smaller sheets screwed together, because i didn't have large enough sheets. It was an experiment that worked.
> 18 x 18" and about 8-9" tall.
This hood kicks butt over a 4 x 4' garden. Normally i wouldn't recommend a 600 for a 4 x 4 space, but this hood can make it happen.
For those interested in building an air-cooled hood, here is the method i use for designing them.
(The full story is at: http://www.overgrow.com/iss4/aircoo...reflector1.html )
Hood building may seem a little daunting at first, but after doing 1 or 2 it's a piece a cake!
The example here is for the triangular design - a great shape for long/rectangular gardens. The 4-sided pyramid (excellent for square gardens!) is similar as far as planning goes, except all 4 sides are triangles, instead of 2 being rectangles.
Use graph paper to draw it out, so there are no funny surprises when trying to fit the parts together later.. We want to try to work within 1/4" tolerances.. ideally 1/8".
Each box here represents 1". (Usually you want it to be less than that, like 1 cm.)

The first step is to measure the diameter of the bulb. If you have trouble doing this, just tie a string around the bulb, measure the string, and divide by 3.1 to get the diameter.
Start by drawing a circle equal to the diameter of your bulb (3.5" in this example). Also draw a line 1.5" below the circle. This is where the glass plate will be. Don't worry about the length of the line, just draw it across the page for now.

Next draw a vertical line through the center of the bulb. Also draw 2 arcs 1.5" away from bulb (2" from a 1000w HPS) at the 10-o-clock and 2-o-clock position, like in the diagram. You'll see why in a second.

Now take a square card (it must be exactly square) and align the top and bottom corners with the vertical line on the paper. Then - keeping the corners aligned - slide the card up or down until it meets the 2 arcs. Now just trace the outline of the card with a pen. This is where the sides of the hood will be.
Now measure the lengths and height.. To measure the 2 diagonal sides, you can use a second piece of graph paper.. or use the Pythagorean theorem, heheh.

Cool, so now we have a side view of the hood. We also have the dimensions of the 2 triangular panels - 16" wide by 9" tall.. 12" will be the height of the adjacent panels.

Now we just want the dimensions of the other 2 panels. To do this, first draw a side view of the bulb in it's socket. Try to get the sizes pretty accurate, including the position of the inner arc tube. We're going to center the hood around the middle of the arc tube (the red X). This probably isn't the middle of the bulb. Some hoods on the market aren't centered around the arc tube. Shame on them.
So draw a rectangle centered around the red X.. 9" high (in our example), and 1.5" between the bulb and bottom plate..
So, these panels will be how big?.. Yup, 11.5" long by 12" tall.. Got that? The height of the panels = the length of the adjacent side in the diagram.

That's it - now we're ready to cut the panels, cut holes for the vents and socket, pre-drill the screw holes, and fasten the panels together.. Feel free to make a cardboard model first, just to make sure you measured everything right.
The 4-sided pyramid is a little trickier since there's no vertical surface to mount the socket to.. you have to make a supporting bracket for it. No big deal really, just make it rigid enough so the bulb can't slap against the glass plate when you accidentally bonk your head against the hood (stoned of course)..

Remember you can use whatever materials are available to you.. as long as it's metal.
I'll try to get some photos up of some nice 4-sided's.. In the mean time, if anyone has questions just ask..
jacker
Btw, the above plans are just rough samples - do not use them! Bulb sizes vary too much.
The finished product:

---
MK2 posts
A little more info please jackerspackle.
Thanks for posting about your reflectors again. I think a lot of us get stuck in the forums and forget about some of the great articles that are available on OG.
Got a few Questions for you...
1 - What tools (ALL of them) does one need to take on this project? Tin snips, power drills, speciality bits, etc?
2 - What order should one follow if they are going to take this project on? Build the ballast & buy the socket first and then move on to building the reflector?
3 - Do you have any pictures you could post that focus on how you attached/mounted the socket to the reflector? This seems to be the biggest grey area to the whole project. A few different angles on that would be helpful to those who are going to attempt to take this project on.
4 - I can't think of a way to put this into words but...Did you use one sheet of metal - make your cuts - and fold it into the shape you wanted (i.e. one piece)? Or, did you cut out various pieces from the sheet - and just assemble them using metal screws, brackets, and foil tape (i.e. multiple pieces)? Hope you understand what
I'm trying to ask.
5 - For this question let's assume the triangular reflector is being built. Assuming the socket is on one side of the reflector and the exhaust vent is on the other side - where does one connect the intake hose to insure air passes over the bulb before being exhausted? For AF's purposes this will be in a 30"D x 48"L x 72"H cabinet with a 400/430 watt HPS lamp.
BTW, the links at the end of your article on air cooled reflectors are not working. Error 404?
Thanks bro.
MK2
---
Chronic Man posts
A question or two....
I think I'm going to convert my existing hoods to air cooled. I'm going to use two fans, one to push and one to pull. I'm wondering why you use only one fan. Aren't you afraid of burning your plants or your bulb? And another question, do you know how many lights you can run in series? You know using two fans to cool several hoods. Someone posted a good diagram in the image gallery, but it's gone now. I would think that would be the way to do it with several hoods, what do you think? I mean that's a hell of alot of fans. Do you like the inline fans better, or the squirrel fans? You seem pretty knowledgable....nice article btw.
Thanks...
cHrOnIc man
---
Jackerspackle posts
MK2, you said:
.....................
What order should one follow if they are going to take this project on? Build the ballast & buy the socket first and then move on to building the reflector?
....................
It definitely helps to have all parts on hand before starting. Most bulb sockets are the generic ceramic type with 2 mounting screws in the back, but you may find other arrangements out there. Plus there's several kinds of junction boxes too, and since these usually attach right to the hood, you'll want it nearby so you can see how it attaches..
......................
What tools (ALL of them) does one need to take on this project? Tin snips, power drills, speciality bits, etc?
.....................
Just tin snips and a power drill, bro. Regular drill bits work fine, but it helps to make a small pilot hole first.
....................
Did you use one sheet of metal and fold it into the shape you wanted? Or, did you cut out various pieces from the sheet?
....................
They're 4 separate panels. Photos coming up..
Hey Chronic Man,
I used 1 fan for that 250 watter in the article because the heat wasn't so bad. But for anything higher in wattage it's 2 fans..
I don't run them in series so i can't really say.
Ok, here's the first 4-sided pyramid.. A couple of things to note..
> The intake is on the bottom right of one side, and the exhaust is at the very top of the opposite side. This seems to be the ideal location for this kind of hood.
> The junction box is held with a large strip of metal across the top and a smaller piece on the bottom.
> The socket/junction box combo makes the hood heavier on one side, so the mounting hooks were moved over a little to put them near the center of gravity. This evens out the weight on the chains and prevents the hood from hanging lopsided.
> 28 guage sheet metal.
> 14 x 16" and 9" tall.

Here's a 4-sided around a 600 HPS .
> Again, the exhaust is at the top.
> The socket support is just some piece of metal i found in the duct section of my hardware store.
> The 5 supports for the glass are 1" hardware brackets, bent to the proper angle with a monkey wrench.
> Each of the 4 panels is actually 2 smaller sheets screwed together, because i didn't have large enough sheets. It was an experiment that worked.
> 18 x 18" and about 8-9" tall.
This hood kicks butt over a 4 x 4' garden. Normally i wouldn't recommend a 600 for a 4 x 4 space, but this hood can make it happen.


