What's new
  • Happy Birthday ICMag! Been 20 years since Gypsy Nirvana created the forum! We are celebrating with a 4/20 Giveaway and by launching a new Patreon tier called "420club". You can read more here.
  • Important notice: ICMag's T.O.U. has been updated. Please review it here. For your convenience, it is also available in the main forum menu, under 'Quick Links"!

Gnomes New Bloom Room

the gnome

Active member
Veteran
well.......
over the last year of gathering supplies and spending all my $$ the new bloom room is ready to go online
:woohoo:


it's a 14 x 20' sealed
starting up with 6000w's in parabolic hoods.
and the room still big enough for a roomy 8000w's
possibly 9000w if the AC will take it.

I put a 32,500BTU mitsu mini...
in the 6KWtest runs it absolutely ROCKs!!

picture.php


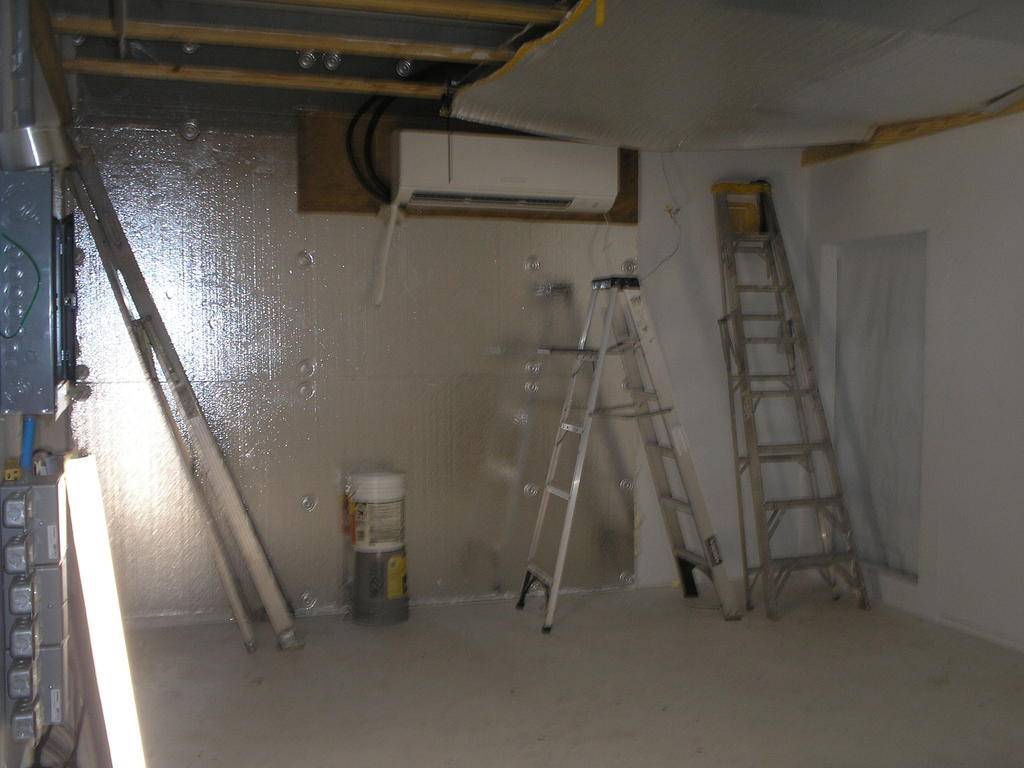
insulation was a key factor for me to keep elec. costs down.
i wanted this room to be as efficient as a walk in cooler.

I have experience with 3" aluminum structural insulated panels used for carport roofs, aluminum rooms .
they are 4 ft by any length up to 20ft.
AND
its the same materials/design used for a walk in cooler.
I thought about using the alum panels but cost was up there at around $5 sq-ft
so with 10ft of length needed cost per panel was $200 plus tamales.


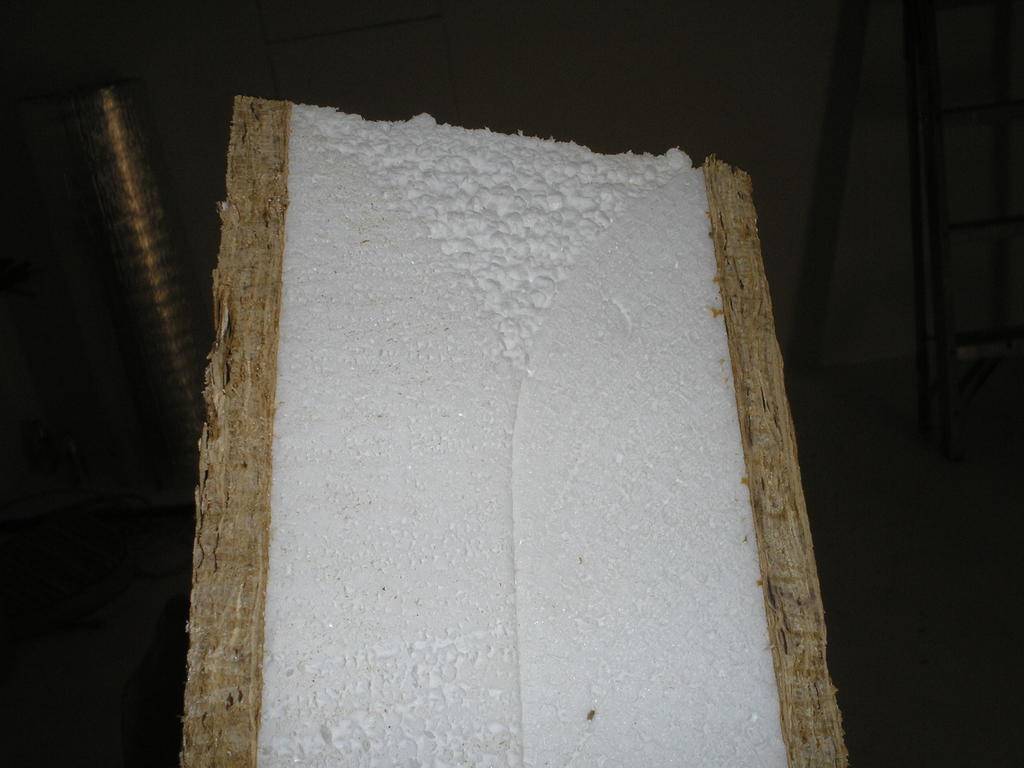
i found a company that makes prefab insulated walls,
any thickness of 1lb EPS foam skinned w/1/2" OSB on both sides made to any length like the alum panels.
tops/bottoms+sides can be splined any depth so you can attach the walls together.
so i got the foam 3-1/2" thick to take a std. 2x4.
BUT
the icing on the cake is that I get each 4x10' panel for under $90...

here's a piece of a wall panel
picture.php


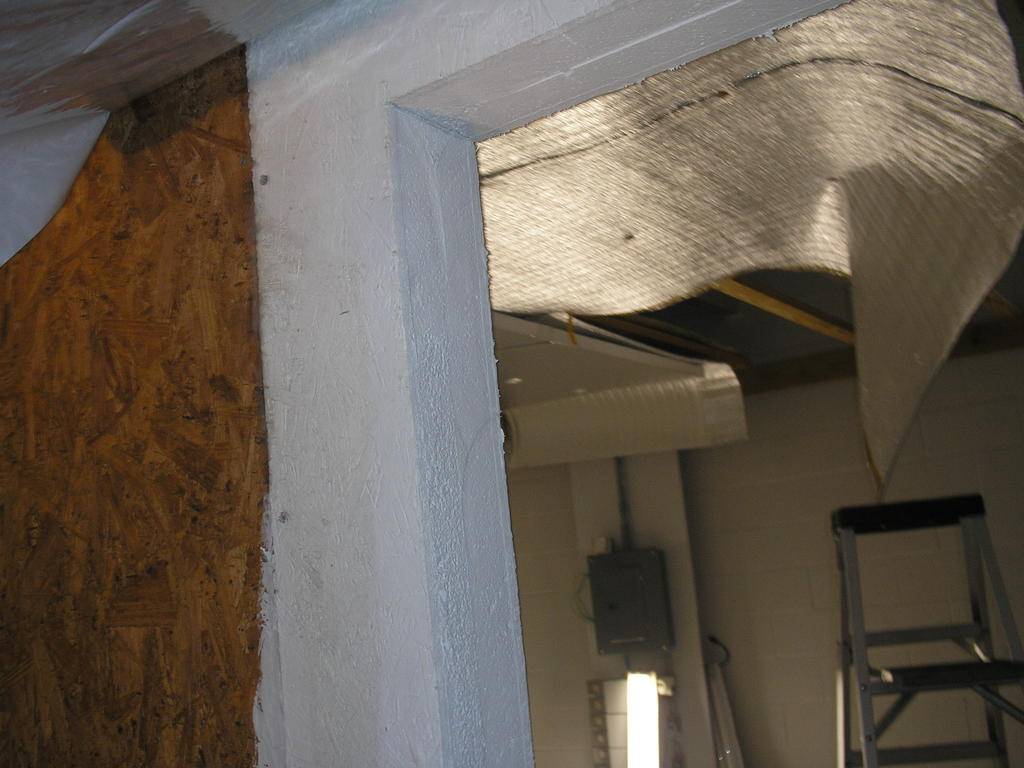
below you can see the side joint between the painted panel with a door opening+the unpainted wall panel,
this is where i had the sides splined 3/4" on each side so a 2x4 went between the sides of each panel 3/4"
this gave me something to fasten to on the sides of the panels.
picture.php


a 2x4 *track* was laid on the floor.
bottoms of the panels were splined an 1-1/2" deep so the track fits snugly into the bottom of the panel,

just set the panel on the 2x4, screw it and its secure.:joint:

the ceiling is concrete with objects in the way.
the panels were shortened 3/4-->1"
great stuff foam sealed the gap.
after the foam set the walls had no back+forth play despite having no type of physical attachment to the ceiling.
only the foam.=
even without the foam there was only 1-2inches play when the wall run was secured at both ends.

the side butts+bottoms were only screwed 16" OC.
this system is extremely sturdy
 
Last edited:

farmdalefurr

I feel nothing and it feels great
Veteran
Ya got that shit locked down from the looks of things

Gonna look real nice stocked with ladies

What strains ya gonna run?
 

the gnome

Active member
Veteran
the prefab'd panels i used for the room made up 2 of the 4 walls,
the other 20ft run i had cinder block and the 14ft run was wood.
on the block wall i had to seal it from moisture with dri loc,
then covered the block with 2- 2" thick eps and isocy. foam panels
AND a layer of prodex and covered that with 1/2 4ply CDX plywood.
since this block wall is an exterior wall i did it up heavy w/insulation.
so I have over R-40 insul. value on it
PLUS
the noise reduction that goes along with it.
the insulation was run to the concrete ceiling so you can infrared scan it 24/7 and not see a thing
picture.php

.
picture.php


here it is finished with the plywood
picture.php

.
the end wall with the mini split current; has 1 layer of 2" eps foam but will get 2 layers of prodex with a 1/2 plywood covering, so I'll have close to R-40 on it.


Ya got that shit locked down from the looks of things
Gonna look real nice stocked with ladies

What strains ya gonna run?

the greenery is being stocked right now farmdale
1st bloom run is with 5 strains
gage green Leia OG
mosca's tsi fly and ot x IBG
CGS secret recipe-->(diesel #1 x abusive kush) X chemBX2
and a few chemmy jones.
I also have rez's KQK in the loop but had troubles
she'll be in the next run hopefully.

I was promised cuts of GSC, GG#4, original headband and others but that favor seems to have hit a snag??.....
shucks.gif

so I'll be starting some new stuff from seed and go keeper hunting to get variety going on.
 
Last edited:

the gnome

Active member
Veteran
the ceiling
this had lots of issues and was constantly modified as it went along.
ceiling is concrete with 9-10ft of head room but there were *things* in the way that kept me from getting anywhere near that. also the ceiling had to be sloped from one end to the other.

to span across the 14ft i really needed to use 2x8s which would have made the finish height way too low.
i went with 2x4 #2 yellow pine turned on its side for max headroom,
which really weakens the load a board can take so i ran lead anchors into the concrete at a 90deg angle so it wouldn't pull out, then fastened 2 tie wires straight down to each 2x4 attached on the sides @90deg angles.
this only lowered the ceiling an 1-1/2" for the support.

insulation was combo of prodex and 2"eps foam panels.
i ran the prodex on top and bottom of the 2x4 with an air space between them,
the air space really helps insulative value.
the the 2 " foam is fastened to that.
i used prodex fast action with the adhesive strip, i still had to run some 2 sided tape.
it was a major pita to seal the seams so the fast action helped alot.
picture.php


next the 2" foam panels were installed
picture.php


after that i hit the snag of what to use to seal it all up with
i had weight and fire considerations to deal with.
i had a propane Co2 water gen to be hung from the ceiling and this gave me major concerns,
all that foam is a fire bomb waiting to be lit up.

5/8" sheetrock is perfect but way too heavy to use,
I thought of using 1/2" plywood but its still pushing the weight imo so i found 1/4" 4x8 luan panels, nice and lite but still afire hazard.
there's is a fire retardant paint available but its Xpensive and it may be off gassing for months afterward.

then I went back to my aluminum and roofing exp.and remembered the 4x10 sheets of .032 aircraft grade alum.
under $40 a sheet and i needed 5.

you can get these at sheet metal shops or roofing suppliers.
among other things its used to make hi grade eave/wall flashings
for torch down/hot tar roofs.

perfect for my needs,
its fire proof and only 18lbs a sheet

picture.php


ok, ceilings in!
so including the 2x4 supports the entire 14x20ft ceiling system weighs under 160lbs and will easily support 4-5times its weight.
insulation value close to R-40--->walkin cooler
fireproof---> I sleep really good knowing this one!
AND
it looks neat as shit too

oh yeah :smoke:
picture.php


.
 
Last edited:

the gnome

Active member
Veteran
Damn bro, shit is looking so nice

So so clean

A++

thanks farmdale,
after a harvest or 2 I plan on doing the side walls up with .032 alum. panels
so then the walls will be fireproof
plus the walls will get 2 layers of prodex so add another R-32 to the walls(R-16 per layer),
not to mention the DB reducing qualities.
prodex alone drops 19DBA in contact noise reduction *per layer*
plus its a radiant barrier!
if that isn't enough its easy as pie to work with and a mere
13/64 inch----5 mm thick.
I love this stuff and a big thanks to granger2 for putting me on it :good:

Nice attention to detail Gnome. Can't wait to the room in bloom!


thanks unregistered190,
there were quite a few details to work out i didn't see coming buts to be expected.
retrofitting compared to new construction always is.

decking out the room w/equip was fairly strait forward.
i saved a nice chunk of change doing certain thing myself like the Co2 system.
a gas gen sized to this room I looked at were in the $400+ range and it would run 6+minutes.
a water gen that runs over $300 is the same thing i got for under $120
AND
what I went with pushes 42KBTUs and the big upside is it runs less than a minute to hit 1000ppm


this is initial testing with the Co2 controller
picture.php


all in all i have well under $200 in that part of the Co2 sys. so that freed up more $$ to get a better quality Co2 controller, a green air SPC-1
I also picked up a greeneye Co2/Rh/temp data logger,
imo that's gonna be an asset for sure running sealed/Co2
 
Last edited:

the gnome

Active member
Veteran
ah thanks OrganicOzark,
Ive poured a lot of time into this project,
many times a calling it a day at 10:20pm
there's a few things like sealing the door that's going to be interesting.

Ive been thinking on it since before I started on this project in sept.
and most every day I've given it a quick *what if i do it like this* thought.
originally I planned on getting a std. steel entry unit for $125,
the more i thought on it i didn't like the idea because of the crap insulateve value.
I men I'm pushing R-40 almost everywhere and this will be a big weak link in that chain.
ease of breaking in too.

then It hit me,
since day 1 Ive been approaching building this with efficiency of a walk-in cooler.
sooooo.... get a walk-in cooler door, right.

reality hit in hard when i looked at the price.
it would be the most expensive single item of the room.
1 on craigs list, used, beat to hell was close to a grand!
average $1200-$1800 brandnew.
but they are schweet fo sure.
insulated, set up already for easy locking, a dyn-o-mite 1 piece positive sealing gasket and very very easy to install.
but the money, so i figured put the steel entry unit in and get the cooler door later when i get more funds,

then smokey the dope genie came out of the bong
and hit me on the head with the hammer hehe.
just use the piece I cut out for the door AS the door,
I mean, its more than walk-in cooler thickness...
I was careful on the cutout, making it as square and level as I could.
here is the cut out
picture.php


then i started thinking about mounting and sealing.
i used 10" gate hinges.
this door takes 2 people to carry it around , weighs close to 90lbs
so the install had be pretty accurate.
installed you can open and close it with your little pinkie with ease

with regular hinges on it can't close because there was only 1/8" top-n-bottom clearance from the saw blade
and the door is 4-1/2" thick

then i got a great idea to kill 2 birds with 1 stone.
on the entry side of the door i took out another 1/8",
so now i had 1/8" clearance top-bot. +sides instead of 1/16"
so it still had very tight clearances on the outside.

BUT
it still wouldn't close because of door thickness
SO
on the inner side i took out 3/4" so its sloped/angled in like a vault door at a bank,
smaller on the inside than the outside so when i put the door seal in it would compress the seal more than would be causing a shearing effect and tearing the seal, not compressing it like a standard door would do when closing.


HD hinges
picture.php


very tite clearance on the out side
picture.php


3/4" on the back side, you can see the cut angle and how it will compress the seal... when i figure out what the seal is lol
picture.php


i haven't sealed it yet it's the last thing on my list along with getting a walk-in cooler door handle.
thinking on running dual seals,

one that is actually in the door jamb,
the other I'll build a flange on the inside around the door that that sticks into the opening about 2" so when the seal is in place the door's back will be flush with it when its closed

EDITED:
didn't do the secondary flange seal since the jamb was so efficient
 
Last edited:

RetroGrow

Active member
Veteran
Looks really nice. My only concern would be off gassing. I don't know about that foam you are using, but "Great Stuff" is a known off gasser and should not be used in a grow room. I learned this the hard way.
 

the gnome

Active member
Veteran
hey retro, thanks for the heads up.
the insul.panels are EPS foam--->styrofoam.
prodex isn't a prob either but I used great stuff?

hardly any is below the ceiling in the room, only to seal around 2 -3/4" pipes with minimal exposure.

the ceiling which is sealed between the room and the the 16"*attic* which in turn is also sealed.
its in the attic i used a fair amount to seal the tops of the wall panels and this was 50-60 days ago... and 95% of it was painted/sealed in the attic with pigmented shellac along with the wall panels.
on the outside it was trimmed off with the walls, and will offgass outside the bloom room.


so how long will GS offgas?
painting it with the pigmented shellac should seal it?
 

Sativa Dragon

Active member
Veteran
IF you want to seal the room make it positive pressure and put a sealing rubber or plastic flange on the inside of the room along the edges of the door so when you close the door the plastic or whatever gets sucked up against the seem, and at the same time positive pressure in your room will keep out unwanted pollen, granted you have your intake air filtered well.

Peace
 

Treetroit City

Moderately Super
Veteran
Looks really nice. My only concern would be off gassing. I don't know about that foam you are using, but "Great Stuff" is a known off gasser and should not be used in a grow room. I learned this the hard way.

True.

My brand new build was pretty poisonous for the first month. Not sure what all was guilty but could have been anything.

If you see your plants doing funny things don't try to chase it too much. Over time my room mellowed and is now fine.
 

RetroGrow

Active member
Veteran
hey retro, thanks for the heads up.
the insul.panels are EPS foam--->styrofoam.
prodex isn't a prob either but I used great stuff?

hardly any is below the ceiling in the room, only to seal around 2 -3/4" pipes with minimal exposure.

the ceiling which is sealed between the room and the the 16"*attic* which in turn is also sealed.
its in the attic i used a fair amount to seal the tops of the wall panels and this was 50-60 days ago... and 95% of it was painted/sealed in the attic with pigmented shellac along with the wall panels.
on the outside it was trimmed off with the walls, and will offgass outside the bloom room.


so how long will GS offgas?
painting it with the pigmented shellac should seal it?

I wish I could tell you how long it will off gas, but I don't know. I can only tell you that I lost some prized genetics by starting seedlings in a room which had "Great Stuff" in it. I didn't build the room and wasn't aware that it was there, until the seedlings began to die. Then, when off gassing became the main suspect of my problem, I found out the "Great Stuff" was used, and knew that was the culprit after doing some research on it. I have posted about it several times before. The whole room was torn down and abandoned. Had to build a new room. Also, be careful what you use to glue the foam panels in place. Don't use roofing tar, which off gasses, as do lots of other adhesives. Some types of foam also off gas, so you really have to be careful there. I am wary of any kind of foam panels.
Not trying to bring your head down. Just a heads up FYI.....:)
Here's the MSDS for "Great Stuff":
http://hpd.nlm.nih.gov/cgi-bin/household/brands?tbl=brands&id=4004008
I have read conflicting things about how long it off gasses.
It sounds like you have it above your grow area, so that's a good thing. I would imagine that if you applied it two months ago, you are probably safe.
 
Last edited:

the gnome

Active member
Veteran
again thanks for the heads up retro,
I'll be keeping a close eye and will get a back up room ready for refugees if needed.

sativa dragon,
this room is sealed, completely w/Co2.
no in or out air when the door is closed.
i'm in a situation where it has to be sealed.
thanks for the helpful advice :)


hey TC!
i'm finally here, plants in for 48hrs and on my 1st problem lol!

I expected off gassing early on
but I'm hoping everything should be stabilized by now.
can't smell anything anymore like i did in the 1st 40-50days.
i knew it wasn't good to put anything in at that time

and ty skunk dragon..
I'm very pleased and glad i went the extra mile on some parts of the room :smoke:
 
Last edited:

Treetroit City

Moderately Super
Veteran
Congrats firing up the room.

I know you been working towards it for some time now buddy, good to see it done.

Anything you think I may be able to help with just ask.

Oh yeah, don't trust the greeneye as far as co2 goes for more than a day or two after calibration. It seems it automatically recalibrates assuming the lowest level it reads is atmospheric conditions. In our case we never are at atmospheric and thus when it auto calibrates it throws it off. Just a little tidbit.
 

the gnome

Active member
Veteran
It's a beautiful room. You are living my dream. Doesn't seem right.....
smile.gif


thanks retro,
Ive spent more time in that room than my own house since sept,

I wonder how long the new room glow last as i get into the learning curve crunch of running this machine with these type of plant numbers and thinking I'll be looking back on the last few months of this build as my last vacation for a long time :D


Congrats firing up the room.

I know you been working towards it for some time now buddy, good to see it done.

Anything you think I may be able to help with just ask.

Oh yeah, don't trust the greeneye as far as co2 goes for more than a day or two after calibration. It seems it automatically recalibrates assuming the lowest level it reads is atmospheric conditions. In our case we never are at atmospheric and thus when it auto calibrates it throws it off. Just a little tidbit.

hey TC, kudos to ya!
you've already been a huge help answering all my Qs I bombarded you with since I started this project.

on the greeneye I'm starting to see that myself
the last 3 weeks Ive had it in the room along with the green air SPC-1 controller
i thought the spc-1 was off and recal'd several; times,
then it drifts off so I recal'd both, manually on the greeneye
recently Ive been suspecting the greeneye.
the spc-1 is very sensitive, alot more than the greeneye.
all it does is turn on and off the set point and its a fair bit more expensive than other controllers that have extra this-n-thats
so imo that extra cost went into higher quality sniffer.
 
Last edited:

the gnome

Active member
Veteran
electrical

I spent lots of time on this making sure it was right.
I installed a 100A 12 space panel fed from a 200A main dedicated solely to this panel.
i have 2xtra spaces to upgrade to another 2-1000w lamps if needed.

after the sub panel went in I wanted everything centralized around it.
all the ballast went above
no need to access them very much unless a cap blows,
so out of the way and keep the heat at the ceiling.
they feed 3 banks of 2-1000w bulbs
picture.php


the controller for the lights i made myself,
all 6 ballasts are on 3 2-pole 15A 220v circuits

i didn't want all 6KW starting at once so i went with a sequential start up using 3 digi timers, I'm sure i could have done it with less but this works.
ballasts/banks fire up 2min apart, if power is interrupted the times have back up bats.
so everything should run smooth unless i change the day/nite cycle.
doing the control sys. for the lite saved me a very nice chunk of change that went back into the room on other things

btw
I did this with a LOT of help from rives.
he's definitely the IC "go to" man when it comes to electricity.

definitely a big asset on the forums :smoke:
picture.php


.
 
Last edited:
Top