What's new
  • Happy Birthday ICMag! Been 20 years since Gypsy Nirvana created the forum! We are celebrating with a 4/20 Giveaway and by launching a new Patreon tier called "420club". You can read more here.
  • Important notice: ICMag's T.O.U. has been updated. Please review it here. For your convenience, it is also available in the main forum menu, under 'Quick Links"!

DIY Worm Bin for dollars.

ehonda187

Active member
Thought I would post a little something that I put together this afternoon. It's so easy to make this worm bin and takes no time to put it together. All you need is stuff from around the house and some composting worms (Eisenia Fetida, Red worms) In no time you can turn kitchen scraps into worm castings for your garden.

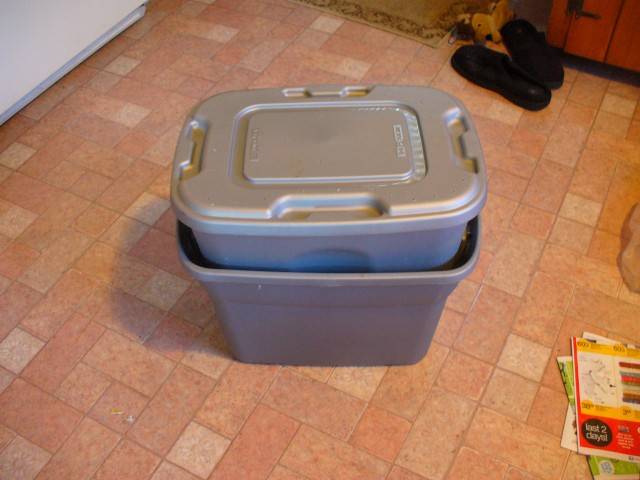
First, you will need a couple of bins for this set up. One bin for the vermicompost and one for the reservoir, I am using these 10 gallon bins I had around the house that I picked up for 2 dollars a piece on sale.


Next, you take a 1/8 inch drill bit and put in some air holes both in the lid and into the sides to ventilate the wigglers environment. You don't want the holes too big or the worms will migrate out of the bin.
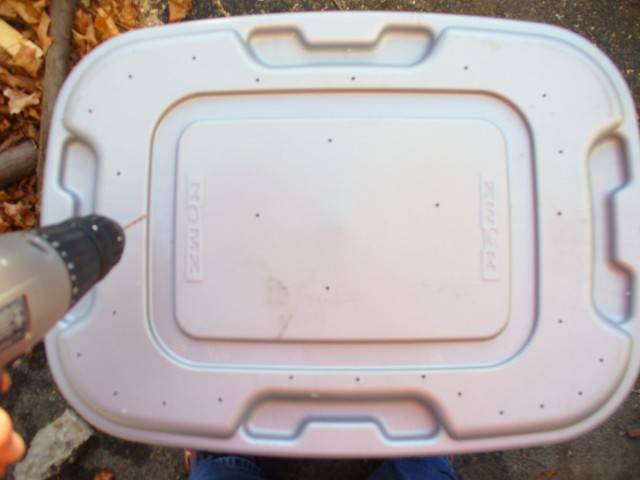
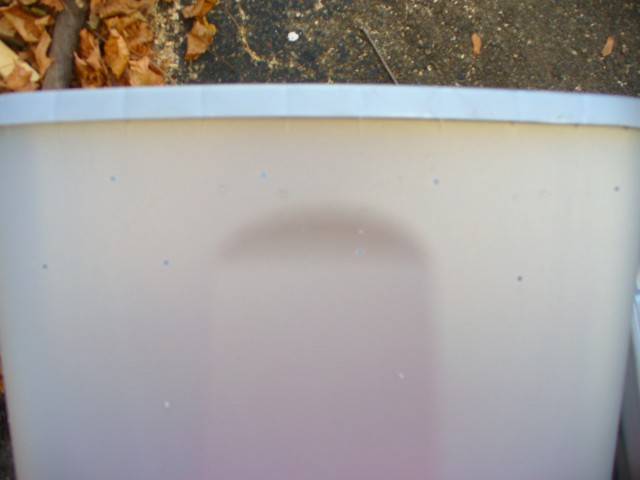


Next, Put a few holes into the bottom of the top bin to allow drainage into the reservoir. Just a few now, or they will fall into drink.


Bin Complete!


Now put a couple of bricks in the reservoir and put the top bin into it and your ready to fill it up with some bedding.


The bedding I used was shredded newspaper, crumbled leaves, shredded cardboard, and you will need some dirt, a couple of cups full for the worms sake. The dirt is for the digestive system of the worm, They need the dirt to grind the food within the gizzard and as well as it supplies the bin with some beneficial microbes.
Get it all in all in there, right to the top. Then wet it all down. Worms need a moist environment since they transpire through the their skin. Not too wet now.


Then add the Dirt and mix it up!


Put in some food scraps and
then add the Worms. I used apples and lettuce and put some bedding over top to discourage fruit flies.
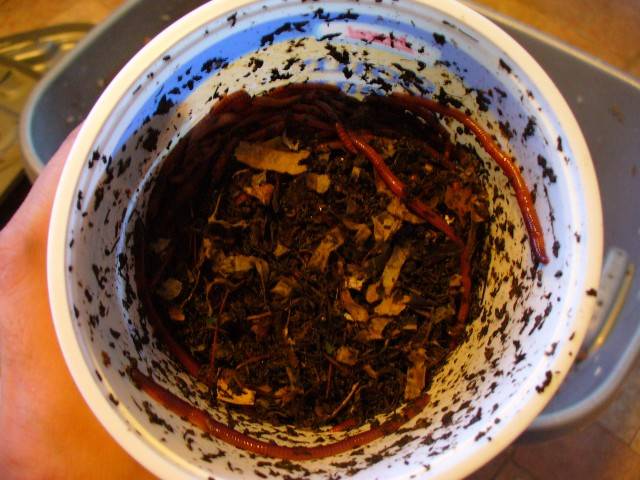


Then cover the worms with a layer of bedding.


Your done! In six weeks you should be ready to start harvesting worm castings. That's will be another thread! Using a pound of worms, they should digest a pound of scraps in a day or 2. Mine I use straight veggies and fruits.
Good luck with your venture. If I missed something, jump right in. :joint:
 

jaykush

dirty black hands
ICMag Donor
Veteran
nice one, i have 5 sets of these. and they work great. one tip though. if you can leaf mold or crushed fall leaves work MUCH better than newspaper as a base material.
 

Microbeman

The Logical Gardener
ICMag Donor
Veteran
Isn't it nice to do things cheap? Another way is to put only 2 to 4 inches of feed/bedding in the bottom, put the worms in and ad food as you watch them consume what's there. Worms feed at the top and this way you can make sure they eat everything. When they get near the top you can fill a mesh plastic transplant tray with their favorite food and they will crtawl in there over about a week. Then you can just snatch off the tray, scoop up worms not in the tray and place into a container; empty out your vermicompost; prepare the worm bin with fresh bedding/food and start over again. Also, you don't have to drill the holes in the side but the bottom is important. For some reason worms love crawling up the sides of the wet plastic to have sex. When you see those white bulge spots on a worm, you no she/he is pregnant.
 

wowzerz

Member
what do you do as far as upkeep? Do you add water to the soil if it drys out, etc? and what is the bottom tub for? just water run off? could you just use the lid of the first tub? Great post, thanks for sharing.
Edit: I have a few more questions. should this be kept outside? I am assuming so, but I thought I should ask. And also, as far as what you can feed them, is there anything off limits, or do you pretty much follow the same guidelines as composting (using veggies, and egg shells, no meat etc)?
 
Very nice thread, Ehonda! This is exactly what Ive been looking for. I can easily contain my worm bin in the basement with no problem.. Doesnt take up much room either! Thanks a lot for contributing man! Exactly what I have been lookin for! i started a compost outdoors last spring, started with leaves, shredded newspapers, dirt, food scraps, and other goodies.. After just a couple months I found the fattest nightcrawlers had mad a nice home in there, and were helping to break down my compost.. This was my first composting experience, and I was amazed by the amount of crawlers that were in there, and their reproductive speed! It was too bad I was forced to move, and I had to leave my compost behind.. :wallbash:

Btw, can u use nightcrawlers instead of redworms? Ive heard u can use both, but wasnt positive. Im looking to use the compost as an additive in my organic soil mix. Thanks again Ehonda10TT
 
what do you do as far as upkeep? Do you add water to the soil if it drys out, etc? and what is the bottom tub for? just water run off? could you just use the lid of the first tub? Great post, thanks for sharing.
Edit: I have a few more questions. should this be kept outside? I am assuming so, but I thought I should ask. And also, as far as what you can feed them, is there anything off limits, or do you pretty much follow the same guidelines as composting (using veggies, and egg shells, no meat etc)?

Wowzerz,
For compost to work properly, it has to have the proper mixture of green and brown ingredients in alternating layers, with the other stuff thrown in for good measure. If composed with the correct ratio of brown and green matter, a compost heap will remain warm and damp.
I will start compiling a list of scraps that can go into your bin..
A good rule of thumb is, if it came from the ground, Give it back to the ground.

Egg Shells (washed out)
Egg cartons (not the plastic or foam ones)
paper
Paper napkins
Freezer-burned vegetables
Burlap coffee bags
Pet hair
Potash rock
Post-it notes
Freezer-burned fruit
Wood chips
Bee droppings
Lint from behind refrigerator
Hay
Popcorn (unpopped, 'Old Maids,' too)
Freezer-burned fish
Old spices
Pine needles
Leaves
Matches (paper or wood)
Seaweed and kelp
Hops
Chicken manure
Leather dust
Old, dried up and faded herbs
Bird cage cleanings
Paper towels
Brewery wastes
Grass clippings
Hoof and horn meal
Molasses residue
Potato peelings
Unpaid bills
Gin trash (wastes from cotton plants)
Rabbit manure
Hair clippings from the barber
Stale bread
Coffee grounds (filter an all!)
Wood ashes
Sawdust
Dryer Lint
Tea bags and grounds
Shredded newspapers
Egg shells
Cow manure
Alfalfa
Winter rye
Grapefruit rinds
Pea vines
Houseplant trimmings
Old pasta
Grape wastes
Garden soil
Powdered/ground phosphate rock
Corncobs (takes a long time to decompose)
Jell-o (gelatin)
Blood meal
Winery wastes
Spanish moss
Limestone
Fish meal
Aquarium plants
Beet wastes
Sunday comics
Harbor mud
Felt waste
Wheat straw
Peat moss
Kleenex tissues
Tree bark
Starfish (dead ones!)
Flower petals
Pumpkin seeds
Q-tips (cotton swabs: cardboard, not plastic sticks)
Expired flower arrangements
Elmer's glue
BBQ'd fish skin
Bone meal
Citrus wastes
Stale potato chips
Rhubarb stems
Old leather gardening gloves
Tobacco wastes
Bird guano
Hog manure
Dried jellyfish
Wheat bran
Guinea pig cage cleanings
Nut shells
Cattail reeds
Clover
Granite dust
Moldy cheese
Greensand
Straw
Shredded cardboard
Dolomite lime
Cover crops
Quail eggs (OK, I needed a 'Q' word)
Rapeseed meal
Bat guano
Fish scraps
Tea bags (black and herbal)
Apple cores
Electric razor trimmings
Hair from a brush
Kitchen wastes
Outdated yogurt
Toenail clippings
Shrimp shells
Crab shells
Lobster shells
Pie crust
Leather wallets
Onion skins
Bagasse (sugar cane residue)
Watermelon rinds
Date pits
Goat manure
Olive pits
Peanut shells
Burned oatmeal (sorry, Mom)
Lint from clothes dryer
Bread crusts
Cooked rice
River mud
Tofu (it's only soybeans, man!)
Wine gone bad (what a waste!)
Banana peels
Fingernail and toenail clippings
Chocolate cookies
Wooden toothpicks
Moss from last year's hanging baskets
Stale breakfast cereal
Pickles
'Dust bunnies' from under the bed
Pencil shavings
Wool socks
Artichoke leaves
Leather watch bands
Fruit salad
Tossed salad (now THERE's tossing it!)
Brown paper bags
Soggy Cheerios
Theater tickets
Lees from making wine
Burned toast
Feathers
Animal fur
Horse manure
Vacuum cleaner bag contents
Coconut hull fiber
Old or outdated seeds
Macaroni and cheese
Liquid from canned vegetables
Liquid from canned fruit
Old beer
Wedding bouquets
Greeting card envelopes
Snow
Dead bees and flies
Horse hair
Peanut butter sandwiches
Dirt from soles of shoes, boots
Fish bones
Ivory soap scraps
Spoiled canned fruits and vegetables
Produce trimmings from grocery store
Cardboard cereal boxes (shredded)
Grocery receipts
 

ehonda187

Active member
Jay Kush - Thanks man. I have 2 grocery bags of leaves in there now. I left some more room to put some more shredded stuff in when I clean up the yard. I'll keep a bunch in a bag in the garage to sustain through the winter time. I have a bag of peat that I want to put a little in as well.

Microbeman- I think it's always a treat when everything you need is at your disposal. It's wild how hungry these guys are, I put in some aged lettuce on the top of the bedding and they barely move when you take the lid off to see them. As far as the harvest, I think I am going to go with the way you mentioned. It seems to be fairly easy. Thanks.

Wowzerz- "what do you do as far as upkeep? Do you add water to the soil if it drys out, etc? and what is the bottom tub for? just water run off? could you just use the lid of the first tub? Great post, thanks for sharing."

Upkeep is easy, just let them do there thing. You don't have to do much but keep them at 55-70 degrees and they will be happy. You don't have to add water, The veggie scraps should supply enough moisture as you put them in. The bottom tub is for fluid collection. The upper tub will secrete moisture as it gets too saturated and drip into the reservoir. I suppose you could use the lid and elevate the tub a little. Same thing. Thanks mang.

TenToesTall- I have a little compost tumbler out in the back yard. It's a great little habit to teach yourself and your kids to do. As far as worms go there are a few kinds that are optimum for composting rapidly. Eisenia foetida (commonly known as red wiggler, brandling, or manure worm) and Lumbricus rubellus. Not too many people use earthworms because they have horrible survival rates in these bins. And damn man that's quite the list. :joint:
 

ehonda187

Active member
Most bait shops around here stock these worms and are fairly easy to obtain. If you can't find them locally then you can find them on the web easily. Ebay is loaded with them. :joint:
 
Will redworms live inside of plant pots without issues? I mean can I drop them into my plants pots, just like an earthworm?10TT
 

ehonda187

Active member
I wouldn't do it, There isn't enough food in that environment so they will start headin out when the lights go out. You will have a cabinet full of hungry worm nomads.
 

maryjohn

Active member
Veteran
I am sometimes surprised by how long red worms survive in my pots. Yea throw some in. Especially if you reuse. While it's resting, a bit of bokashi ant some worms is a great idea.

The op's bin is great for starting out, but something that breathes and flows through is even better. I could not be happier with the worm bin bag from instructables dot com. I also use the bin described here, only I have done away with the second bin and just use the lid to catch any leachate.

Watering: depends on your weather and your scraps, your bin and your bedding. Many find they do have to water.

Feeding: the list of dos and donts should be taken with a grain of salt. I suspect it was written by vegetarians. I just observed a crowd of wigglers congregating on a slice of pork from my bokashi bucket. I have also been unable to confirm their supposed aversion to the alium family.
 

DARC MIND

Member
Veteran
i find that worms live well in big containers.
every now and then i grow pot in tubs, no smaller the 18 gal w/ @ least two plants growing inside. after we harvest, i find a nice community of healthy worms living inside when i go to recycle the soil. i also find worms in many of my container toms and peppers, they grow in 10-20 gal containers and i do find living worms inside.
i believe if you have a nice organic soil, rich with compost and you top mulch or top dress w/ organic matter, worms can and will live in your containers.
here's some images of my first bin, its pretty similar to urs ehonda187,but i use one tub and my leachate catch is made out of a non used oil catcher
the bin
total cost=less then 10$
i use a method like MM to harvest, but i just make two small piles in side the bin, one pile stops getting fed organic matter. while other keeps getting fed,eventually with in a week or two most if not all worms will move to the pile that is being fed.i then collect the unfed pile in a bucket,place a divider and screen my finished compost

screened / unscreened

this earth worm compost is filled with cocoons and baby worms, witch is used to make soil, or as a top mulch and or ACT.
i used this bin to start my other worm bins and every thing runs smoothly. it amazing how simple paper, garden waste and food scraps makes such a good product.
to speed up everything i find it best to chop up everything down as best as possible. after shredded paper i cut it up some more and moisten it down with ACT, my food scraps get thrown in the food processor before giving to worms and leaves get run over by the lawn mover a few times.

to me the more diverse the diet for the worms, the more better EWC i get. i try to use leaves, news paper, peat and coco for bedding. either one works well alone IME but i like to use them all. for food be creative, i use what ever i see the worms eat, my worms love starbucks used coffee grounds, rabbit poop, banana peels and shrimp or lobster shells.
 

ehonda187

Active member
The op's bin is great for starting out, but something that breathes and flows through is even better. I could not be happier with the worm bin bag from instructables dot com. I also use the bin described here, only I have done away with the second bin and just use the lid to catch any leachate.
Here is a flow through setup that I am working on. This was an old polyester laundry basket I had laying around. The material is perfect because it had very tiny breather holes similar to landscape fabric.


I have to go get some trays which I will place under each compartment as they fill for extra support on the frame. They are the 2 liter soda plastic trays.
For a reservoir I will use I one of those tupperware containers that slide under the bed.
I guess I will fire this one up as soon as I get some more worms. :joint:
 

maryjohn

Active member
Veteran
very nice ehonda. You'll find the problem is drying out rather than leaching now.

Do you bokashi? Worms go crazy for it and reproduce fast. Even with just the bran.
 
J

JackTheGrower

That Peaked my interest..

As some know I will try my hand at earthworms soon.

So I need to look up how to make that BBran..

I will try to get them to process the BSF sludge..

So what type of worms like BBran there MJ?
 

maryjohn

Active member
Veteran
I just have red wigglers indoors. haven't tried it with other composting worms.

bokashi bran you can make with LAB culture or EM.

I imagine if you had bedding that absorbs well but dries out well, and some bokashi bran to mix with your bsf leach (like a runny paste), you would have some nice worm food.
 

Kaneh

Member
I've had my worbin going for couple weeks.
It was all good and fun until I got mite invasion!
Why can't these little bastards leave us growers alone!

Well, they're not spider mites, so the're not really harmfull.
I've read that they are normal with new bins when
ecosystem is not yet balanced.

It's just that they're fuking annoying! They attack the food first and crawl all over the place. +It looks like worms are avoidin areas which are crowded with compost-mites.

Have you seen these?
Any ideas how to cut down mite population on my bin?
:dueling:
 

maryjohn

Active member
Veteran
just leave them be. They show up when needed, then go away, then come back when needed again. they are normal and won't hurt the bin.

but they may also be telling you not to feed so much.
 

ehonda187

Active member
Hey Mj, I have not tried bokashi but did some reading up on it last night. Bokashi bran could be made fairly easily I assume. I might give it a go down the road here soon.

I just ordered up some Super European red worms,(Eisenia Hortensis,Carolina Crawlers, .etc..) They are supposed to eat twice as much as there counterpart the red worm and are twice as big. Being that I'm an avid fisherman. I am going to start up a BIG bin of these as well for bait. :joint:
 

Microbeman

The Logical Gardener
ICMag Donor
Veteran
I've had my worbin going for couple weeks.
It was all good and fun until I got mite invasion!
Why can't these little bastards leave us growers alone!

Well, they're not spider mites, so the're not really harmfull.
I've read that they are normal with new bins when
ecosystem is not yet balanced.

It's just that they're fuking annoying! They attack the food first and crawl all over the place. +It looks like worms are avoidin areas which are crowded with compost-mites.

Have you seen these?
Any ideas how to cut down mite population on my bin?
:dueling:

From the Worm Queen;

If you’ve ever looked into an active worm bin you might have noticed that the worms were not the most numerous organisms visible. Beneficial mites, springtails, small white worms and a host of other multi-legged and even no-legged critters were likely visible without the aid of a magnifying lens. Place a sample of the organic material from the bin under a microscope and it becomes clear that the populations of microscopic organisms teeming in the material vastly outnumber the host of organisms visible to the unaided eye. It sometimes begs the question; why do we call this just a worm bin?

In vermicomposting we tend to focus our attention and bin management on the needs of the earthworm because we recognize that worms in the system decrease decomposition time and produce valuable castings. It’s important to remember, however, that a healthy, productive bin is an ecosystem possessed of an incredible diversity of life. The activity of the whole of the system’s living organisms is greater than the sum of its parts and each of these organisms is filling a vital niche in stabilizing the organic material.

Earthworms alone cannot complete the task of converting organic wastes. Lacking teeth and sufficient digestive enzymes of their own, they rely on microorganisms to begin breaking down the organic matter, fragmenting and softening the material so it can be ingested. In the process of taking in the decaying organic material the earthworm also ingests those microorganisms, deriving the majority of its vital nutrients from their bodies rather than from the organic matter itself.

The microscopic bacteria and fungi are aided in their work of decaying the organic material by many of the insects and arthropods we see crawling in the bedding. These organisms shred and break up the organic materials, exposing more of the surface area to microbial attack. In their digestive systems acids, enzymes and gut organisms digest the material and what is not absorbed into the animal’s body is passed as feces. This fecal matter becomes a predigested, simplified food for other organisms, like worms, to further reduce.

Mold and fungi are highly beneficial decomposers common to all worm bins as well as themselves being a food source for earthworms. Damp, dark environments rich in organic matter are natural environments for the growth of these organisms, which secrete enzymes that aid in breaking down some of the most resistant materials in the bin.

Following is a list of some of the most common of the beneficial organisms living in a healthy worm bin:

Ants (Formicidae)
These highly successful insects generally do not live in healthy worm systems but may occasionally visit in search of food. Ants tend to prefer conditions dryer than are found in active worm bins and rarely nest in environments with so many competing invertebrate species. Their continual presence in the system may indicate a need to increase moisture, which will usually discourage or drive them out. While it’s not required that ants be prevented from visiting an outdoor worm bin, keeping the bin elevated with each leg in a can of soapy water will create a barrier, preventing them from entering the system.

Centipedes (Chilopoda)
These multi-legged predators in the worm bin thrive in the damp environment where they feed on other invertebrate residents. They have a pair of huge, formidable pincers that curve from behind the head with which they can subdue prey larger than themselves. They are typically dark brown to reddish/tan in color, with a flattened, cylindrical body and one pair of legs per body segment.

While centipedes do feed on earthworms, it is unusual to have more than one or two in a worm bin, which is an insufficient number to significantly impact the worm population. Still, it is recommended that they be removed from the bin as they can inflict a non-poisonous but painful bite if we accidentally come into contact with one while feeding the system.

Fruit flies (Diptera)
While generally considered a nuisance, fruit fly larvae are voracious decomposers of fruit and vegetables wastes and, as such, are beneficial residents of the worm bin. If the system is being operated outdoors where the nuisance factor is negligible there is no need to attempt to control their numbers. If the system is being operated indoors, pre-treating the feedstock can prevent them. Most fruit flies enter the system as eggs and larvae on the peels of the fruits and vegetables we feed to the bin. Freezing or microwaving the food scraps before adding them to the system will kill the eggs and larvae, preventing the flies from becoming established. Ensuring the food scraps are never left exposed on the surface of the material will prevent mature fruit flies in the environment from being attracted to the bin and using it as a breeding ground.

Preventing a fruit fly invasion is simpler than controlling one. Should the flies become established in your bin and require control, inoculating the system with beneficial nematodes in conjunction with pre-treatment of the feed stock will eliminate them in roughly 10 to 14 days.

Fungus gnats (Diptera)
These small fly species are often mistaken for fruit flies but lack their brightly colored, bulbous eyes. The small, black fungus gnat more closely resembles a mosquito without the long proboscis.

The adult fungus gnat is harmless, feeding on fungal growth in the worm bin. Their larvae will feed on decaying organic matter in the bin, but will also feed on tender plant root hairs if the eggs are deposited onto soil surfaces. In outdoor environments this is not a problem as competition controls their numbers, but in indoor areas the fungus gnat larvae can damage houseplants.

Fungus gnats are not typically introduced to the home from the worm bin, rather, they may find the bin when they are already present in the home. The bin environment, however, is ideal for the adults and can support their populations inside homes. Fungus gnats can be readily controlled by inoculating the bin and all houseplant soils with beneficial nematodes, which feed on the fly larvae, typically eliminating them within about 10 days.

Millipedes (Diploda)
The slow-moving millipede resembles the centipede, but has a more rounded body shape, darker coloring and two pairs of legs per body segment. They are beneficial decomposers in the system, found through all layers of material, are harmless to humans, pets and plants, and do not require control.

Mites (Acarina)
These tiny cousins of spiders can be among the most numerous of the visible decomposers in a healthy worm bin. There are more than a dozen species of mites potentially present in a healthy system, all with four pairs of legs, large bodies and tiny heads, and in colors ranging from white to shades of reddish brown. Some mites are predators of other insects in the system, some feed on fungi and molds, and some on the organic matter itself. Despite web sites with statements to the contrary, mites species predatory on earthworms are not common and are essentially unheard of in worm bins.

It is possible, though uncommon, for mite populations in the bin to bloom on the surface of the material so densely that they cover it entirely . Such mite blooms are typically associated with low oxygen penetration in the worm bed, often brought about by too much moisture and/or too little ability for air to move into the system. The mites, in response to the need for more air, congregate on the surface of the organic matter instead of spreading their population throughout the bin, as they normally do. Correcting the airflow problem will encourage the mites to spread through the bin once again.

Molds and fungi
Mold and fungi are present in any cool, damp environment rich in organic matter. Using their tiny, threadlike hyphae they penetrate into the organic debris and secrete enzymes that reduce the material so they can absorb the nutrients. Their presence in the bin does not require control, but those suffering from severe mold allergies should keep the bin outdoors or in well-ventilated locations to prevent irritation.

Pot worms (Enchytraeidae)
These tiny, threadlike, segmented white worms are among the most commonly cultured worms in the world as they are a prized tropical fish food. Common to healthy worm bins, they feed on decaying organic matter in the system. It is not necessary to attempt to control their numbers.

Slugs (Stylommatophora)
These unpopular invertebrates will appreciate the cool damp conditions of the worm bin to ride out the heat of the day. Some species of slug are omnivores and will aid the beneficial organisms in the system in breaking down the organic matter. While there are carnivorous slug species that feed on earthworms, they eat so few of them as to be a negligible problem.

Slug control is not required but if desired, is best affected by hand picking them from the system.

Black Soldier Fly larvae (Diptera)
The larvae of the black soldier fly can be an intimidating and ugly resident of the worm bin, but is a voracious, beneficial decomposer of organic matter and is neither dangerous to the worms nor a health hazard to the humans managing the system, our pets or our plants.

One half to one inch long, segmented, and dirty white/gray, darkening from orange to black at the front end, these larvae can bloom in massive numbers in an outdoor worm bin. The are not found in indoor systems as adult soldier flies will not willingly enter buildings. Control is not necessary, nor is it advantageous as the larvae quickly fragment the organic material in the system and their fecal matter becomes an excellent nutrition source to the worms. Worm systems harboring black soldier fly larvae are among the most efficient systems in operation.

Sow and Pill bugs (Isopoda)
Known as woodlice, slaters and roly-poly bugs, these crustaceans are welcome residents of healthy worm bin where they feed on the tough woody material that is resistant to microbial attack. It is not necessary to control their populations in the bin.

Sow and pill bugs so closely resemble each other in appearance and behavior that, while different species, they can be viewed as the same organism in the worm bin. They are light brown to dark gray with an armored, segmented shell, seven pairs of legs and antennae.

Springtails (Colembola)
Springtails are often the most numerous of the visible decomposers in the worm bin. While some are dark brown with a spring mechanism, called a fercula, that enables them to jump impressive distances, the most numerous of the colembolans found in the worm bin are tiny white insects that lack the ability to spring. These white springtails will frequently cover the bedding material so thickly that it appears to be frosted.

Springtails are often small enough to walk across the head of a pin and range in color from brown to white. As insects, they possess six legs and a pair of stubby antenna. They are highly beneficial in any environment of decomposing organic matter and controlling their numbers in the worm bin is neither beneficial nor necessary.


Live and let live
Fears sometimes arise over the presence of many of the invertebrate residents of the bin as well as over the molds and fungi that may be present. As a culture we have been conditioned to see these organisms as harmful and in need of control or eradication. Concerns over the possibility that the insects may damage houseplants or infect pets, or that molds will spread disease are not uncommon. It’s important to remember, however, that the vast majority of the organisms living in the bin are there because they feed on dead and decaying organic material, or because they feed on the other organisms feeding on the decaying organic material. They have no interest at all in living plant or animal tissue or they would be found in environments where these preferences could be met. They do not spread disease, rather, the majority of the organisms in the worm bin are competitors of disease causing organisms and actually reduce health risks! The worm bin residents are beneficial to the processing of organic matter and should be left alone to work their magic side by side with the worms. Operating a worm bin means supporting an ecosystem, and a healthy ecosystem needs a diverse population of organisms in order to thrive.

All rights reserved, Kelly Slocum, 2001
 
Top