What's new
  • Happy Birthday ICMag! Been 20 years since Gypsy Nirvana created the forum! We are celebrating with a 4/20 Giveaway and by launching a new Patreon tier called "420club". You can read more here.
  • Important notice: ICMag's T.O.U. has been updated. Please review it here. For your convenience, it is also available in the main forum menu, under 'Quick Links"!

220w pl-l coco scrog cupboard

ScrubNinja

Grow like nobody is watching
Veteran
Or as I've started calling it, the Elevation Station :abduct:

The good news is this build should be well documented in photos. The bad news is that I'm still building it! I'll need some advice along the way and I wanted a seperate thread from my tent thread so the info is all in one place.

The main ingredient, $20 secondhand cupboard: (ignore the hood resting on top for now)


As well as being secondhand, it was built out of recycled furniture, so it's thirdhand or more. It's as solid as a rock and as heavy as a bunch of them. Walls and doors are 16mm thick chipboard which is coated both sides with some kind of hard Laminex style sheeting. Except for the back board which was some kind of thin MDF and was replaced with a sheet of 12mm ply seen here:


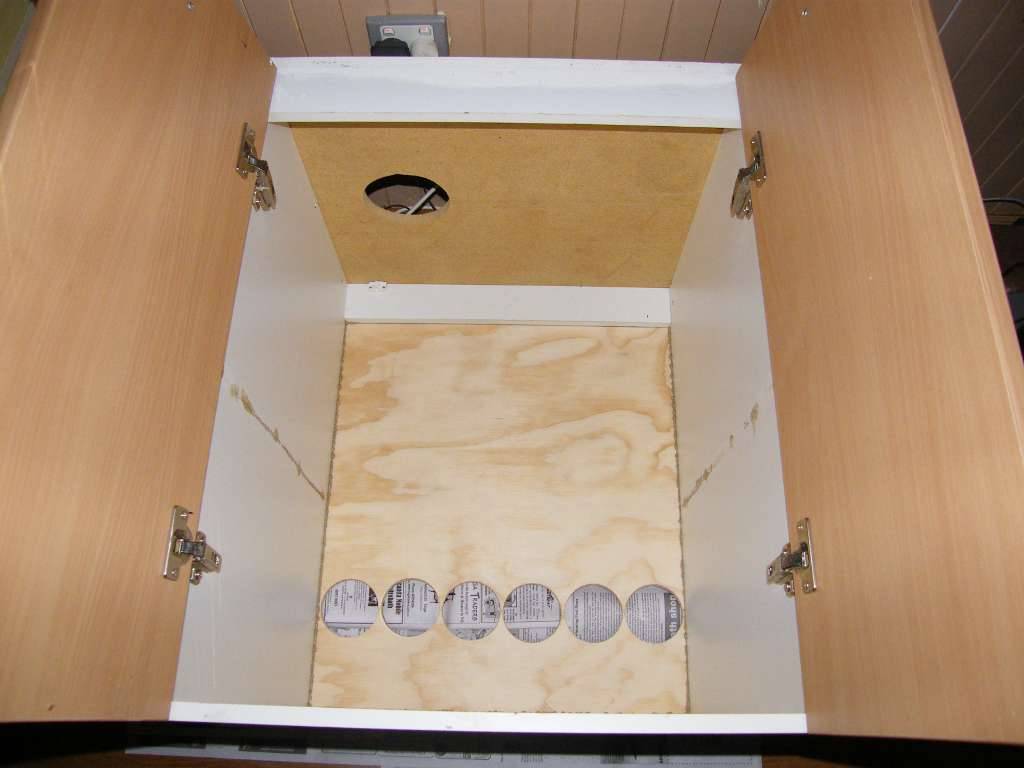
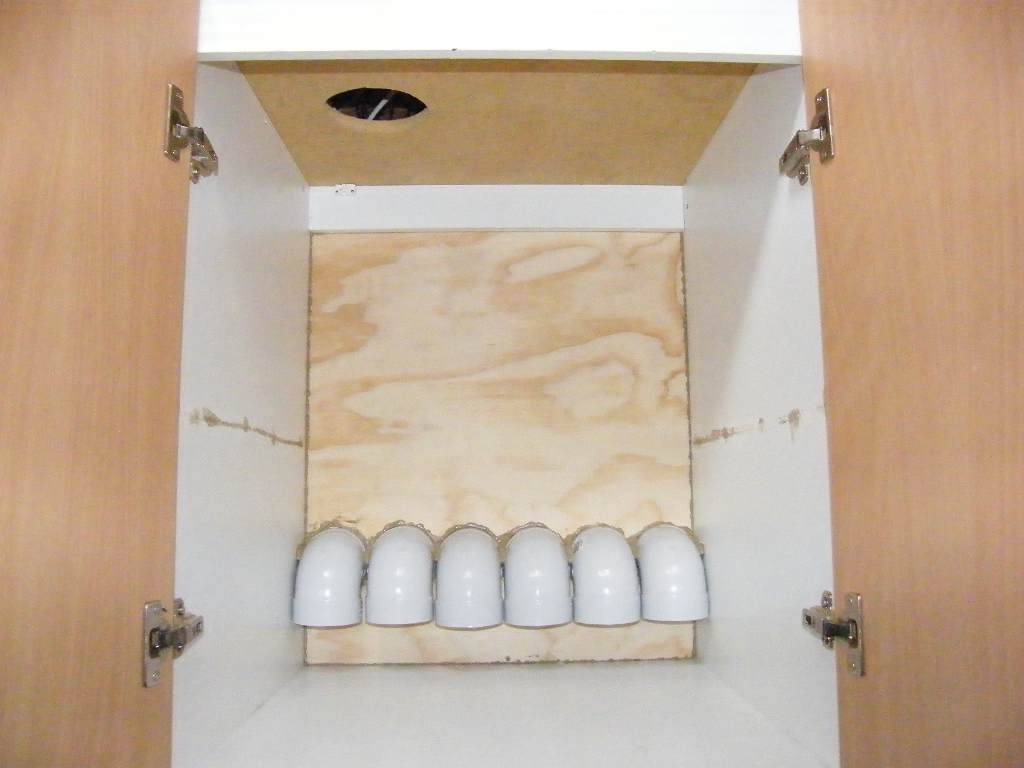
Those are six 90mm intake holes and a 120mm exhaust hole in the roof. I attached 90mm PVC elbows to the intakes:


The actual inside diameter of the elbows seems to be more like 85mm. This gives me 3x the amount of intake as exhaust. I'll probably be filtering the intakes so that will reduce it substantially, I think. But it's nice to have it in reserve if I need it. I live in the tropics so I can't take any shorts on the ventilation.

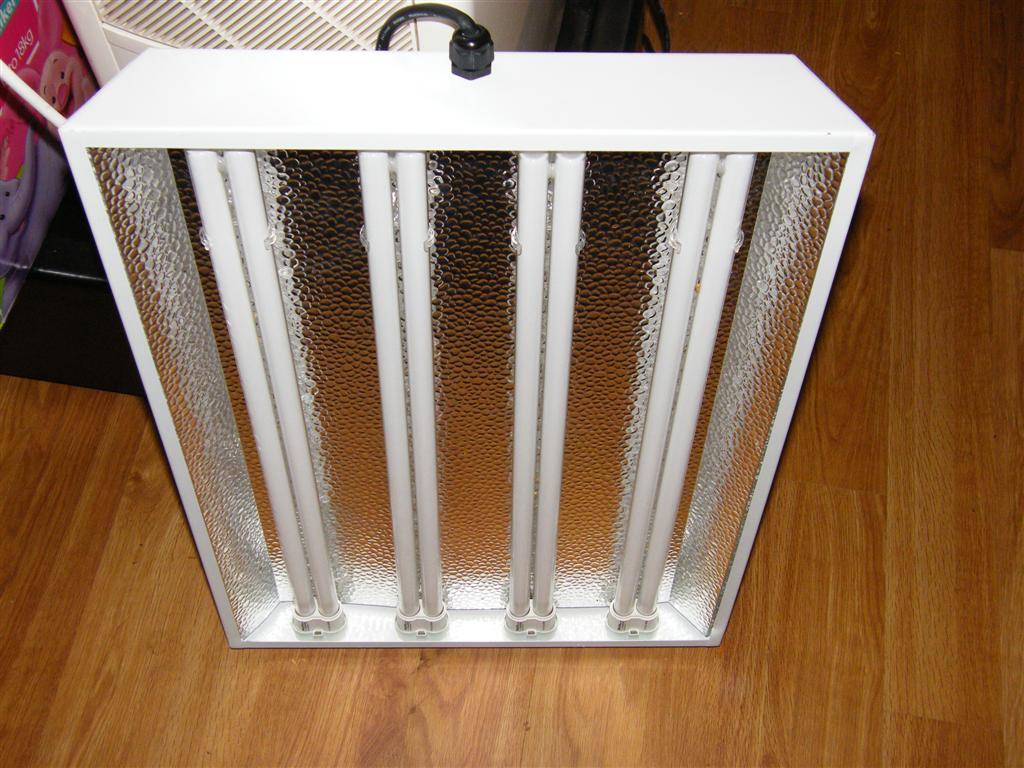
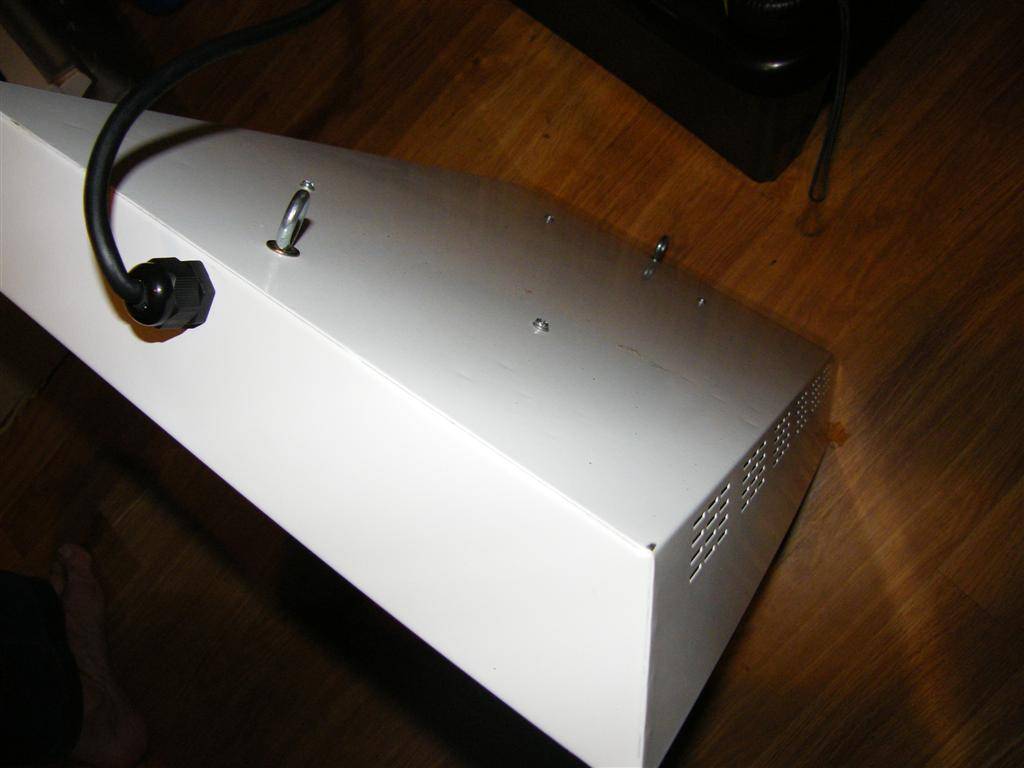
The pl-l hood was obtained secondhand but rarely used (1 veg run), with Philips veg spectrum bulbs installed. I obtained some random thin glass sheet and what do ya know, it's almost the perfect size to DIY a vented glass hood. It's quite do-able despite not being purrrfect.


There will be two stacked 120mm Thermaltake Smart Case Fan II fans mounted on top of the hood connecting up to the exhaust hole in the roof of the cab. I may use flexible ducting so I can lower the lights. These two fans will be pushing into (and hopefully muffled by) the carbon filter. They'll also be packed around with fibreglass insulation.


The carbon filter will be sitting on top of the cupboard and will be a large black plastic rubbermaid style container with a lid. There will be a third Thermaltake located on the rear of this container, out of sight and hopefully on low speed, doing some pulling.

The Thermaltake has some mighty impressive mm/h2o pressure specs so I'm confident I can get away with the configuration I've got planned. Otherwise I can rearrange fans if needed. I have ordered a lot.

For air circulation on top of the scrog, I ordered two 120mm Cooler Master Long Life fans. For circulation under the screen (and anywhere else I may randomly need a fan), I went with three cheap generic 80mm fans which are usually pretty quiet and low powered but perfect for the job. I'm hoping all these fans get here in the next couple of days.

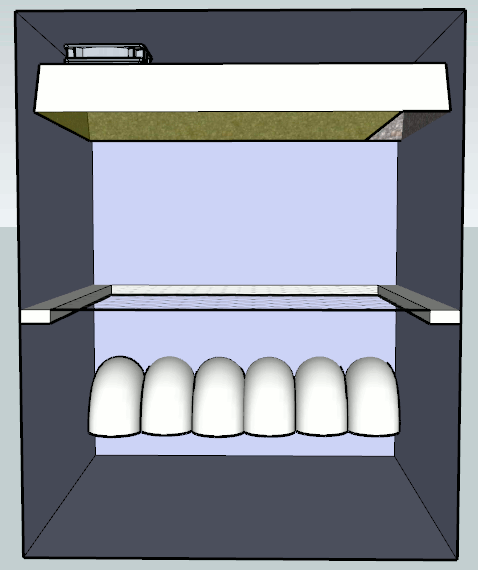
Here's sort of what it should look like when I'm done:


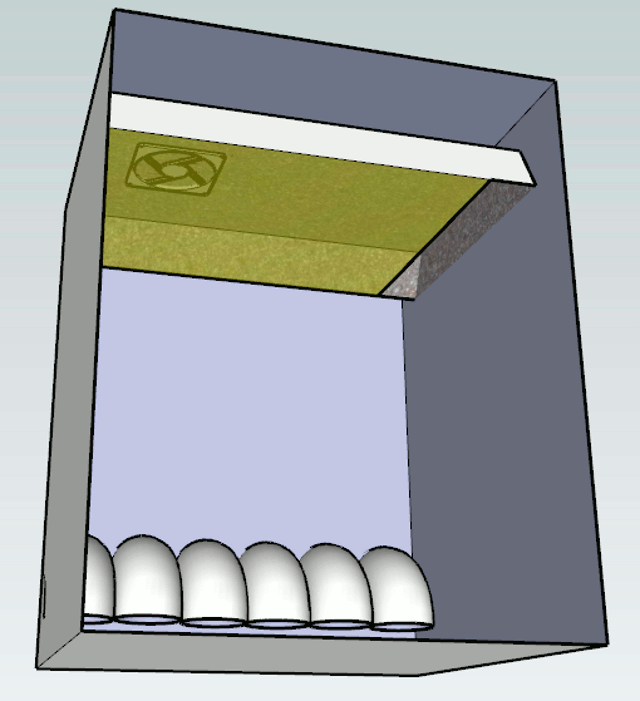
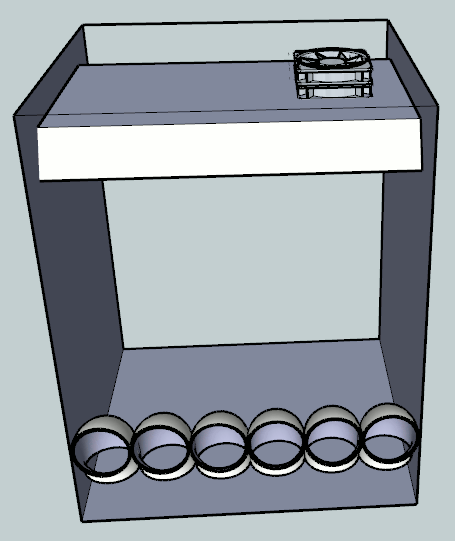
The roof and rear panel have been made invisible in the second pic so you can see better. I hope to install a large slide out tray on the floor so I can have better access to underneath the scrog. That's why I didn't stick with my original fixed-scrog design shown here:


I also hope to install an automated watering system and res, for which I think I've got all the parts needed. But apart from that it'll just look like a cupboard with a rubbermaid sitting on it. With the res it'll look like a cupboard with a rubbermaid sitting on it and another one beside it. :)

Some specs:

  • W: 575mm 0r 22.5"
  • D: 550mm or 21.5"
  • H: 715mm or 28"
  • Square footage: 3.34
  • Watts: 220+
  • w/sq ft: 65

Feel free to follow along as I turn this into reality and also, uhhh, if you have a glass covered hood, how did you attach it? I heard they need regular cleaning and if I can't come up with a good system, I'll have to remove the hood to clean it, and to remove the hood I need to remove the doors. I will filter intakes but will that be enough? I may go glass free the first run since it's winter here. Thanks for reading!

EDIT: Hello I am making this edit from the future. It's important to note that stacking PC fans directly on top of each other is not a good idea! Indeed, it can be counter productive. So read up first, unlike me. Oh and while I'm here, it should also be said that the design strays a lot in general from the initial Sketchups etc.
 

basscadet

Member
Cool, first chair!! :lurk:

Lookin' good so far Scrub. May the elevation begin:abduct:

Will this be just a veg box or are you changing tubes and flowering as well?
 

ScrubNinja

Grow like nobody is watching
Veteran
Welcome aboard fellows. Glad you found it Growmeds! Bass, I still haven't got around to actually checking the availability of other kelvin bulbs. I probably left that a bit late, LOL, but I'll enquire at a lighting store tomorrow. I guess I'll be flowering under veg spectrum if not!
 
C

cork144

this looks like its going to shape upto be a brilliant grow.

ill be watchin,
 
I

inthelight

*hitchhikers thumb*

*hitchhikers thumb*

hey is this station into elevation? can I catch a ride?:abduct: :lurk:
 

Work2much

Member
Cool stuff, ain't building a micro cab fun and addicting? I swear I've made way too many random purchases with future cabs in mind and now have a bunch of stuff and less $$$ in my pocket lol. It's still fun though.

Good call on the 120mm X 2 pushing to act as a muffler, I've been a proponent of that around here for a while.
 

ScrubNinja

Grow like nobody is watching
Veteran
Hi Cork, I sure hope it does, thanks for looking in. :yes:

Haha jump on board inthelight, we're going to the next state - the elevated mindstate! :abduct:

Heh, Work2much, I know what you mean! The cost is already pretty high for this one. I always seem to find a reason that the old equipment I paid through the nose for is not suitable, so I usually buy a new item, discover that I've made the wrong purchase, buy a new thing and finally get the job done. :D I reckon I could build about 4 grow cabs with the stuff I have spare now.

I hit the lighting store up today - I can only get 4000k (which I found out is the ones I have now) and 3000k, of which I ordered three. So I was thinking of flowering with 3 x 3000k and 1 x 4000k. Does that sound like a good choice, pl-l people? I was also thinking, I have a single tube 13w fluoro and could stick a daylight bulb in there...It should just fit beside the pl-l hood. Yes/no/maybe?

Did I mention the bulbs are 40 something $AUD each :badday:

Ah well, get ready for a beautiful sight...


As I bought them online, they were obliged to f--k something up with the order. One of the thermaltakes is a quiter, less powered fan (in the centre of pic) but maybe that'll work out better for my needs.

I also bought a huge rectangular pot for this grow, I think it's 28 litres, and a paint brush, so we're cooking with gas now. :D

Edit: oh yeah and the specs on the thermaltakes I linked to are way out... On the box these say 120.68 CFM (max) and 7.78 mm/h20 (max) which is even stronger than I thought! Wooo
 

Aerohead

space gardener
Veteran
I hit the lighting store up today - I can only get 4000k (which I found out is the ones I have now) and 3000k, of which I ordered three. So I was thinking of flowering with 3 x 3000k and 1 x 4000k. Does that sound like a good choice, pl-l people? I was also thinking, I have a single tube 13w fluoro and could stick a daylight bulb in there...It should just fit beside the pl-l hood. Yes/no/maybe?

That will work just fine, if they weren't $40 AUD? I would suggest a 6700k rather than a 4000 but I think 3 X3k and a 4k will work out nice too.
 

immaculate

Member
Awesome setup! Please document in detail! Can't get enough. Will be following closely as I'm constantly learning and getting ideas for my next grow.

Sorry to hear about the fan miss-match. I'm still getting the wiring thing down and trying to find an adapter that can power my 120mm fan to its potential without blowing one. Only burnt 2 fans so far! Only thing that has worked was a spare wireless router power cord. Wrote down the exact specs and gonna check Radioshack tomorrow. They must think I've built a big pc by now to need all these fans.
Good luck and thanks for taking the time to detail it all and thanks for your help with my grow. Peace.


As far as rigging the glass, does it fit too small or too big? You could probably easily drill some holes into the hood depending on if it's got a "lip" to accept the original hood, and then I dunno, glass bit? If it's too big is there some sort of special industrial adhesive that can be used to apply it directly to the hood? I'll be interested to see what you end up figuring out.


P.S. So in reading your description of the "airflow schematics" I'm still trying to understand things. In drilling passive intakes, is the air system set up such that air is always drawn in from the passive intakes? How crucial of a role do the elbows play in directing airflow? Thanks.
 

Aerohead

space gardener
Veteran
Edit: oh yeah and the specs on the thermaltakes I linked to are way out... On the box these say 120.68 CFM (max) and 7.78 mm/h20 (max) which is even stronger than I thought! Wooo

How many amps do those fans draw? It's more accurate to judge by how much power they consume because CFM ratings on PC fans are very inflated.
 

Aerohead

space gardener
Veteran
Most of us use wall warts, just be sure that you don't try to run more fans than it's capable of. check the draw of the fans V.S the power supply and don't exceed more than 80% of available power.
 

ScrubNinja

Grow like nobody is watching
Veteran
How many amps do those fans draw? It's more accurate to judge by how much power they consume because CFM ratings on PC fans are very inflated.

The Thermaltakes are 0.48A on max except the lesser powered one is that too. To tell you the truth I mostly look at the mm/h2o measurement when a filter is involved. They are pretty good fans though. Thanks for the light advice too!

Immaculate, thanks! I will try to get some pictures up of the airflow and glass plan cos I know it must be hard to understand. It is.

Damn, dude! Don't go blowing those fans! lol. I blew one good fan in my early days and that was enough to learn. Basically, what Aero said. Or in other words - make sure the adapter is 12v DC or less if you want lower speed but not higher than 12v and not AC.

Then look at the fans and add up the total amps of each one. You need the power adaptor to be equal or higher Amps than the total of the fan/s it'll be running. For example the fan I just talked about is 0.48A so two of those would add up to 0.96A or 960mA. For this I would get a 12v DC 1 Amp adapter to run both, wired in parallel.

You can get a wallwart (preferably with adjustable voltage), or you can adapt a computer's power supply, or you can use whatever random adapter you find. I like the ones from hard drive adapters:


They come with a molex fitting which is what computer fans have. I had to make a simple adapter before it would work:


Let me know if there's anything you don't get.
 

immaculate

Member
Okay, I understand your molex fitting adapter based on the ones that came with my fans. Here's the thing: I'd like to wire one 120mm fan since the other one I have is wired (outtake) and works great. I don't know anything about the electrical stuff really, but the adapter that works is rated at an input of 100v-240v .5A 50-60 hz and an output: +12V 1.0 max...I was planning on finding one that matched those specs in the store. Heh.

I also would like to have separate plugs for each fan because they are located on opposite sides of the cab and it seems easier.
 

ScrubNinja

Grow like nobody is watching
Veteran
Okay, I understand your molex fitting adapter. Here's the thing: I'd like to wire one 120mm fan since the other one I have is wired (outtake) and works great. I don't know anything about the electrical stuff really, but the adapter that works is rated at an input of 100v-240v .5A 50-60 hz and an output: +12V 1.0 max...I was planning on finding one that matched those specs in the store. Heh.

Cool, yes, that is exactly the adaptor I described (it's basically the output numbers that you need to look at to work out the numbers) so you should be able to run one fan fine (as you have already noticed, haha).

Here's the figures on my fans from the back of boxes, for my own reference:

Thermaltake Smart Case Fan II (variable speed) (stacked pushing exhaust)
  • 0.08 - 0.48 Amps
  • 35.2 - 120.68 CFM
  • 0.94 - 7.78 mm-h2o
  • 22.5 - 46.4 dBA

Thermaltake Smart Case Fan Blue LED (variable speed) (pulling exhaust)
  • 0.12 - 0.48 Amps
  • 38.6 - 93.7 CFM
  • 1.5 - 4.1 mm-h2o
  • 17 - 46.5 dBA

Cooler Master Long Life Silent Fan (bud blowing duty)
  • 0.35 Amps
  • 69.69 CFM
  • 2.94 mm-h2o
  • 19 dBA

I've used the LED Thermaltake (lesser spec'd) and it's a damn good fan, so I should be happy with the higher rated ones I reckon. As long as the figures aren't too fudged.
 

ScrubNinja

Grow like nobody is watching
Veteran
You know what, I am going to forget all about the glass idea for now. It's doing my head in so I'll focus on just having good ventilation. It'll still be an air cooled hood, just not a glass covered one.

Here is basically what the filter unit will look like:


It's not to scale at all, and I've invisibled the front and the lid of the rubbermaid so you can see what's going on. That's a layer of carbon inside the rubbermaid. The lid has to be sealed air tight for it to all work correctly.

Slide the rubbermaid to the left until it's hole lines up above the 2 x fans on top of the light. See how there are now 3 fans inline in the airflow? 2 pushing and 1 pulling. And as we all know thanks to Ventilation101 and Understanding Air Flow, and the manual for my last fan, fans stacked inline will keep the same CFM but have an increase in static pressure ability. Placed side by side they would have double the CFMs but the same static pressure.

Peace
 

ScrubNinja

Grow like nobody is watching
Veteran
P.S. So in reading your description of the "airflow schematics" I'm still trying to understand things. In drilling passive intakes, is the air system set up such that air is always drawn in from the passive intakes? How crucial of a role do the elbows play in directing airflow? Thanks.

Sorry, I forgot to answer this. Yes, air is constantly being drawn in through the intakes via the fans on top of the light hood, and the fan on the rear of the carbon filter box. Even at lights off. The elbows only real purpose is to serve as a light trap so that's why they point down. Inside the elbows will be painted flat black and I'll paint a strip of flat black directly underneath where those pipes spill air in, on the floor. This all serves to stop light reflecting out (and in).

Then on the outside rear wall there'll be a strip of black aquarium filter foam to let some air through and block lots of light. Each one of these techniques is probably not gonna work on their own but the elbows, the black paint, and the foam should have it sorted. The complete air path goes like this:

Outside of cab > thru aquarium foam > thru pvc elbow > thru the plants > thru mainly the base of the bulbs > thru 2 fans > out of cab and into filter unit > thru layer of carbon > thru another fan > exit.

Simple really :dance:
 

D.I.trY

Member
really like your design pictures scrub and thats a nice filter with lots of surface area.

Are you drilling that hole in the top of the cabinet (below the rubbermaid) through the top of light hood? I'm a little bit worried that some places on some bulbs wont get enough air blowing onto them and will get bastardly hot in your climate. As you know this was my experience in balmy britain, but as you say you will have fans circualting air around the bulbs so actually it should be ok without glass. It may well be better to blow the lamps cool than to suck them cool with glass to direction the sucking airflow through the bulbs. I had absolutely no space to fit fans in this way so i dont know how well it works but hopefully it will and you wont lose light to glass, or have the hassle of cleaning it.

I am a little bit sceptical of pc fans pulling enough air through the filter, the ducts, the elbows, the intake filter etc. because the backpressure is such a killer. i had such a hard time with it myself. When i got the AC sunon's and hooked them up to a fan controller they just blew all pc fans i had tried away. If the exhaust fans wont cut it i really recommend a 38mm thick AC (well two stacked actually) like the sunons and a speed controller of course.
good luck and ill be paying close attention!
 

ScrubNinja

Grow like nobody is watching
Veteran
Thanks for looking in dude!

The original plan was to have the hood be adjustable height. You can't see it in the designs but there was to be flexible ducting from the hole in the hood to the hole in the top of cab.

I've since shuffled things around in my head so adjustable lighting is no longer needed and it'll be fixed, directly to the roof I guess. I'm thinking bolt the two stacked fans on the floor of the carbon filter. So the whole cab becomes passive in a way. Only problem is I lose the noise insulation of the wooden cab for thin plastic walls. F--k it, I'm doin' it anyway unless there's a better suggestion.

Anyway to answer your question, the cab's exhaust hole is directly above the hole in the hood, yes. I hear what you're saying, I will locate the fans on the opposite side of the cab to the exhaust hole and angle them on the bulbs. I remember Hydro-soil posted they should be cooled from tip to base so I kept that in mind locating the hole in the hood. But you're right, it won't work fully, especially with the reflector back in there.

You have some dope-ass fans for sure. I found some specs and it converts to 1cm h2o! Sheeeit, I can't argue with that. I was looking at some 38mm thick 12v fans but none I saw could match the T-Take which is strangely only 25mm thick.
 

Latest posts

Latest posts

Top