buzzerd
Member
Hello and welcome to DWC 101, I thought that I would put together a little how to for those of you that have been asking “How do I build a bubbler?” and I will also be addressing “OK,I Built it Now What?” as we try to answer your questions as easily as possible something is always lost in the translation so I’ll add a few pics
I’ll only be addressing the issue of a simple bubbler for this is the easiest way for a novice grower to get started and to determine if this is the way they want to grow or move on to a different style of hydroponics, ebb& flo, aeroponics, etc.etc.
The basics:
The materials you’ll need are very simple and you may even have most of them at home if not get ready to go to wally world your only going to need 15-$20
1- 10gal Sterlite of Rubbermaid tub I prefer sterlite it has a flat top
2- 10 in air stones
1- Aqua culture dual outlet air pump…rated for 30-60 gal aquariums
1- 8 ft pkg of ¼ in airline
2- Check valves………….these are important
2- net pots..i use 5-6 inch......or home made
Items you’ll also need that you have at home
Tape measure
Drill
¼ dia drill bit
A compass or a small pc of wood ……you’ll see
Pencil
Straight edge (ruler will due)
Utility knife
Roll of 1 in wide duct tape. I’m going to catch hell for the duct tape but after research there are “NO” I repeat “No” toxics chemical in their adhesives and the are totally biodegradable look it up………the info is there
Now gather every thing together and we’ll get started

First we want to determine what size net pots to use i prefere the 6in so thats what we will be using.....no net pots? continue to the end for more on this

now measure the net pot to determine the size of the hole that you will be cutting in this case it will be a 6in hole and set your compass to 3" if you don't have a compass grab your small pc of wood and mark your centers at 3" and drill 2 holes as such


and mark your holes like this i used a nail in the stationary hole and a pencil in the other to mark your hole

this is how it should look after you have laid out your holes and now it's time to cut them out .....PLEASE USE CAUTION WHEN DOING THIS....... i suggest that you do the cutting out on a hard wooden surface

and here it is go ahead and trial fit a net pot and you may have to do a little trimming for it to sit flush with the top

turn the lid over and measure from the top to the bottom of the net pot

now take your tape and measure down the side and mark a line this is going to be your starting water level

ok we can sit this aside and begin to put the tub together
determine the lengths of air line that you need and cut and get your check valves

now get your air pump and attach the airlines as shown***IMPORTANT** make sure that the arrows on the check valves are pointing in the direction of air flow

now drill 2 holes in the side of the tub and insert air lines....SUGGESTION
drill the holes in the end of the tub instead of the side


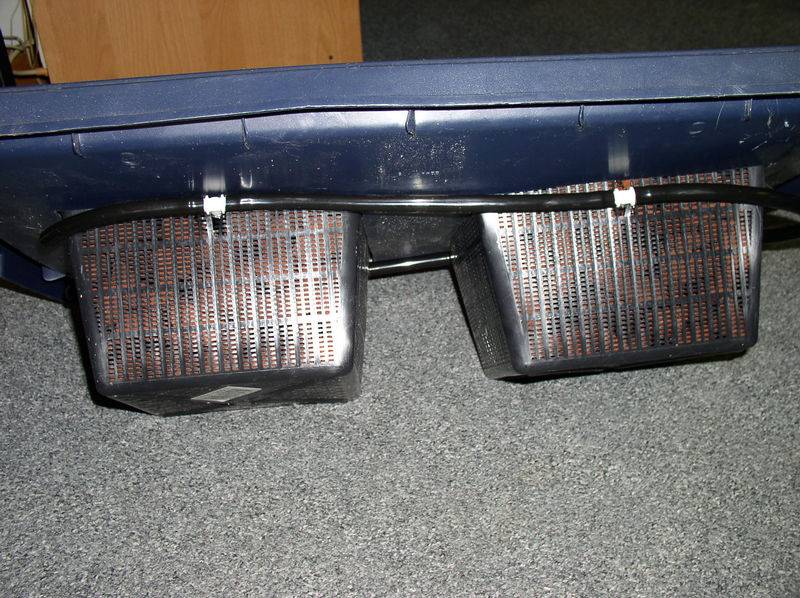
now take and duct tape the airstones to the tub as shown and attach air lines....this is why i said use the end of the tub

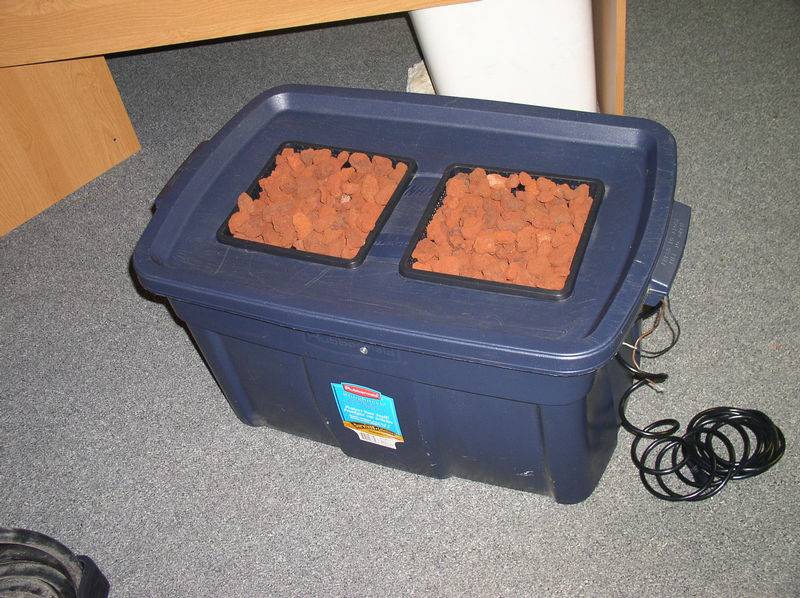
your now ready to fill with water and add air


so you need a net pot? here you go while your at wally world get you a couple of plastic pots that you feel will suit your need and procede to drill 1/4 dia holes both in the bottom and partially up the side and you now have a home made net pot


well that about covers "How To Build a Bubbler" this is about the eaisiest system that the novice grower could use to introduce themselves to Hydroponics this style is not for everyone and remember it's only the basics which we water farmers have to tweak and turn to fit our needs
look for " OK I Built It Now What?" coming soon in thread near you
I’ll only be addressing the issue of a simple bubbler for this is the easiest way for a novice grower to get started and to determine if this is the way they want to grow or move on to a different style of hydroponics, ebb& flo, aeroponics, etc.etc.
The basics:
The materials you’ll need are very simple and you may even have most of them at home if not get ready to go to wally world your only going to need 15-$20
1- 10gal Sterlite of Rubbermaid tub I prefer sterlite it has a flat top
2- 10 in air stones
1- Aqua culture dual outlet air pump…rated for 30-60 gal aquariums
1- 8 ft pkg of ¼ in airline
2- Check valves………….these are important
2- net pots..i use 5-6 inch......or home made
Items you’ll also need that you have at home
Tape measure
Drill
¼ dia drill bit
A compass or a small pc of wood ……you’ll see
Pencil
Straight edge (ruler will due)
Utility knife
Roll of 1 in wide duct tape. I’m going to catch hell for the duct tape but after research there are “NO” I repeat “No” toxics chemical in their adhesives and the are totally biodegradable look it up………the info is there
Now gather every thing together and we’ll get started

First we want to determine what size net pots to use i prefere the 6in so thats what we will be using.....no net pots? continue to the end for more on this

now measure the net pot to determine the size of the hole that you will be cutting in this case it will be a 6in hole and set your compass to 3" if you don't have a compass grab your small pc of wood and mark your centers at 3" and drill 2 holes as such


and mark your holes like this i used a nail in the stationary hole and a pencil in the other to mark your hole

this is how it should look after you have laid out your holes and now it's time to cut them out .....PLEASE USE CAUTION WHEN DOING THIS....... i suggest that you do the cutting out on a hard wooden surface

and here it is go ahead and trial fit a net pot and you may have to do a little trimming for it to sit flush with the top

turn the lid over and measure from the top to the bottom of the net pot

now take your tape and measure down the side and mark a line this is going to be your starting water level

ok we can sit this aside and begin to put the tub together
determine the lengths of air line that you need and cut and get your check valves

now get your air pump and attach the airlines as shown***IMPORTANT** make sure that the arrows on the check valves are pointing in the direction of air flow

now drill 2 holes in the side of the tub and insert air lines....SUGGESTION
drill the holes in the end of the tub instead of the side


now take and duct tape the airstones to the tub as shown and attach air lines....this is why i said use the end of the tub

your now ready to fill with water and add air


so you need a net pot? here you go while your at wally world get you a couple of plastic pots that you feel will suit your need and procede to drill 1/4 dia holes both in the bottom and partially up the side and you now have a home made net pot


well that about covers "How To Build a Bubbler" this is about the eaisiest system that the novice grower could use to introduce themselves to Hydroponics this style is not for everyone and remember it's only the basics which we water farmers have to tweak and turn to fit our needs
look for " OK I Built It Now What?" coming soon in thread near you