What's new
  • Happy Birthday ICMag! Been 20 years since Gypsy Nirvana created the forum! We are celebrating with a 4/20 Giveaway and by launching a new Patreon tier called "420club". You can read more here.
  • Important notice: ICMag's T.O.U. has been updated. Please review it here. For your convenience, it is also available in the main forum menu, under 'Quick Links"!

DIY mini AC for cabinet use beta v.0.0.1

K

kelimmo

Hi fellow hobby growers.
I came across a problem while building a cabinet a while ago when the owner of the cabinet wasn't willing to let me drill big exhaust/intake holes for ventilation equipment.
I heard about some people who had built AC:s (or heat pumps for heating small sheds and equal) out of cheapo dehumidifier internals.

I had bought one for a larger growroom once and don't need it anymore so I thought I'd take it apart and look how its built up.


The design is really simple. Its built exactly like a portable AC only with smaller parts and the condenser and vaporizer aren't separated and equipped with a fan each.

This is what I started with


With just the front and back covers removed it looks like this:


I removed the fand and fan cover to get a better look at the heatsinks.


I'm replacing the hygrostat that was mounted on the front cover with a digital day/night thermostat.


The slightly bluish one is the one that gets cold :) if you don't want to test which one gets cold yourself.


CAREFULLY bending the warm side upward will help me place it on top of the upper shelf keeping the cold side and compressor inside the grow area.
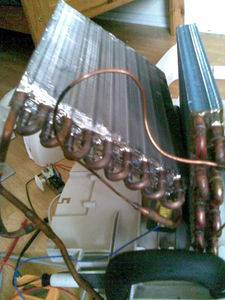


This is what my test rig looks like right now:
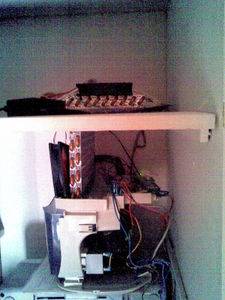

Equipped with 4x120mm 12V fans it holds the cabinet equipped with a 210W Lohius CFL bulb at around 10F lower than room temperature!
I'll test it out with a 400w HPS when I'm done testing this setup.

So it's still just a PROOF OF CONCEPT but it has crazy potential. And no, I did't need to empty the system or use any tools but a copper pipe bender and a screwdriver.

The next thing to do is to remove the rest of the plastic housing and make small ducts for the fans. This will make the performance and size optimal and usable.
 
Last edited:

Barnt

Member
Wow thats cool. How much power is that thing rated to use? Do you notice any change of humidity? Do you get much water condensing on the coils?
 

bounty29

Custom User Title
Veteran
Interesting stuff, should work if you get the airflow set up properly. Dehumidifiers and ACs are the same thing for the most part, just different airflow and placement. Definitely looking forward to seeing the potential of this kind of thing. Nice work! :wave:
 
K

kelimmo

Barnt said:
Wow thats cool. How much power is that thing rated to use? Do you notice any change of humidity? Do you get much water condensing on the coils?

The compressor is rated at 240W if I remember correctly. The humidity will drop a bit but I thought I'd just add an ultraphonic fogger to raise it right up again. The dehumidifier is rated to pull 2½ gallons of water out of the air every 24h.. It sounds alot but in practice you keep the humidity up with pretty easy tricks in such a small, sealed enviroment.

It'll need some kind of simple co2-addition too but I'll try to keep it simple and cheap this time and not over do it like I always do.
 
Last edited:

FreezerBoy

Was blind but now IC Puckbunny in Training
Veteran
Excellant contribution. Rep points for you.

You may want to include a pipe bender write up. I can see people folding the tubing shut pretty easily. Personally, I've packed tubes with sand to prevent crimping but, only when tubing is loose and open at both ends. Wouldn't want to see sand getting into this. Again, nice stuff.
 
K

kelimmo

Thanks alot for the positive feedback! It keeps me going.

I've been doing a few modifications today and the thing is getting better every hour.

The upper coil was a pain in the ass to get up on the shelf it's supposed to be on when I start growing. It wasn't a removable shelf and the whole cab is glued and screwed to the wall behind it and on the left side of it.

After hours with my sweetest friend mr. Crowbar I got the sucker up there.


Still not even a hole from a screw in the whole cab!

It's getting smaller and cleaner now.. I removed a bunch of unnecessary (spelling?) electronic crap from the compressor and now only have a overheat protection, the defrost function and the new thermostat on it.


I'll wire up the 400w today (clock's 6 PM here) if I get this baby wired up.

And it's officially beta v.0.1.0 now too (instead of 0.0.1) :D
 
Last edited:

bounty29

Custom User Title
Veteran
Looking great, this is something a lot of people could find useful, thanks for the documentation.
 
K

kelimmo

Starting to look more like a grow cab and not just a empty space with a compressor in one corner..


There's just too much left to do before I can do a test run so I'll continue tomorrow.. even though I won't be able to sleep tonight because of this project :D
 

bounty29

Custom User Title
Veteran
kelimmo said:
...even though I won't be able to sleep tonight because of this project :D

I've had too many projects keep me awake at night. The only thing I've found that helps at all is to write all your thoughts down in a list, a lot of the times I can't fall asleep because I'm afraid I'll forget some of my ideas I get while laying in bed. Something like this? No way I could sleep until it was done. :wave:
 

aligee

Well-known member
Veteran
Nice to see brains at work ! Great idea i also rock a 400w and temps are crazy down here in summer. curious to know what your temps are with lights on. how do you plan on exhausting the cab ?
 
K

kelimmo

bounty29 said:
a lot of the times I can't fall asleep because I'm afraid I'll forget some of my ideas I get while laying in bed. Something like this? No way I could sleep until it was done. :wave:

That's about exactly my problem too :D Sometimes a lot of forgotten measurements critical for some new theory to work can make me crazy especially if I'm building something that's not in my own apartment so I can't go measuring them in the middle of the night.

Anyways..

The compressor was emitting a hell of a mechanical noise when I first started it up.. It took just 20 minutes to make the whole setup quieter than my refrigerator which isn't noisy at all. I used some kind of really sticky, silicone-like stuff on every spot the pipes and compressor was touching or close to touching a wall or some other object. A bit of padding on the doors and refining the paddings on the cooling system would make this setup emit sound less than a peson breating normally.
 
K

kelimmo

OK, beat THIS:

Measurement in front of one of the fans inside the cab:
8.4 degrees Celsius = 47.12 degrees Fahrenheit


30cm (~1 foot) from the 400W!! bulb:
21.2 degrees Celsius = 70.16 degrees Fahrenheit


I just need to rig up a bigger fan for the condensor.. the two small ones can't cope with the amount of heat that the lamp+compressor puts out.

EDIT: noisy ass fan rigged up for the condensor.. I have to find a new one but this one will be allright as long as I'm just testing


More pics coming in a few hours.. the cab looks bombed right now while testing.
 
Last edited:
K

kelimmo

OK, now I've come acoss my first two problems with this setup..
1. The heat pump does not cool as fast as the lamp gets hot.. it needs around 30-45 min before it reaches the temperature it needs to be able to keep up with the rising temps of the lamps.. This should be fixed with the clock on the thermostat set to switch to daytime with a lower than room temperature setting 45min earlier than the lamp gets its power while the night setting still is higher up so the compressor just keeps the cab at room temperature. Not sure if this works yet but I'll keep testing. Otherwise I just have to add a timer to the setup.

2. The flap/container for the condensing water is a tricky one to make and even yet keep quiet around alot of resonance. I'm trying to fix this by coating the plastic flap with silicone (sikaflex).. it just needs time to dry and then adding some bitium/led mat to the backside.
 
Last edited:

imnotcrazy

There is ALWAYS meaning to my madness ®
Veteran
If there is enough copper lines between the coils you'd make it even more efficient if you could get the compressor section into the mechanical area as well. They do get quite warm.

Otherwise, very good writeup and idea.. Thanks for sharing
 
K

kelimmo

imnotcrazy said:
If there is enough copper lines between the coils you'd make it even more efficient if you could get the compressor section into the mechanical area as well. They do get quite warm.

Otherwise, very good writeup and idea.. Thanks for sharing

Yep, the compressor gets quite hot and has to cope with cooling its own heat output too. The lines were just too short to get the compressor on the upper shelf so I had to compromise. Its (the compressor's) positioning has given me alot of head ace in other aspects too.. If I had a cab where it would be possible to use it having the compressor and condenser on the side of the cab or behind it it would be alot more efficient.

Thanks!
 
Top