What's new
  • Happy Birthday ICMag! Been 20 years since Gypsy Nirvana created the forum! We are celebrating with a 4/20 Giveaway and by launching a new Patreon tier called "420club". You can read more here.
  • Important notice: ICMag's T.O.U. has been updated. Please review it here. For your convenience, it is also available in the main forum menu, under 'Quick Links"!

Designing a dual 150-watt CMH cab

ReikoX

Knight of the BlackSvn
A few weeks ago my neighbor was throwing away an old coral reef light. I asked if I could have it, and he said yes and that it worked he just upgraded to LED. This light was six feet tall and had three 150-watt MH and eight 39-watt T5HO. I took it home and stripped it apart. I then bench tested the components and sure enough they worked. Well that got the old juices flowing and I thought about building a cab with these lights.

I've been reading a couple of vertical threads and decided to give vertical a shot. My first thoughts were to do a vertical tree grow using the T5HO lining the walls around the plant, but the design was getting too complex. Next I thought about doing a stadium with the three bulbs hanging down the middle, but wasn't sure I could cool it. Then it hit me, two cabs with the 150-watt on a flip-flop. After doing a bit of research I found out that my ballast will work with a CMH bulb, and I finally settled on the Phillips Master Color protected bulb at 3000 K.

The next step was to find a place to put it. I have all my cabs in a spare room that I've always called my workshop. I have a futon in there I never use, so that is where I will put it. And, since it is in my workshop, I decided a workbench would be perfect!

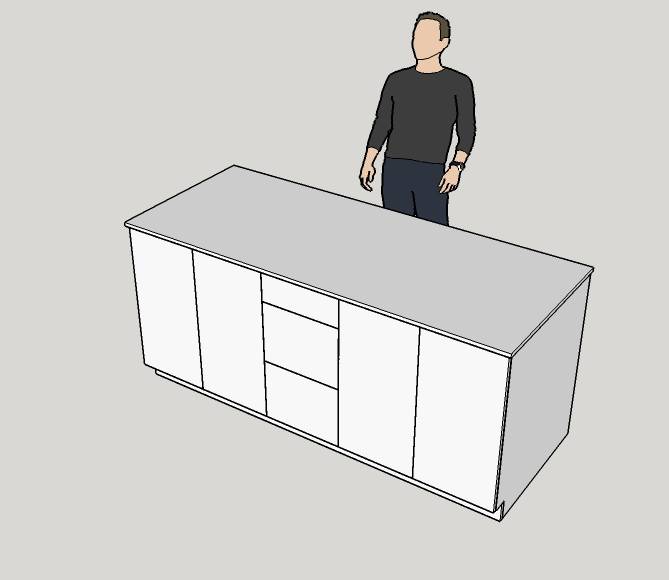
Time to fire Sketchup and do some modeling. The overall dimensions are about 75" W x 30" D x 35" H.


Each grow chamber is about a 30" cube. In the center are two drawers that can be used to store nutrients or as a drying chamber. Also in the center are the ventilation and electronics.


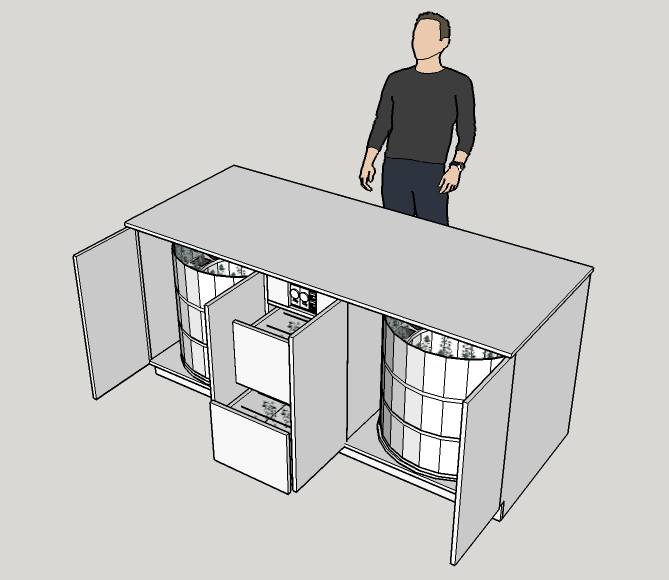
The grow is going to be a vertical coliseum. The coliseum us broken into three sections that hold 10 plants each for a total of 60 plants. The coliseum is on a lazy Susan to allow me to easily move each section to the front.


ReikoX

Knight of the BlackSvn
Ventilation

Ventilation

Since it is vertical, I chose to use a 7" Honeywell fan with three speeds. This will be directly below the bulb blowing up and should act as a cool tube. The main extraction fan with a carbon filter hides in the center console behind the drawers.


Air comes in from the bottom back of each grow chamber, it is then pulled through the light trap, through the filter, then pushed up into the electronics section and out the back. I chose a S&Park TD-100 but the design can accommodate a 4" Vortex if the TD-100 isn't up to the task.


ReikoX

Knight of the BlackSvn
Light usage

Light usage

All of my previous cabs were designed to fit the grow in the cab. This time I'm building a cab around the grow.

This shows the coliseum and the light distribution. The outer sphere is 12" from the bulb while the inner sphere is 8". Each plant is mostly within this sweet spot.


The pots are 3x3x8 mini tree pots, MT38.
 

ReikoX

Knight of the BlackSvn
Final thoughts

Final thoughts

Building Materials:
I plan to make this out of melamine. It's a plastic laminated piece of particle board. It's used in kitchen cabinets and furniture. It requires no sanding or finishing. It is water resistant, and cheaper than quality birch plywood (though still not cheap). It can be difficult to work with, chips easily, and requires special glues, finishes, and tools.

Medium & Nutrients:
I'm going to stay with what I know best. I'll stick with the Fox Farms Coco Loco with the Bio Canna line of nutrients (Vega, Florez, Boost, and Rhizotonic).

Automation:
One of my buddies suggested a motorized lazy susan. I thought it was too complicated and error prone. The same thing could be said for Blumats or drip irrigation. Not to mention I really enjoy spending time with the plants.

Cycles:
I plan to run this as a perpetual, but I want to first run a monocrop through it to get things full. Getting 60 healthy clones from the same plant will be tricky with my micro cabs. I may have to veg out several clones just for that purpose.

Outlets & Timers:

Each grow chamber is going to be equipped with a four outlets. One set will be hooked up to the timer and the second set will be always on. The timers are going to be in-wall digital timers. I will use two separate timers instead of a true flip-flop circuit since I had the ballasts anyway.

Temperature Control:
Each side will have a themostat and the fan will have a speed controller. This will be wired like my other cab so when everything is cool, the fan runs on the speed controller. When either is too hot, the fan will fun full speed.

Questions, comments, or concerns?
I'm still at the point where I can make changes to the design. I value opinions and will consider them all no matter how silly.

Vibes++
 

ReikoX

Knight of the BlackSvn
Coliseum Layout

Coliseum Layout


My tree pots came in today. I used upside down pots to simulate the top row.There are 30 total pots for each side. The bottom row has 12 while the top has 18. There is plenty of room for the fan in the center. It fits within a 30" square and represents one of the two grow chambers.
 

ReikoX

Knight of the BlackSvn
Models and Templates

Models and Templates

I wanted to make sure everything fits together correctly, so I made a 1/4 scale model of the workbench. I used Sketchup to print out the pieces then cut them out of the foam core. Everything fit as expected. There are a few corners that are not square, but considering I just traced pieces it fit pretty well.


The foam core was cheap and I bought way more than I needed, so I decided it would work well for my template. Again I used Sketchup to print out a full size template (from several pieces I had to tape together) and traced them out. These will aid me in my layout, as I can trace out the location of the holes quickly. I plan to make a wood template and use a router to cut out each piece. This is going to be the most difficult part to build. I'm not decided on the material I'm going to use. It may be melamine as well.


blynx

WALSTIB
Moderator
ICMag Donor
Veteran
Cool design! Looking forward to seeing this in action!

How much distance between the upper tree pot soil line and the top of the cab?
 

Dropped Cat

Six Gummi Bears and Some Scotch
Veteran
Good to see you model/prototype this design.

I used cardboard for my mock ups, but foam core is better as i see here.

Do you have sheet metal skills, I wonder.
 

ReikoX

Knight of the BlackSvn
Awesome design. Plugged in. Interested in seeing the double stack coliseum. G'luck ReikoX

Sick project! I'm gonna keep an eye on this thread, for sure!


im curious to see how this goes. should be interesting no matter what!

:tiphat:

Great lots of though. Looking forward to seeing this cabinet progress.

Thanks guys, glad to have you watching. This is my most ambitious project to date.

Cool design! Looking forward to seeing this in action!

How much distance between the upper tree pot soil line and the top of the cab?

Hey blynx, thanks for stopping by.

The interior is 30" cubed. The tree pots are 8" high. So roughly 15" from soil to the top. The goal is to average 3 grams per plant. I've been able to do that in my PC with 12/12 from seed.

The cab would easily be converted to use LEDs if I can't keep these CMH bulbs cool.

Good to see you model/prototype this design.

I used cardboard for my mock ups, but foam core is better as i see here.

Do you have sheet metal skills, I wonder.

Hi DC,
Man I need to make me some of that Zamaldelica hashish like you did, it looks delicious.

Foam core is great no grain, sturdy, and easy to cut and put together with nails.

Sheet metal, why yes I do. My filing cabinet and storage cabinet are both metal. The PC too I guess. In fact this is the first cab I'm doing out of wood.

Build 2 of them ship one out to the OC for me... awesome work bro can't wait to see it up and running :party::plant grow:

No sweat, that will be about 2k USD. Seriously though I'm going to be in this thing for quite a bit. Pricing out the melamine alone is going to be around $250. Not to mention hardware, timers, plugs, conduit, bulbs, pots, fans, soil, nutrients, and most importantly TIME. It adds up quick, but luckily the cost is spread out over several pay checks as I work on it.
 

ReikoX

Knight of the BlackSvn
Useful threads

Useful threads

Compact SOG with CFL's

The DrBudGreengenes method is the granddaddy of this whole project. I know the method works, I've used it quite successfully in my PC.

***DrBud Takes CFL SOG to the Next Level***

Another of DrBudGreengenes projects. Here we see that the method scales well to larger (though still micro) grows.

Anti's MicroStealth Cab Design (Dr. Bud Method)

Anti is full of great ideas. Particularly the way he plans out his designs and uses Sketchup. In this thread you will notice a lot of similarities in the ventilation design and general layout.


Seeking Critique on Vert Colosseum SOG concept.

A follow up thread by Anti. In this thread he designs and builds This is one of the threads that really got me interested in going vertical.


Bongsauce's new super cab! dual 150w Vertical hps + LED

I don't usually look at other sites, but this thread is worth putting up with the other community. This cab was directly inspired by the previous thread and is where I decided to start off this design.

Cobra420's Dual 150w HPS Cabinet

Another great thread using dual 150-watt HID lighting.

Boleman is back with his brand new edition... 150watt CMH! 24"x24"x28"H under fishtnk

Though not as detailed as the previous threads, this is the thread that made me realize exactly what my neighbor was throwing away. Without this thread I would have passed it up.

I'm sure there are many, many others but these are the main ones for this project.
 

ReikoX

Knight of the BlackSvn
Bulbs and Materials

Bulbs and Materials

I finally got the right bulb. At first I ordered the cheapest pulse start MH with a medium base. Well those weren't compatible with my ballast. Next I ordered the Phillips Master Color CMH, but I got the unprotected version. Since I didn't want to risk burning down my house, I sent all those back and got the protected Master Color in 3000K.


The bulb is definitely bright! After test firing it for about 20 minutes, I turned it off and was surprised the filament was still glowing red hot.


I was walking around the home improvement store looking for the right material for the reflector pieces in the back. At first I was thinking about 1/8" plywood, but it wasn't flexible enough to wrap around. I decided that the corrugated plastic would work well for that.

I was still debating what martial to use in the construction. Again thinking that 1/8" plywood would be cheaper (not really) and easier to work with. My plan was to use a router with a jig for the circles, and a template for the holes that the pots go in.

I looked at 1/2" melamine shelving, but it was too expensive and the shape would leave a lot of waste. The full sheets would require power tools and a truck, which I could have borrowed. I went home frustrated.

I was looking at my foam core model and was suprised how strong and sturdy it was. I had several pieces of scrap corrugated plastic that I started playing with. Using some #6 1" sheet metal screws I built a small shelf similar to how I designed it. It took my full weight (180 lbs) before it slid out from under me and broke. I had to use great force to rip the screws out. I was satisfied that this would work for the whole thing.

I bought a couple sheets and several hours later I had this. Well the plants are from my PC, they didn't grow like that in a few hours, hehehe. The design is stable and I can lift and move it without any trouble. The only thing I'm going to change is cutting a small handle in the back.


The plastic is great because it is light, water proof, cleans easy, cuts with hand tools, requires no sanding or painting, and comes in manageable size sheets. It's not as strong as the plywood or melamine, but it's simply there to hold things in place. It also isn't as heat resistant, but neither are the plants. It's not completely opaque, but that shouldn't be too much of an issue. It does have a "grain" and that leaves a bit of waste and makes for some odd angled screws. It's also one of the more expensive ($/sqrft) materials I looked at.
 

Goats

Active member
i can't wait to see how it turns out, and to see it full of girlies.

i'm really enjoying watching this come together.

:lurk:
 

Latest posts

Latest posts

Top