What's new
  • Happy Birthday ICMag! Been 20 years since Gypsy Nirvana created the forum! We are celebrating with a 4/20 Giveaway and by launching a new Patreon tier called "420club". You can read more here.
  • Important notice: ICMag's T.O.U. has been updated. Please review it here. For your convenience, it is also available in the main forum menu, under 'Quick Links"!

Building a Floro Tube Setup - DIY

bounty29

Custom User Title
Veteran
Ok, so my last grow had some heat issues, and I don't really have room in my cab to fit a fan bigger than a PC fan, so I had to change some stuff around. This is one of the major things, I've got a couple things left, but I'm almost there. I used a 150w HPS, and it worked out pretty good considering it was my first grow, but was in the 90s during the last half of flowering, which I feel had a large effect on my final weight. (about 40g from bagseed.)

Ok, so anyways...

Materials
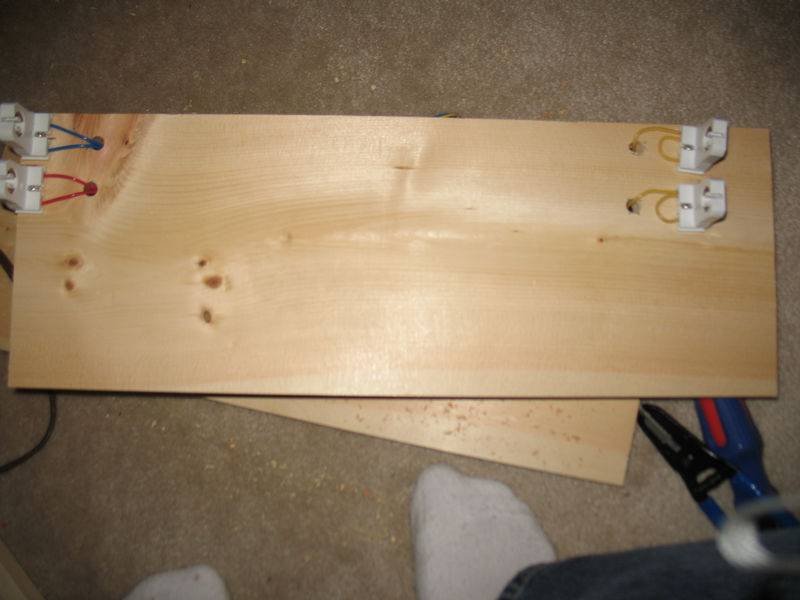
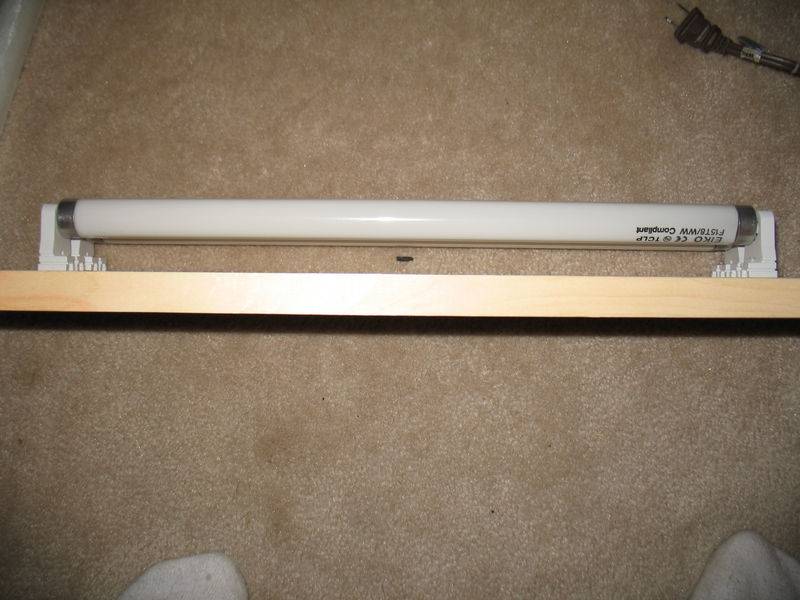
1. 1"x??" board, cut to desired length (?? depends on how many bulbs you want)
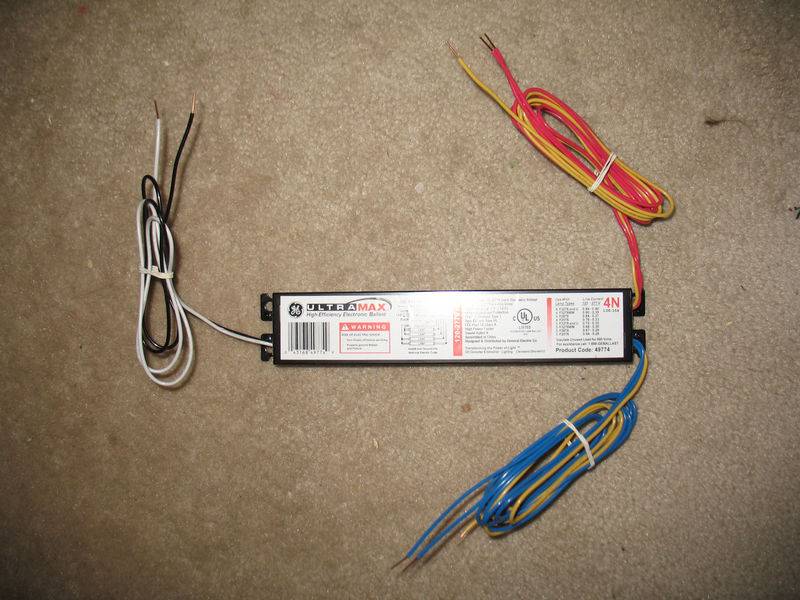
2. Flourescent Ballast, preferably electronic (as opposed to magnetic) suitable for length of bulb you're using
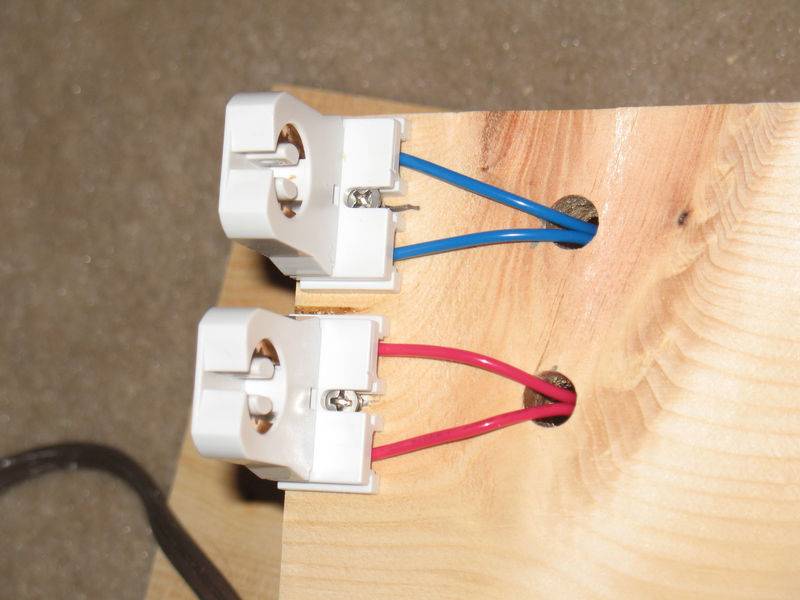
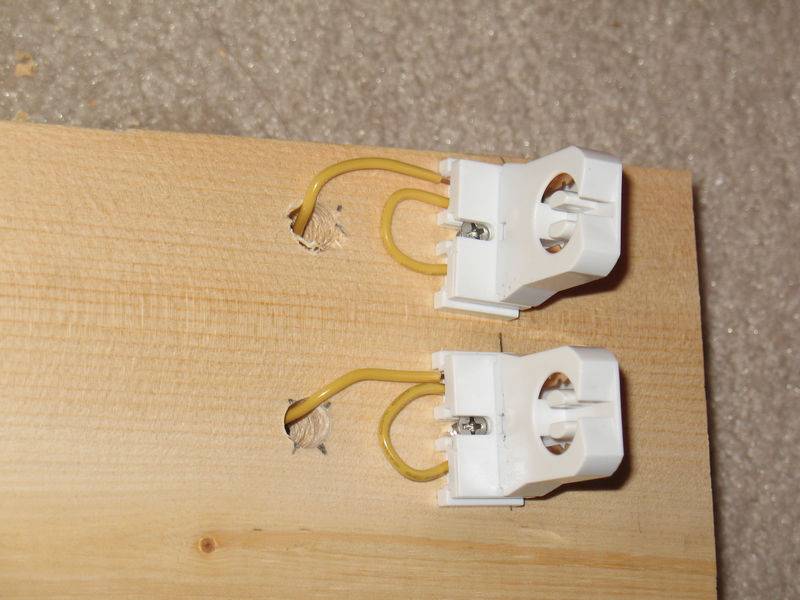
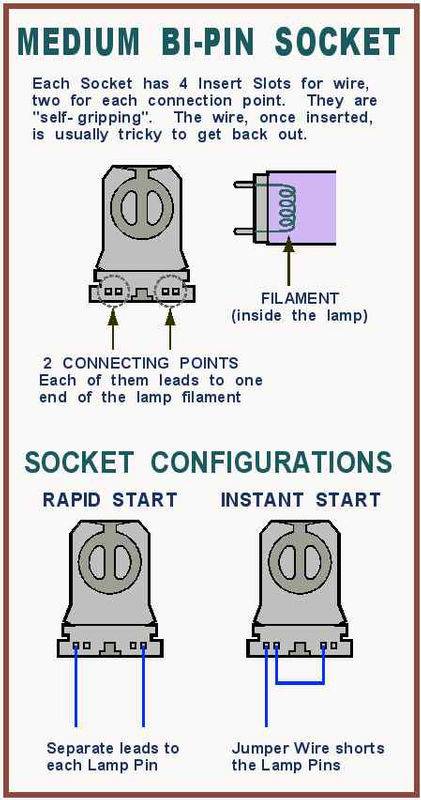
3. Two bi-pin fluorescent sockets for each tube you're using
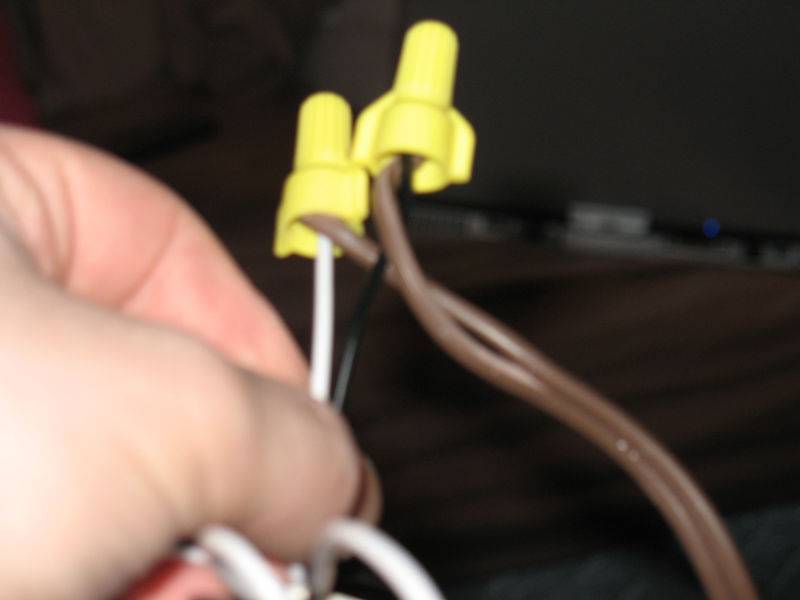
4. A couple wire nuts for each ballast you're using
5. A male end of a power cord
6. Fluorescent tubes
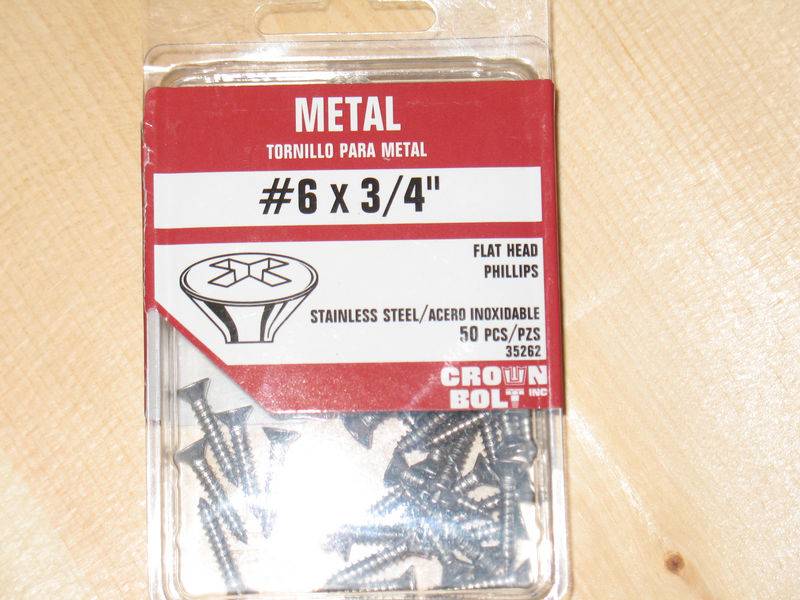
7. #6 3/4" screws, two for each bulb
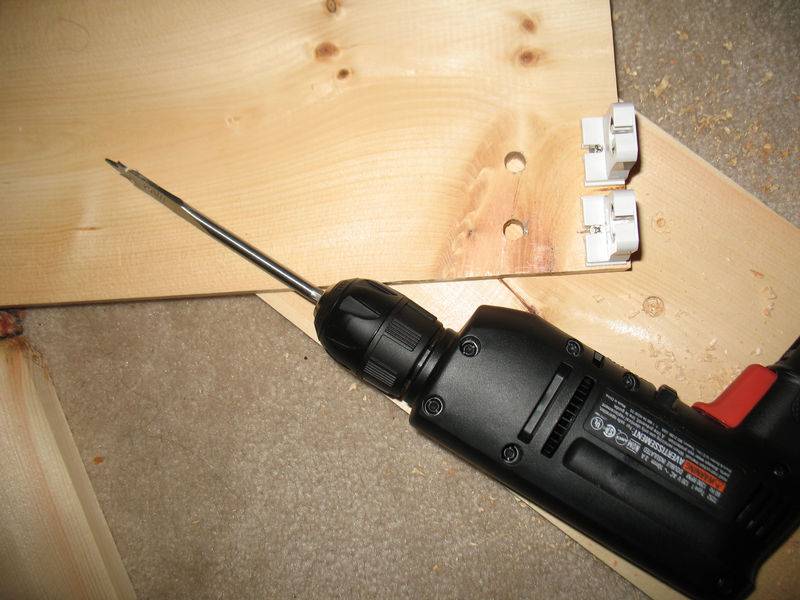
8. Drill, or tool to make a hole in the board for wiring
9. Screwdriver, for fine tuning socket mounts and attaching the ballast

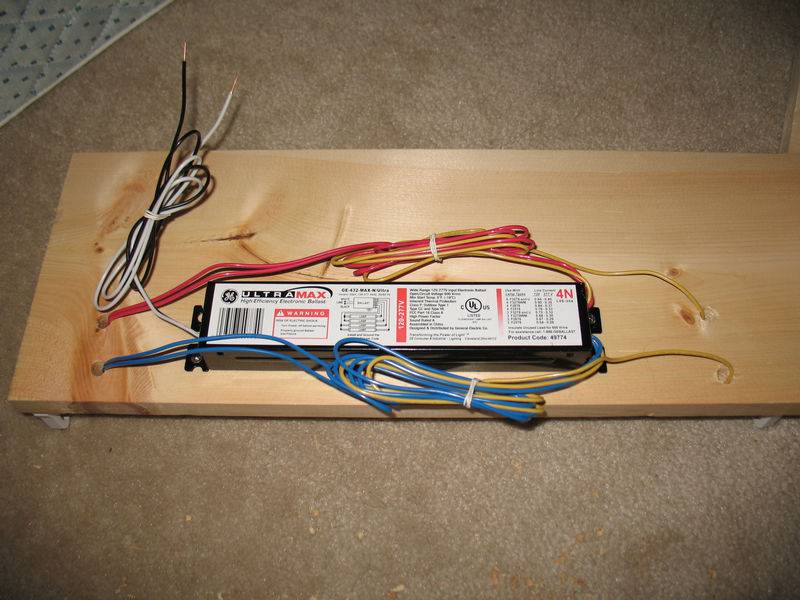
Here's what I'm using


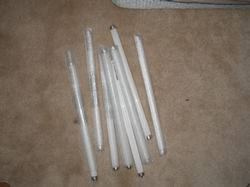
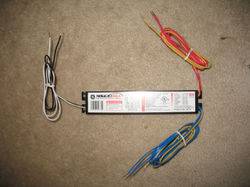
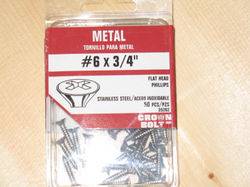
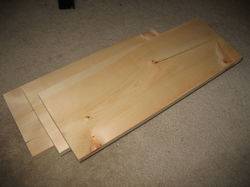
(Not Pictured: Male cord, wire nuts, drill, screwdriver)
 

bounty29

Custom User Title
Veteran
In my situation, I'll be using 18" bulbs, and in the current cabinet I'll be using four of them. So I'll need two ballasts, four bulbs, eight sockets, and a piece of 1"x8", cut to appx 18.5" (I had mine cut to 20" to be safe, but there's a good inch of wasted board.)

First, place your sockets on one end of the board, and trace where they are, as well as a little mark in the center of the notch on the bottom. That notch is where they slide onto a screw to hold on to the board. Once you've marked the board with where the screw should go, just press it in a little and start turning the screwdriver. (I wouldn't advise the drill for this part.) Once it's almost all the way in (1/8" showing?) try to slip on the socket. Then adjust it so that you can slip it on, but it's a tight fit.


After you've done that, and they're attached firmly, place a bulb into it, and into another socket. Trace where the socket at the other end is, and mark the center. Repeat the previous steps, until you've finished attaching the sockets.

Once all your sockets are placed, bore a hole through the board, about an inch inside the socket. This can be done a few different ways, but I used a 3/8" drilling bit and got them done nice and quick.


Attach the ballast to the back of the board, centered between the sockets. I just put a couple screws in the corners of mine (using a hand powered screwdriver) attached it more than adequately.


I used a four bulb ballast, and wired it to use two bulbs, a method known as overdriving. More information, as well as wiring diagrams, can be found at the thread going on here. Your board should look something like this after the wiring, if using the same setup as me. (The wiring is a little different for a two bulb ballast using one, and wiring them regular.)


You're almost there! Get your male ended cord, wire up the black and white wires, screw them tight, and plug it in!


(Last two pictures taken before ballast was attached)

Edit: Oh, I forgot. I've got a couple of S-screws that I'm just going to put in the four corners, and hang it by a chain so it can be lowered right on top of the plants.

Here's the overdriving wiring guide. Even if you're not using this, it shows how to wire it normally.
bounty29 said:
Here's a couple pictures I found when looking for information about overdriving floro tubes. Apparently magnetic ballasts are no good, you need to get the electronic ones. I might have to look into this...


Last edited:

bounty29

Custom User Title
Veteran
And now to see how much it costs, and what you get. (All fluorescent items I'm using are T8. I feel that equipment, partnered with overdriving, is the best fluorescent setup for the money right now.)

Fluorescent Ballast - $14.21* (I picked this ballast because it can operate 18" bulbs all the way up to 48" bulbs, and it uses four, so can be overdrivin with two bulbs.)
Fluorescent Tubes - I used 18" 15w tubes, just the size I needed for my setup. Two of these per ballast, and they cost about $1.50 from that site. It looks like the prices for bulbs other than the 18" and 24" ones are a bit high, so maybe you could get them cheaper from Home Depot or something.
Fluorescent Light Sockets- They came in packs of two, so you need one pack for every bulb you're using. I got them for $3.97 per pack at Home Depot.
Pack of #6 3/4" screws - $3.26
Boards - I got a six foot length of 1"x8", cut down to the size I needed right at Home Depot, that cost me $5.45, go with the cheapest wood you need, it's nothing special.
Wire nuts and male end of power cord - $3~ each, I had some laying around.

For the parts just to make the thing light up, it cost $25~, add in the boards and stuff, which I will use for mounting several of the setups, cost about $15. I'll be adding one more ballast to this now (two more bulbs) and when I move to my other cab, I'll add three more ballasts. When using 18" tubes, one overdriven ballast puts about about 51w. For now I'll be using 100~w, and when I move up I'll be using 250w. I'll be starting a run of Sour Diesel IBL in this in a few weeks hopefully, pending the safe arrival of my seeds. I feel that if the plant were scrogged, and these floros kept at a minimum height, I could get a very good gpw number considering the power of the fluorescent lights. I can't wait to test it out.

So for the lights, it cost me $25 for a 51w~ setup. If you were to use a 48" bulb, you'd get about 110w out of each setup, which would probably cost around $30. The 18" setup gives about 1.4w per sq in, where the 48" setup puts out around 1.1w per sq in. It's not much of a difference, but when compared to non overdriven setups, the 18" only gives 0.8w per sq in, and the 48" gives 0.67w per sq in.

What I like about this is all the light is evenly spread out, which suits a scrog perfectly. I'm hoping to run two scrogged plants, each using about half the width of the lights (6"x9" screens.) We'll see how this compares to the 150w HPS, I'm curious to find out. The heat issue should be gone, but will that make this a reasonable alternative? I'll have to wait and see how the grow goes, but I have plenty of faith in the fluorescent lighting, even though there are many people that doubt it.


*Price as of posting time :woohoo:
 
Last edited:

FGandalf

Member
Looking good Bounty. Are you going to paint the wood white? You should, or at least paint it some thing. The paint adds to the safety factor when mounting electrical products to wood. Some will say it's not necssesary you be the judge. But it looks good. I think with the 18" or 24" bulbs you can get more efficient use of the ballasts like your doing. You should look into the h-depot shop lights they are 7.95 or 9.95 and it will cut some of your costs. One of those fixtures will come with an electronic ballast and 4 ends so you can hook up one overdriven circuit and 2 24" bulbs. Purchase 2 HD setups and you have 2 ballasts 4 24" bulbs and no extra costs for buying those bi-pin sockets, i can't believe how much they are no matter where you go. Anyway just an idea. :wave: 
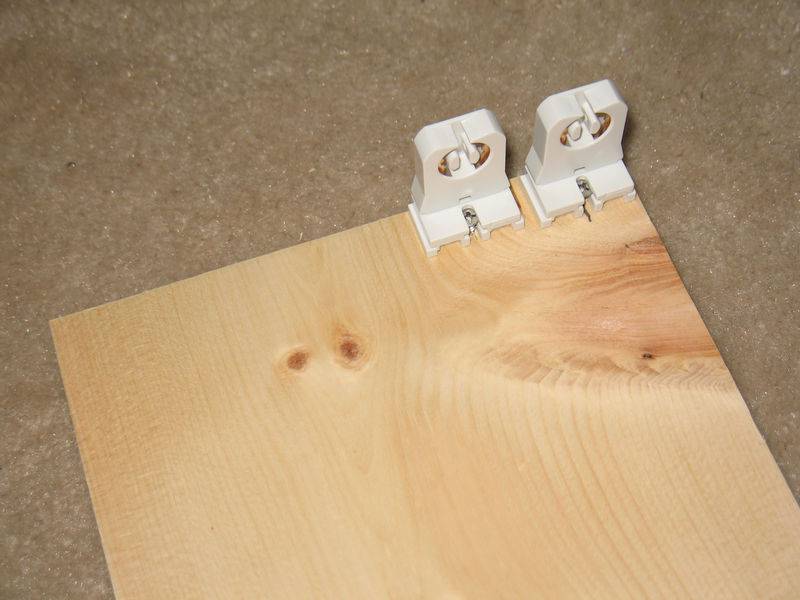
keep up the good work.
 

bounty29

Custom User Title
Veteran
Yeah I was shocked at the price of the sockets as well. I looked at my Home Depot for lights I could use but they all seemed to be magnetic ballast, which I thought wouldn't work. One of the problems with my grow space is it's a hair too small for 24" bulbs. I could probably fit them in, but ventilation would be a problem. Next time I'm at HD I'll definitely be on the lookout for pieces, as I am every time I visit.

I think I'm probably just going to tape some cheap mylar to the wood, just to keep things simple. The ballasts stay cool to the touch, and the bulbs get warm. I think if the plants ended up touching them they would get burnt, but an inch away is perfectly fine. Since my last grow I've been using my cabinet for storage, I need to clean it out and get it in running condition again.

One thing I've noticed: When I plug the lights in, the bulbs aren't like... full power. They're real dim, and once I move the pins around in the socket they kick on. It's weird though, I'm not sure why it would do that.
 
Last edited:
G

Guest

great tutorial!

hey pontiac! get yer ass over here and link 'er up :p
 

NOKUY

Active member
Veteran
looks good bounty

an option to buying the seperate parts is to buy the generic shop light at HD

it has the ballast, 4 sockets, and wires of course. plus the white metal reflector that you can cut to fit your needs (thats how I did it) the whole light w/out bulbs was 7.99

just a thought (the light is for 48inch bulbs, but I run 18 inchers w/ mine, after reconfiguration and complete dismantling of the original shop light)
 

bounty29

Custom User Title
Veteran
Man what is this shop light you guys are talking about? Is it in the aisle with all the different floro tube arrangements up on the high part of the aisle? I couldn't find anything there for under $20, I thought I looked everywhere. If that's true then I might have to get a bunch of those.
 

NOKUY

Active member
Veteran
they are there...I dont think they are set up for display tho....mine were under the shelf in a big stack right under the floro displays.

im looking at the box right now, and its called a:
"commercial electric" shop-light
model #732-334 or 27732-334 (both those numbers are on there)
SKU 4633584899
price $7.99 USD

the box is mostly white w/ gray accents

hope that helps
 
G

Guest

i picked up the light thats prewired for 7.99 at hd, it was the 48incher also. wish i woulda read more about flouros before going with a 400w hps
 

bounty29

Custom User Title
Veteran
That's awesome, thanks yukon, I'll be heading out to Home Depot tomorrow in hopes of grabbing a few of these. If they really are that cheap, my cabinet may be seeing a lot more wattage soon.

Edit: Lol... so I guess that just made this thread useless, unless you want to waste your money :bat:
 
Last edited:
G

Guest

Thats alright Indiana,you're going to need that 400 watt from early veg until flower.The secret to tube floros is to keep the tops of the plants literally 1/4 inch below the lamps,if the top fans touch it does no harm,just bend them down and keep that growtip almost on the floro.You'll have to adjust it a link up every day.Grow it to 4 -6 inches this way,then transplant up from cup or 4 inch pot to 1 gallon and continue vegging under 400HPS
 

FGandalf

Member
if movingthe pins around causes the bulbs to flicker or flash, check the connections and make sure the bulbs are sitting in the ends correctly. The over driven lamps are hard to tell from regular lamps after a while just get one and put it near the others for a comparison. Sounds like one side of it might be disconnected or loose. But watch out some plants will bleach a bit if left touching the tubes for too long, maybe a few days but still not like with a hps or mh. good luck with it.
 

bounty29

Custom User Title
Veteran
So I got the Home Depot light today, and the $8 setup didn't have the SL15 ballast inside (The one you want for overdriving) It was just some cheap generic ballast, which didn't have the right wiring setup to be overdriven. I didn't realize they were only two bulb lights too. If you can get your hands on one that has the SL15 ballast, then it's a good deal. If not, then you can follow this guide. Since I can't get the right ballast at HD, I'll be ordering several more of these ones and maxing out my cabinet.
 

bounty29

Custom User Title
Veteran
Yeah I forgot about that whole mylar thing. I've got some flat white high-heat spray paint left over from when I built my cabinet, I'll probably just use that.
 

cloneX

Member
Interesting setup bounty29, do you have any pics of the results you had with these & your cab? Also wondering does anyone know where these items can be bought in Europe, seems to be hard to find a good selection of fluoro tubes here where I live, any help much appreciated.
 
Top