Olum
Member
Heeeeeeeeeeeeeey! I'm finally building my first cab and I'm really excited about it! The design is inspired by Anti's Stealth Cab 3000 (thanks Anti, you rule!) and of course, the NGB stealth cab. I opted to modify an existing cabinet instead of starting from scratch and ended up with an unfinished sink cabinet. So far I've only managed to gut it and paint the inside and some of the pieces that will eventually go inside. I knew that I wanted to base the cab on Anti's, so I started buying stuff before I had everything all figured out. Not at all a problem, gave me a chance to really focus on the task and start to develop more ideas. After spending 16 hours working on it, buying materials and tools, and finally sitting down to sketch something out, I have a blueprint. Unfortunately I am not familiar with google sketch. I tried using it and found it to be confusing and gave up in the interest of time. I have been planning to do this build for a couple of months now and tomorrow is my self imposed dead line. I need to have at least the majority of the work done by early afternoon tomorrow. Without further ado or guilding the lily, I present to you my first stealth cab.
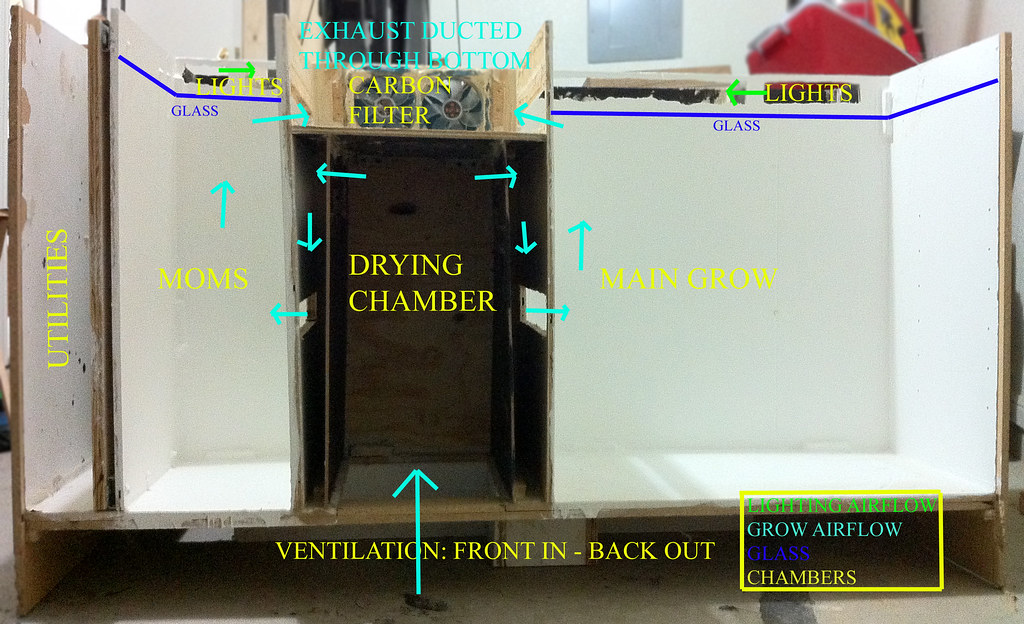
FRONT VIEW TRANSPARENT
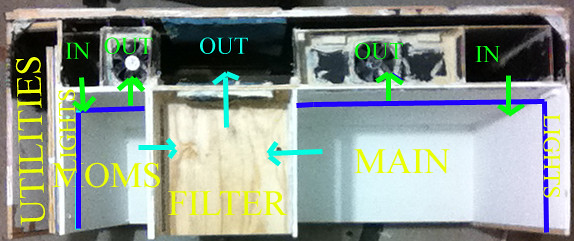
SIDE VIEW CROSS SECTIONS OF CHAMBERS

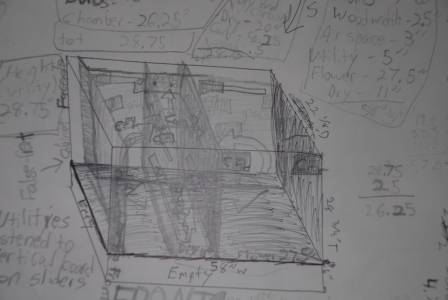
STONER LOGIC
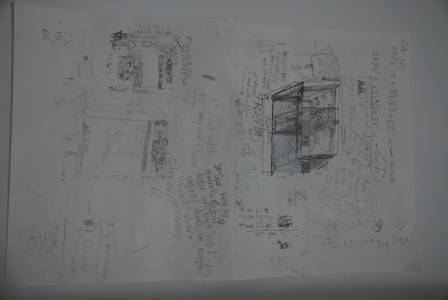
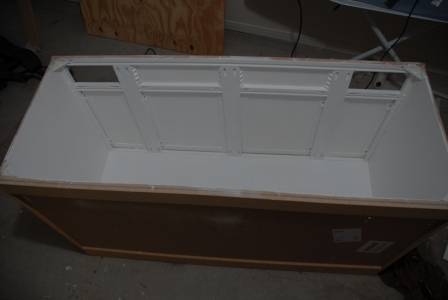
CAB IN EARLY DEVELOPMENT
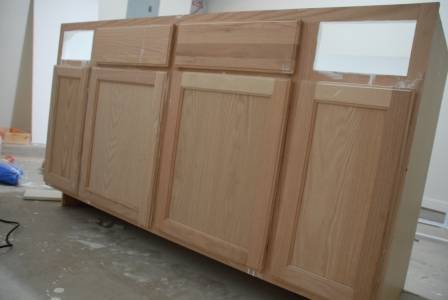
CAB IN EARLY DEVELOPMENT
Ok, so you're probably looking at that crappy picture of a crappy drawing and saying to yourself, "Gee, that sure is a shitty picture. That writing looks like a 5-year-old's too." Take a moment to look closer my friends and let me try to explain. I'm sorry I don't have a better graphic representation. In case you can't read or understand the pictures, here is the idea:
It's a sink cabinet that I will attach a top towhen completed.
Outer dimensions: 34 1/2" T X 24 1/8" D X 60" W
Inner space: 28 1/4 T X 22 1/8 D X 58" W
The floor of the cabinet stands 6" off the ground as the walls protrude downward past the floor. I entirely removed the front portion of the bottom 6" and will likely make more alterations to the walls to allow more air in and out as all air moving in or out will do so through the bottom via inlet and outlet ducts in the rear (as opposed to having inlet and outlets in the back and ducting in the top.) I'm able to do make use of the additional 7" + in depth my cab has over Anti's to make up for it's lack of height, so in the end my mom and flower chambers are actually taller and wider, but will be of the same depth as Anti's. I have a significantly smaller secondary chamber as I am doing a more traditional grow instead of a perpetual. I have room for three mothers in my mother chamber. I'm not sure how many plants I should put into my flower chamber. I want to SCROG with BOG's Blue Moon Rocks. Any suggestions? The air circulates via a passive intake system traveling in through the center drying chamber, splitting up and going to the mother and grow chambers through double walls meant to prevent light leakage from one chamber to another, up through the chambers, into a carbon filtering chamber, and is then expelled via two 120mm pc fans capable of up to 78 CFM each into the rear air outlet which is approximately 7" deep and covers the entire area behind the drying and filter chambers. It continues on both sides behind the other chambers, but is only about 4" deep behind those chambers as both grow chambers have wall ducts feeding from the bottom into the glass-encased CFL area. I am still uncertain as to how many lights I will use, but I have 24 on hand -- 12 2700K 23w 1600 lumen Soft Whites and 12 5000k 27w 1750 lumen Daylights. Each light chamber gets its own 120 mm fan exhausting into the same larger rear chamber that the carbon filter exhausts into. I will carefully ensure an airtight seal around the glass so that there is no smell leakage from the plants, around the glass, and into the exhaust ducts without passing through the carbon filter. To the side is a 5" wide utility/storage area that I may install a piece of wood into vertically with drawer sliders and mount the electronics into so I can slide it out as one panel for easy access. The both chambers' plants will also be on shelves that slide out. I even plan to attach hooks to strips of wood fixed to the cieling of the drying chamber with drawer slides so I can hang or remove buds by sliding them out as well. Not shown in my doodles are the dividers under the cab in the 6" area beneath that will separate the in flowing and out flowing air to ensure fresh air is coming in instead of recycling carbon dioxide laden air. I will also be installing a fan speed controller so that each fan's speed can be individually controlled. The cab will be in a carpeted and air conditioned room. The fans will be wrapped in either foam or surrounded by insulating caulk-like foam to reduce noise from vibration and sound proofing foam (approx 2" thick) will be applied to the rear wall of the exhaust duct. The front, the part that actually opens will be held on by strong magnets and will be on what most would consider to be the back of the cabinet. The cabinet doors will be glued, caulked, and completed sealed. If anyone asks, they're locked. The cabinet facade is then, actually the rear.
CHAMBERS (Inner space - does not include inner wall widths of 1/2" and outer wall widths of 3/4" and greater)
MAIN GROW - 26.25" T X 17" D X 27.5" W
MAIN GROW LIGHTS - 2.5" T X 22 1/8" D X 27.5" W
MOTHER - 26.25" T X 17" D X 9" W
MOTHER LIGHTS - 2.5" T X 17" D X 9" W
DRYING/INTAKE CHAMBER - 20" T X 17" D X 11" W
CARBON FILTERING CHAMBER - 8.25" T X 17" D X 11" W
* EXHAUST DUCT (CENTER PORTION) - 28.75" T X 7 5/8" D X 12" W
* EXHAUST DUCT (BEHIND GROW CHAMBER) - 28.75" T X 4 1/8" D X 27.5" W
* EXHAUST DUCT (BEHIND MOM CHAMBER) - 28.75" T X 4 1/8" D X 9" W
MOTHER LIGHT'S AIR INTAKE - 28 3/4" T X 3" D X 9" W
MAIN LIGHT'S AIR INTAKE - 28 3/4" T X 3" D X 27.5" W
UTILITY ROOM - 28 3/4" T X 22 1/8 D X 5" W
*There is only one exhaust. It is larger than both of the intake ducts for the lights these intakes actually exist inside the larger exhaust duct. Thus these measurements are imperfect as they do not take into account larger strips of space on the outer corners of the exhaust area after the intake areas for the light chambers end. All air intake and exhaust happens through the bottom of the cab. All air intake and exhaust duct measurements are likely slightly off (=/- 1/2").
I'm still unsure as to how exactly to hook up my lights and fans. I have everything I need -- lights, fans, fixtures, wire, PC power supply -- but I'm not sure how best to wire everything. Any help on that would be greatly appreciated.
I'm very excited to have begun this project and am so grateful to everyone who has helped me on IC through their informative and entertaining posts and chat room encounters. I am open to suggestions and comments and I hope you'll go with me as I begin my journey towards mini pot farmerdom.
FRONT VIEW TRANSPARENT
SIDE VIEW CROSS SECTIONS OF CHAMBERS
STONER LOGIC
CAB IN EARLY DEVELOPMENT
CAB IN EARLY DEVELOPMENT
Ok, so you're probably looking at that crappy picture of a crappy drawing and saying to yourself, "Gee, that sure is a shitty picture. That writing looks like a 5-year-old's too." Take a moment to look closer my friends and let me try to explain. I'm sorry I don't have a better graphic representation. In case you can't read or understand the pictures, here is the idea:
It's a sink cabinet that I will attach a top towhen completed.
Outer dimensions: 34 1/2" T X 24 1/8" D X 60" W
Inner space: 28 1/4 T X 22 1/8 D X 58" W
The floor of the cabinet stands 6" off the ground as the walls protrude downward past the floor. I entirely removed the front portion of the bottom 6" and will likely make more alterations to the walls to allow more air in and out as all air moving in or out will do so through the bottom via inlet and outlet ducts in the rear (as opposed to having inlet and outlets in the back and ducting in the top.) I'm able to do make use of the additional 7" + in depth my cab has over Anti's to make up for it's lack of height, so in the end my mom and flower chambers are actually taller and wider, but will be of the same depth as Anti's. I have a significantly smaller secondary chamber as I am doing a more traditional grow instead of a perpetual. I have room for three mothers in my mother chamber. I'm not sure how many plants I should put into my flower chamber. I want to SCROG with BOG's Blue Moon Rocks. Any suggestions? The air circulates via a passive intake system traveling in through the center drying chamber, splitting up and going to the mother and grow chambers through double walls meant to prevent light leakage from one chamber to another, up through the chambers, into a carbon filtering chamber, and is then expelled via two 120mm pc fans capable of up to 78 CFM each into the rear air outlet which is approximately 7" deep and covers the entire area behind the drying and filter chambers. It continues on both sides behind the other chambers, but is only about 4" deep behind those chambers as both grow chambers have wall ducts feeding from the bottom into the glass-encased CFL area. I am still uncertain as to how many lights I will use, but I have 24 on hand -- 12 2700K 23w 1600 lumen Soft Whites and 12 5000k 27w 1750 lumen Daylights. Each light chamber gets its own 120 mm fan exhausting into the same larger rear chamber that the carbon filter exhausts into. I will carefully ensure an airtight seal around the glass so that there is no smell leakage from the plants, around the glass, and into the exhaust ducts without passing through the carbon filter. To the side is a 5" wide utility/storage area that I may install a piece of wood into vertically with drawer sliders and mount the electronics into so I can slide it out as one panel for easy access. The both chambers' plants will also be on shelves that slide out. I even plan to attach hooks to strips of wood fixed to the cieling of the drying chamber with drawer slides so I can hang or remove buds by sliding them out as well. Not shown in my doodles are the dividers under the cab in the 6" area beneath that will separate the in flowing and out flowing air to ensure fresh air is coming in instead of recycling carbon dioxide laden air. I will also be installing a fan speed controller so that each fan's speed can be individually controlled. The cab will be in a carpeted and air conditioned room. The fans will be wrapped in either foam or surrounded by insulating caulk-like foam to reduce noise from vibration and sound proofing foam (approx 2" thick) will be applied to the rear wall of the exhaust duct. The front, the part that actually opens will be held on by strong magnets and will be on what most would consider to be the back of the cabinet. The cabinet doors will be glued, caulked, and completed sealed. If anyone asks, they're locked. The cabinet facade is then, actually the rear.
CHAMBERS (Inner space - does not include inner wall widths of 1/2" and outer wall widths of 3/4" and greater)
MAIN GROW - 26.25" T X 17" D X 27.5" W
MAIN GROW LIGHTS - 2.5" T X 22 1/8" D X 27.5" W
MOTHER - 26.25" T X 17" D X 9" W
MOTHER LIGHTS - 2.5" T X 17" D X 9" W
DRYING/INTAKE CHAMBER - 20" T X 17" D X 11" W
CARBON FILTERING CHAMBER - 8.25" T X 17" D X 11" W
* EXHAUST DUCT (CENTER PORTION) - 28.75" T X 7 5/8" D X 12" W
* EXHAUST DUCT (BEHIND GROW CHAMBER) - 28.75" T X 4 1/8" D X 27.5" W
* EXHAUST DUCT (BEHIND MOM CHAMBER) - 28.75" T X 4 1/8" D X 9" W
MOTHER LIGHT'S AIR INTAKE - 28 3/4" T X 3" D X 9" W
MAIN LIGHT'S AIR INTAKE - 28 3/4" T X 3" D X 27.5" W
UTILITY ROOM - 28 3/4" T X 22 1/8 D X 5" W
*There is only one exhaust. It is larger than both of the intake ducts for the lights these intakes actually exist inside the larger exhaust duct. Thus these measurements are imperfect as they do not take into account larger strips of space on the outer corners of the exhaust area after the intake areas for the light chambers end. All air intake and exhaust happens through the bottom of the cab. All air intake and exhaust duct measurements are likely slightly off (=/- 1/2").
I'm still unsure as to how exactly to hook up my lights and fans. I have everything I need -- lights, fans, fixtures, wire, PC power supply -- but I'm not sure how best to wire everything. Any help on that would be greatly appreciated.
I'm very excited to have begun this project and am so grateful to everyone who has helped me on IC through their informative and entertaining posts and chat room encounters. I am open to suggestions and comments and I hope you'll go with me as I begin my journey towards mini pot farmerdom.
 have to try that with the spider