Some people struggle with the building of this box, dimensions and stuff...plus some pictures are small so you can't make out anything...so i decided to post the first thread of NGB in which he built his box.
enjoy
NewGanjaBoy
Uniq Evangelist
Registered: Jul 2000
Posts: 423
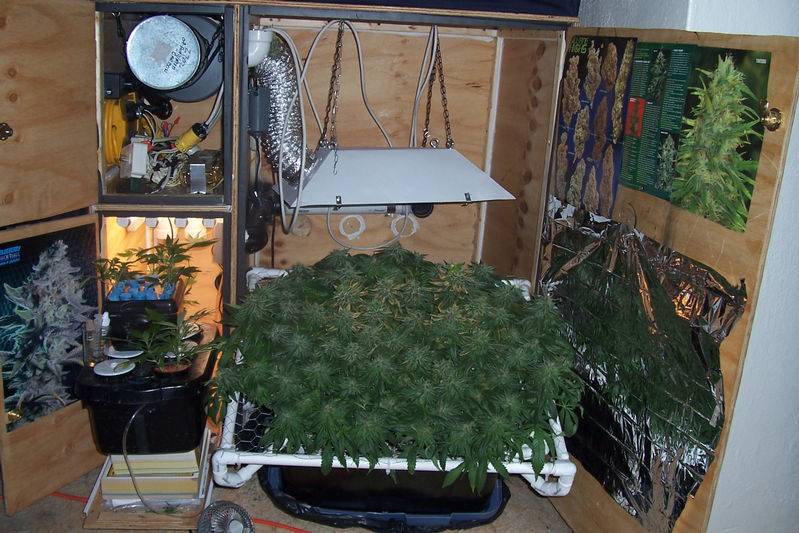
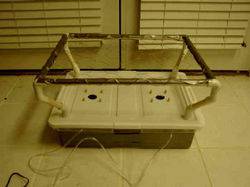
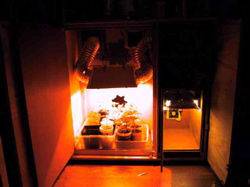
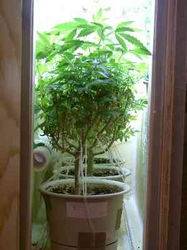
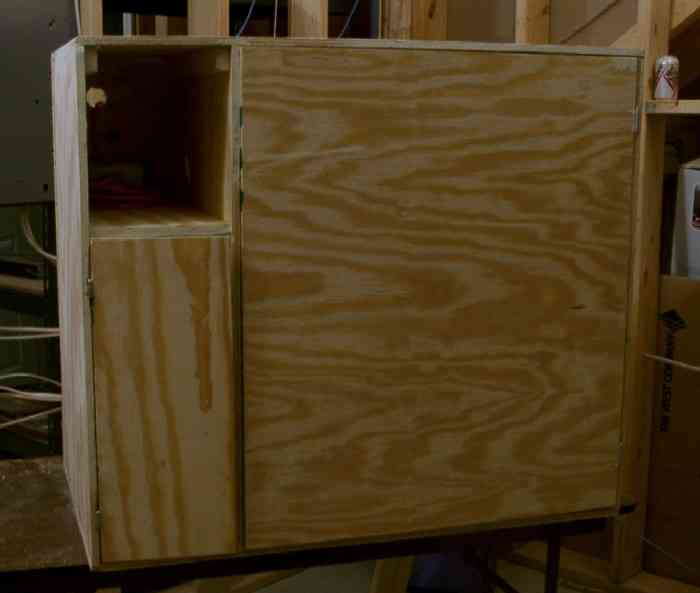
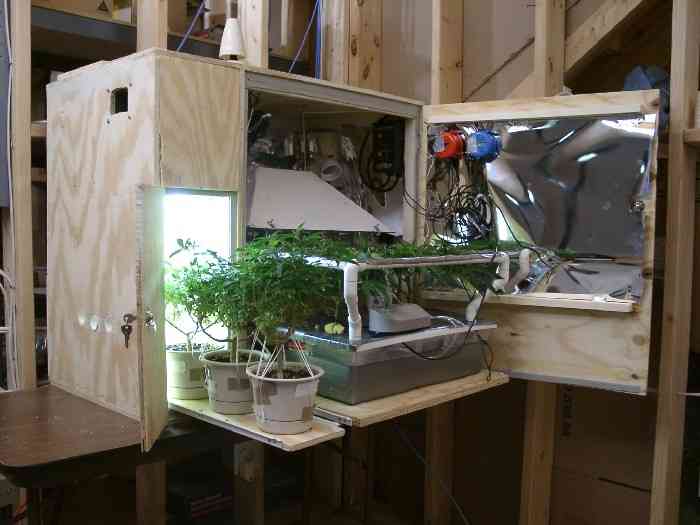
Afoaf cant do big grows for now, so he's doing a mini cabinet. I wanted to post them to get feedback. Here is a shot from the front of the cabinet.

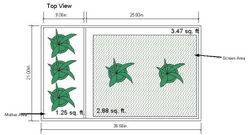
Here is a view from the top
Notes...
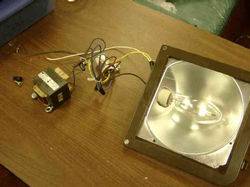
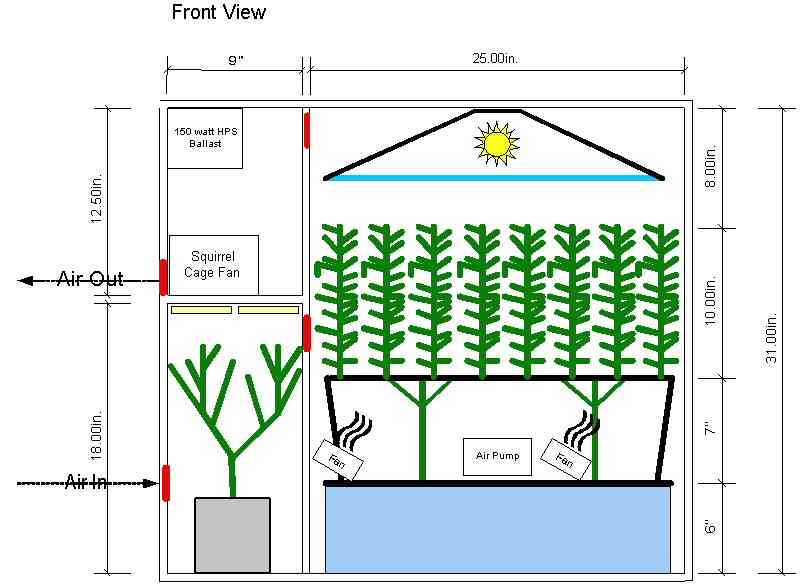
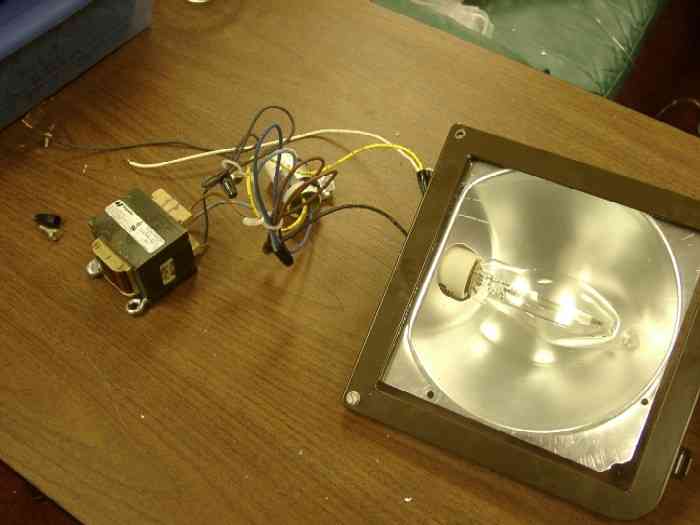
Afoaf went with a 150 hps security lamp for $80. It turned out to have very simple guts, so he removed the balast and lamp and the made balast remote. He still has to figure out what to put the balast in, as the origional packaging is too bulky. He was thinking about using a small metal meatloaf pan. The 150 balast is not that big.
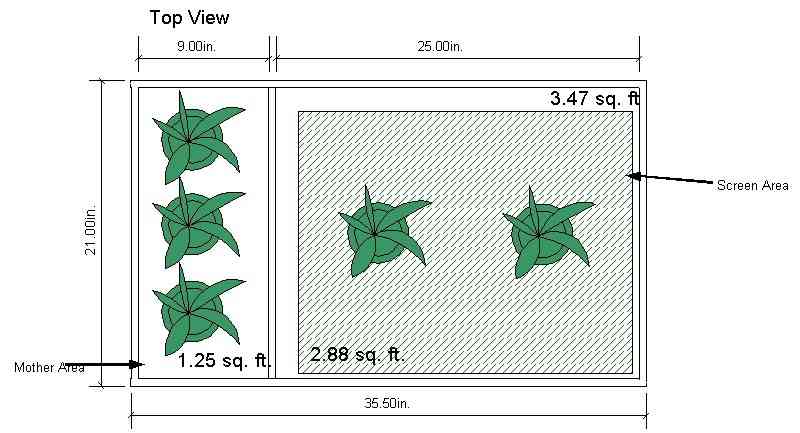
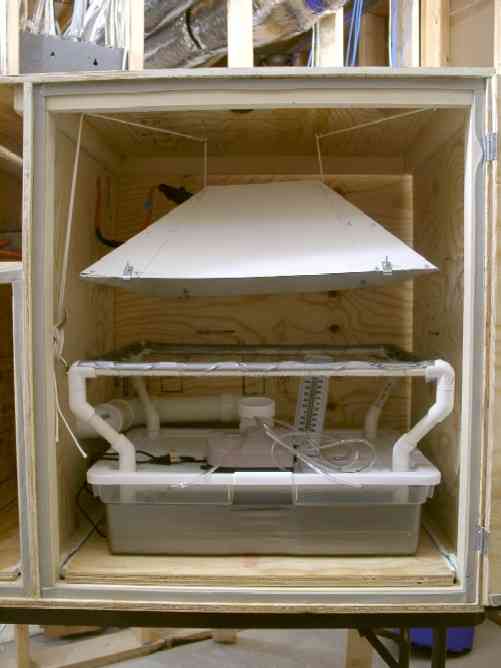
The grow box is broken down into 3 areas. The top left is the utility room that houses the balast, ozon generator, and air fan.
The bottom left is the mother chamber. It can hold 3 to 4 of his size mothers.
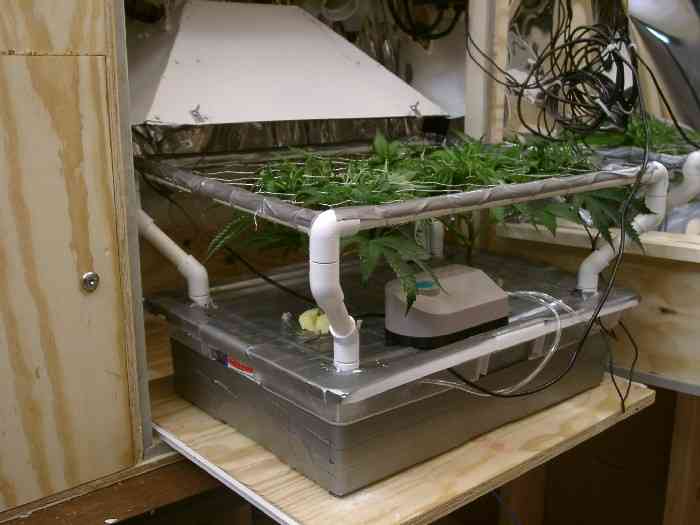
The flowering chamber is using a modified bubbler design. The res is a 8 gallon rubber box. The screen is connected to the top. When you lift the top, the screen goes with it. The res is on a sliding draw so that the entire unit can slide out of the flowering chamber. Pull the top and put on another res the same size to replace nuts.
The air flows through the red openings between the chambers. What isn't shown on the diagram is that there is 2" pvc piping that is in the holes to stop light leakage and to better control the flow of air through the unit.
The hole from the mother to flowering chamber has a pvc pipe that wraps around the flowering chamber and brings the air flow directly under the screen, between the two plants. As the squirrel cage fan pushes air out of the utility area, air is sucked in from the mother chamber, through the pvc pipe up under the screen.
The hole from the utility to flowering chamber has a pvc pipe that also wraps around the back side of the flowering chamber to the right side of the lamp. the fan sucks air from that pipe which pulls the heat from the lamp and sends it off to the utility room. This is 4 inch PVC pipe so that the air tiger ozone generator can fit into it. By the time the air is in the utility room is has been scrubbed by the ozone.
The box is being built out of .5 inch plywood. It will be made stealth by being placed inside of a cardboard box in a room with about 70 other boxes that have nothing in them. The box will also be locked with key.
Pics of Light
This is the $80 150 hps. Probably can use the hood you see here. Afoaf is thinking of putting the balast and started in a meatloaf pan. Very easy to take apart, and was only $10 more then the 70 watt hps.
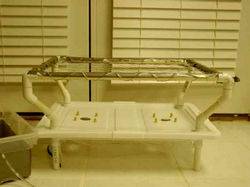
DWC SCROG
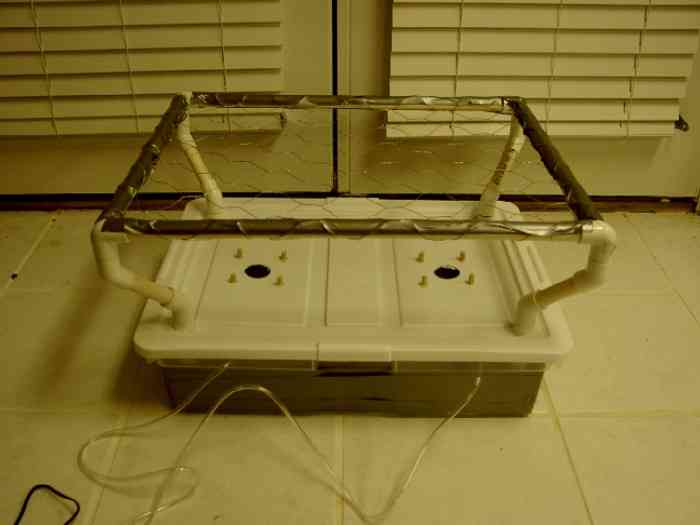
Afoaf is a DWC fan. Its just too much easier to maintain then soil. This setup has a few unique options. Here is a shot of it empty and ready to go.
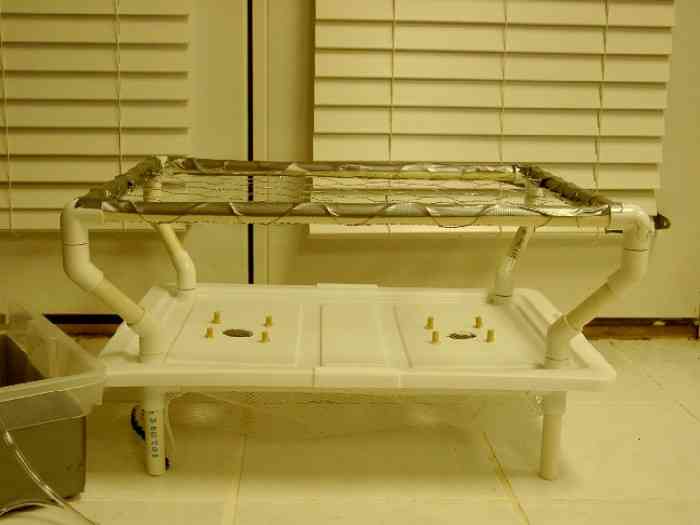
Screen and res cover
More work is still to be done to light tighten the box...
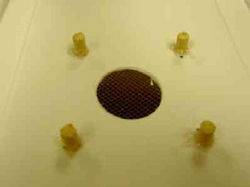
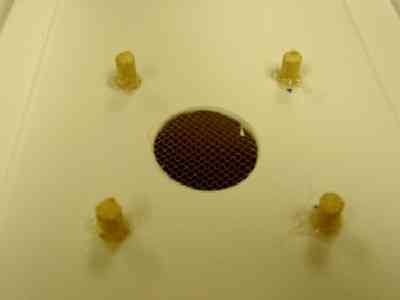
Afoaf is now going without any medium at all. This shot shows how the plants are put into the set and setup for scrog. The clone is started in a simple areo cloner, where they sit in a tub waiting to develop roots. I let the roots go for a while longer then normal in the cloner, and then put them in the hole shown below. The plant stump is wrapped in a cheap foam sponge to help is sit more snugly into the hole. Then a cotton shoe string is used to wrap around the wood poles and the plant to tie the plant down to the cover. While the plant is small the weight won't be a problem. When they hit the screen, they are tied down with twist ties, which further adds stability to the plant.
The cover has a plastic netting glued to the bottom. This is designed to provide support for the roots when lifting the cover off of the res. The roots should be able to grow through it just fine.
When it comes time to harvest, there are no messy clay balls or overgrown plast cups to deal with. Cut the roots from the plant, let dry and pull from plastic netting. This is a nice way to go when doing DWC. Afoaf hates the cups and balls!!
chestgrower
New Member
Registered: Oct 2000
Posts: 23
Similar grow
Af has very similar setup to yours 150 w hps...pics are from grow with soil, but now the grow is a bubbler/scrog setup (no pics of that yet)
another
another with cabinet open
results @5 weeks 12/12
nfm

~PostmorteM~
Edge Member
Registered: Feb 2001
Posts: 109
where did you get that 150 watter?
did you get that at HomeDepot?
because 10 more bucks for it thats a good deal.
please fill me in.
DurbanLegend
Edge Member
Registered: Dec 2000
Posts: 153
NewGanjaBoy,
I'm very intrigued by your scrog/dwc setup, which looks very well engineered. The 1/2" pvc looks to be a very good solution to the problem of attaching a scrog screen to a dwc bucket.
Could you post some pics of the underside of the lid? I'd like to see how the scrog frame attaches down there (looks like you have a square of tubing underneath to hold it all togehter). I'd also like to see how the netting is attached on the bottom.
Also, I'm very curious about your method of holding the plant in place without grow rocks and netcups. Could you post a few pics to illustrate that method further once you get your grow going?
Thanks, and good karma for you, nice work!
NewGanjaBoy
Uniq Evangelist
Registered: Jul 2000
Posts: 423
PostmoreM:
I got the lite at a place called Lowes. Note that the 150 was 10 more then the 70 watt they also had. I have seen people here direct wire the 70 watt bulb, and they probably got going for even less.
DurbanLegend,
Afoaf has grown without the cups and balls one grow, but didn't invite me over to take a picture! It all started with leaving the clones in the area-cloner for too long. The scrog cover does have a rectangle of PVC right under the cover. This provides structural support, andd allows the cover to easily handle any weight the plants will put on it. Afoaf can lean onto the cover with his two fists and push down really hard and not bother the cover.
The mesh net is held onto the pvc with glue. The 1/2 inch pvc is glues into the cover, but the screen can unplug from the top. When it comes time to harvest, just snip the plant trunk and pull the screen off of the cover (the pvc joints directly ontop of the screen are not glued together. When adding water, you can just lift the cover, which takes the screen with it. That hot glue gun helped well with this part of the project.
Chestgrower:
Nice cabinet. I saw your post of these pics earlier. You and a few others over the last year have convinced me that a small cabinet can be used to grow good bud. I convinced afoaf to give it a try.
I would like to find out more about your home made hood. Afoaf is designing his hood now, and the design will be similar (he is going for something a bit shorter). He is using sheetmetal and cutting and folding one piece to make the cover, and was planning on putting a lip in the sheet metal to slid the glass into the hood. Do you find that the plants can go all the way up and touch the glass without any heat problems?
Also, You seem to be venting the hood seperately from the flowering chamber. If true, do you have two seperate timers for this? Afoaf was planning on having the air from the flowering chamber sucked through the light hood to have a single air flow through the mother chamber into the flowering chamber and scrubbed as it went to the utility area and blown out with a squirrel cage fan.
The only down side to this seems to be that the air flow for the flowering room is controlled by heat, and not "air freshness". Afoaf was thinking about making room for a jug of water for suger and yeast to go in and make CO2. Air venting could be a problem if he goes down this route.
Any thoughts on this?
Another shot of screen
I'm working on a new article for OG on this system of growing and wanted to post another pic.

krypto
Grow Guru
Registered: Oct 2000
Posts: 4459
Overgrow Subscriber
Been keeping my eye on you....
Looks like all of those drawings are Finally paying off!!!!!
Your not Only good at drawing and planning but the application is some piece of work also...
Seems to me that we will soon have another Master Grower on our hands here......
Keep those ingenious ideas coming...
K 2 U
Neww
,,,,,,,,Ganja
......................Mon..............
[Myskonoid]
Disco Mushroom
Registered: Jan 2001
Posts: 371
Hey buddy.
Thats one awsome setup bro.
Did you plan it all by yourself?
Looks very well planned and unique!
Hope everything turns out to be super, good luck.
Heres some K+ for sharing that nice piece of work.
Thanks.
Love Robin
Jasper2100
Edge Member
Registered: Mar 2001
Posts: 210
I have seen a setup...
just like that here a while ago and it used same amount of plants and everything. Everything looked exactly the same(that wasn't your post was it?). I can't remember the poster or the name of the thread but some one else might.....anyone? Any way you could check it out and see how productive it really is(if you weren't the original poster of the thread that I am thinking)...
Peace J21
NewGanjaBoy
Uniq Evangelist
Registered: Jul 2000
Posts: 423
This is my 3rd grow room I have built and I have to say, it's alot easier to design them then it is to build them. This small box was more work then my last 2k 42 plant grow. I haven't done wood working in a while, so man this was alot of work.
Here is what it looks like unfinished:
Whats left
The opening one the top left is going to be covered up. Thats the utility room, where the 150 hps balast, squirrel cage fan, and air scrub goes.
The back is not attached yet. I am waiting until all the hardware has been mounted. Here is a picture with the doors open.
Whats cool
The mother chamber on the left can fit 3 of my current mothers. They fit, but are tight. The chamber has an inside width of 8.5 inches.
Both the mothers and the scrog grow are on slides that allow easy access. With the scrog out like this, the cover can be lifter for changing of the water and training.

The inside of the flowering chamber is as tight as I can get it with the tools I have (maybe a few inches on the width could go given the scrog size). The 2 inch PVC is for air to flow from mother chamber to flower chamber. Another 2 inch PVC will go from a flex hose to the utility chamber on top (still to be installed).
The box will be air tight except for the openings I create specifically for air flow. This will move the air right up from under the screen through the plants, into the light and funneled into the utility room to be blown out from the fan.
I still have to paint the outside, add 3 locks (one for each chamber), attach the back, wire the utility room, blah, blah, blah....
Man this is alot of work!!
Also,
Note the air cooled hood I made from sheet metal. This is one piece cut and folded. It has a glass shield not shown in the pics. It wasn't that bad converting the basic security lamp into a remote ballast with air cooled hood.
The Local Grow
Edge Member
Registered: Jul 2000
Posts: 247
Impressive
Hey man, I'm impressed. Small, no doubt, but looks like you have plenty of room for your nuggets. who needs more? how many watts are you going to squeeze in there? and i'd imageine the mothers are going to be under flo's? Anyways, very novel, good work. Peace
lowgrow
Junior Member
Registered: Sep 2000
Posts: 69
Nice job!!!
NewGanjaBoy
Uniq Evangelist
Registered: Jul 2000
Posts: 423
Mother Chamber w/Lighting
I took a 2 foot double floro ballast and stripped it from its housing. The ballast can actually handle a range of tubes. The grow box cannot fit 2 ft bulbs because it's internal depth is only 21 inches. 18 inch bulbs worked out just fine. These 18 inch soft white bulbs cost 3.98 each and provide around 850 lumens per bulb. This works out to around 1650 lumens per sq.ft. in the mother room. This seems good, and I intend to add a strip of mylar around the sides and top.
The cool thing about this box is that the ballast for the floros is remote too!! The fixtures are screwed to the top of the ceiling in the mothor room and wires lead to the ballast in the utility room, just like the 150 hps for the flowering chamber.
NewGanjaBoy
Uniq Evangelist
Registered: Jul 2000
Posts: 423
Well, the new box has been running for about two weeks now. I thought I might post some more pics of the setup.
First, here is a pic of the box. Normally this box is covered with cardboard boxes, but I dont want to show that.

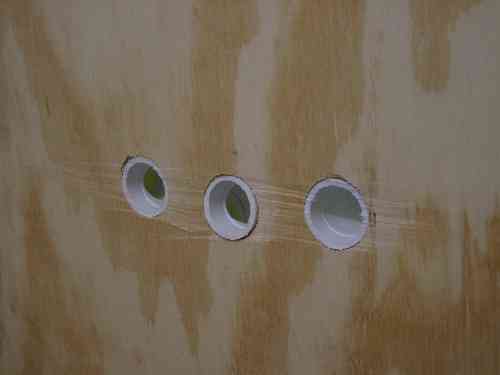
Air flow is great
This next pic shows the inlet air holes. When the blower is running, these holes are like a vacum. The entire box is trying to suck itself closed. These holes are filled with 1in pvc that helps to keep the secret. They pvc needs to be covered with something because when the room is totally dark, you can see the pvc pipes glowing. Normally the box is covered inside a set of boxes (like a second skin I guess).
With the doors open, and the drawers out, you can get a good view of whats going on inside. When the doors are closed, no light leaks out of the edges. The only light that is a problem is the air hole inlets.
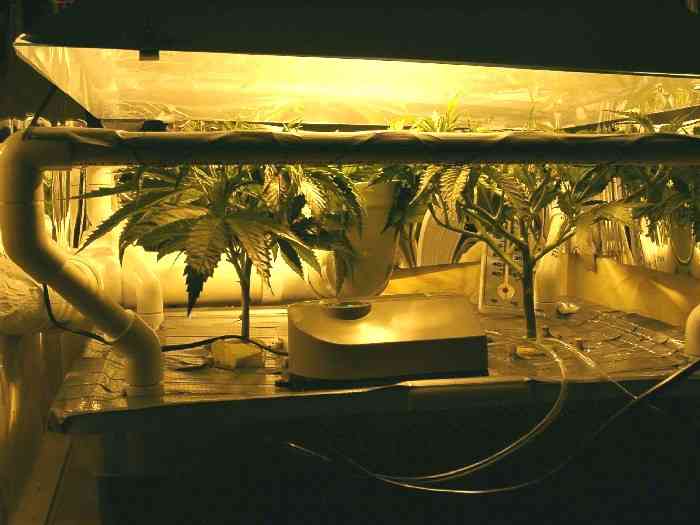
Here is a decent shot of under the screen. Its a bitch to get good pics of this stuff. With the light on, everything is bright and yellow. With the light off, its too dark, even with normal room lighting. Oh well.
I am amazed at how thick the stem is becoming. I think it is due to the slight vibration the blower creates. You can feel the plants jiggling ever so slightly and see the edges of the leaves buzzing. Growth has been fanominal.
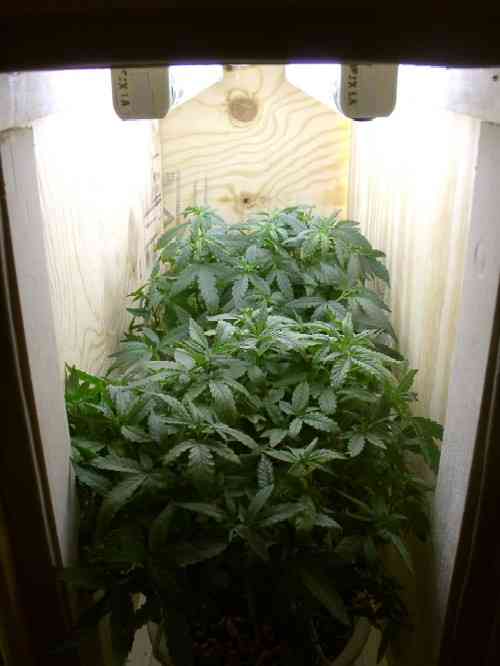
The screen is starting to fill now. 4 days ago neither plant was touching the screen. I think flowering should be started today. I don't want the buds to get bigger then 10 inch, from screen to glass in hood.
This is silver pearl. This bitch put out some killer buds. I am anxious to see how much bud this box can put out. I am hoping I can get 4 oz. out of it. 3 oz would be nice too.
Roots
I still haven't figured out how to get a good pic of the roots yet. Here is the best I could do for now. Roots look good. Again, growth is unbelievable. They now seem to be drinking about 4 liters a day.
And finally.....
Inside the mother box. These bitches put out some killer smoke. 3 unique brands. SSSC Blue Berry, White label silver pearl, and Growie Seeds K2. This is my version of a conisour cabinet.
I have been thinking of puting 4 vareties per pot. Imagine the stems of the 4 plants twisting around eachother and then branching out into 4 seperate clusters. You should be able to do it, and get about 8 good clones per cut each. This would alow me to have 12 varieties in the mother room. We will see.....
smot
Junior Member
Registered: Aug 1999
Posts: 55
superfast growth
dude u aren't kidding about the growth rate i remember it like it was yesterday, little babies now monsters!!
r u using gh nutes?
i used a thicker screen i think in my bubbler and ended up cutting square holes in the screen close to the center of the rockwool cubes where most of the roots were it is working great.
i still want to build a box similar to that, its oh so sweet
?I have this fourway from bagseed at almost forty days, only 4" tall now, started in peatpot then I rinsed the roots and put it in a bubbler(15Q) gh nutes. looks very healthy and massive amounts of side branching, I can see the growth tip that would make the 10th node, its under a 250w w/tempered glass about 14"away,75f-84f.
Why is it so short?I can't find any extended info on this strain, i searched here and at cc.com.
late
ross
NewGanjaBoy
Uniq Evangelist
Registered: Jul 2000
Posts: 423
GH nutes are being used here. Also, must use tons of epson salt because these babies need way more mag. then what the gh nutes will give. It's amazing, if you just use the GH nutes, the plants will start to look really bad. Put in some epson salt and boom, they bounce right back into shape.
I'm a bit nervous about the stretch. Flowering is going to start today. By the time the first two weeks go by, the screen will be totally full and the buds starting to form upwards.
If I remember correctly, with HID a good garden will put out about 1 gram per watt. If thats true, this box should put out about 150 grams or 5.35 oz. Wont take long to find out....
holyherb
New Member
Registered: Jan 2001
Posts: 24
heya
I would just like to say that you are doing an exceptional job. I was curious about how you control the temperature in there. As the picture shows the plants are very close to the HID lamp. Like I said keep up the great work! Peace brother!
NewGanjaBoy
Uniq Evangelist
Registered: Jul 2000
Posts: 423
Heat Control
You can see a pic of the fan I have in a previous post (just click the search link on one of my posts). It totally rocks with 150 cfm. This thing clears the box out about 10 times per minute.
I built the hood, and it contains a 150 hps bulb. The ballast is remote in the utility room above the mother chamber. The hood has a glass shield, and is air cooled. If you look at the pic of under the screen, you will see a 2 in pvc pipe snaking around the back from the mother chamber. Cool air coming through the air inlets feed through the mother chamber and into the flowering chamber through the 2 inch pvc pipe. That pipe puts the air inlet directly under the screen. Air comes rushing into the flowering room through that pipe, through the screen and the buds and hits the glass shield of the hood. That keeps the glass shield cool. If you touch the glass it feels cooler then the air in the flowering chamber. Air then gets sucked into the hood and out through another 2 inch pvc pipe on the top, through the utility room and out the hole on the top of the left side (you can see it in the first pic).
As I said in a previous post, this air flow system cools the room down by 16 degrees. When the light is on, the flowering room is 80. When the light is off, the flowering room is 70 (same as outside the box). Mother chamber is always the same temp as outside.
Since I moved the mothers into their new home, they have really shown they love it. I am using less watts for the mother room then I was before, but am getting better lumens per sq. ft. The other box I had them in was waisting sq. ft. for the # plants I had in it.
Guest
Registered: Not Yet
Posts: N/A
Okay I see the grow net as you called it in the article but at what height is it and how is it attached to what and does the size of the mesh make a difference.
Guest
Registered: Not Yet
Posts: N/A
ahhh looks sick !!! +k very well construced !!
love it and update this !
Karma Chameleon
Junior Member
Registered: Jun 2002
Posts: 98
OMG! You're a freakin' genius NGB!
That's an incredible setup. Are you supplying any Co2? I'm not seeing any, but it looks like things are going nicely without it.
Anyway - very nice. Kudos and +K!
~KC~
Guest
Registered: Not Yet
Posts: N/A
I have a great idea for summer camp OverGrow Growers Campout.
enjoy
NewGanjaBoy
Uniq Evangelist
Registered: Jul 2000
Posts: 423
Afoaf cant do big grows for now, so he's doing a mini cabinet. I wanted to post them to get feedback. Here is a shot from the front of the cabinet.
Here is a view from the top
Notes...
Afoaf went with a 150 hps security lamp for $80. It turned out to have very simple guts, so he removed the balast and lamp and the made balast remote. He still has to figure out what to put the balast in, as the origional packaging is too bulky. He was thinking about using a small metal meatloaf pan. The 150 balast is not that big.
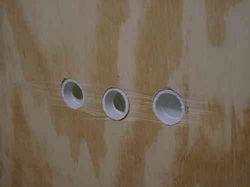
The grow box is broken down into 3 areas. The top left is the utility room that houses the balast, ozon generator, and air fan.
The bottom left is the mother chamber. It can hold 3 to 4 of his size mothers.
The flowering chamber is using a modified bubbler design. The res is a 8 gallon rubber box. The screen is connected to the top. When you lift the top, the screen goes with it. The res is on a sliding draw so that the entire unit can slide out of the flowering chamber. Pull the top and put on another res the same size to replace nuts.
The air flows through the red openings between the chambers. What isn't shown on the diagram is that there is 2" pvc piping that is in the holes to stop light leakage and to better control the flow of air through the unit.
The hole from the mother to flowering chamber has a pvc pipe that wraps around the flowering chamber and brings the air flow directly under the screen, between the two plants. As the squirrel cage fan pushes air out of the utility area, air is sucked in from the mother chamber, through the pvc pipe up under the screen.
The hole from the utility to flowering chamber has a pvc pipe that also wraps around the back side of the flowering chamber to the right side of the lamp. the fan sucks air from that pipe which pulls the heat from the lamp and sends it off to the utility room. This is 4 inch PVC pipe so that the air tiger ozone generator can fit into it. By the time the air is in the utility room is has been scrubbed by the ozone.
The box is being built out of .5 inch plywood. It will be made stealth by being placed inside of a cardboard box in a room with about 70 other boxes that have nothing in them. The box will also be locked with key.
Pics of Light
This is the $80 150 hps. Probably can use the hood you see here. Afoaf is thinking of putting the balast and started in a meatloaf pan. Very easy to take apart, and was only $10 more then the 70 watt hps.
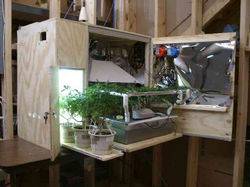
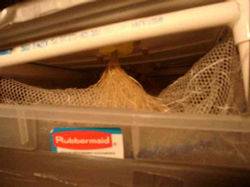
DWC SCROG
Afoaf is a DWC fan. Its just too much easier to maintain then soil. This setup has a few unique options. Here is a shot of it empty and ready to go.
Screen and res cover
More work is still to be done to light tighten the box...
Afoaf is now going without any medium at all. This shot shows how the plants are put into the set and setup for scrog. The clone is started in a simple areo cloner, where they sit in a tub waiting to develop roots. I let the roots go for a while longer then normal in the cloner, and then put them in the hole shown below. The plant stump is wrapped in a cheap foam sponge to help is sit more snugly into the hole. Then a cotton shoe string is used to wrap around the wood poles and the plant to tie the plant down to the cover. While the plant is small the weight won't be a problem. When they hit the screen, they are tied down with twist ties, which further adds stability to the plant.
The cover has a plastic netting glued to the bottom. This is designed to provide support for the roots when lifting the cover off of the res. The roots should be able to grow through it just fine.
When it comes time to harvest, there are no messy clay balls or overgrown plast cups to deal with. Cut the roots from the plant, let dry and pull from plastic netting. This is a nice way to go when doing DWC. Afoaf hates the cups and balls!!
chestgrower
New Member
Registered: Oct 2000
Posts: 23
Similar grow
Af has very similar setup to yours 150 w hps...pics are from grow with soil, but now the grow is a bubbler/scrog setup (no pics of that yet)
another
another with cabinet open
results @5 weeks 12/12
nfm
~PostmorteM~
Edge Member
Registered: Feb 2001
Posts: 109
where did you get that 150 watter?
did you get that at HomeDepot?
because 10 more bucks for it thats a good deal.
please fill me in.
DurbanLegend
Edge Member
Registered: Dec 2000
Posts: 153
NewGanjaBoy,
I'm very intrigued by your scrog/dwc setup, which looks very well engineered. The 1/2" pvc looks to be a very good solution to the problem of attaching a scrog screen to a dwc bucket.
Could you post some pics of the underside of the lid? I'd like to see how the scrog frame attaches down there (looks like you have a square of tubing underneath to hold it all togehter). I'd also like to see how the netting is attached on the bottom.
Also, I'm very curious about your method of holding the plant in place without grow rocks and netcups. Could you post a few pics to illustrate that method further once you get your grow going?
Thanks, and good karma for you, nice work!
NewGanjaBoy
Uniq Evangelist
Registered: Jul 2000
Posts: 423
PostmoreM:
I got the lite at a place called Lowes. Note that the 150 was 10 more then the 70 watt they also had. I have seen people here direct wire the 70 watt bulb, and they probably got going for even less.
DurbanLegend,
Afoaf has grown without the cups and balls one grow, but didn't invite me over to take a picture! It all started with leaving the clones in the area-cloner for too long. The scrog cover does have a rectangle of PVC right under the cover. This provides structural support, andd allows the cover to easily handle any weight the plants will put on it. Afoaf can lean onto the cover with his two fists and push down really hard and not bother the cover.
The mesh net is held onto the pvc with glue. The 1/2 inch pvc is glues into the cover, but the screen can unplug from the top. When it comes time to harvest, just snip the plant trunk and pull the screen off of the cover (the pvc joints directly ontop of the screen are not glued together. When adding water, you can just lift the cover, which takes the screen with it. That hot glue gun helped well with this part of the project.
Chestgrower:
Nice cabinet. I saw your post of these pics earlier. You and a few others over the last year have convinced me that a small cabinet can be used to grow good bud. I convinced afoaf to give it a try.
I would like to find out more about your home made hood. Afoaf is designing his hood now, and the design will be similar (he is going for something a bit shorter). He is using sheetmetal and cutting and folding one piece to make the cover, and was planning on putting a lip in the sheet metal to slid the glass into the hood. Do you find that the plants can go all the way up and touch the glass without any heat problems?
Also, You seem to be venting the hood seperately from the flowering chamber. If true, do you have two seperate timers for this? Afoaf was planning on having the air from the flowering chamber sucked through the light hood to have a single air flow through the mother chamber into the flowering chamber and scrubbed as it went to the utility area and blown out with a squirrel cage fan.
The only down side to this seems to be that the air flow for the flowering room is controlled by heat, and not "air freshness". Afoaf was thinking about making room for a jug of water for suger and yeast to go in and make CO2. Air venting could be a problem if he goes down this route.
Any thoughts on this?
Another shot of screen
I'm working on a new article for OG on this system of growing and wanted to post another pic.
krypto
Grow Guru
Registered: Oct 2000
Posts: 4459
Overgrow Subscriber
Been keeping my eye on you....
Looks like all of those drawings are Finally paying off!!!!!
Your not Only good at drawing and planning but the application is some piece of work also...
Seems to me that we will soon have another Master Grower on our hands here......
Keep those ingenious ideas coming...
K 2 U
Neww
,,,,,,,,Ganja
......................Mon..............
[Myskonoid]
Disco Mushroom
Registered: Jan 2001
Posts: 371
Hey buddy.
Thats one awsome setup bro.
Did you plan it all by yourself?
Looks very well planned and unique!
Hope everything turns out to be super, good luck.
Heres some K+ for sharing that nice piece of work.
Thanks.
Love Robin
Jasper2100
Edge Member
Registered: Mar 2001
Posts: 210
I have seen a setup...
just like that here a while ago and it used same amount of plants and everything. Everything looked exactly the same(that wasn't your post was it?). I can't remember the poster or the name of the thread but some one else might.....anyone? Any way you could check it out and see how productive it really is(if you weren't the original poster of the thread that I am thinking)...
Peace J21
Grow box almost done - Still more work to go
NewGanjaBoy
Uniq Evangelist
Registered: Jul 2000
Posts: 423
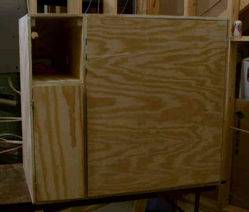
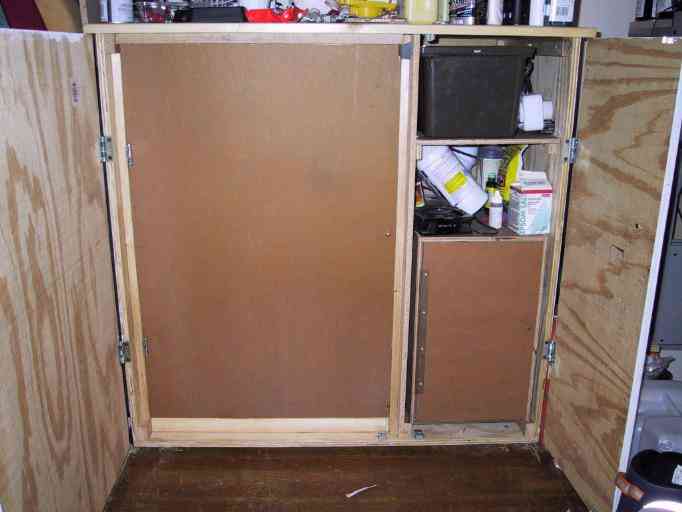
This is my 3rd grow room I have built and I have to say, it's alot easier to design them then it is to build them. This small box was more work then my last 2k 42 plant grow. I haven't done wood working in a while, so man this was alot of work.
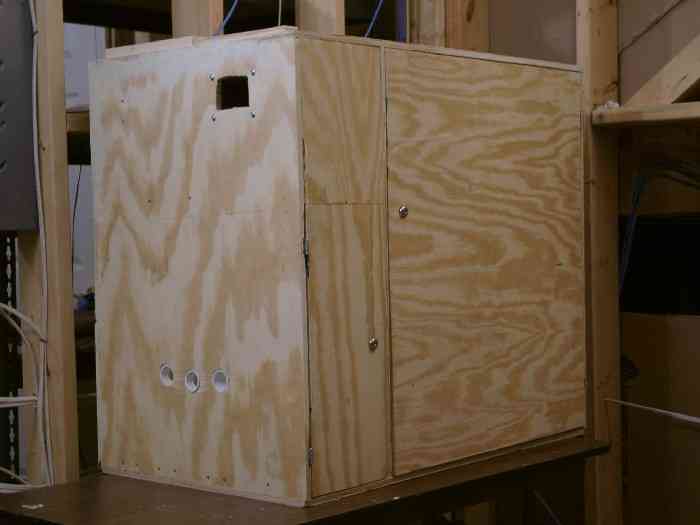
Here is what it looks like unfinished:
Whats left
The opening one the top left is going to be covered up. Thats the utility room, where the 150 hps balast, squirrel cage fan, and air scrub goes.
The back is not attached yet. I am waiting until all the hardware has been mounted. Here is a picture with the doors open.

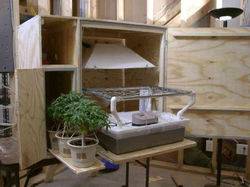
Whats cool
The mother chamber on the left can fit 3 of my current mothers. They fit, but are tight. The chamber has an inside width of 8.5 inches.
Both the mothers and the scrog grow are on slides that allow easy access. With the scrog out like this, the cover can be lifter for changing of the water and training.
The inside of the flowering chamber is as tight as I can get it with the tools I have (maybe a few inches on the width could go given the scrog size). The 2 inch PVC is for air to flow from mother chamber to flower chamber. Another 2 inch PVC will go from a flex hose to the utility chamber on top (still to be installed).
The box will be air tight except for the openings I create specifically for air flow. This will move the air right up from under the screen through the plants, into the light and funneled into the utility room to be blown out from the fan.
I still have to paint the outside, add 3 locks (one for each chamber), attach the back, wire the utility room, blah, blah, blah....
Man this is alot of work!!
Also,
Note the air cooled hood I made from sheet metal. This is one piece cut and folded. It has a glass shield not shown in the pics. It wasn't that bad converting the basic security lamp into a remote ballast with air cooled hood.
The Local Grow
Edge Member
Registered: Jul 2000
Posts: 247
Impressive
Hey man, I'm impressed. Small, no doubt, but looks like you have plenty of room for your nuggets. who needs more? how many watts are you going to squeeze in there? and i'd imageine the mothers are going to be under flo's? Anyways, very novel, good work. Peace
lowgrow
Junior Member
Registered: Sep 2000
Posts: 69
Nice job!!!
NewGanjaBoy
Uniq Evangelist
Registered: Jul 2000
Posts: 423
Mother Chamber w/Lighting
I took a 2 foot double floro ballast and stripped it from its housing. The ballast can actually handle a range of tubes. The grow box cannot fit 2 ft bulbs because it's internal depth is only 21 inches. 18 inch bulbs worked out just fine. These 18 inch soft white bulbs cost 3.98 each and provide around 850 lumens per bulb. This works out to around 1650 lumens per sq.ft. in the mother room. This seems good, and I intend to add a strip of mylar around the sides and top.
The cool thing about this box is that the ballast for the floros is remote too!! The fixtures are screwed to the top of the ceiling in the mothor room and wires lead to the ballast in the utility room, just like the 150 hps for the flowering chamber.
Grow Box Update
NewGanjaBoy
Uniq Evangelist
Registered: Jul 2000
Posts: 423
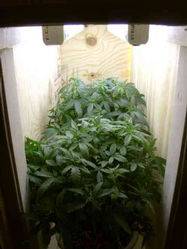
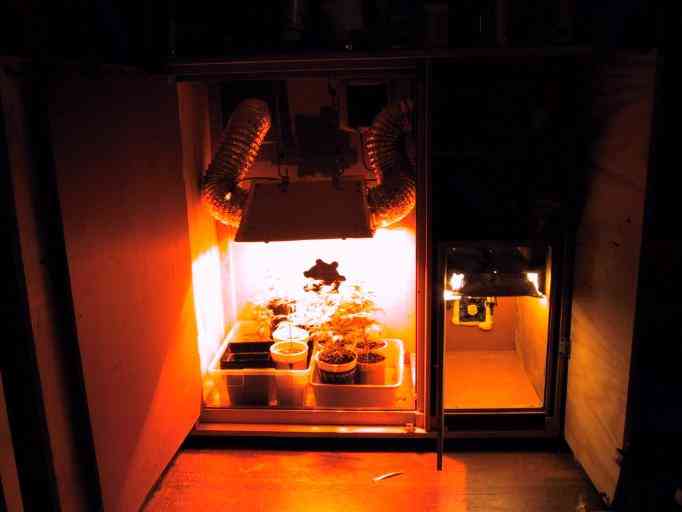
Well, the new box has been running for about two weeks now. I thought I might post some more pics of the setup.
First, here is a pic of the box. Normally this box is covered with cardboard boxes, but I dont want to show that.
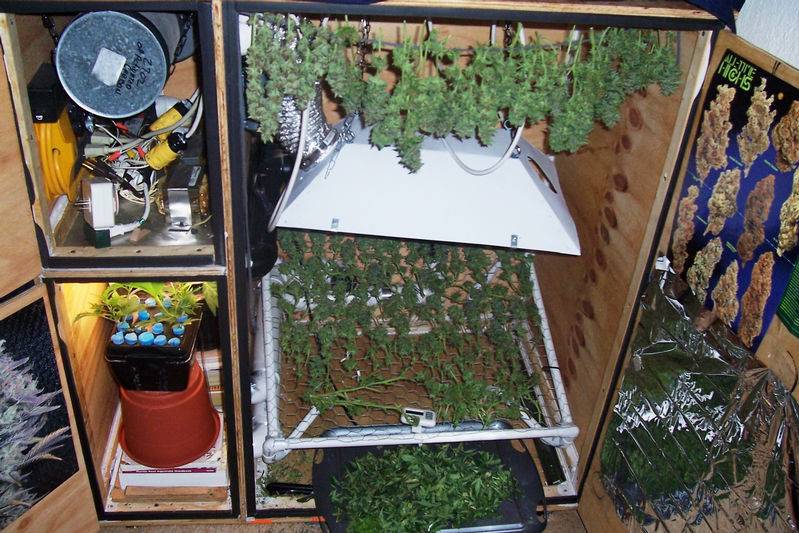
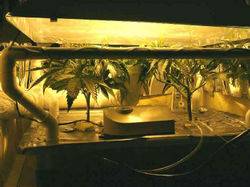
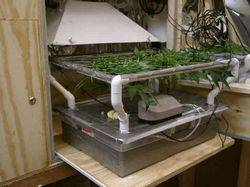
Air flow is great
This next pic shows the inlet air holes. When the blower is running, these holes are like a vacum. The entire box is trying to suck itself closed. These holes are filled with 1in pvc that helps to keep the secret. They pvc needs to be covered with something because when the room is totally dark, you can see the pvc pipes glowing. Normally the box is covered inside a set of boxes (like a second skin I guess).
With the doors open, and the drawers out, you can get a good view of whats going on inside. When the doors are closed, no light leaks out of the edges. The only light that is a problem is the air hole inlets.
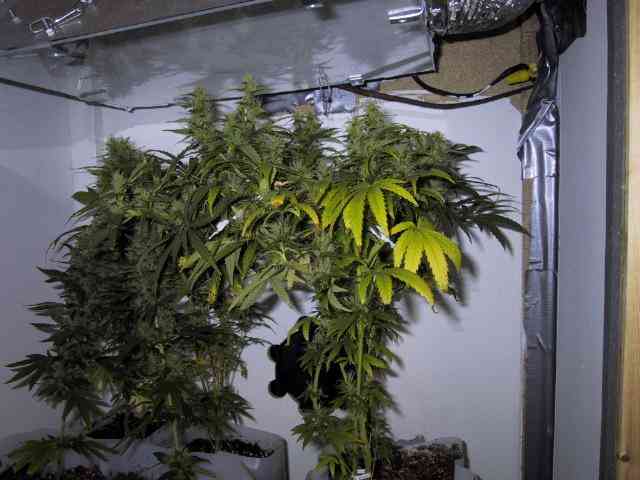
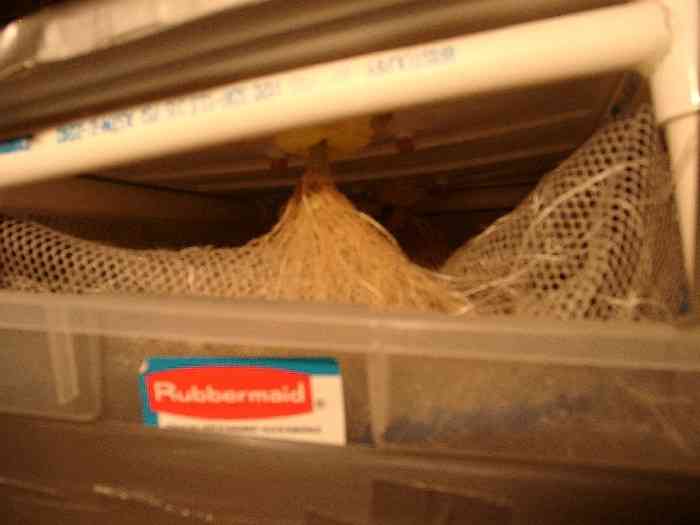
Here is a decent shot of under the screen. Its a bitch to get good pics of this stuff. With the light on, everything is bright and yellow. With the light off, its too dark, even with normal room lighting. Oh well.
I am amazed at how thick the stem is becoming. I think it is due to the slight vibration the blower creates. You can feel the plants jiggling ever so slightly and see the edges of the leaves buzzing. Growth has been fanominal.
The screen is starting to fill now. 4 days ago neither plant was touching the screen. I think flowering should be started today. I don't want the buds to get bigger then 10 inch, from screen to glass in hood.
This is silver pearl. This bitch put out some killer buds. I am anxious to see how much bud this box can put out. I am hoping I can get 4 oz. out of it. 3 oz would be nice too.
Roots
I still haven't figured out how to get a good pic of the roots yet. Here is the best I could do for now. Roots look good. Again, growth is unbelievable. They now seem to be drinking about 4 liters a day.
And finally.....
Inside the mother box. These bitches put out some killer smoke. 3 unique brands. SSSC Blue Berry, White label silver pearl, and Growie Seeds K2. This is my version of a conisour cabinet.
I have been thinking of puting 4 vareties per pot. Imagine the stems of the 4 plants twisting around eachother and then branching out into 4 seperate clusters. You should be able to do it, and get about 8 good clones per cut each. This would alow me to have 12 varieties in the mother room. We will see.....

smot
Junior Member
Registered: Aug 1999
Posts: 55
superfast growth
dude u aren't kidding about the growth rate i remember it like it was yesterday, little babies now monsters!!
r u using gh nutes?
i used a thicker screen i think in my bubbler and ended up cutting square holes in the screen close to the center of the rockwool cubes where most of the roots were it is working great.
i still want to build a box similar to that, its oh so sweet
?I have this fourway from bagseed at almost forty days, only 4" tall now, started in peatpot then I rinsed the roots and put it in a bubbler(15Q) gh nutes. looks very healthy and massive amounts of side branching, I can see the growth tip that would make the 10th node, its under a 250w w/tempered glass about 14"away,75f-84f.
Why is it so short?I can't find any extended info on this strain, i searched here and at cc.com.
late
ross
NewGanjaBoy
Uniq Evangelist
Registered: Jul 2000
Posts: 423
GH nutes are being used here. Also, must use tons of epson salt because these babies need way more mag. then what the gh nutes will give. It's amazing, if you just use the GH nutes, the plants will start to look really bad. Put in some epson salt and boom, they bounce right back into shape.
I'm a bit nervous about the stretch. Flowering is going to start today. By the time the first two weeks go by, the screen will be totally full and the buds starting to form upwards.
If I remember correctly, with HID a good garden will put out about 1 gram per watt. If thats true, this box should put out about 150 grams or 5.35 oz. Wont take long to find out....
holyherb
New Member
Registered: Jan 2001
Posts: 24
heya
I would just like to say that you are doing an exceptional job. I was curious about how you control the temperature in there. As the picture shows the plants are very close to the HID lamp. Like I said keep up the great work! Peace brother!
NewGanjaBoy
Uniq Evangelist
Registered: Jul 2000
Posts: 423
Heat Control
You can see a pic of the fan I have in a previous post (just click the search link on one of my posts). It totally rocks with 150 cfm. This thing clears the box out about 10 times per minute.
I built the hood, and it contains a 150 hps bulb. The ballast is remote in the utility room above the mother chamber. The hood has a glass shield, and is air cooled. If you look at the pic of under the screen, you will see a 2 in pvc pipe snaking around the back from the mother chamber. Cool air coming through the air inlets feed through the mother chamber and into the flowering chamber through the 2 inch pvc pipe. That pipe puts the air inlet directly under the screen. Air comes rushing into the flowering room through that pipe, through the screen and the buds and hits the glass shield of the hood. That keeps the glass shield cool. If you touch the glass it feels cooler then the air in the flowering chamber. Air then gets sucked into the hood and out through another 2 inch pvc pipe on the top, through the utility room and out the hole on the top of the left side (you can see it in the first pic).
As I said in a previous post, this air flow system cools the room down by 16 degrees. When the light is on, the flowering room is 80. When the light is off, the flowering room is 70 (same as outside the box). Mother chamber is always the same temp as outside.
Since I moved the mothers into their new home, they have really shown they love it. I am using less watts for the mother room then I was before, but am getting better lumens per sq. ft. The other box I had them in was waisting sq. ft. for the # plants I had in it.
Guest
Registered: Not Yet
Posts: N/A
Okay I see the grow net as you called it in the article but at what height is it and how is it attached to what and does the size of the mesh make a difference.
Guest
Registered: Not Yet
Posts: N/A
ahhh looks sick !!! +k very well construced !!
love it and update this !
Karma Chameleon
Junior Member
Registered: Jun 2002
Posts: 98
OMG! You're a freakin' genius NGB!
That's an incredible setup. Are you supplying any Co2? I'm not seeing any, but it looks like things are going nicely without it.
Anyway - very nice. Kudos and +K!
~KC~
Guest
Registered: Not Yet
Posts: N/A
I have a great idea for summer camp OverGrow Growers Campout.
The End