Mr_Micro
Member
Hello all! I've been meaning to make this thread for quite sometime now but I suppose I was just feeling too lazy to get off my butt and take the pics for it until now.
So join me now at day 43 of flowering in my PC Cabs for what will hopefully be one heck of a show of modern microgrowing technology
But before we get into the juicy nug shots, I'll give you a little rundown of my setup....
Two PC cases under my desk. One is 19" (L) x 8" (W) x 20" (H) and the other is 19" (L) x 8" (W) x 26" (H).
Lighting is supplied by a single 50 watt HPS with an internal electronic ballast on the left side of the case and a single 42 watt CFL on the right side. Right now I'm using 2700k CFLs for flowering, but I have 6500k CFLs that I use for the the first few weeks of vegetative growth. The HPS and CFL lights both run to a simple analog timer on the power strip mounted to the back of the case to control the light cycles.
The walls,ceiling, and floor are all covered with Reflectix insulation. I found it to be very inexpensive, highly reflective, quite durable, and 10,000 times easier to work with than mylar. I cut sections to the appropriate size and attached them with hot glue on the back reflective foil tape on the edges.
Ventilation is taken care of in the smaller case by a 80mm 25cfm (23dBa) PC fan intake and a 80mm 50cfm (19dBa) PC fan exhaust. The exhaust fan blows air out the back of the case through 3" dryer ducting that connects to a Can 705 carbon filter. The Can Filter is rated for 39 cfm but even with the limited back pressure produced by the 50cfm PC fan exhaust, it works just fine with it. The Can filter ultimately restricts the exhaust to around 35 cfm, which is still enough to create a vaccume inside the case to make sure that no odor escapes through the cracks and all the air coming out goes through the carbon filter. The larger PC case uses the same ventilation system but with a 80mm 50 cfm intake fan and an adjustable speed 120mm exhaust fan that adjusts between 40 cfm and 110cfm (I generally run it around 80cfm (30dBa)). All fans are wired to 12v DC adapters plugged into the power strip on the back of the case.
To keep the plants from getting leaves or flowers caught in the fans, I attached a square of some window screen to each fan with some sticky backed velcro. This way I can remove the screens to clean them (the screen on the intake fan does a very nice job of filtering dust and dirt out of the air coming into the grow room) very easily. They do an excellent job of keeping the plants from getting caught in the fans without reducing airflow, and I generally clean these little fan screens about once a week to keep dust from building up on them.
There is also a car sized negative ion generator/ozone generator/electrostatic cleaner mounted on the back of the small case that I run for a few minutes after I open up the case for matinance to eliminate any lingering odor in the room. It also serves as a backup incase something ever goes wrong with the carbon filter or ventilation system and I end up with odor escaping the case. It puts out 10,000/cm©¯ negative ions and 0.04ppm of Ozone when run continueously (although I usually run it on the "2 minutes on/2 minutes off" setting when I use it). I find it works extremely well so far and the only matinance required is to wipe off a little metal plate inside once every few months.
The growing mediums I'm using are 1 gallon SWC hydro tubs with two flowering plants in each. I started with 4 in each tub, but reduced to 2 after flowering (I have seperate lids that hold 4 net pots for vegging). The netpots themselves contain Hydrotron grow rocks with a Rapid Rooter plug in the middle.
There is a small air pump mounted inside the cases in the upper right hand corner that runs 1/4" tubing down to an airstone inside the SWC tub that runs 24/7.
Also, I dont know if you can tell from the pictures, but I made a little hinged hatch in the lid of the SWC tub so I can easily take PH readings, check the water level, and top off the water without ever having to remove the lid from the tub. It's proven to be infinitely useful!
The water and nutrients being used are simply tap water with 20ml per gallon of Pure Blend Pro Bloom, 5ml per gallon Cal-Mag Plus, and 5ml per gallon of Hydroguard. The PH is balanced with Earth Juice Natural PH Down & PH Up.
I started the plants (12/12 from seed) with 5ml per gallon of Pure Blend Pro and gradually worked up to 20ml per gallon which is what I'll be using for the rest of the grow. On the next water change (tomorrow, day 44) I am going to start using Pure Blend Pro Bloom Soil Formula instead of the regular PBP bloom for 2 weeks and then flush with plain PH balanced tap water for the last week.
The feeding schedual is pretty simple really. I change the nutrient enriched water in the reservoir once a week and top it off with plain PH balanced tap water every other day in between changes. I also re-balance the PH in the reservoir every other day when I top off the water, as it tends to flucuate about 1 point every 2 days due to the small res size.
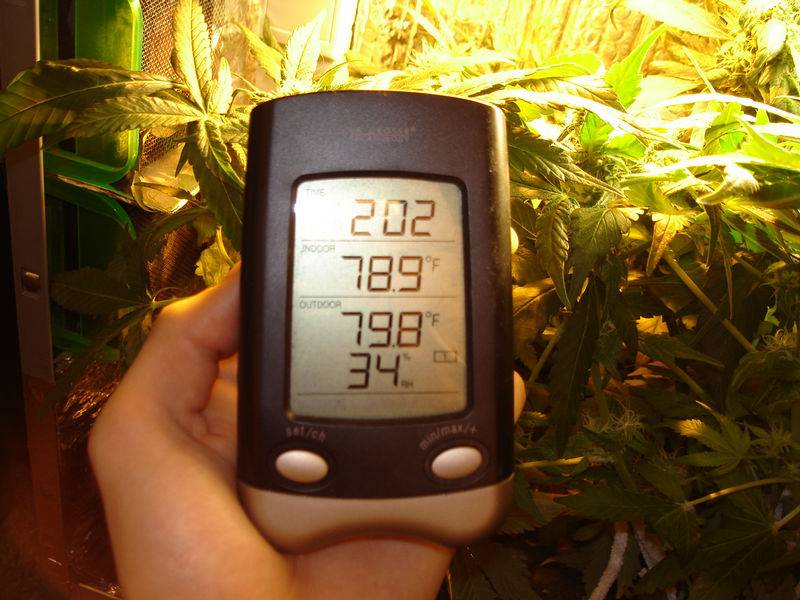
The temperature and humidity inside the cases is monitored by a wireless digital temperature/humidity gauge. In the pictures below you should be able to see the remote sensor mounted just below the HPS light in my smaller case. There is one in the larger case as well, but you can't really see it in the pics. The sensors send a signal to the 2 channel wireless display unit so I can always monitor the temps and humidity levels in my cases without ever having to open them up. The temps are almost always 1-4*F above ambient room temperature, although they have gotten up to 7 or 8*F above room temperature on hotter days.
And finally, just to gild the lilly, I'm keeping a constant flow of Co2 going into the PC Cases by using Nutrafin natural fermenation Co2 units (you can see them in the pics of the back of the cases). I'm not sure exactly how much Co2 they produce, but I noticed a huge spike in growth after I put them in so I'd say they have to be doing some good! They use natural fermantation to produce Co2 (much like brewing beer) and only need to be refilled once a month. Just fill em up with sugar and water and then add in 1 Nutrafin "activator" and "stabilizer" tablet. Screw on the lid, connect the 1/4 tubing, and you've got Co2 for a month! The 1/4" tubing running out of the Co2 canister runs into the back of the PC case and along the back wall to the right side of the case where it releases Co2 at the top of the canopy. Since the Co2 comes out on the right side of the case and the exhaust fan is on the left side of the case, I can only imagine that it pulls the Co2 inriched air across the canopy and allows it to disperse over the flowers. In any case, I'm very pleased with the results of these Co2 units! (You can find more info on them on the first page of the 150watt HPS Club thread)
On a final note, I made a nice little light trap on the back of the intake fan and used black electrical tape for the rest of the light proofing. Altogether I'd say the cases are about 99.8% light proof. I can shut off all the lights in the room with the lights inside the case on and not see a single speck of light coming from under my desk! The fans themselves put out a maximum of 19 to 23dBA of sound, which is extremely quiet and sounds just like a normal computer running. The air pumps also produce no noticable noise due to being dampened by the Reflectix insulation that covers the walls inside the cases. There is a very slight "humm" that comes from the case, but it sounds exactly like your average computer tower and has fooled every guest that has came over into thinking they were a normal computer tower. They never even looked twice at em! And just incase they did, the doors have a nice keyed lock on it that prevents any prying eyes from opening up the cases without a key.
Whew! Thats a lot of tech info! Now for the real fun...
The plants I'm growing are DJ Short's True Blueberry, Sensi Seeds's Skunk #1, and Serious Seeds's Bubblegum.
The smaller case contains one True Blueberry on the left side of the case (started on the right, was LST'd to the left) and one Skunk #1 on the right side (started on the left, LST'd to the right). The larger case contains two Bubblegum.
All plants were started on 12/12 from seed exactly 63 days ago and began showing sex around days 25 to 30. So at this point I'm estimating that I'm right about at day 43 of flowering give or take a few days.
They all stretched a lot in the first few weeks due to the pretty horrid conditions of the cases when I started them. I was using only the 50 watt HPS, a passive wick system growing system (which was fluctuating 3 PH points every 24 hours), and had a horrible ventilation system that put the temps in the mid to upper 90's. Top it all off with the fact that I accidentally snapped the main stem on the Blueberry 3/4 of the way through around day 15! Needless to say, these girls went through hell in the first few weeks of growth before I got my grow dialed in.
But despite the giant stretching and huge internode length from the abuse they suffered, I was still able to very easily keep them within the available 11" of growing height in my smaller case. (Yes, you heard me right, I use only 11" of growing height!)
I use a simple method of LSTing to keep height down. I have small shelf mounting brackets attached to the top of the SWC unit's lid that I loop pipe cleaners around and wrap the other end of the pipe cleaners around the branches and stem of the plant.
Then once the plant is LST'd to be almost completely horizontal (but now too wide to fit in it's half of the case) I LST the main stem backwards towards the middle of the case! LST'ing conserves space by making the plant horizontal to keep height down, but by bending the main stem into a sideways "U" shape it allows me to keep the width to a minimum as well!
With this technique I end up with a plant that, in full flowering, is only 8" wide x 8" long x 10" tall! Take that Lowryder! I'm not sure if it would work on a full blooded sativa, but it certainly worked on Skunk #1, True Blueberry, and Bubblegum as I was able to keep them all in the 8"x8"x10" size limit.
And now to reward you for all your patient reading of my insanely long discription of this grow op...
Onto the pics!
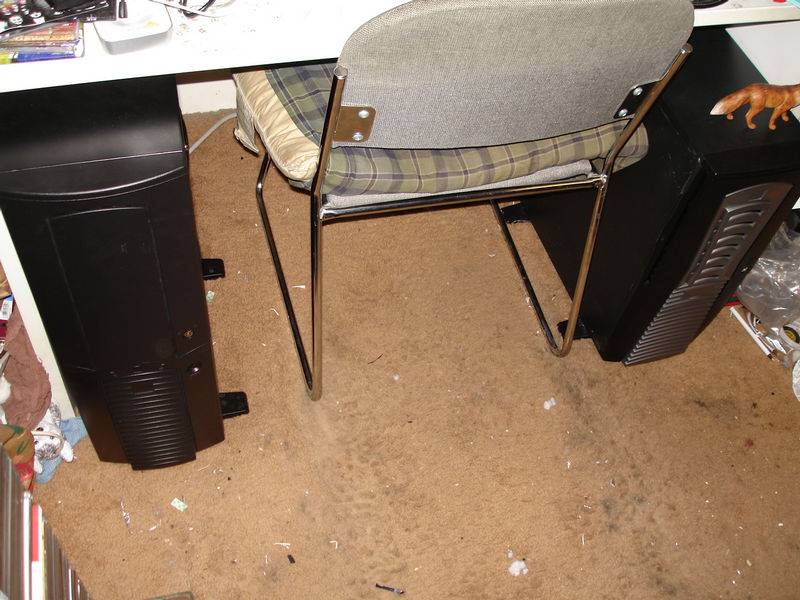
Here we see your average messy looking computer desk with two towers underneath...

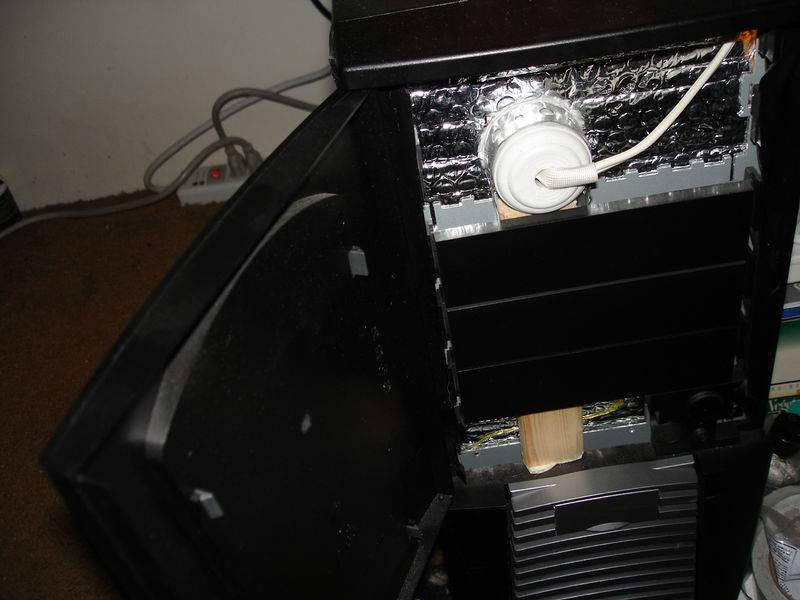
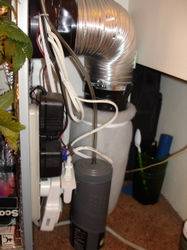
Hmm... lets take a closer look at this smaller one... hey! What the!

Why is there a carbon filter, a Co2 generator, ion/ozone generator, and all this electrical stuff attached to this computer?
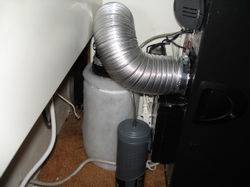
The other one has this stuff too! What kind of computers are these!?
You know exactly what kind they are Here's a pic of the True Blueberry and Skunk #1 from about a month ago.

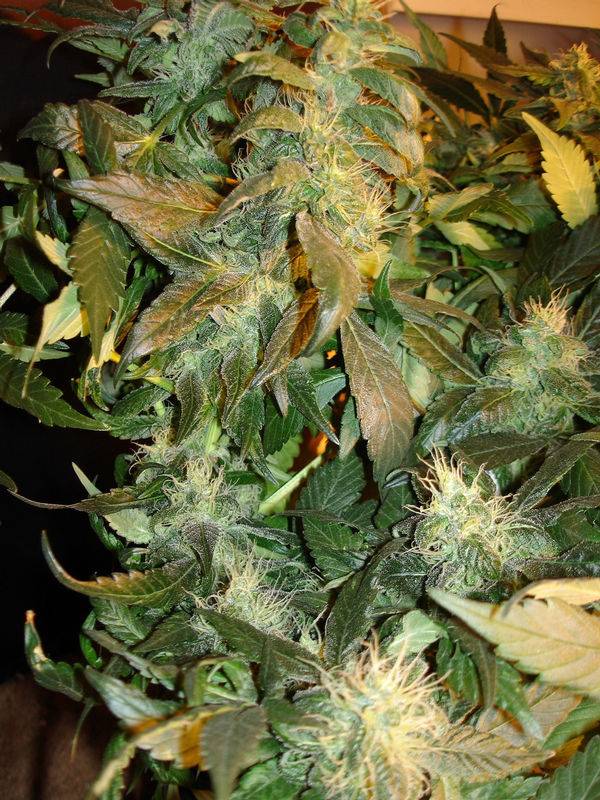
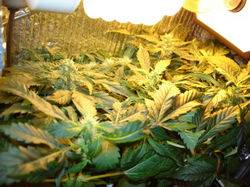
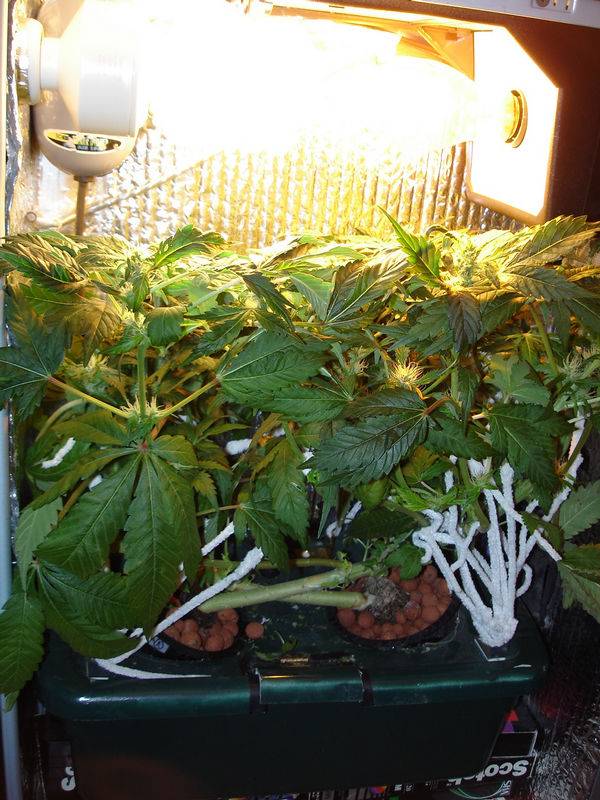
And heres the True Blueberry and Skunk #1 now at 43 days flowering!

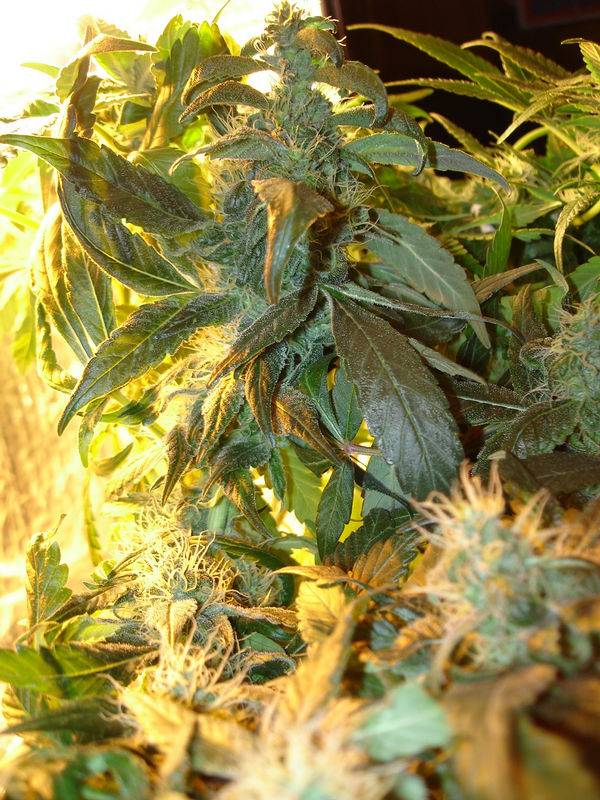
Lets take a closer look, shall we?
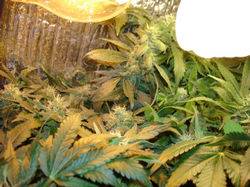
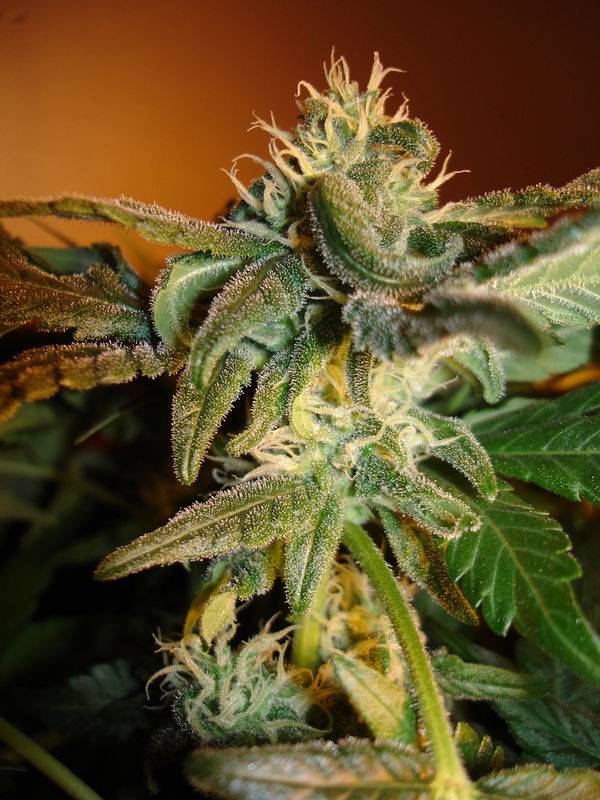
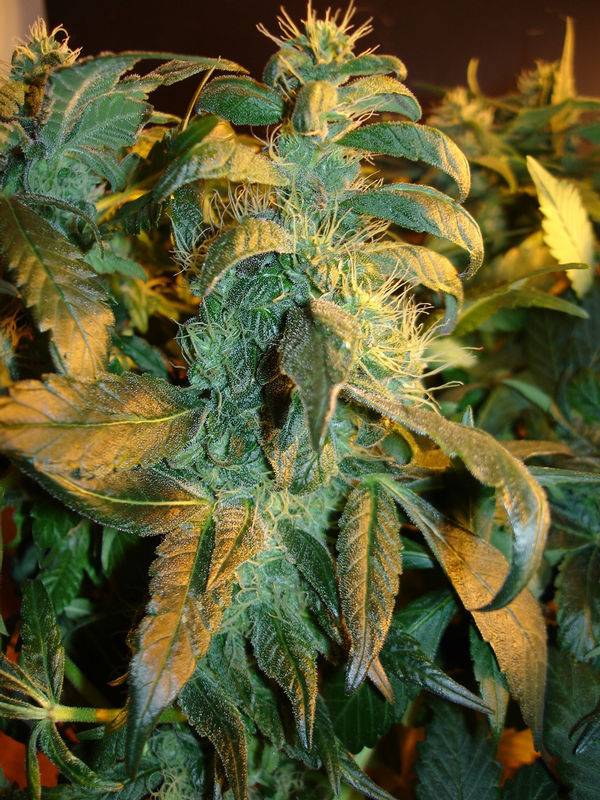
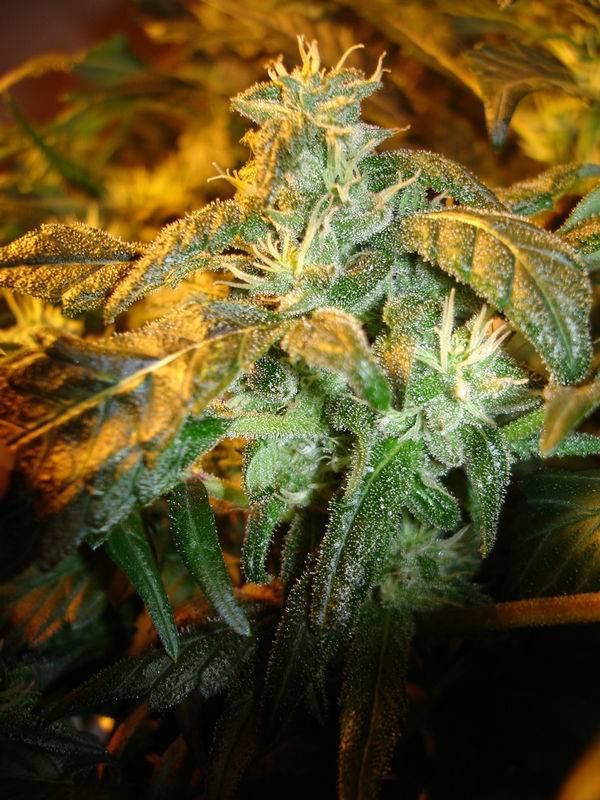
And now for an even closer look at the main cola on Ms. True Blue

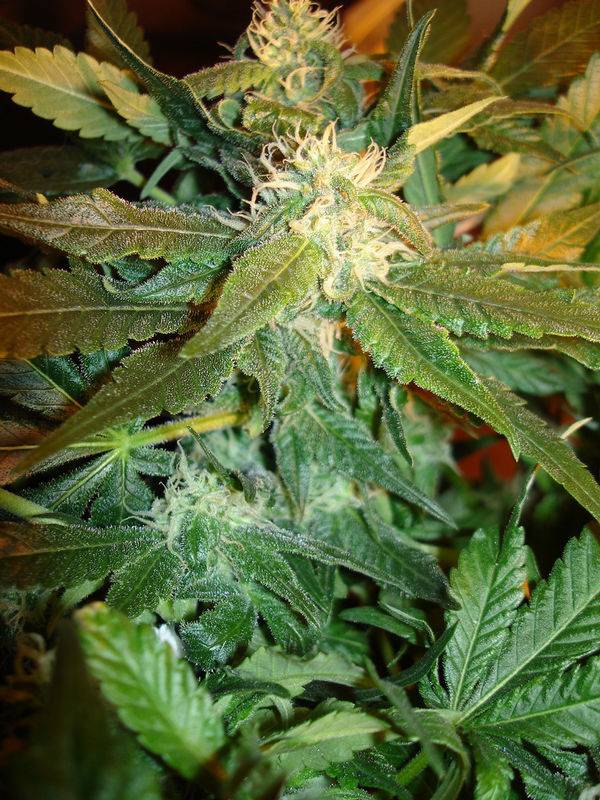
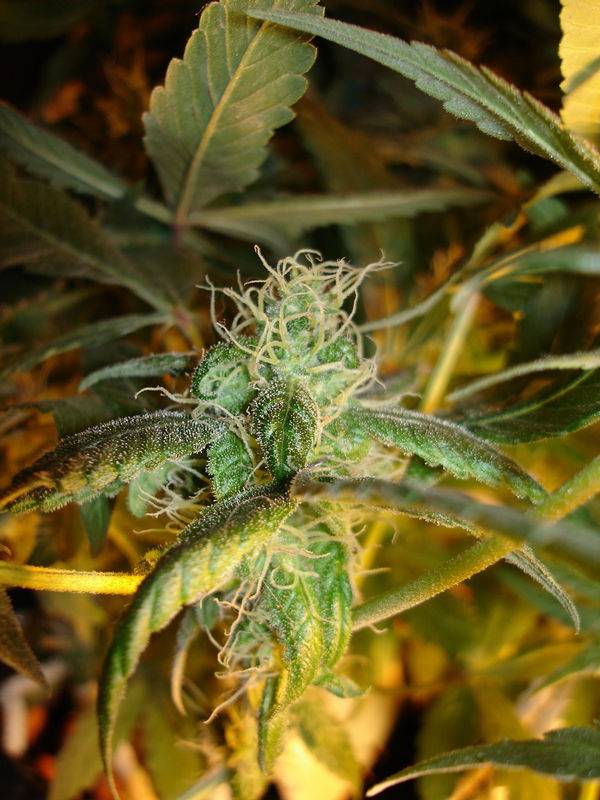
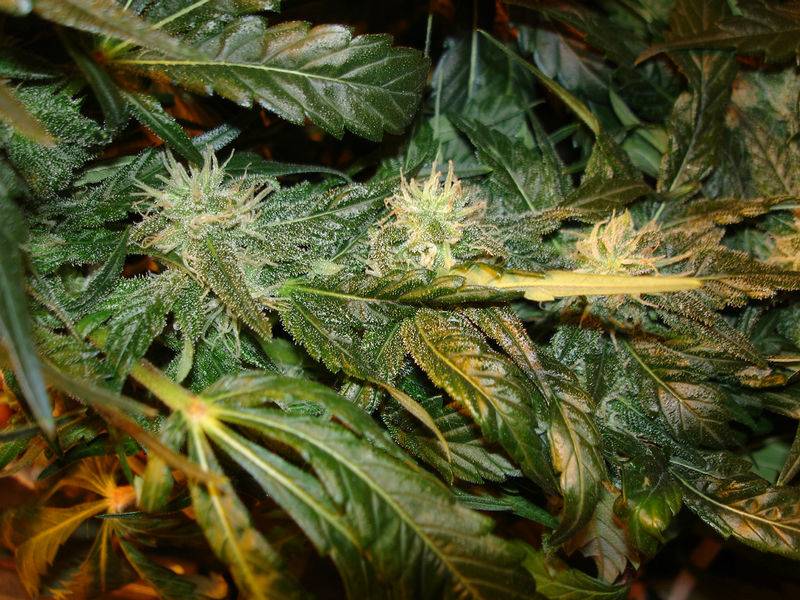
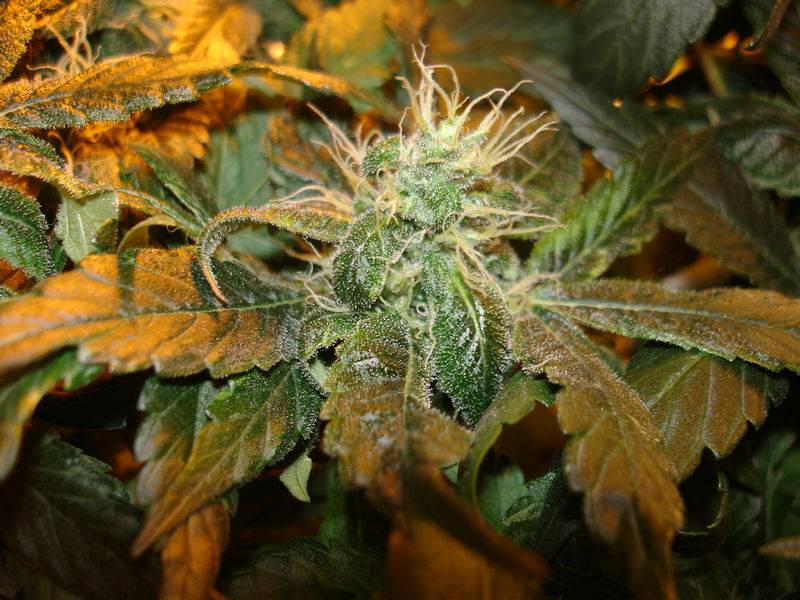
And how about a lower nug from the True Blue while we're at it?

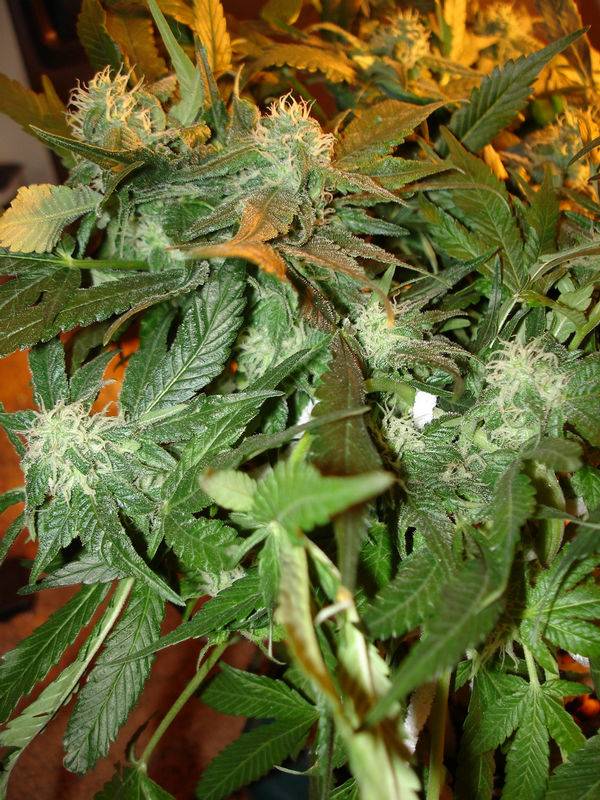
And a little love for the Skunk #1 too! Altogether now!
The smaller 20" case with the True Blueberry and the Skunk #1 is looking good... lets go explore the bigger 26" case with the Bubblegum now!
(I actually stacked VHS tapes underneath the tub in this case to provide only 11" of growing height to the Bubblegum as well... and it worked!)
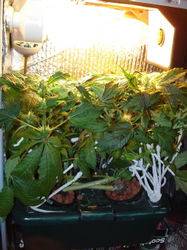
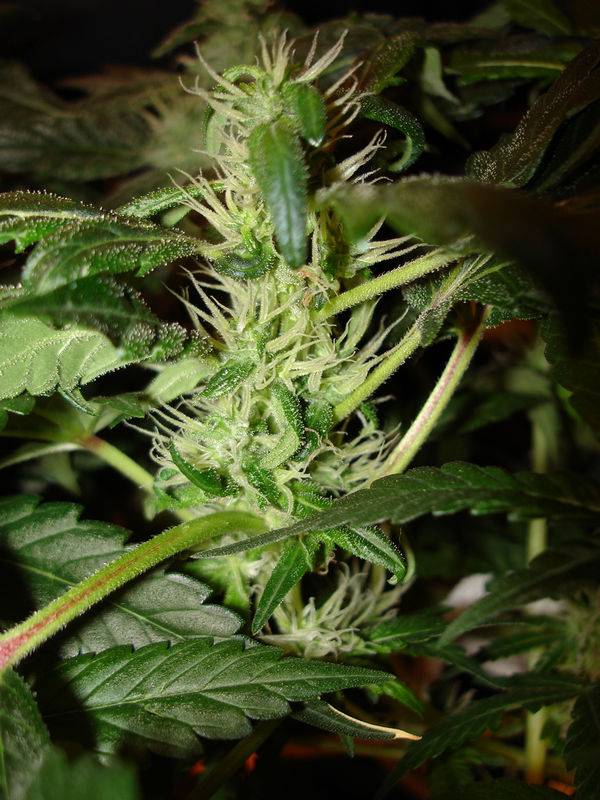
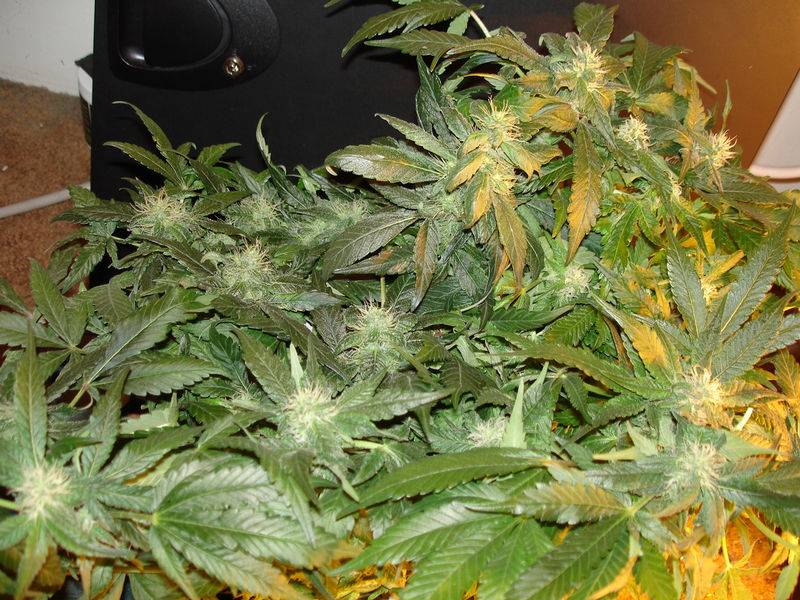
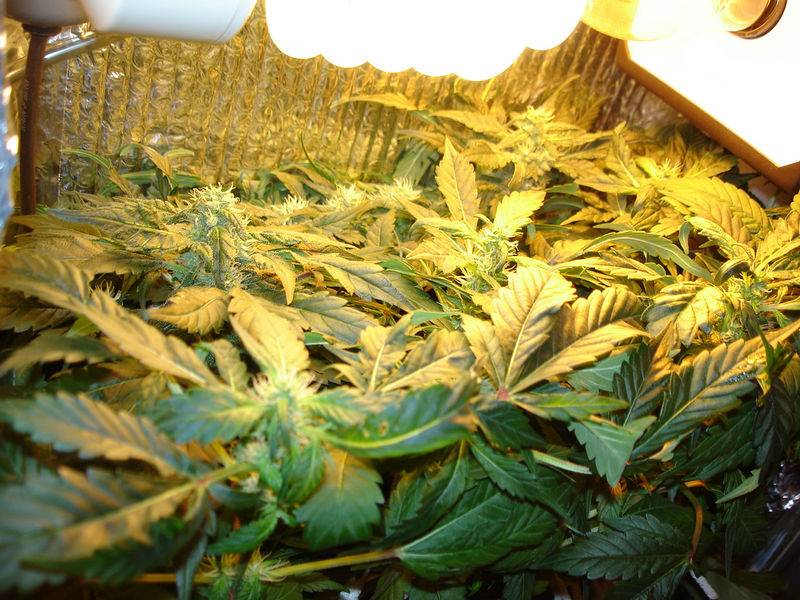
A little closer view of the canopy now...
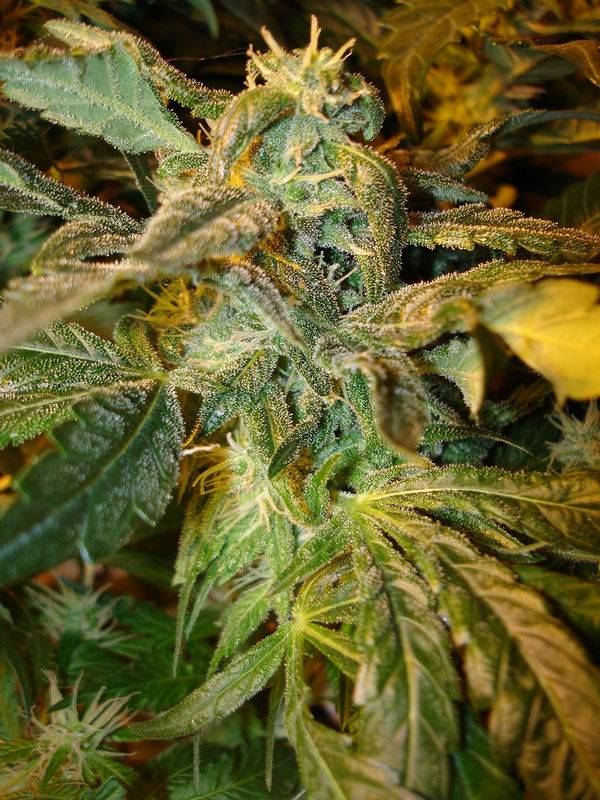
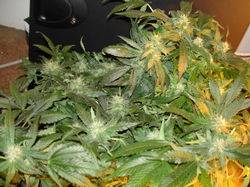
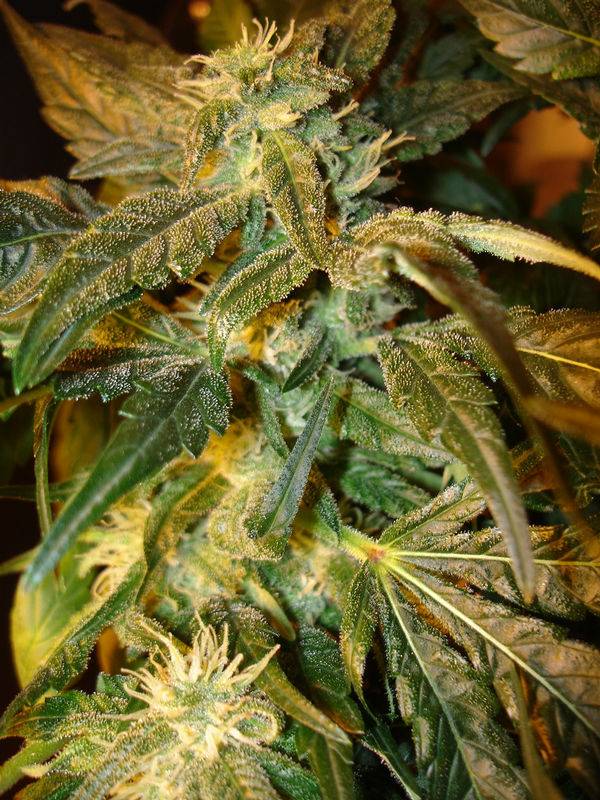
Want a closeup of a nice hydro-organic PC Case style Serious Seeds Bubblegum bud in full bloom? Of course you do!

Mmm yeah... buds lookin good... temps are lookin good... Mmmm Hmmm...

I hope you've enjoyed what you've seen and read so far! I'll be updating this thread at least once a week to follow the progress of my True Blueberry, Skunk #1, and Bubblegum from now now until it's finally harvested, cured, and ready to be smoked.
And incase you were wondering, "Why the heck did he go through all this trouble building these PC cases for a couple ounces max?". To put it simply... I live in an apartment with my fiance, so stealth was the absolute most important factor. We talked a lot about the best way for me to grow a personal stash and ultimately decided PC case grows were the safest and stealthiest way to do it. Besides, my fiance doesnt smoke and I only smoke about a half a gram to a gram every other weekend so even if I only get a half ounce out of a each case I'll be set for quite a while!
And yeild aside, I just really love to grow! I find it very theraputic and it's wonderful to be able to come in and sit with your garden any time you like... you just cant put a price on being able to sit next to a nice warm well lit garden full of lush greenery when outside it's the middle of winter with 3 feet of snow on the ground! To me, the growing is proccess is just as fun and wonderful as the final product is. I used to live in a place where I could grow 8 or 10 full sized plants in a big basement without having to train them to grow short and I never had to deal with any security or stealth problems. But since I now live in somewhere far less secure with less space but still wanted to grow, a PC Case grow just seemed like the best and safest option for my living situation.
After this grow I think I'm going to reduce my setup to just using the smaller case only (more stealthy) and do a run with some Sensi Seeds Northern Lights and I'll be sure to keep you guys posted with a thread for that grow too.
But for now, I hope you've enjoyed the show! Take care, stay safe, and I'll update this thread with more pics and progress within the next week!
So join me now at day 43 of flowering in my PC Cabs for what will hopefully be one heck of a show of modern microgrowing technology
But before we get into the juicy nug shots, I'll give you a little rundown of my setup....
Two PC cases under my desk. One is 19" (L) x 8" (W) x 20" (H) and the other is 19" (L) x 8" (W) x 26" (H).
Lighting is supplied by a single 50 watt HPS with an internal electronic ballast on the left side of the case and a single 42 watt CFL on the right side. Right now I'm using 2700k CFLs for flowering, but I have 6500k CFLs that I use for the the first few weeks of vegetative growth. The HPS and CFL lights both run to a simple analog timer on the power strip mounted to the back of the case to control the light cycles.
The walls,ceiling, and floor are all covered with Reflectix insulation. I found it to be very inexpensive, highly reflective, quite durable, and 10,000 times easier to work with than mylar. I cut sections to the appropriate size and attached them with hot glue on the back reflective foil tape on the edges.
Ventilation is taken care of in the smaller case by a 80mm 25cfm (23dBa) PC fan intake and a 80mm 50cfm (19dBa) PC fan exhaust. The exhaust fan blows air out the back of the case through 3" dryer ducting that connects to a Can 705 carbon filter. The Can Filter is rated for 39 cfm but even with the limited back pressure produced by the 50cfm PC fan exhaust, it works just fine with it. The Can filter ultimately restricts the exhaust to around 35 cfm, which is still enough to create a vaccume inside the case to make sure that no odor escapes through the cracks and all the air coming out goes through the carbon filter. The larger PC case uses the same ventilation system but with a 80mm 50 cfm intake fan and an adjustable speed 120mm exhaust fan that adjusts between 40 cfm and 110cfm (I generally run it around 80cfm (30dBa)). All fans are wired to 12v DC adapters plugged into the power strip on the back of the case.
To keep the plants from getting leaves or flowers caught in the fans, I attached a square of some window screen to each fan with some sticky backed velcro. This way I can remove the screens to clean them (the screen on the intake fan does a very nice job of filtering dust and dirt out of the air coming into the grow room) very easily. They do an excellent job of keeping the plants from getting caught in the fans without reducing airflow, and I generally clean these little fan screens about once a week to keep dust from building up on them.
There is also a car sized negative ion generator/ozone generator/electrostatic cleaner mounted on the back of the small case that I run for a few minutes after I open up the case for matinance to eliminate any lingering odor in the room. It also serves as a backup incase something ever goes wrong with the carbon filter or ventilation system and I end up with odor escaping the case. It puts out 10,000/cm©¯ negative ions and 0.04ppm of Ozone when run continueously (although I usually run it on the "2 minutes on/2 minutes off" setting when I use it). I find it works extremely well so far and the only matinance required is to wipe off a little metal plate inside once every few months.
The growing mediums I'm using are 1 gallon SWC hydro tubs with two flowering plants in each. I started with 4 in each tub, but reduced to 2 after flowering (I have seperate lids that hold 4 net pots for vegging). The netpots themselves contain Hydrotron grow rocks with a Rapid Rooter plug in the middle.
There is a small air pump mounted inside the cases in the upper right hand corner that runs 1/4" tubing down to an airstone inside the SWC tub that runs 24/7.
Also, I dont know if you can tell from the pictures, but I made a little hinged hatch in the lid of the SWC tub so I can easily take PH readings, check the water level, and top off the water without ever having to remove the lid from the tub. It's proven to be infinitely useful!
The water and nutrients being used are simply tap water with 20ml per gallon of Pure Blend Pro Bloom, 5ml per gallon Cal-Mag Plus, and 5ml per gallon of Hydroguard. The PH is balanced with Earth Juice Natural PH Down & PH Up.
I started the plants (12/12 from seed) with 5ml per gallon of Pure Blend Pro and gradually worked up to 20ml per gallon which is what I'll be using for the rest of the grow. On the next water change (tomorrow, day 44) I am going to start using Pure Blend Pro Bloom Soil Formula instead of the regular PBP bloom for 2 weeks and then flush with plain PH balanced tap water for the last week.
The feeding schedual is pretty simple really. I change the nutrient enriched water in the reservoir once a week and top it off with plain PH balanced tap water every other day in between changes. I also re-balance the PH in the reservoir every other day when I top off the water, as it tends to flucuate about 1 point every 2 days due to the small res size.
The temperature and humidity inside the cases is monitored by a wireless digital temperature/humidity gauge. In the pictures below you should be able to see the remote sensor mounted just below the HPS light in my smaller case. There is one in the larger case as well, but you can't really see it in the pics. The sensors send a signal to the 2 channel wireless display unit so I can always monitor the temps and humidity levels in my cases without ever having to open them up. The temps are almost always 1-4*F above ambient room temperature, although they have gotten up to 7 or 8*F above room temperature on hotter days.
And finally, just to gild the lilly, I'm keeping a constant flow of Co2 going into the PC Cases by using Nutrafin natural fermenation Co2 units (you can see them in the pics of the back of the cases). I'm not sure exactly how much Co2 they produce, but I noticed a huge spike in growth after I put them in so I'd say they have to be doing some good! They use natural fermantation to produce Co2 (much like brewing beer) and only need to be refilled once a month. Just fill em up with sugar and water and then add in 1 Nutrafin "activator" and "stabilizer" tablet. Screw on the lid, connect the 1/4 tubing, and you've got Co2 for a month! The 1/4" tubing running out of the Co2 canister runs into the back of the PC case and along the back wall to the right side of the case where it releases Co2 at the top of the canopy. Since the Co2 comes out on the right side of the case and the exhaust fan is on the left side of the case, I can only imagine that it pulls the Co2 inriched air across the canopy and allows it to disperse over the flowers. In any case, I'm very pleased with the results of these Co2 units! (You can find more info on them on the first page of the 150watt HPS Club thread)
On a final note, I made a nice little light trap on the back of the intake fan and used black electrical tape for the rest of the light proofing. Altogether I'd say the cases are about 99.8% light proof. I can shut off all the lights in the room with the lights inside the case on and not see a single speck of light coming from under my desk! The fans themselves put out a maximum of 19 to 23dBA of sound, which is extremely quiet and sounds just like a normal computer running. The air pumps also produce no noticable noise due to being dampened by the Reflectix insulation that covers the walls inside the cases. There is a very slight "humm" that comes from the case, but it sounds exactly like your average computer tower and has fooled every guest that has came over into thinking they were a normal computer tower. They never even looked twice at em! And just incase they did, the doors have a nice keyed lock on it that prevents any prying eyes from opening up the cases without a key.
Whew! Thats a lot of tech info! Now for the real fun...
The plants I'm growing are DJ Short's True Blueberry, Sensi Seeds's Skunk #1, and Serious Seeds's Bubblegum.
The smaller case contains one True Blueberry on the left side of the case (started on the right, was LST'd to the left) and one Skunk #1 on the right side (started on the left, LST'd to the right). The larger case contains two Bubblegum.
All plants were started on 12/12 from seed exactly 63 days ago and began showing sex around days 25 to 30. So at this point I'm estimating that I'm right about at day 43 of flowering give or take a few days.
They all stretched a lot in the first few weeks due to the pretty horrid conditions of the cases when I started them. I was using only the 50 watt HPS, a passive wick system growing system (which was fluctuating 3 PH points every 24 hours), and had a horrible ventilation system that put the temps in the mid to upper 90's. Top it all off with the fact that I accidentally snapped the main stem on the Blueberry 3/4 of the way through around day 15! Needless to say, these girls went through hell in the first few weeks of growth before I got my grow dialed in.
But despite the giant stretching and huge internode length from the abuse they suffered, I was still able to very easily keep them within the available 11" of growing height in my smaller case. (Yes, you heard me right, I use only 11" of growing height!)
I use a simple method of LSTing to keep height down. I have small shelf mounting brackets attached to the top of the SWC unit's lid that I loop pipe cleaners around and wrap the other end of the pipe cleaners around the branches and stem of the plant.
Then once the plant is LST'd to be almost completely horizontal (but now too wide to fit in it's half of the case) I LST the main stem backwards towards the middle of the case! LST'ing conserves space by making the plant horizontal to keep height down, but by bending the main stem into a sideways "U" shape it allows me to keep the width to a minimum as well!
With this technique I end up with a plant that, in full flowering, is only 8" wide x 8" long x 10" tall! Take that Lowryder!
I'm not sure if it would work on a full blooded sativa, but it certainly worked on Skunk #1, True Blueberry, and Bubblegum as I was able to keep them all in the 8"x8"x10" size limit.And now to reward you for all your patient reading of my insanely long discription of this grow op...
Onto the pics!
Here we see your average messy looking computer desk with two towers underneath...
Hmm... lets take a closer look at this smaller one... hey! What the!
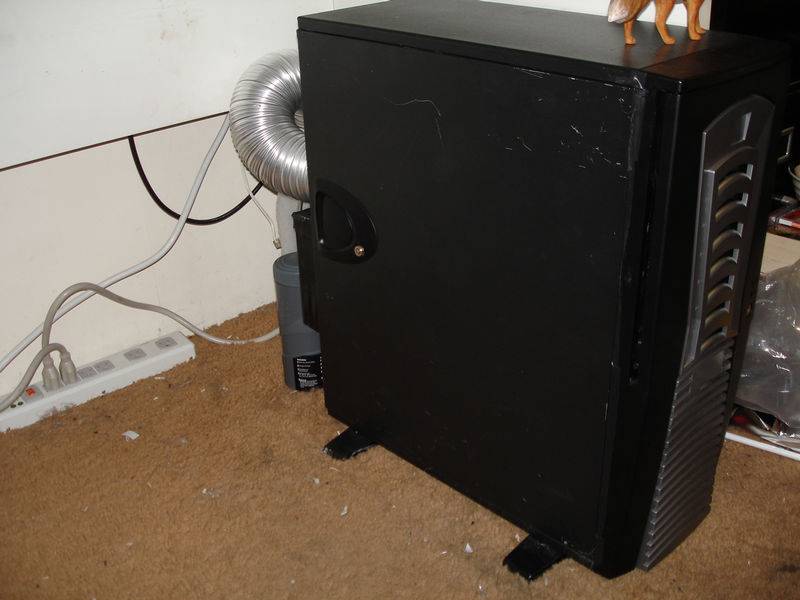
Why is there a carbon filter, a Co2 generator, ion/ozone generator, and all this electrical stuff attached to this computer?

The other one has this stuff too! What kind of computers are these!?

You know exactly what kind they are
Here's a pic of the True Blueberry and Skunk #1 from about a month ago.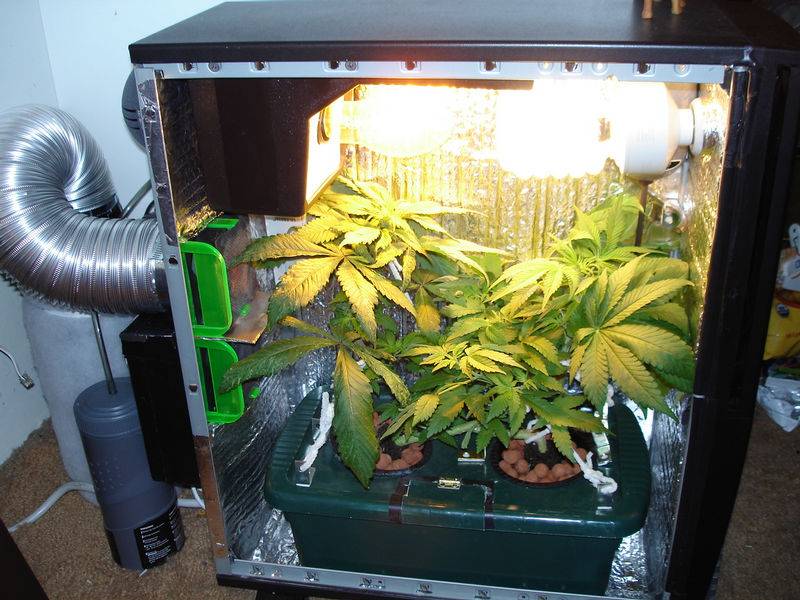
And heres the True Blueberry and Skunk #1 now at 43 days flowering!
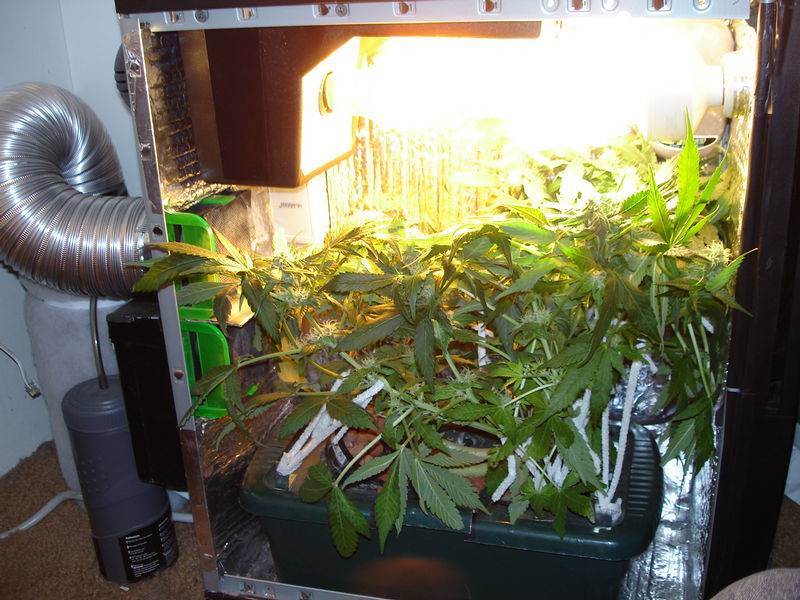
Lets take a closer look, shall we?

And now for an even closer look at the main cola on Ms. True Blue
And how about a lower nug from the True Blue while we're at it?
And a little love for the Skunk #1 too! Altogether now!
The smaller 20" case with the True Blueberry and the Skunk #1 is looking good... lets go explore the bigger 26" case with the Bubblegum now!
(I actually stacked VHS tapes underneath the tub in this case to provide only 11" of growing height to the Bubblegum as well... and it worked!)
A little closer view of the canopy now...
Want a closeup of a nice hydro-organic PC Case style Serious Seeds Bubblegum bud in full bloom? Of course you do!
Mmm yeah... buds lookin good... temps are lookin good... Mmmm Hmmm...
I hope you've enjoyed what you've seen and read so far! I'll be updating this thread at least once a week to follow the progress of my True Blueberry, Skunk #1, and Bubblegum from now now until it's finally harvested, cured, and ready to be smoked.
And incase you were wondering, "Why the heck did he go through all this trouble building these PC cases for a couple ounces max?". To put it simply... I live in an apartment with my fiance, so stealth was the absolute most important factor. We talked a lot about the best way for me to grow a personal stash and ultimately decided PC case grows were the safest and stealthiest way to do it. Besides, my fiance doesnt smoke and I only smoke about a half a gram to a gram every other weekend so even if I only get a half ounce out of a each case I'll be set for quite a while!
And yeild aside, I just really love to grow! I find it very theraputic and it's wonderful to be able to come in and sit with your garden any time you like... you just cant put a price on being able to sit next to a nice warm well lit garden full of lush greenery when outside it's the middle of winter with 3 feet of snow on the ground! To me, the growing is proccess is just as fun and wonderful as the final product is.
I used to live in a place where I could grow 8 or 10 full sized plants in a big basement without having to train them to grow short and I never had to deal with any security or stealth problems. But since I now live in somewhere far less secure with less space but still wanted to grow, a PC Case grow just seemed like the best and safest option for my living situation.After this grow I think I'm going to reduce my setup to just using the smaller case only (more stealthy) and do a run with some Sensi Seeds Northern Lights and I'll be sure to keep you guys posted with a thread for that grow too.
But for now, I hope you've enjoyed the show! Take care, stay safe, and I'll update this thread with more pics and progress within the next week!
Last edited: