What's new
  • Happy Birthday ICMag! Been 20 years since Gypsy Nirvana created the forum! We are celebrating with a 4/20 Giveaway and by launching a new Patreon tier called "420club". You can read more here.
  • Important notice: ICMag's T.O.U. has been updated. Please review it here. For your convenience, it is also available in the main forum menu, under 'Quick Links"!

You Gotta SIP, Not Slurp

thailer

Active member
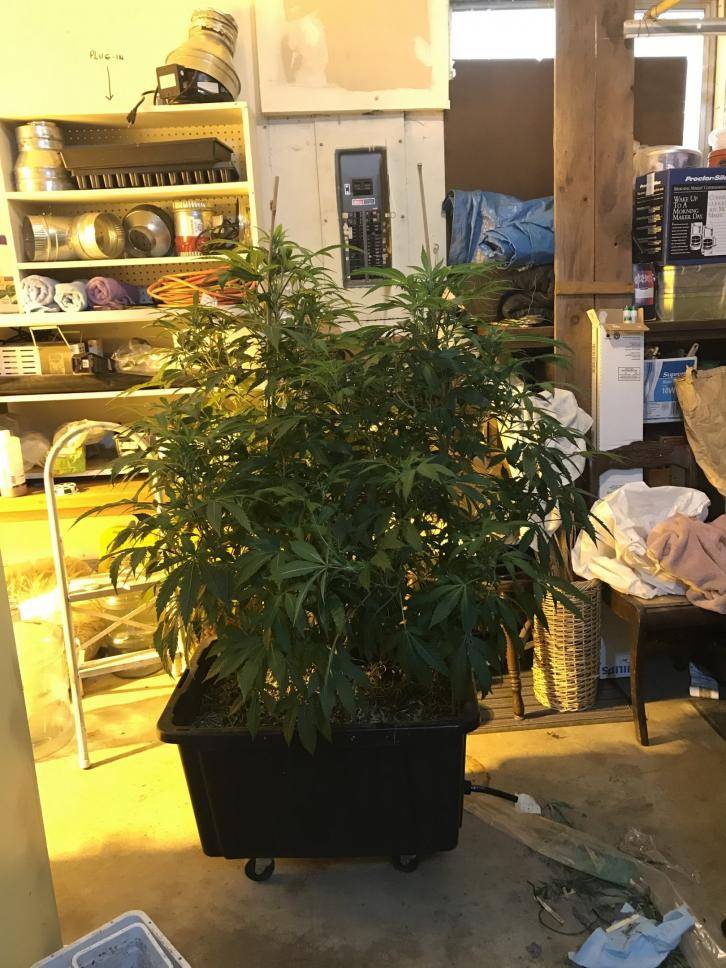
I switched over from fabric bags to SIPs a couple years ago and have never looked back. Keeper cuts that were yielding 140 grams per plant suddenly increased to 230-250 grams, the resin content was greasier and increased as well. The plants vegged a lot faster and plant health increased. I had spent quite a while researching online different SIP designs and settled on making something of my own that was inspired by the hempy buckets here that used perlite. Other designs use the peat moss as the wick and i do not want the soil getting super soggy to prevent wet feet, it leaches nutrients into the water, and the peat moss itself doesn’t have as good of wicking capabilities as perlite, meaning water can not travel upwards as fast as it can if it were perlite.

picture.php


picture.php


So some things to consider before building this system.
If you want to use hand water soluble fertilizers, this really isn’t the system for you because the reservoir will collect the run off nutrients. Try a blumat system. This is water only to keep it clean and there’s no way to leach the system the way i built it. I don’t really need to or haven’t as of yet.
You can’t transplant out of it easily.
It can be boring because all you do is fill up water and make clones.

So I made SIPs you can hand water first by pouring water down a PVC tube and the plants eventually started sucking the water out the SIP daily. I was hoping to get a few days in between but the plants were growing great!! I was able to fill up the SIP before the soil got dry and it worked, but i wanted more so next design incorporated hydro tubing connecting the SIPs to a reservoir the size of a garbage can. This way I don’t have to squeeze in the room to water the ones in the back and they all are able to be filled up from outside the room. Moses Wellfleet has been running the hand watered design for a while now and loves it!

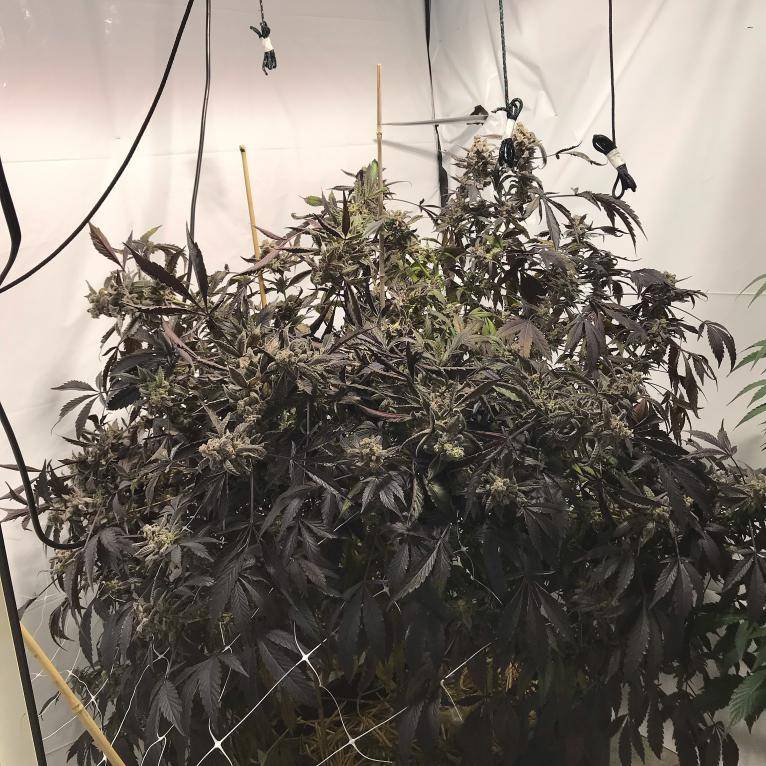
It worked great and i was able to go 3 weeks from transplanting a young small plant before it drank up water but once they are established plants, they will drink, drink, drink. You can add a garden hose or RO system to fill up the trash can if you want a completely hands off approach to growing. I did notice that growth rates did go down a little when i switched over to the SIPs on irrigation which keep the water reservoir inside the SIP at a constant height versus the hand watered SIP which the level goes down as the plant consumes the water. To keep the growth rates going, be sure to fill up the tote completely with premoistened soil so it doesn’t get lower settling as it gets wetter because every inch counts in this case as air decreases the further down you go int he soil. see below.

58188.jpg


What makes a good container soil mix
https://ucanr.edu/blogs/blogcore/postdetail.cfm?postnum=29331

water and air porosity
https://ucanr.edu/blogs/blogcore/postdetail.cfm?postnum=29390

how much air and water
https://ucanr.edu/blogs/blogcore/postdetail.cfm?postnum=29450

effects on root diseases like rot
https://ucanr.edu/blogs/blogcore/postdetail.cfm?postnum=29510

effects of soil settling, salt and drought on root rot
https://ucanr.edu/blogs/blogcore/postdetail.cfm?postnum=29579

when to irrigate/how to determine when to water and how much
https://ucanr.edu/blogs/blogcore/postdetail.cfm?postnum=29674
https://ucanr.edu/blogs/blogcore/postdetail.cfm?postnum=29691

cation exchange capacity
https://ucanr.edu/blogs/blogcore/postdetail.cfm?postnum=29697

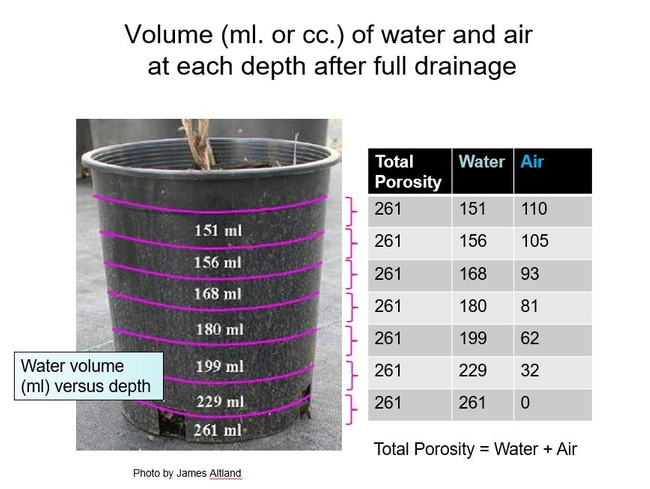
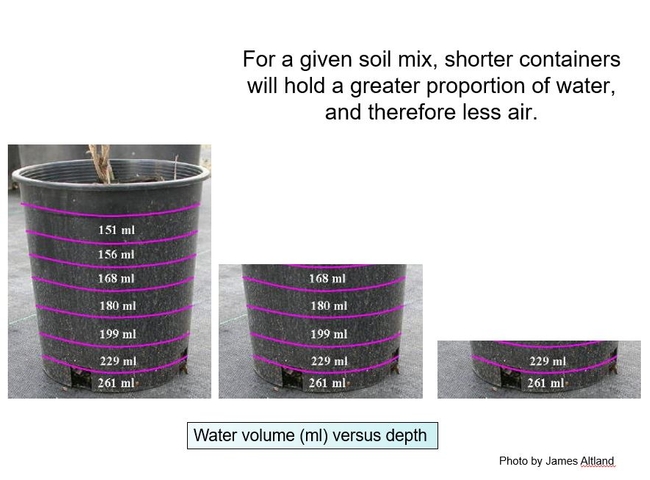
so basically the deeper the pot, the more air closer to the surface. if the soil is shallow and wide, its just not the same as the identical amount in a deeper pot. so the soil in the SIPs is wide and shallow and i want to add more soil while creating depth to grow these large trees indoors.

58193.jpg
 
Last edited:

thailer

Active member
So I will try to explain how the connected system works first and once you understand, you can really design with anything if you don’t want to use totes. You can use smaller 5 gallon buckets doubled up so the bottom stays in the same place and you can pull the top bucket out and move it from veg to bloom or in a better spot. You can put this outdoors and make a guerilla grow if you can pump water from a stream. Seriously the possibilities are endless.
picture.php

So the water level is determined by the level of water that is in the control box by a float valve if it and the SIPs were level to the floor. If you pick up the control box, it will raise the level of water inside every SIP till it reached the same height as the water that is inside the control box. I suggest playing around with this before adding the soil to make sure the level is correct and you have an air gap between the water table and the soil. More on that later tho. The reservoir garbage can is raised up to increase the water pressure. The shut off valves let you unhook a SIP to take out of the room. You should also put a shut off valve between the reservoir and the control box as well but not included in pic.

I was told by some growers who have this system set up already that you can not put more than six SIPs on one control box and i think that is due to the speed the water can service each SIP. as it fills up, the first SIP gets topped off till it is full and then it will fill up the second SIP and down the line but if the plants are drinking heavily or the sun is hot evaporating the soil, then the last SIP can get very little water. I have seen people put more on there so feel free to play around but you can set up multiple control boxes to run off of one reservoir as long as the water can keep up with amount of SIPs you want serviced.

Whew! I hope that made sense!
 

thailer

Active member
Single line design is better for smaller rooms because the line kinks sometimes if there’s not enough room.


picture.php

picture.php


IF you have a bigger wider room and want to put a lot of sips on one line, try a loop so the line ends and starts at the control bucket.


picture.php


So to make a hand watered and an auto top off SIP, here’s what you do!

First you’ll need to buy a tough tote that are sold at most stores. They’re usually black bottom with yellow lid and say they are stackable and can hold lots of weight. These things are durable and they won’t bow out so you can drag them around without breaking them. Plus the plastic isn’t brittle and softer to make the holes.

Now for the hand watered design you’ll want to measure 3.5” above the bottom and that is where the top of the hole should be when you drill. This is the overflow hole that water will come out of if you add too much and it determines how much water you can put in there.


picture.php


For the irrigation SIPs you want to measure so the bulk head has enough room to remain flat so it seals properly but still stays as low as possible to the bottom. The point of this is so the hole is covered with water and keeps full so air bubbles don’t get down clogging the line.

Hand watered design
picture.php
 

thailer

Active member
Screw in the screen to keep perlite out of the hole and cover with drain cover or nylon.

picture.php

picture.php


The get 4” wide perforated drainage pipe and create a similar shape inside the SIP. cover ends with old socks or more drain cover so perlite doesn’t get inside. Then back fill with perlite. Shown below is the hand watered design but the irrigation one looks the same except it doesn’t have a PVC pipe 2” coming out of the corner to put water down into the reservoir without creating leaching. Hint: add perlite AFTER you put the pipe down because if it gets any soil or perlite inside of the pipe, it won’t work. Probably could put drain pipe cover on it too. If you’re doing the irrigation design, you don’t need the pvc pipe.
picture.php

picture.php


Inside pic of the control box

picture.php
 

thailer

Active member
Pic of one dumped upside down to look at the roots
picture.php

picture.php

picture.php


Roots grow right down into the water table and anchor the plant while thinner roots line the perlite bed and create a mat thick. Its so simple. Now this setup provides about 15 gallons of soil and can support most plants grown indoors but if you like to grow big giant plants and don’t want to be hindered by root bound growth, I’m going to increase the soil and redesign the SIPs a third time so i can grow big giant plants easier than what i can do now.

picture.php


So i think i've figured out the best design to make the SIPs operate better to support larger plants that need stakes. i think i am gonna double up the totes so the bottom tote contains the reservoir and some sort of support for the tote above that is set inside the bottom tote that will hold the soil. this will give me 13-15 inches of soil where currently i am around 10". but its not just about getting more soil depth to hold up stakes; it also increases oxygen to the root zone. my theory is the difference between the hand watered design and the irrigation line design is the wet dry cycle the hand watered sips get which influences transpiration, osmosis at the root zone which increases fertilizer ppm as the soil drys when the plant sucks the water dry from the soil, while the auto top off sips constantly have the same water level.

at the root zone there is root pressure and cohesion tension theory which is how water/fertilizer enters the roots and then move up the plant and into the atmosphere. root pressure can only make water travel through the roots so far and isn't as big of influence in transpiration as cohesion tension theory. cohesion tension theory can make water travel despite gravity up tall plants because water is a polar molecule and i like to imagine it like a magnet toy train. the H20 connects to the h20 below that and so on and so on so it creates this chain. as the plant transpires and releases humidity into the air, each water molecule that is evaporated on the leaf surface, will pull up the following h20 molecule below it on the chain. this video explains it a lot better than me

https://www.youtube.com/watch?v=L-osEc07vMs

https://www.youtube.com/watch?v=jLc4JT522VA

so the plant itself acts like a wick system which is the basis of how the SIP works too. you can see how the pressure to release into the air increases as the water rises up and out of the stomata.

SPAC+%3D+soil-plant-atmosphere+continuum+A+plant+is+a+Living+Wick..jpg


so this all starts at the soil level with the root zone being influenced by the amount of water/oxygen to the root zone. the soil can't be over saturated or the plant won't transpire. so that moves me on to my next topic about the depth of the original SIP and why i want to add more soil depth.
 
Last edited:

moses wellfleet

Well-known member
Moderator
Veteran
Organics meets hydropnics

Organics meets hydropnics

Great to see this here, thanx thailer :rasta:

Also been running sips for the better part of 2 years, still waiting to come across a disadvantage to the system.

The first thing other growers usually ask is about the whole thing turning anaerobic. That will only happen if nutrients are added directly to the reservoir. With dry amendment organic soil and pure water added to the reservoir it is idiot proof. If you build it as shown above you will enjoy perfect levels of moisture and aeration.

Organoponics :skiiing:
 
Last edited:

thailer

Active member
Great to see this here, thanx thailer :rasta:

Also been running sips for the better part of 2 years, still waiting to come across a disadvantage to the system.

The first thing other growers usually ask is about the whole thing turning anaerobic. That will only happen if nutrients are added directly to the reservoir. With dry amendment organic soil and pure water added to the reservoir it is idiot proof. If you build it as shown above you will enjoy perfect levels of moisture and aeration.

Organoponics :skiiing:

thanks moses for all your help and feedback to help improve the system! i suppose we should also include the addition of EM1 to the reservoir too?

has anyone with SIPs included EM1 in the water reservoir and not gotten any rotten smells? just curious as i haven't heard of anyone using it in the water and not also having stinky smells or they can't get roots to inhabit the water section. i think a lot of the more recent news about SIPs is with the probiotic crowd. i think EM1 would be more beneficial in the soil and not the reservoir myself.
 

thailer

Active member
Im in. I am a big fan of a good SIP and will be getting back to them sooner than later.

was your previous SIPs the hand watered kind or did you link them up to a big reservoir?


:thank you:
glad to have you all along for the ride! i'm going to start the new design in the next day or so. i can grow some big giant bushes in these things but i have to topdress before bloom. i just want to go the whole way through without topdressing and i want more support at the root level to hold the weight of the branches. the plants fall over otherwise.
 

thailer

Active member
i think using soil for a wick would be fine in the hand watered design because you have overflow to elach anything. when i first made this irrigation line design, i added premoistened soil to the sip and the wick was all ready to keep the soil the same moisture. this didn't have any leaching into the reservoir below and the water stayed clear until one day i wanted to give them a barley tea. when i did that, i noticed algae started to develop and the water turned a little yellow and wasn't clear any longer. now i can't get rid of the green algae but it doesn't do anything so i just let it be.


also wanted to add that last night i was transplanting a new plant into a SIP that i had grown a large plant in. the soil when i put the plant was at the tippy top of the tote and even mounded up some because i was trying to get the rootball as high as possible from the water table. after that round was over and i harvested, i realized the soil level had gone down 3-4 inches and the texture of the soil was like vermicompost and didn't resemble or feel like potting soil which is what i typically have in first round soil. the soil level does drop some but this round made it more apparent simply because of my effort to mound up a hill.

i also fixed links for the post on the first page that talks about potting soil, root rot and air stuff. even having a little experience under my belt i think i learned some stuff.
 

moses wellfleet

Well-known member
Moderator
Veteran
thanks moses for all your help and feedback to help improve the system! i suppose we should also include the addition of EM1 to the reservoir too?

has anyone with SIPs included EM1 in the water reservoir and not gotten any rotten smells? just curious as i haven't heard of anyone using it in the water and not also having stinky smells or they can't get roots to inhabit the water section. i think a lot of the more recent news about SIPs is with the probiotic crowd. i think EM1 would be more beneficial in the soil and not the reservoir myself.

I don't use EM1 at all and I only ever tried it once in the very beginning. The rez went anaerobic, a foul smelling white jelly was dripping off the dipstick. I was going to abandon the whole project at that point. Then you suggested I try with plain water in the rez.
 

MICrazy

New member
I am doing something very similar to your hand watered design. After an organic test run, the tastes converted me.

I use cheaper 20g totes that are taller. Was going to use the yellow-lid totes, but those are shallower and I wanted more dirt/less water overall.

My drainage pipe was cut into sections, capped, and laid on the bottom to completely fill the area. It took 4 sections. The middle 2 I made a little shorter for the wick, which I just used the soil and packed it in there really good. I used the exact same bulkheads and screens, and zip tied the drain sleeve to the fill pipe and the drainage tube.

Now, since I'm a nub -- I've run into either acidic soil or anaerobic conditions. I didn't have a decent soil pH tester when I set them up, and I didn't learn my liming lesson at the time of construction -- but my bins were around 5.0 pH. I have added EM1 once or twice, and also top watered some teas. Not sure if it's non-limed peat or the EM1/teas that caused it. I thought my mineral mix had liming agents in it, but it only had Gypsum. Would adding oyster shell on top of gypsum be too much calcium? Wondering if I should change my mineral mix. Currently using BAS LOS 3.0.

My well is a hard 250ppm and sulphury this time of year. I had been diluting it down a lot, tested the res and it was ~30ppm. Thought maybe the lack of buffer in the water was contributing -- so I now only dilute it down to ~100ppm. Thinking that will provide a little more buffer for the water.

To remediate, I top dressed some Oyster Shell+EWC. That didn't move the needle much, so I got some Olympus Up (liquid calcium carbonate) and have top watered once. Any thoughts on adding that the res? pH is up to 6.0 now, so getting better. Plant is still lime green though.

I usually add Gnatrol once a week, today is that day. I think I'll make a Gnatrol/olympus up for the top water today.

So do you SIP pros EVER top water any goodies? Microbes? Recharge?
If so, I assume you water light so it doesn't get down to the res?

Also deciding on cover crops. I have some going crazy with cover crops, some I did light, some I already chopped. Been drying out the clover/buckwheat/whatever and making a nice mulch mix. But it's a pain in the ass to top dress in between the jungle growth. If I could just top dress + a nice bio mulch that would be easier.

With respect to connecting them together....

Since I already have pumps, manifolds, tubing from my hydro experimentation -- I was thinking just run 1/4" feed lines to the fill tubes, connect the drains, and have a little soil rdwc kinda thing. The waterfall down the fill tube would also provide a little aeration. Right now, everything is pretty young and it can go a week or so between fill-ups -- not sure I'll ever connect them.
 

thailer

Active member
I am doing something very similar to your hand watered design. After an organic test run, the tastes converted me.

I use cheaper 20g totes that are taller. Was going to use the yellow-lid totes, but those are shallower and I wanted more dirt/less water overall.

My drainage pipe was cut into sections, capped, and laid on the bottom to completely fill the area. It took 4 sections. The middle 2 I made a little shorter for the wick, which I just used the soil and packed it in there really good. I used the exact same bulkheads and screens, and zip tied the drain sleeve to the fill pipe and the drainage tube.

Now, since I'm a nub -- I've run into either acidic soil or anaerobic conditions. I didn't have a decent soil pH tester when I set them up, and I didn't learn my liming lesson at the time of construction -- but my bins were around 5.0 pH. I have added EM1 once or twice, and also top watered some teas. Not sure if it's non-limed peat or the EM1/teas that caused it. I thought my mineral mix had liming agents in it, but it only had Gypsum. Would adding oyster shell on top of gypsum be too much calcium? Wondering if I should change my mineral mix. Currently using BAS LOS 3.0.

My well is a hard 250ppm and sulphury this time of year. I had been diluting it down a lot, tested the res and it was ~30ppm. Thought maybe the lack of buffer in the water was contributing -- so I now only dilute it down to ~100ppm. Thinking that will provide a little more buffer for the water.

To remediate, I top dressed some Oyster Shell+EWC. That didn't move the needle much, so I got some Olympus Up (liquid calcium carbonate) and have top watered once. Any thoughts on adding that the res? pH is up to 6.0 now, so getting better. Plant is still lime green though.

I usually add Gnatrol once a week, today is that day. I think I'll make a Gnatrol/olympus up for the top water today.

So do you SIP pros EVER top water any goodies? Microbes? Recharge?
If so, I assume you water light so it doesn't get down to the res?

Also deciding on cover crops. I have some going crazy with cover crops, some I did light, some I already chopped. Been drying out the clover/buckwheat/whatever and making a nice mulch mix. But it's a pain in the ass to top dress in between the jungle growth. If I could just top dress + a nice bio mulch that would be easier.

With respect to connecting them together....

Since I already have pumps, manifolds, tubing from my hydro experimentation -- I was thinking just run 1/4" feed lines to the fill tubes, connect the drains, and have a little soil rdwc kinda thing. The waterfall down the fill tube would also provide a little aeration. Right now, everything is pretty young and it can go a week or so between fill-ups -- not sure I'll ever connect them.

so you added EM1 to the reservoir water? or to the soil?

jeremy doesn't share the BAS 3.0 recipe like the other original ones he started selling. it really doesn't have calcium carbonate or oyster shell? i saw his BAS Lite soil doesn't have any. i don't really understand why they started advocating omitting lime from the soil recipes and rely on crab meal which doesn't have liming capabilities like something that has more than 90% CaCO3. back in 2016 bluejay/mountain organics posted a recipe that didn't use lime and swore the compost and crab meal was enough. everyone that uses the recipe that i've seen has issues tho. i would suggest making your own soil and use one of the recipes from the old mix he sells. i use the basic coot mix one. there's also dank.frank who has a recipe others love and he is here at icmag to ask questions while jeremy is probably looking at his bank account balance.

i think you should flush out the reservoir and fill it up with plain water diluted down to till the ph is 6.0-6.5 and not so much what the ppm is.

i don't top water anything because it pushes nutrients down into the reservoir and that effects the pH of the water. try adding the gnatrol to a sprayer and misting the top of the soil. gnats are in the first 1-2" anyhow.

i hope i got all your questions and i hope others offer advice too because i don't really shine at fixing people soil problems.
 

moses wellfleet

Well-known member
Moderator
Veteran
I am doing something very similar to your hand watered design. After an organic test run, the tastes converted me.

I use cheaper 20g totes that are taller. Was going to use the yellow-lid totes, but those are shallower and I wanted more dirt/less water overall.

My drainage pipe was cut into sections, capped, and laid on the bottom to completely fill the area. It took 4 sections. The middle 2 I made a little shorter for the wick, which I just used the soil and packed it in there really good. I used the exact same bulkheads and screens, and zip tied the drain sleeve to the fill pipe and the drainage tube.

Now, since I'm a nub -- I've run into either acidic soil or anaerobic conditions. I didn't have a decent soil pH tester when I set them up, and I didn't learn my liming lesson at the time of construction -- but my bins were around 5.0 pH. I have added EM1 once or twice, and also top watered some teas. Not sure if it's non-limed peat or the EM1/teas that caused it. I thought my mineral mix had liming agents in it, but it only had Gypsum. Would adding oyster shell on top of gypsum be too much calcium? Wondering if I should change my mineral mix. Currently using BAS LOS 3.0.

My well is a hard 250ppm and sulphury this time of year. I had been diluting it down a lot, tested the res and it was ~30ppm. Thought maybe the lack of buffer in the water was contributing -- so I now only dilute it down to ~100ppm. Thinking that will provide a little more buffer for the water.

To remediate, I top dressed some Oyster Shell+EWC. That didn't move the needle much, so I got some Olympus Up (liquid calcium carbonate) and have top watered once. Any thoughts on adding that the res? pH is up to 6.0 now, so getting better. Plant is still lime green though.

I usually add Gnatrol once a week, today is that day. I think I'll make a Gnatrol/olympus up for the top water today.

So do you SIP pros EVER top water any goodies? Microbes? Recharge?
If so, I assume you water light so it doesn't get down to the res?

Also deciding on cover crops. I have some going crazy with cover crops, some I did light, some I already chopped. Been drying out the clover/buckwheat/whatever and making a nice mulch mix. But it's a pain in the ass to top dress in between the jungle growth. If I could just top dress + a nice bio mulch that would be easier.

With respect to connecting them together....

Since I already have pumps, manifolds, tubing from my hydro experimentation -- I was thinking just run 1/4" feed lines to the fill tubes, connect the drains, and have a little soil rdwc kinda thing. The waterfall down the fill tube would also provide a little aeration. Right now, everything is pretty young and it can go a week or so between fill-ups -- not sure I'll ever connect them.
I posted earlier in the thread about EM1 turning my sip anaerobic. The rez will smell foul. Yes I would change the water in the rez and try with fresh water from now on.

I agree with thailer, the original soil mix l started with had dolomite and high cal lime (similar to aragonite and can be used in place of oyster shell flower) as well as gypsum. I recycle my soil and I add back those mineral amendments every run. Any soil mix that that relies only on crab shell meal for calcium doesn't make sense to me. I suggest you try something different, I can send you a link to a mix if you want?

i hope i got all your questions and i hope others offer advice too because i don't really shine at fixing people soil problems.

Too modest. Thailer is well qualified to offer advice, my plants are living proof of that! :thank you:

Another thing I wanted to mention is that I find nutrients are more available in the moist, microbial soil of the sip. I am not getting any fade, plants are staying green until harvest. I will have to reduce the nutrients I top dress every run.

:skiiing:
 

MICrazy

New member
so you added EM1 to the reservoir water? or to the soil?


Both, actually. But that was a few weeks ago. EM1 was the only additive I added to the res. But I'm considering adding some olympus up.


jeremy doesn't share the BAS 3.0 recipe like the other original ones he started selling. it really doesn't have calcium carbonate or oyster shell? i saw his BAS Lite soil doesn't have any. i don't really understand why they started advocating omitting lime from the soil recipes and rely on crab meal which doesn't have liming capabilities like something that has more than 90% CaCO3.


The ingredients for the LOS3.0 mineral mix is on the site. No lime. Depending on where you look, some of the ingredients can help buffer, but no serious lime is included. I'm wondering if this mix is more tailored to Coco.


1. BuildASoil Basalt - Our Favorite Rock Dust for trace minerals. Highly paramagnetic. 2. Gypsum Flour Pellets - Calcium and Sulfur
3. Vansil W-10
4. BuildASoil Premium Montomorillonite


I'm going to spin up a few more this weekend, and debating on LOS3.0 mineral mix + oyster -vs- just a little azomite + oyster/dolomite.


Again, since I wasn't able to get a decent pH right after potting -- I'm not sure if the mix would have done fine without the lime, or I just messed it up and made it anaerobic.


All future batches will be pH tested/limed before going into the totes.


i think you should flush out the reservoir and fill it up with plain water diluted down to till the ph is 6.0-6.5 and not so much what the ppm is.


My well water mix sits right around 7.0, so it should push the pH up a bit over time. My concern with the super low ppm mix I was using is the water being more of a solvent. It was pretty close to RO water (~20-30ppm). My well has a fair number of carbonates and iron, so I dilute. Now I dilute it down to 100ish.


i don't top water anything because it pushes nutrients down into the reservoir and that effects the pH of the water. try adding the gnatrol to a sprayer and misting the top of the soil. gnats are in the first 1-2" anyhow.


I've done that before, can do it again. Once everything is in sips with a thick mulch layer, hopefully I can slow down on the gnatrol -- but I have some fabric pots going and they are always around. I've started bottom watering the fabrics, and in a month or so they will be gone.


i hope i got all your questions and i hope others offer advice too because i don't really shine at fixing people soil problems.


Thanks for your help man, I do appreciate it.


Do you run cover crops? Now that I have a stash of greenage for mulch/worms -- I'm thinking it's more of a pain in the ass than it may be worth.


Also doing some avocado-tech with some oyster/crab shell in the mix there. Hoping those little buggers drag all that around a bit.
 

Latest posts

Latest posts

Top