
-
Happy Birthday ICMag! Been 20 years since Gypsy Nirvana created the forum! We are celebrating with a 4/20 Giveaway and by launching a new Patreon tier called "420club". You can read more here.
-
Important notice: ICMag's T.O.U. has been updated. Please review it here. For your convenience, it is also available in the main forum menu, under 'Quick Links"!
You are using an out of date browser. It may not display this or other websites correctly.
You should upgrade or use an alternative browser.
You should upgrade or use an alternative browser.
Pushing Limits- #1 The medical SOG(ish) Room
- Thread starter pushlimits
- Start date
pushlimits
Member
I don't condone the installation of dangerous things (that will stop your heart and not even blink) without the supervision of a professional. But, putting in a sub/control-panel is easier then you'd think. It takes; know how, a little elbow grease and A lot of common sense. If these are things you can deal with (I'm sure they are) and are willing to take risk, then by all means I can help you! I will post a little example of a simple power installation very soon.
Just keep in mind all installations very according to your needs, particular set-up, and budget. My installation may not reflect your needs, but the basic idea of distributing power will always be the same.
In the interest of not muddying up this diary, any questions pertaining to sub-panel installation- just send it to me. But in the future post- I will attempt to make it very clear.
that's cool pushlimits, will be handy for many i bet to have that info posted up. real nice thread you are making here. thanks for sharing 
Thank you!
Thank you!
Pushlimits that is more than generous of you. It seems like you would be a very trustworthy person to learn such a thing from. You don't even know how much this would help me out! I can tell you are an all around great guy, much appreciation man. I don't expect a certified course or anything, anything would be of great assistance") I await your post eagerly, sir!
I await your post eagerly, sir! 
Thank you!
I don't condone the installation of dangerous things (that will stop your heart and not even blink) without the supervision of a professional. But, putting in a sub/control-panel is easier then you'd think. It takes; know how, a little elbow grease and A lot of common sense. If these are things you can deal with (I'm sure they are) and are willing to take risk, then by all means I can help you! I will post a little example of a simple power installation very soon.
Just keep in mind all installations very according to your needs, particular set-up, and budget. My installation may not reflect your needs, but the basic idea of distributing power will always be the same.
In the interest of not muddying up this diary, any questions pertaining to sub-panel installation- just send it to me. But in the future post- I will attempt to make it very clear.
Pushlimits that is more than generous of you. It seems like you would be a very trustworthy person to learn such a thing from. You don't even know how much this would help me out! I can tell you are an all around great guy, much appreciation man. I don't expect a certified course or anything, anything would be of great assistance
I await your post eagerly, sir! pushlimits
Member
As requested, Section One of the sub-panel installation.
As requested, Section One of the sub-panel installation.
As Requested, I will attempt to demonstrate a rough guide to installing your very own power source. I only write this because my prior experience in the field- I’ve heard of more houses being burned down by over loaded circuits, then people being killed from a little DIY electrical installation. Again, I don’t condone this so- WEAR RUBBER SOLED SHOES!
This will contain 3 Sections;
Section one- Bringing in the power
Section two- designing a panel
Section three- Installation instructions.
Section One- Bringing in the power
First things first, determine your Load- to do this add up the total wattage of all your appliances, this includes appliances you intend on having in the future. For example-
2- 600 watt lights = 1200 watts
2 more in the future= 1200Watts
1- 6 lamp and 1-4 lamp T5= 540 watts
1 6’ inline fan= 150 Watts
2- box fans= 120 watts
Misc. stuff= 300 Watts
Total= 3510 Watts
Take the total wattage and divide it by your voltage. Unless you have a device (240 volt light) that says otherwise, or you don’t live in the U.S. it’s always going to be 120 Volts. This will give you the total amperage. This number will determine the materials you will need.
So 3510 Watts/120 volts = 29.25 AMPS
Determine your material from your total amperage. We will start from the power source and work our way over.
Get a Breaker- Most houses should have breakers. If you don’t, change them, (bring them to code for gods sakes). If you’re not in a house, you’re in a factory/ commercial building. If you’re at this scale and you have to read this tutorial - you already F’ed up. Get a new career.
A common misconception would be- “O.K. I need a 30 AMP breaker, if I’m drawing 29.25 AMPS, right?” Wrong! A breakers rating can only Safely handle 80% of its laod. So a 30 AMP breaker should only be loaded with 24 AMPS. Don’t get me wrong, I have never seen a group of devices draw 100% of it’s rating, 100% of the time! Furthermore The electrical equipment is made super safe and can handle a lot more then it’s rated for. I’ve done it. But my question to you (the reader) is- why take a chance? This is very important and dangerous. Its not the type of thing to skimp out on!
So for this example get a breaker that’s rated for 40 AMPS.( I would say 35 but it’s rare to find them) Better safe then sorry- to follow the cliché
Determine a Raceway.- Race way in laymen’s terms is- anything that safely houses/holds your wiring. There are many options to chose from, and are determined by your desired amperage, wire used, and were it’s going through. These range from;
Conduit
Green field/ MC cable
Wire trouff/ basket
Special pre- made cables (S.O. cord)
Holes drilled through studs/ truses
Staples/ one hole straps
The list goes on. Just remember, all wire (unless rated for open air) need some sort of raceway. For this example I will use Greenfield, It’s cheap, easy to use and easy to explain. It’s just a flexible metal conduit that gets strapped to studs every couple feet. This runs between the breaker box and you sub-panel. Most people will end up using Romex.
Find a wire/cable- Wire size is determined by amperage. So, in most cases 40 AMPS can be carried on anything from #6 wire (big) to 10 gauge (moderate) wire. Safely and affordably (wire price goes up exponential with size) I will use a #8 wire (anything smaller then 10 is called gauge, bigger is simply- #) If it were 30 AMP- You would use10 or 12 gauge, 20 AMP- 12 gauge, 15 AMP- 14 gauge. You get the picture.
You can also buy cable instead of wire. Cables for electrical wiring usually have 2 numbers; first being its gauge, second being the amount of conductors (wires) in it. Example 12-3 Romex is one cable containing 3- 12 gauge wires. This is industry standard for houses. It has a white (neutral) a black (hot) and a bare (ground), all sheathed nicely in a yellow PVC jacket. My example will not use it, but it’s what most people use in there houses.
Simple Run-down
Don’t worry, I will go into better detail in the installation section. I’m very medicated and it seems a bit long winded right now. So here’s some pics;
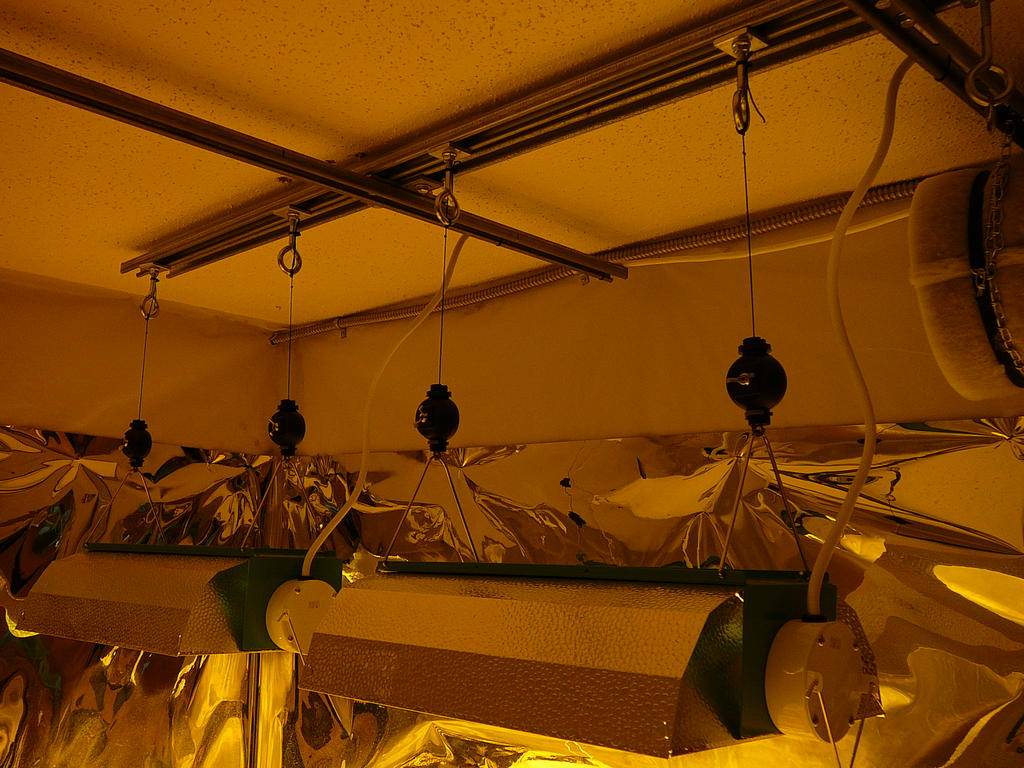
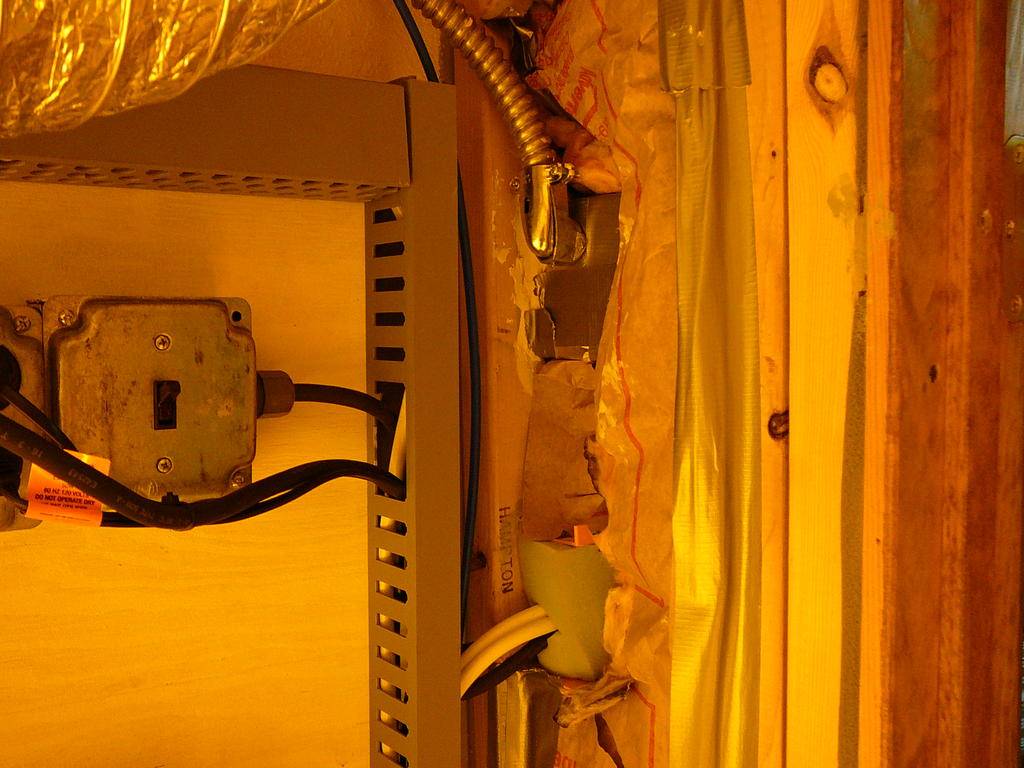
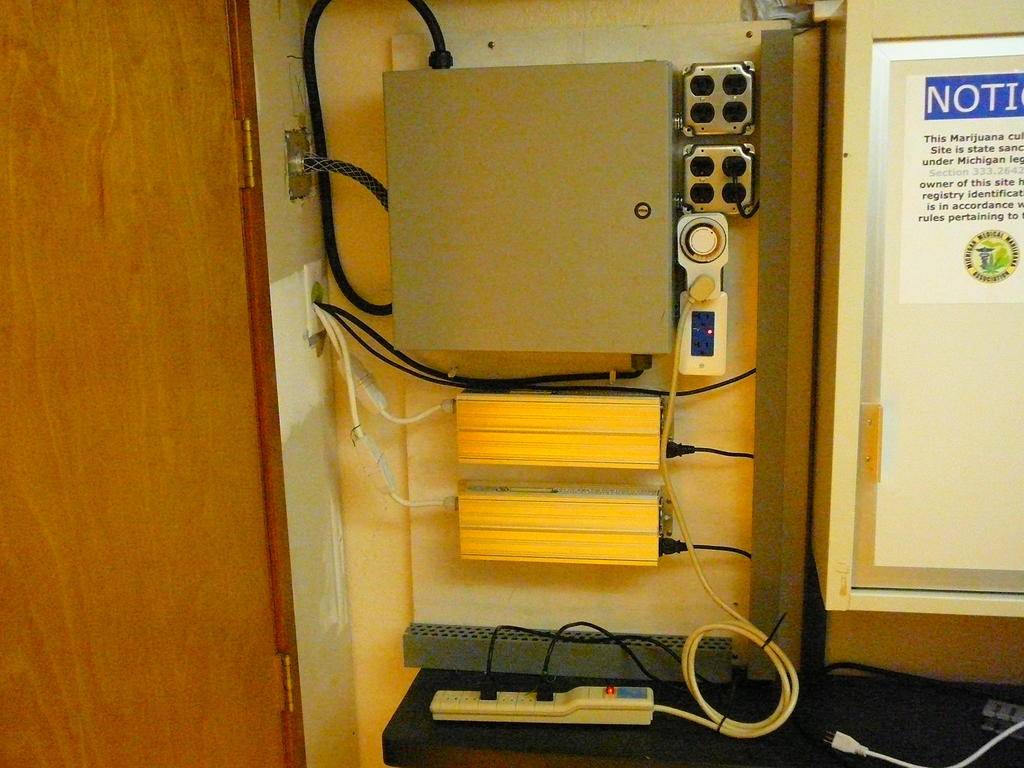
Pic #1- The 3/4" greenfield (raceway) up in the corner, held up by one hole straps. it contains 4- #8 wires. The wall on the other side has the breaker box. I simply drilled a hole and pulled it through.
Pic #2- The greenfield goes into a 90 degree connector, that's connected to a 4 square junction box (light proof). This box houses my connections on the other side of the wall.
Pic #3- The box on the wall with the big black cable sticking out of it, is the other side of the junction box. This is a 10-4 S.O. cord. wire nutted to the wires coming through the greenfield. and as you can see, powers my panel.
As requested, Section One of the sub-panel installation.
As Requested, I will attempt to demonstrate a rough guide to installing your very own power source. I only write this because my prior experience in the field- I’ve heard of more houses being burned down by over loaded circuits, then people being killed from a little DIY electrical installation. Again, I don’t condone this so- WEAR RUBBER SOLED SHOES!
This will contain 3 Sections;
Section one- Bringing in the power
Section two- designing a panel
Section three- Installation instructions.
Section One- Bringing in the power
First things first, determine your Load- to do this add up the total wattage of all your appliances, this includes appliances you intend on having in the future. For example-
2- 600 watt lights = 1200 watts
2 more in the future= 1200Watts
1- 6 lamp and 1-4 lamp T5= 540 watts
1 6’ inline fan= 150 Watts
2- box fans= 120 watts
Misc. stuff= 300 Watts
Total= 3510 Watts
Take the total wattage and divide it by your voltage. Unless you have a device (240 volt light) that says otherwise, or you don’t live in the U.S. it’s always going to be 120 Volts. This will give you the total amperage. This number will determine the materials you will need.
So 3510 Watts/120 volts = 29.25 AMPS
Determine your material from your total amperage. We will start from the power source and work our way over.
Get a Breaker- Most houses should have breakers. If you don’t, change them, (bring them to code for gods sakes). If you’re not in a house, you’re in a factory/ commercial building. If you’re at this scale and you have to read this tutorial - you already F’ed up. Get a new career.
A common misconception would be- “O.K. I need a 30 AMP breaker, if I’m drawing 29.25 AMPS, right?” Wrong! A breakers rating can only Safely handle 80% of its laod. So a 30 AMP breaker should only be loaded with 24 AMPS. Don’t get me wrong, I have never seen a group of devices draw 100% of it’s rating, 100% of the time! Furthermore The electrical equipment is made super safe and can handle a lot more then it’s rated for. I’ve done it. But my question to you (the reader) is- why take a chance? This is very important and dangerous. Its not the type of thing to skimp out on!
So for this example get a breaker that’s rated for 40 AMPS.( I would say 35 but it’s rare to find them) Better safe then sorry- to follow the cliché
Determine a Raceway.- Race way in laymen’s terms is- anything that safely houses/holds your wiring. There are many options to chose from, and are determined by your desired amperage, wire used, and were it’s going through. These range from;
Conduit
Green field/ MC cable
Wire trouff/ basket
Special pre- made cables (S.O. cord)
Holes drilled through studs/ truses
Staples/ one hole straps
The list goes on. Just remember, all wire (unless rated for open air) need some sort of raceway. For this example I will use Greenfield, It’s cheap, easy to use and easy to explain. It’s just a flexible metal conduit that gets strapped to studs every couple feet. This runs between the breaker box and you sub-panel. Most people will end up using Romex.
Find a wire/cable- Wire size is determined by amperage. So, in most cases 40 AMPS can be carried on anything from #6 wire (big) to 10 gauge (moderate) wire. Safely and affordably (wire price goes up exponential with size) I will use a #8 wire (anything smaller then 10 is called gauge, bigger is simply- #) If it were 30 AMP- You would use10 or 12 gauge, 20 AMP- 12 gauge, 15 AMP- 14 gauge. You get the picture.
You can also buy cable instead of wire. Cables for electrical wiring usually have 2 numbers; first being its gauge, second being the amount of conductors (wires) in it. Example 12-3 Romex is one cable containing 3- 12 gauge wires. This is industry standard for houses. It has a white (neutral) a black (hot) and a bare (ground), all sheathed nicely in a yellow PVC jacket. My example will not use it, but it’s what most people use in there houses.
Simple Run-down
- Determine amperage
- Install the raceway
- Run the wires through (and label)
- Install the device end
- Install the breaker end
- Turn your head and flip the switch.
- Viola you have power
Don’t worry, I will go into better detail in the installation section.
I’m very medicated and it seems a bit long winded right now. So here’s some pics; Pic #1- The 3/4" greenfield (raceway) up in the corner, held up by one hole straps. it contains 4- #8 wires. The wall on the other side has the breaker box. I simply drilled a hole and pulled it through.
Pic #2- The greenfield goes into a 90 degree connector, that's connected to a 4 square junction box (light proof). This box houses my connections on the other side of the wall.
Pic #3- The box on the wall with the big black cable sticking out of it, is the other side of the junction box. This is a 10-4 S.O. cord. wire nutted to the wires coming through the greenfield. and as you can see, powers my panel.
pushlimits
Member
Chapter #6- Progression
Chapter #6- Progression
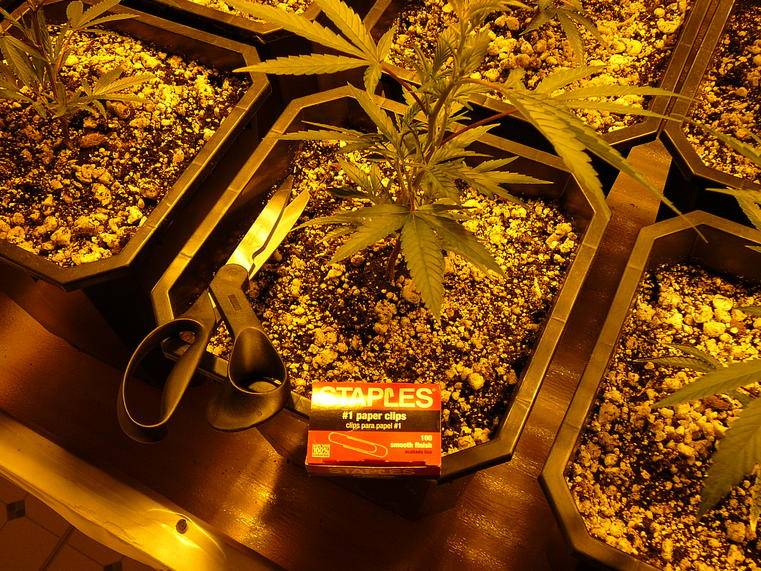
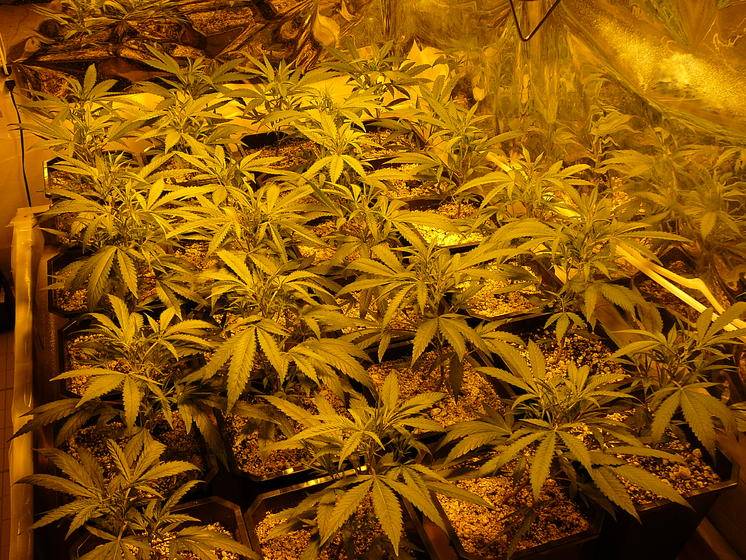
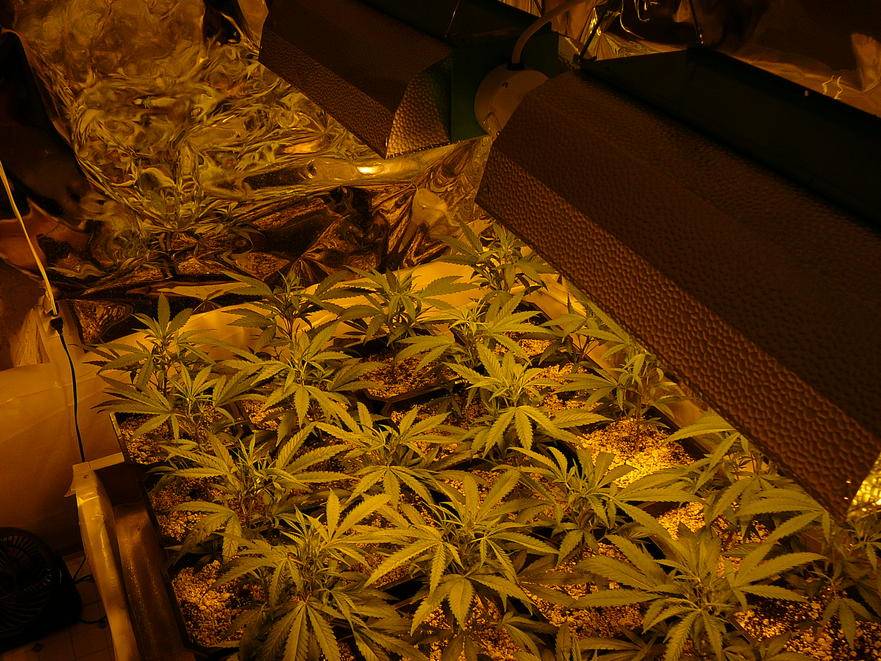
These girls are about a foot tall and have plenty of branches. Now is around the time I try and manipulate the growth for a more even canopy.
For these types of grows I Trim all the bottom growth, and bend (or top, in this case bend) the tip to divert hormones to lower branches. I like this way, it seems to work well. I mostly like the trimming of the lower growth part. It creates air flow, yes, but most importantly (to me anyway) it makes maintenance MUCH EASIER!
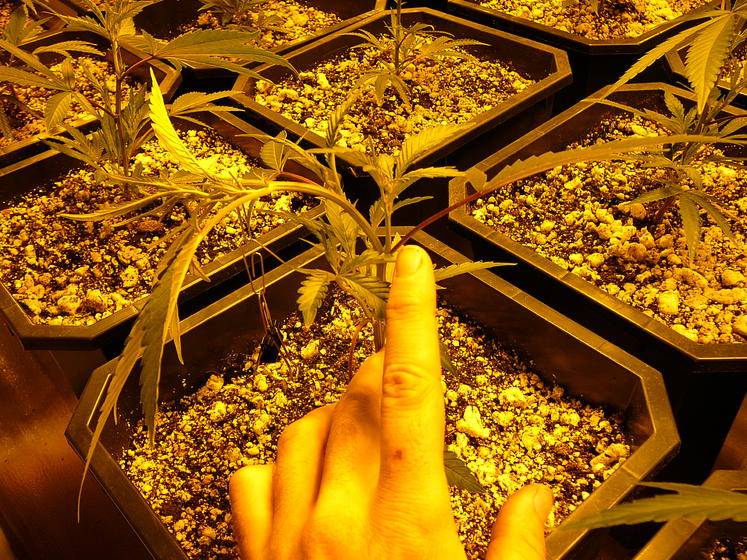
To bend, I take the uppermost tip,put on the appropriate amount of weight in paperclips, and hook it on. Cheap easy and effective. In a few days you won't even see them anymore. In one of the pictures I'm pointing to the desired effect. The lower branches begin to grow higher then the tip. When they all catch up, remove the paperclips.
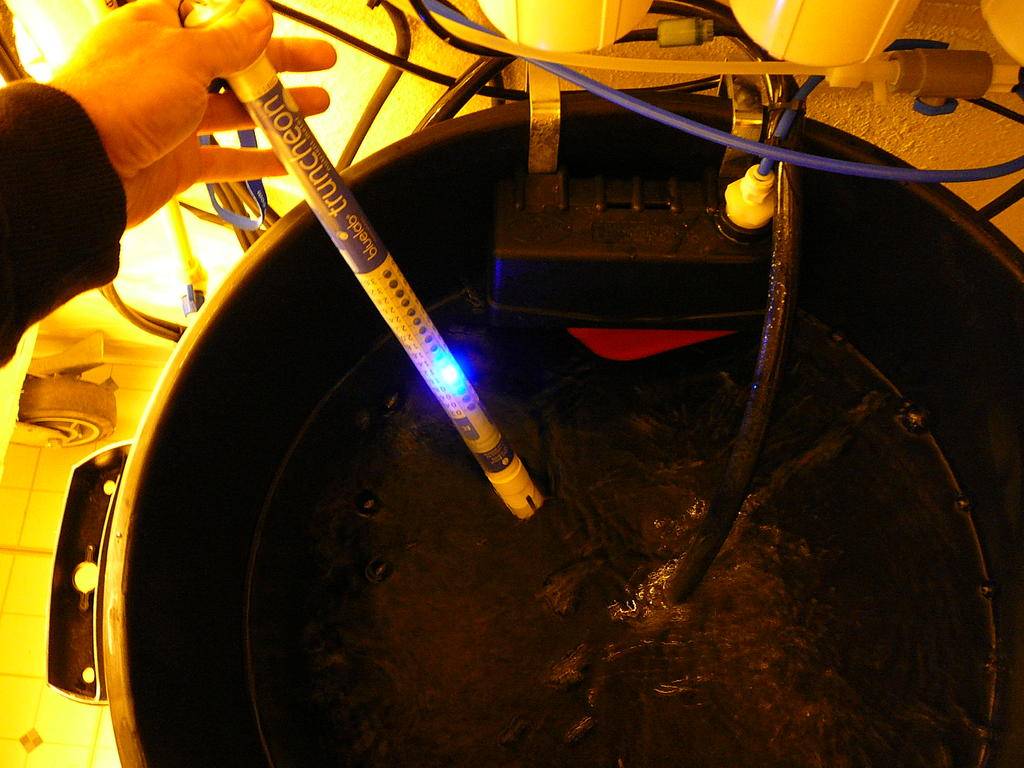
In veg, I feed the girls with 0.8-1.2 EC. Last watering I feed with a EC of 1.0. The runoff water came out at 1.2. This tells me I have a slight build-up and need to flush. Although, I flush at the end of veg anyway. and a 0.2 build-up isn't that bad really. This Lemon Skunk is very sensitive and likes light doses.

Chapter #6- Progression
These girls are about a foot tall and have plenty of branches. Now is around the time I try and manipulate the growth for a more even canopy.
For these types of grows I Trim all the bottom growth, and bend (or top, in this case bend) the tip to divert hormones to lower branches. I like this way, it seems to work well. I mostly like the trimming of the lower growth part. It creates air flow, yes, but most importantly (to me anyway) it makes maintenance MUCH EASIER!
To bend, I take the uppermost tip,put on the appropriate amount of weight in paperclips, and hook it on. Cheap easy and effective. In a few days you won't even see them anymore. In one of the pictures I'm pointing to the desired effect. The lower branches begin to grow higher then the tip. When they all catch up, remove the paperclips.
In veg, I feed the girls with 0.8-1.2 EC. Last watering I feed with a EC of 1.0. The runoff water came out at 1.2. This tells me I have a slight build-up and need to flush. Although, I flush at the end of veg anyway. and a 0.2 build-up isn't that bad really. This Lemon Skunk is very sensitive and likes light doses.
Thank you so so much for posting that write up on electrical installation. I decided to skip it momentarily to focus on talking about your grow
The growth looks great man! They look happy and look like they are growing fast. I like how you tie the tips down and then let them continue growing like normal when the bottom of the plant catches up. It's like a temporary LST, never seen that before, that's sweet! I know you said this strain likes to stretch. Does tying them down like that help them stay bushy or compact throughout the grow? I've had strains that will stretch like a mother maybe this would work for me.
I can't wait to see them flower, strain sounds tasty! Good growing brotha! Thanks for sharing, time to delve into your electrical write up
Electric tutorial was well done and easy to understand. You make it sound so easy, maybe you should put up a big skull and crossbones so people don't underestimate the dangers here, lol. I still have a few questions but I will leave those to PM. I don't think I can PM right now though I don't have enough posts, won't be long til I do.
nice grow!! ill definitely be tagging along!! keep up the good work!
pushlimits
Member
Thanks relentless; enjoy the show!
No problem Poof, I hope the rest of my electrical tutorial covers your questions. One day I'll make a extensive thread for the community. Like I said I'm more worried about people overloading circuits with gods knows what, then people getting hurt wiring their own power up. I would recommend buying a beginners wiring book from Home Depot or something, but my tutorial should give people a hobby-specific outline to work off of.
Yes, it is kinda like a temporary LST. This method makes it so the lower branches are about 1-2 inches below the main cola; opposed to 3-6 inches below when nothing is done. It helps, but it's not magic. I left one side of the grow untouched so people can compare the two; untouched and tip bent.
S
Silky Johnson
Hey nice setup bro cant wait to see how youre going to do. I was just wondering if you thought of switching over to coco?
InducedSerenity
Member
Great setup and walkthrough, thanks for the information! I'd also encourage you to consider stepping over to coco
pushlimits
Member
Silky Johnson, Inducedserenity;I was seriously considering trying coco this run. Unfortunately, I opted against it. I've tried quite a few substrates in my day, and for some reason coco never made it to the roster. I am very curious as to how it will compare to peat moss. As far as substrates go, I'm not even partial to peat. As a matter of fact; I've never tried anything I was 100% blown away by. They all have pro's and con's.
Thank you both for the suggestion.
I have a few quarrels with using coco though. One big factor being its price. I know people say "I've used the same coco three times now." I'm just not convinced that's a safe practice for me. Mainly because my location; it's damp and cold. I imagine this would cause big problems for me to have a constantly wet substrate that loves to hold bacteria, in a environment such as mine. Then again, I'm no expert!
I will have to look into it more. I've done a good amount of research on coco, but, I always walk away a bit weary. Again, thanks for the input.
S
Silky Johnson
Yeah thats all true but it would be nice to try a plant or 2 next run in some coco. Im pretty sure you'll want to stay coco. Check out this site im using these pots going coco. Ive heard nothing but the best when these 2 products are used together. http://www.youtube.com/watch?v=-NUjNBKex0I
pushlimits
Member
Continued progress
Continued progress
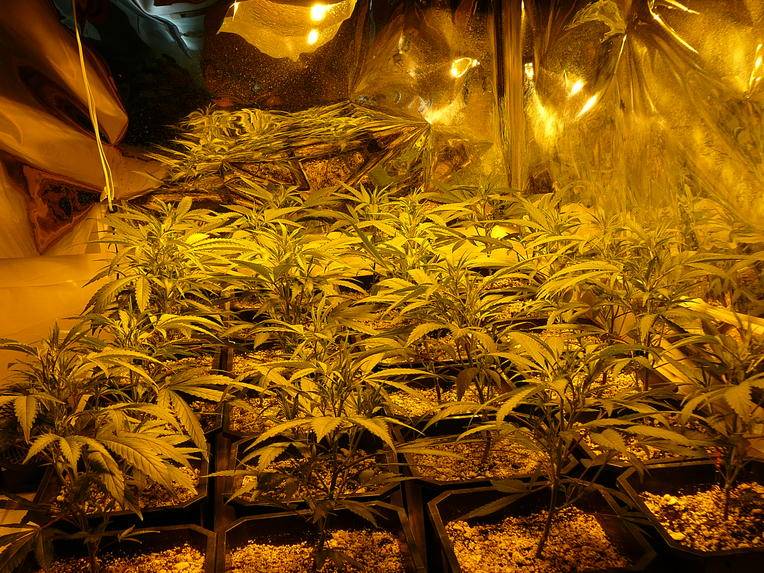
Time for a update- I switched to 12/12, 2 days ago. They have filled the canopy very nicely. The plants have only grown 3" in height since my last update, for a total of 15". But, as you can see, they have branched out and grown much wider, which is exactly the effect I was looking for.
The tip bending allowed the bottom branches to shoot up closer to the tops. One picture you can see; my pinky finger is pointing to the top, My index is pointing to the lowest branch on the plant. -sweet-. Normally this gap would be three times the size.
I flushed the soil one day prior to forcing flower. The growth is lush and strong. (so far so good with the CNS-17) No pests, nutrient deficiencies, or tip burn to report as of yet. I'm very pleased with the health of the plants so far.
Thanks for tuning in. and be sure to come back. Until then- Let's push the limits

Continued progress
Time for a update- I switched to 12/12, 2 days ago. They have filled the canopy very nicely. The plants have only grown 3" in height since my last update, for a total of 15". But, as you can see, they have branched out and grown much wider, which is exactly the effect I was looking for.
The tip bending allowed the bottom branches to shoot up closer to the tops. One picture you can see; my pinky finger is pointing to the top, My index is pointing to the lowest branch on the plant. -sweet-. Normally this gap would be three times the size.
I flushed the soil one day prior to forcing flower. The growth is lush and strong. (so far so good with the CNS-17) No pests, nutrient deficiencies, or tip burn to report as of yet. I'm very pleased with the health of the plants so far.
Thanks for tuning in. and be sure to come back. Until then- Let's push the limits
pushlimits
Member
A preview for my next grow- Pushing limits #2
A preview for my next grow- Pushing limits #2
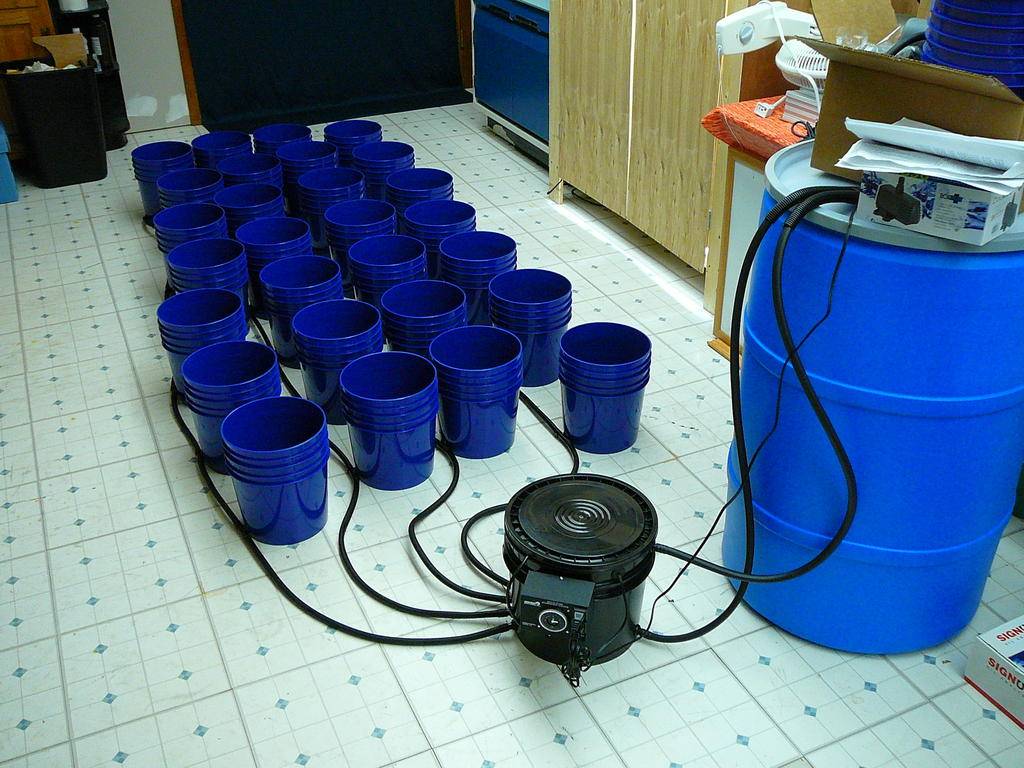
Here's a unnecessary preview of my next grow-
I pulled out my multi-flow bucket system. I've had it for a while, but never used it yet. My next run, Pushing Limits #2, I think I will use it. Looks easy and productive. I've set it up to work out the bugs and get a feel for it. (not to mention, re-engineer it). You know, testing the waters! "if you fail to plan; you plan to fail."
It's going to be 28 buckets, under 3 x 600's, spanning a small (relative to other bucket growers) 4x8 canopy space- I've always been a fan of medium sized plants;not SOG small, not Tree sized either- just right!
I'm going to add devices to the system that will make it labor free and easy to deal with (except cleaning the hydroton). Being a bucket system virgin, this ought to be fun! Be sure to join along. looks like I'll begin the first week of November.
A preview for my next grow- Pushing limits #2
Here's a unnecessary preview of my next grow-
I pulled out my multi-flow bucket system. I've had it for a while, but never used it yet. My next run, Pushing Limits #2, I think I will use it. Looks easy and productive. I've set it up to work out the bugs and get a feel for it. (not to mention, re-engineer it). You know, testing the waters! "if you fail to plan; you plan to fail."
It's going to be 28 buckets, under 3 x 600's, spanning a small (relative to other bucket growers) 4x8 canopy space- I've always been a fan of medium sized plants;not SOG small, not Tree sized either- just right!
I'm going to add devices to the system that will make it labor free and easy to deal with (except cleaning the hydroton). Being a bucket system virgin, this ought to be fun! Be sure to join along. looks like I'll begin the first week of November.
S
Silky Johnson
That setup is the reason why Im switching over to coco. I cant wait to see what you can do with it bro. Are you going to set them on top something to help them all drain. I had a problem with water sitting in the bottoms of the buckets which cause root rot. If you can dial that system in I heard good results. Are those the 2gal buckets? Good Luck broskee
Heya hope all is well in the grow. I was wondering if you ever considered organic soil either? I'm into the notion of putting all of the things the plant and soil needs into the mix from the get go and all you have to do is water til you chop. It doesn't get much easier and the nugs come out superior in my opinion. I used to use grow big and the fox farm line of liquid nutes now full organic is easier cheaper and way tasty!

pushlimits
Member
Hey guys! good to hear from ya.
Silky- I've had this bucket system for a little over a year, and haven't used it. So suffice to say; I've been doing some research since. Remember- I'm a engineer, not a gardener, so this system is right up my alley! So, here's a short synopsis of what I've gathered.
My buddy just harvested a crop from his bucket grow. He yielded roughly 3.7 lbs with 2000 Watts. Not to mention; he was running a sativa dominant strain, and this was his third ever Grow!! (I was green with envy, asshole! ha ha). From the various information I've gathered, and studying my buddies garden- I've written out a problem/solution list. Not to give away too much information, I will list some problems I can see with the system:
Poof- I've actually done the 100%, diehard, Organic methods before. I'm a big fan, the bud it produced was fantastic. I started out with fox farm, light warrior, and perlite. I feed with teas I brewed myself. one for veg, early flowering and late flowering. I got the recipes from "The Rev" in skunk magazine. But to be honest it's just not my cup of tea! (no pun intended) I have a few problems with it, Here's why:
When you get through a good amount of grows, take the Pepsi challenge. When I did, hydro came out on top. I've been there and wasn't that impressed. One thing I can say is, it was extremely simple throughout the grow. Less maintenance and less things to go wrong; being buffered and all. For the most part, a very stress free method.
Silky- I've had this bucket system for a little over a year, and haven't used it. So suffice to say; I've been doing some research since
. Remember- I'm a engineer, not a gardener, so this system is right up my alley! So, here's a short synopsis of what I've gathered.My buddy just harvested a crop from his bucket grow. He yielded roughly 3.7 lbs with 2000 Watts. Not to mention; he was running a sativa dominant strain, and this was his third ever Grow!! (I was green with envy, asshole! ha ha). From the various information I've gathered, and studying my buddies garden- I've written out a problem/solution list. Not to give away too much information, I will list some problems I can see with the system:
- standing water in bottom of containers
- water temperature rising too high
- flooding form faulty switches, relays, Ect.
- rez changes pain in the ass (problem for me at least)
- leaks (obviously)
- uneven water distribution ( buckets further from controller)
- unstable roots form plants being top heavy
- plants too far apart, (I'm a firm believer that plant canopys should not exceed the width of the medium, regardless of method used. yields DOUBLE for me when I practice this)
Poof- I've actually done the 100%, diehard, Organic methods before. I'm a big fan, the bud it produced was fantastic. I started out with fox farm, light warrior, and perlite. I feed with teas I brewed myself. one for veg, early flowering and late flowering. I got the recipes from "The Rev" in skunk magazine. But to be honest it's just not my cup of tea! (no pun intended) I have a few problems with it, Here's why:
- I'm an engineer, not a gardener. Personally, synthetics suit me better. (I can't say this enough, I really don't have a green thumb)
- I want precision, and I want it right away. I like to control as many variables as possible, not feed little microbes and pray that they do the work for me.
- Organic did taste better, but not by much. Although I tasted a slight difference, no one else who tried it did.
- I yield 2-3x as much with hydro....
- It's easier ( mixing a ton of organic soil was a bitch), and in some cases cheaper.
- I'm exposed to chemicals much worse then the ones in mineral salts. Fertilizers in weed should be the least of my worries. and I question if it's really dangerous at all.
- I'm no plant physiologist. I think the research and development that professionals put into bottled nutrients, is better then any of the raw materials (guano, castings) I would haphazardly put together for plant growth. My degree doesn't say- "biochemistry, P.H.D." but some people at botainicare's do.
When you get through a good amount of grows, take the Pepsi challenge. When I did, hydro came out on top. I've been there and wasn't that impressed. One thing I can say is, it was extremely simple throughout the grow. Less maintenance and less things to go wrong; being buffered and all. For the most part, a very stress free method.

