This is a documentation of my automated watering system for a 6-6 plant, in coco, home grow, using relatively high volume pumps and second resolution timers. Blumats seem to be another popular option for automatic watering but my veg shelf is 4.5’ above ground and above my reservoir bucket, and I did not think a passive Blumat type system would handle that height difference. The fertilizer mixing is not automated in my design. I have looked at Dosatron injectors but even the smallest models I have found are expensive, and meant for larger operations. So I premix the water with powder or liquid fertilizers and correct the PH, and use the timer activated watering system described below.
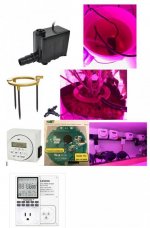
Here are the key components:
- An oversized submersible pump, so the pressure in the watering hose network is elevated, and approximately same at each plant outlet. I use the Ecoplus 727810; one in the veg and one in the flower watering bucket.
I use Halo rings in the larger 2-5 gallon pots and ¼” hose and “T” splitters with small plants in cups to 2 gallon pots. These create sufficient back pressure so the water pressure is very similar at each plant, and therefore the flow rate is also uniform from plant to plant.
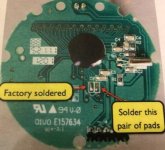
- Modified Hydrofarm 7 Day Dual Outlet Digital Timer to activate 1 second resolution timing control. This is important. These timers are inexpensive and I have found them to be reliable, but they are sold configured at only minute resolution in the programmable mode. Activating the second resolution is easy: unscrew the four screws in the back. Pop off the front perimeter cover to access the two (or four) smaller screws next to the front display face. Unscrew those and expose the green circuit board. In the middle there are two jumper pads. The one on the left has a jumper installed, while the one on the right is open. A jumper has to be soldered in that right jumper pad-pair. This turns the “ON/AUTO/OFF” button into the second resolution adjust button during programming. Voila, you now have an inexpensive 1 second resolution timer to control your high volume pump. A few years back 1 second resolution timers were $150+, but now I found one for around $50, so this may be an easier option for most.
With the Ecoplus 727810, I water 6 plants four times a day for 6-12 sec - depending on plan size, humidity, outlet type at the plants, etc… I use these 1 second resolution timers only with the pumps. The original configuration of minute resolution is perfect with lights and the aquarium air bubblers I use to aerate and mix the water buckets starting a few minutes before the pumps come on.
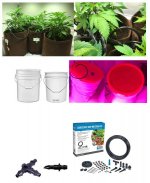
- I use 6 gallon buckets with the plumps and a standard 5 gallon buckets to mix the nutes and fill the 6 gallon buckets with. This is a small convenience to easily and quickly measure out 5 gallon portions of whatever per gallon recipe you are using. If the bucket and the plant tray are at the same level, a siphon break has to be installed on the line (recirculate back in the bucket with a ¼” hose) to make sure you do not siphon out all the water during the first watering!!!
If I have to go away for weeks (3 weeks have been the most) I use larger plastic bins (up to 50 gallon). My veg area is a 2’x4’ Botanicare flood tray on a 4.5’ above ground shelf (behind a darkroom curtain, below the shelf is the drying area) with a drain hose that can drip into a toilet (on the other side of the grow room closet). The flower area is a 4’x4’ Botanicare tray on the ground with a small automatic sump pump.
- The Hydrofarm ½“ black hose is excellent, but order with it plenty of the matching Hydrofarm couplers, T-s, and a few termination plugs, because the Home Depot or Lows sold ½“ adapters do not fit very well and more expensive. With smaller plants I use 1/4" hoses and couplings, T-s and stakes from the DIG system. An end terminated Hydrofarm 1/2" diameter black hose is the main line, with 1/4" hoses tapped off to each plant. No need for a siphon release in the veg bucket because those plants are well above the water surface in the bucket.
Here are the key components:
- An oversized submersible pump, so the pressure in the watering hose network is elevated, and approximately same at each plant outlet. I use the Ecoplus 727810; one in the veg and one in the flower watering bucket.
I use Halo rings in the larger 2-5 gallon pots and ¼” hose and “T” splitters with small plants in cups to 2 gallon pots. These create sufficient back pressure so the water pressure is very similar at each plant, and therefore the flow rate is also uniform from plant to plant.
- Modified Hydrofarm 7 Day Dual Outlet Digital Timer to activate 1 second resolution timing control. This is important. These timers are inexpensive and I have found them to be reliable, but they are sold configured at only minute resolution in the programmable mode. Activating the second resolution is easy: unscrew the four screws in the back. Pop off the front perimeter cover to access the two (or four) smaller screws next to the front display face. Unscrew those and expose the green circuit board. In the middle there are two jumper pads. The one on the left has a jumper installed, while the one on the right is open. A jumper has to be soldered in that right jumper pad-pair. This turns the “ON/AUTO/OFF” button into the second resolution adjust button during programming. Voila, you now have an inexpensive 1 second resolution timer to control your high volume pump. A few years back 1 second resolution timers were $150+, but now I found one for around $50, so this may be an easier option for most.
With the Ecoplus 727810, I water 6 plants four times a day for 6-12 sec - depending on plan size, humidity, outlet type at the plants, etc… I use these 1 second resolution timers only with the pumps. The original configuration of minute resolution is perfect with lights and the aquarium air bubblers I use to aerate and mix the water buckets starting a few minutes before the pumps come on.
- I use 6 gallon buckets with the plumps and a standard 5 gallon buckets to mix the nutes and fill the 6 gallon buckets with. This is a small convenience to easily and quickly measure out 5 gallon portions of whatever per gallon recipe you are using. If the bucket and the plant tray are at the same level, a siphon break has to be installed on the line (recirculate back in the bucket with a ¼” hose) to make sure you do not siphon out all the water during the first watering!!!
If I have to go away for weeks (3 weeks have been the most) I use larger plastic bins (up to 50 gallon). My veg area is a 2’x4’ Botanicare flood tray on a 4.5’ above ground shelf (behind a darkroom curtain, below the shelf is the drying area) with a drain hose that can drip into a toilet (on the other side of the grow room closet). The flower area is a 4’x4’ Botanicare tray on the ground with a small automatic sump pump.
- The Hydrofarm ½“ black hose is excellent, but order with it plenty of the matching Hydrofarm couplers, T-s, and a few termination plugs, because the Home Depot or Lows sold ½“ adapters do not fit very well and more expensive. With smaller plants I use 1/4" hoses and couplings, T-s and stakes from the DIG system. An end terminated Hydrofarm 1/2" diameter black hose is the main line, with 1/4" hoses tapped off to each plant. No need for a siphon release in the veg bucket because those plants are well above the water surface in the bucket.