What's new
  • Happy Birthday ICMag! Been 20 years since Gypsy Nirvana created the forum! We are celebrating with a 4/20 Giveaway and by launching a new Patreon tier called "420club". You can read more here.
  • Important notice: ICMag's T.O.U. has been updated. Please review it here. For your convenience, it is also available in the main forum menu, under 'Quick Links"!

Super easy DTW table's

issack

Active member
Veteran
I wanted to share what I did for this new room I just fired up.
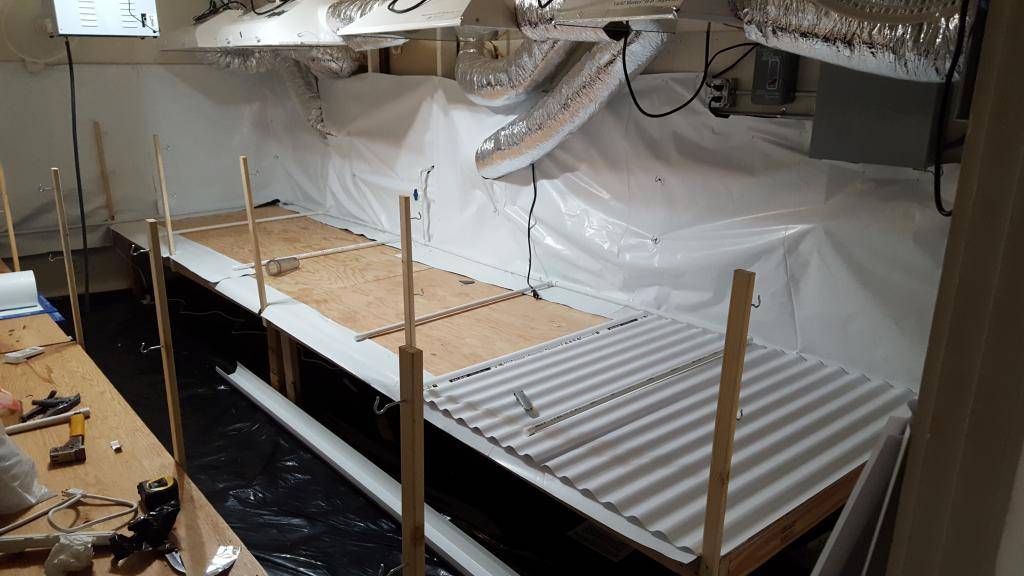
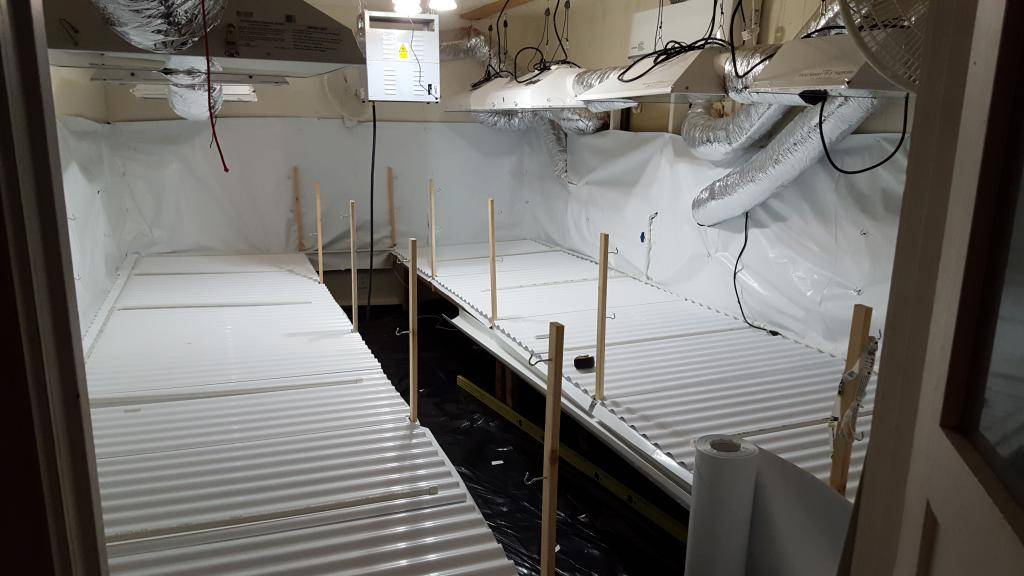
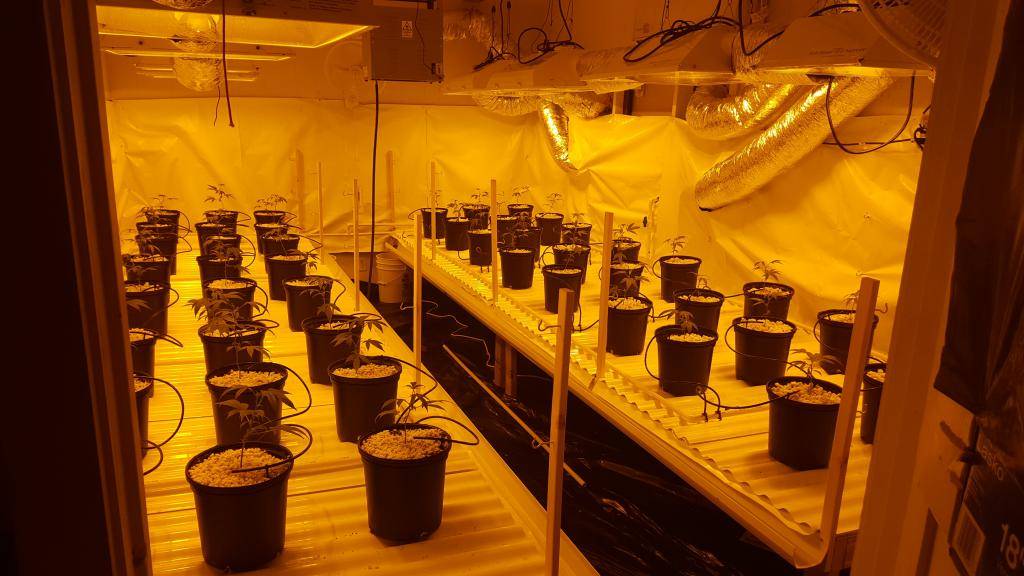
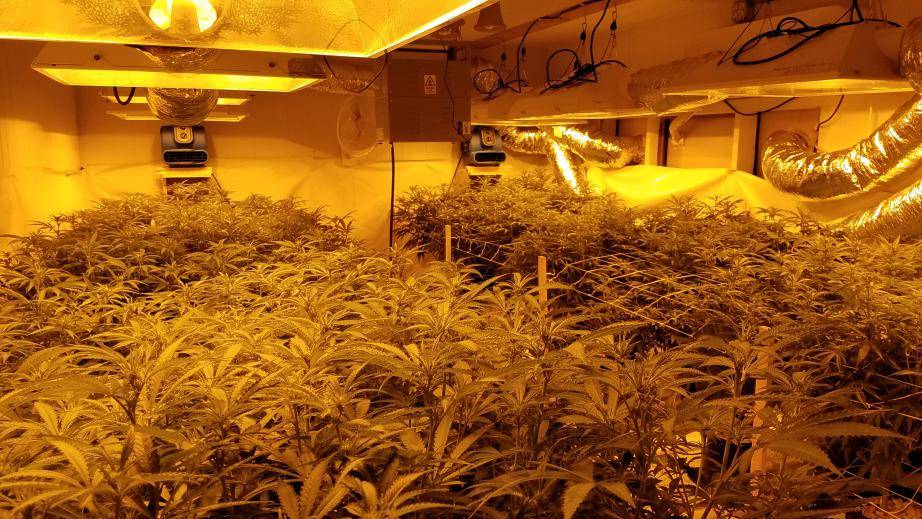
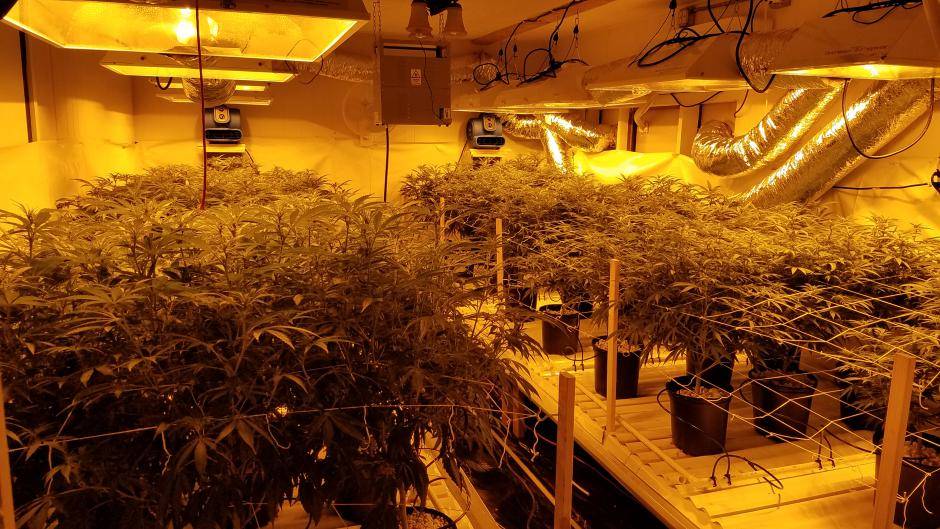
Build a table.. any size. I used 3/8" plywood and 2x4s. Make it have a slope. I did 3/4" slope for this. Go get some white plastic corrugated roofing and plastic rain gutters. Cut them accordingly to where the roofing extends over the gutter a bit. I tacked down some panda film about 10in back on the table just in case any water wanted to creep back. ( it didn't creep at all. ) slope your gutters to a 5 gallon bucket, or if u have to make a low table then any kind of low boy tote with do. And there ya go. DTW table super cheap and simple. I built these in like 2 hours and planted the next day. Works perfectly. I extended the panda from the walls to the table so when I spray it just runs off in the gutters. Easy to break down. And the roofing is easy to clean up between grows.
Hope this helps someone in future projects.
Aloha.!
picture.php

picture.php

picture.php

picture.php

picture.php
 
Looks good! I also made my own tables with the corrugated plastic, except mine are running length wise instead of to the side like yours.

I want to add some sort of gutter system to drain into a single res like you've done.

The problem is I also want to add wheels to my tables so I can slide them side to side.. Still trying to figure out a way to accomplish both.
 

issack

Active member
Veteran
Cool man. ! Hey you could get some coasters and put them on each leg, and you're table will roll. They have a lock too so it would be stable till u wanted to roll it . Could even rig up the bucket to roll with the table.
 
Yes casters on each leg is what i was thinking as well. My goal is to eliminate walkways and have one big canopy.

I had an idea today to attach all the runoff bins with bulkhead fittings and PVC pipe and have a single pump w/ float switch sitting in one of the bins. This solves the auto-drain problem.

Sorry i'm brainstorming in your thread but it helps to bounce ideas off someone.

Your room looks nicely packed with no wasted space. Nice job.
 

queequeg152

Active member
Veteran
nice. very efficient design.

i like your two blowers in the back there... they look like those flood remediation blowers. what cfms do they move?
 

Drop That Sound

Well-known member
I've been scoping out a bunch of free pickup truck bed liners lately, trying to convince a buddy to pick one up and build a room around it as the raised floor, at a slant with a gutter drain setup like yours at the bottom.

bedlinertinaalbercapick-up-todos-los-modelos-D_NQ_NP_8550-MLM20006036154_112013-F.jpg


What you guys think? I suppose you could cut the walls off and turn them into trays, as long as you need, or even just use the flat ribbed part. I like free materials, and always loved the corrugated roofing idea, looks great!

I already have one from an old chev and was gonna use it on a mini 4x8 green hoop house trailer, but an indoor DTW bed liner setup would be pretty cool too I think.
 

issack

Active member
Veteran
Yes casters on each leg is what i was thinking as well. My goal is to eliminate walkways and have one big canopy.

I had an idea today to attach all the runoff bins with bulkhead fittings and PVC pipe and have a single pump w/ float switch sitting in one of the bins. This solves the auto-drain problem.

Sorry i'm brainstorming in your thread but it helps to bounce ideas off someone.

Your room looks nicely packed with no wasted space. Nice job.

James you can brainstorm all you want man. This thread is to help. :)
I use a float switch on my R/O storage water. I use 2 50 gallon garbage cans and I have a bulkhead connected to both. So when the first one fills up it starts to drain into the other one. Then when the other is full I have the float a bit above the bulkhead so it shuts off the incoming water. All my water storage and rez tank is outside and pumps into the room. I have a chiller on my 50 gal rez set at 64. So far this room is drinking 30 gallons a day. So I'm a rez cleaning watering fool. ! It's kinda much cause I tried to put a 100 gallon rez in and it ended up creating a siphon cause my water line was above the plants. So I had to go back to my wimpy 50 gallon one. Everyday I'm on water nutrients patrol. Haha.! Oh well. Hoping for a good harvest on this one. Pineapple chunk is the strain.
Here is my water shed.

picture.php

picture.php

picture.php
 

issack

Active member
Veteran
nice. very efficient design.

i like your two blowers in the back there... they look like those flood remediation blowers. what cfms do they move?

Got these blowers at Lowe's. They are 860cfm and they rock house. !! I have them on medium setting they move so much air. And produce no heat. Super light too. I'm a big fan of blowers running down my light's to move some of that hot air. I use these always on any room I build. They kick on when light's come on.
 

issack

Active member
Veteran
I've been scoping out a bunch of free pickup truck bed liners lately, trying to convince a buddy to pick one up and build a room around it as the raised floor, at a slant with a gutter drain setup like yours at the bottom.

View Image

What you guys think? I suppose you could cut the walls off and turn them into trays, as long as you need, or even just use the flat ribbed part. I like free materials, and always loved the corrugated roofing idea, looks great!

I already have one from an old chev and was gonna use it on a mini 4x8 green hoop house trailer, but an indoor DTW bed liner setup would be pretty cool too I think.

That would definitely work. But honestly. The roofing would be easier to set up. Also the width is so wide on that. I strip my branches when I flip 12/12 so I get more light to bud sites and more energy to the end of branches and not have a rats nest of air buds. and it's a royal pain in the ass on a 4 food deep table. Takes me hours . Unless you put it in the center of the room and be able to walk around it. Still u would have to build a table to hold it. Then u would have to cut it.. that would be a pain too. It could for sure work. But I think roofing is more simple. I made these in couple hours and turned on the room the next day.
 

Jackstraw215

New member
I'm looking at building these very soon but have a few questions. Do you add 2x4's along the plywood to make it more rigid or do you just have the legs on each corner with no support in the middle of the plywood? also how are the legs attached? finally, do you remember how much material it took to make each table as in how many 2x4's and how much plastic?? I would be running a pretty much identical setup to yours as far as amount of tables and lights. Thanks a ton, these looks awesome!! looks like i could outfit my whole room for around $200 from what ive come up with based upon home depot prices. what kind of saw for cutting the plastic, circular?? I will need to get one of those but i need one in my arsenal anyways.
 

issack

Active member
Veteran
Yes I added 2xs to make it sturdy. I just snapped a shot for u. Legs just slap in the corner and screw on. Easy and fast.
Harvesting as we speak.! I think I used 6 12foot sheets of roofing
 

Attachments

  • 20170506_123324.jpg
    20170506_123324.jpg
    38 KB · Views: 28
  • 20170504_172923.jpg
    20170504_172923.jpg
    99 KB · Views: 29
  • 20170503_180426.jpg
    20170503_180426.jpg
    94.1 KB · Views: 17
  • 20170430_212340.jpg
    20170430_212340.jpg
    99.3 KB · Views: 27

Jackstraw215

New member
sweet jesus you crushed it man!! I appreciate you takin pics and replying to me. So in that first pic, is that 2 tables touching or do you have 2 legs like that right next to eachother? It's hard to tell kind of sorry, I'm not very experienced in fabrication, I know I could do these tables and probably even more complex projects with plans and whatnot. Looks like about a 2 foot spacing for the supports goings down the width of the plywood correct? :dunno: :tiphat: thanks man
 

bsgospel

Bat Macumba
To add to the roofing discussion- I've seen tables like this and some people insist on putting screws through the middle to keep it in place or screws along the perimeter. This usually causes a spider-web of cracks to appear and all the run-off to fall onto the wood and not into the gutters. Then- to fix that, they'll spray flex seal or whatever into the cracks/over the screws which never really solves anything. Any other way to affix the roofing without causing dips or cracks is infinitely better than applying patch after patch, band-aid after band-aid until you have to throw the whole panel out. Like Isacck said, this is supposed to be easy. In the first pics of this post- he's literally just over lapping a couple slats together and nothing else. Perfect!

And Issack- fantastic results. Gotta love the weight even more when it comes out of a clean/organized room
 

Jackstraw215

New member
To add to the roofing discussion- I've seen tables like this and some people insist on putting screws through the middle to keep it in place or screws along the perimeter. This usually causes a spider-web of cracks to appear and all the run-off to fall onto the wood and not into the gutters. Then- to fix that, they'll spray flex seal or whatever into the cracks/over the screws which never really solves anything. Any other way to affix the roofing without causing dips or cracks is infinitely better than applying patch after patch, band-aid after band-aid until you have to throw the whole panel out. Like Isacck said, this is supposed to be easy. In the first pics of this post- he's literally just over lappintheg a couple slats together and nothing else. Perfect!

And Issack- fantastic results. Gotta love the weight even more when it comes out of a clean/organized room

so you are saying that the panels are attached with nothing??
 

issack

Active member
Veteran
Yes it's 2 table's butted together. Yes 2 foot spacing for 2x4s running down the width. 4 legs each table. 3/8 plywood.
No screws are needed at all for the panels. Just over lap and done. No leaked at all. Screwing these together is stupid in my opinion. You would just create another issue u have to deal for leaks. It flows in the gutters fine.
Hey no problem man. Glad this helps you in future plans.!!
 

issack

Active member
Veteran
To add to the roofing discussion- I've seen tables like this and some people insist on putting screws through the middle to keep it in place or screws along the perimeter. This usually causes a spider-web of cracks to appear and all the run-off to fall onto the wood and not into the gutters. Then- to fix that, they'll spray flex seal or whatever into the cracks/over the screws which never really solves anything. Any other way to affix the roofing without causing dips or cracks is infinitely better than applying patch after patch, band-aid after band-aid until you have to throw the whole panel out. Like Isacck said, this is supposed to be easy. In the first pics of this post- he's literally just over lapping a couple slats together and nothing else. Perfect!

And Issack- fantastic results. Gotta love the weight even more when it comes out of a clean/organized room

Thanks man.! My first run with this room. Next one will be better. I had some hight issues with the 1000s. I'm leaving them all the way up and lowering my tables about 6 inches. Got some mean light burn on some of them . Still hoping I pulled 12 elbows or more. We shall see.
 

Jackstraw215

New member
Shiiiit! Setting up a 3kw with these tables in my room that will soon be my 6kw, I have a 5kw goin in another room that is a bit smaller. The 5k is my first real grow besides the 2k i pulled down a couple months ago. I'll be happy with .5gpw with this organic soil/ nectar for the gods run but my next 3k is gonna be soil fed Veg+ bloom, would do coco but clones are in soil already. then switch that room to all coco. The 5k room will be a little trickier to outfit but we will see, thinking switching it to 4k DE's to make configuration easier. Whenever I talk to someone and they try to give me advice I always think "but do you pull 1gpw??" lots of people have"tips" but dont really know shit about growing. I think I know more about certain aspect s of growing than some old fukers that have grown for years because I've been on here and other sites and read books but they have not haha.Looks like you're one of the people I WILL listen to about growing because clearly you've got the shit down. long rant, off topic, mas dabs por favor cheers :smokeit:
 

issack

Active member
Veteran
You can plug those clones that are in soil right in the coco. I did that with this last run I posted. Broke off a lot of the soil and planted them right in.
Strains bro. Having big fat harvests are all in the strains. And of course having your room and feeds dialed in.
This was my first time doing the " coco trees" method. Low EC and every 2 hours feed with slight run off once roots are established and they are drinking. I'll never go back to anything else now that I have tried it. It's amazing. I never went over 900ppm. Kept it simple. This was done with Floranova and I added OG biowar beneficial microbe tea's with every feed. Also foliar spray every week. No root afids ever. And I even beat russet mites at the beginning of this grow.. can say enough good shit about that product.
The more and more I become more simple with my grows, the more weight I'm getting. I've tried a lot of different nute lines. And I just keep going back to Floranova.. if it's not broke don't fix it. Simple strategies and you will prevail. If one over thinks and keeps adding what they think is the miracle juice then things start going down hill IMO.
Simple feeds. Low EC. Every 2 hours. Climate temps and humidity at light's out dialed in. And a GOOD STRAIN.!! Is the winning factor.
 
Top