thanks! first i'll try to answer the easy parts.
the reflector glass is kept about 24" above the closest plant material. this is producing slightly above 1200 umol in the centers as an average.
running the ballast at 1000 watts right now but thinking about stepping them up to the super turbo nuclear setting and resetting height for about 1400 umols.
you know i have one reservoir running both veg and flower sites. i just changed out the solution at 130 days.
i re-filled with an approx 900 ppm or 1.8 ec solution ph'ed initially to 5.8 with 85% phosphoric acid.
the recirculating part first reservoir is running around 920 ppm with a ph of 6.1.
however, random individual plant pump reservoirs in both flower and veg are running about 1030 ppm so something is happening during the trip through the 7 reservoirs to cause an increase in ppm? or perhaps the entire body of solution has not blended completely yet.
we are tracking the solution daily looking for curves and tendencies.
but all plants in both veg and bloom are looking good. vegging plants growing at high speed as in inches per day. flowering plants producing big fat trichome laden buds. all on one solution.
i won't be able to reach a balance of feed concentration and plant/room demands until i get all sites filled but it looks like i'm getting close.
on the subject of feed ratios i'll get back to you later! i've got to go to work now.[/quote
****************************************************
I've been running jacks+CN at 600ppms (1:.64) since your first PPK thread started. My first PPK run was in 5gallon buckets stacked w 1.5" tail-piece as the wick.. harvests were big, averaging 6-8Zs / plant with 600w. but yield has decreased as my system has been updated over the years.. different strains and tubing adjustments are leading me to believe (and you will tell me if I'm way off base) that the lower PPMs realized in each PPK rez is being caused by larger tubing connecting each piece of the system passing more lower PPM juice thru to each component. it now looks more like this: 600>650>700>850
In the beginning, you (and I) used tire valves, 1/4" hose and allot of goop. That has grown to garden hose sized 'tubing' connecting the system parts.. I used to get PPM readings like this w 1/4" tubing then: 600ppms in volume rez, 700ppms in the control rez, pump rez was 850ish ppms and individual PPK rezs' were in the 1000+PPM arena.. possible that the larger hose passes more 600ppm juice than the 1/4" hose and that larger volume keeps the PPMs more diluted thru out the system.. eg. you are now putting in higher, 900ppms, initially to gain the 1000+ppms in the ppk rez..
hoping you can follow that gibberish but it boils down to this... I'm going back to smaller hose in my smaller system and sticking to 600PPMs initially.
your larger garden hose thru smaller hole, eliminating the tire valve/electrical connections (yeah!) should also work for 3/8" tubing thru a 11/32" hole and should be just as water tight...
maybe? the main reason i'm feeding at this level is that's what it takes to stay up with these lights. if you don't feed the hell out of them they start showing deficiency displays.

-
Happy Birthday ICMag! Been 20 years since Gypsy Nirvana created the forum! We are celebrating with a 4/20 Giveaway and by launching a new Patreon tier called "420club". You can read more here.
-
Important notice: ICMag's T.O.U. has been updated. Please review it here. For your convenience, it is also available in the main forum menu, under 'Quick Links"!
You are using an out of date browser. It may not display this or other websites correctly.
You should upgrade or use an alternative browser.
You should upgrade or use an alternative browser.
Something wicked this way comes
- Thread starter delta9nxs
- Start date
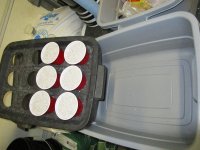
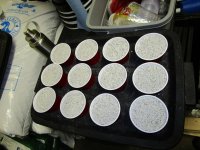
several people have asked about the cloner i use. it's nothing but a 10 gal rubbermaid tub. the tub itself is untouched. the lid has 12 3" holes cut in it.
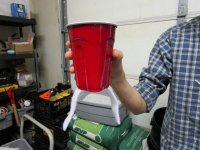
i use these square bottom solo cups because it's easy to cut two corners off with a pair of scissors.
the material is a 1" x 8" piece of "thermolam plus" fabric from walmart and places that sell fabrics. a few dollars per yard. it is used as an insulating layer for quilt making and is 100% polyester which makes for fine wicking material.
thread it through both holes so that equal lengths hang out.
the tub has a molded line in it about halfway up. this is your fill level line. i use a 350 ppm jack's calcinit solution initially ph'd to 5.8 but it will rise during the rooting process and i let it.
i use the regular medium grade perlite and rinse it well. also, after loading the cups i will pour nutrient solution through them to waste one time before putting the cups in the container.
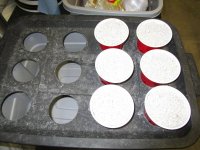
make a hole in the perlite all the way down to the bottom. if it is centered it will hit the cloth wick.
cut the clones long enough to reach the bottom and cut them off square, not at an angle. the reason for this is that it puts the end of the cutting in full contact with the fabric. guaranteed pathway for water.
i scarify the last 1-1.5" of the cutting before packing the perlite snugly around the stem. i don't usually use a rooting hormone.
i clone out in the open in my main veg room with no domes but the room is 82-84f and 85% rh all the time.
you want the solo cups resting lightly in the hole not shoved down as far as possible. this is to maintain the small air gap below the cups.
i normally don't refill as the solution level drops as the cuttings are in the containers less than 14 days.
at 10 days roots will begin showing out of the cups along the wick. i let them get grow out a few days and then cut the roots and wick material outside of the cup off at transplant. leaving a thick, bushy, ball of roots.
with this technique there is a very low failure rate and nothing to do but wait after loading the clones.
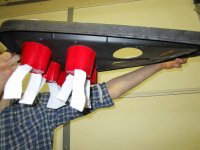
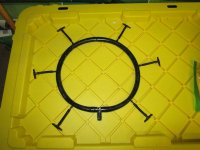
then on to the halo. this is for the 7 gal tubs. if you can see the holes there are 9 1/8" holes directed straight down plus the 6 additional lines with t's creating 12 more outlets we installed to increase dispersion.
it also increased total flow so we dialed back the duration on the timers so that the same volume is delivered.
i use these square bottom solo cups because it's easy to cut two corners off with a pair of scissors.
the material is a 1" x 8" piece of "thermolam plus" fabric from walmart and places that sell fabrics. a few dollars per yard. it is used as an insulating layer for quilt making and is 100% polyester which makes for fine wicking material.
thread it through both holes so that equal lengths hang out.
the tub has a molded line in it about halfway up. this is your fill level line. i use a 350 ppm jack's calcinit solution initially ph'd to 5.8 but it will rise during the rooting process and i let it.
i use the regular medium grade perlite and rinse it well. also, after loading the cups i will pour nutrient solution through them to waste one time before putting the cups in the container.
make a hole in the perlite all the way down to the bottom. if it is centered it will hit the cloth wick.
cut the clones long enough to reach the bottom and cut them off square, not at an angle. the reason for this is that it puts the end of the cutting in full contact with the fabric. guaranteed pathway for water.
i scarify the last 1-1.5" of the cutting before packing the perlite snugly around the stem. i don't usually use a rooting hormone.
i clone out in the open in my main veg room with no domes but the room is 82-84f and 85% rh all the time.
you want the solo cups resting lightly in the hole not shoved down as far as possible. this is to maintain the small air gap below the cups.
i normally don't refill as the solution level drops as the cuttings are in the containers less than 14 days.
at 10 days roots will begin showing out of the cups along the wick. i let them get grow out a few days and then cut the roots and wick material outside of the cup off at transplant. leaving a thick, bushy, ball of roots.
with this technique there is a very low failure rate and nothing to do but wait after loading the clones.
then on to the halo. this is for the 7 gal tubs. if you can see the holes there are 9 1/8" holes directed straight down plus the 6 additional lines with t's creating 12 more outlets we installed to increase dispersion.
it also increased total flow so we dialed back the duration on the timers so that the same volume is delivered.
Attachments
maybe? the main reason i'm feeding at this level is that's what it takes to stay up with these lights. if you don't feed the hell out of them they start showing deficiency displays.
I don't see why you need 3"PVC for establishing a PPK site...But when I did UCurrent with 3" I used a chop saw with a disk blade and a saws-all for all other cuts.What's the easiest way to cut sections of 3" PVC? I went to a couple of home depots and they won't cut them for me.
What's the easiest way to cut sections of 3" PVC? I went to a couple of home depots and they won't cut them for me.
i use a chop saw with a wood blade. we call it the "Death Saw" because the blade guard disappeared a long time ago and both the safety interlock switch and the on/off switch are broken and the saw motor is hot wired to the plug so we have to plug it in to turn it on.
$115!
 http://www.harborfreight.com/catalo...%3Dsaw&RequestData=CA_AttributeSelected&q=saw
hands and fingers are important... I'm a jerry rigger but don't know bout hardwiring a chop saw w no guard brother.. but ua big boy..
hands and fingers are important... I'm a jerry rigger but don't know bout hardwiring a chop saw w no guard brother.. but ua big boy..
$115! View Imagehttp://www.harborfreight.com/catalo...%3Dsaw&RequestData=CA_AttributeSelected&q=saw
hands and fingers are important... I'm a jerry rigger but don't know bout hardwiring a chop saw w no guard brother.. but ua big boy..
i got it from harbor freight! POS a few more cuts and then i can toss it.
My god D just add a toggle. 
https://www.delcity.net/store/Toggl...V_i5xV1Wt6hAKn46U3tZfgJpRIKaYBMg-EaApgm8P8HAQ
https://www.delcity.net/store/Toggl...V_i5xV1Wt6hAKn46U3tZfgJpRIKaYBMg-EaApgm8P8HAQ
")
My god D just add a toggle.
https://www.delcity.net/store/Toggl...V_i5xV1Wt6hAKn46U3tZfgJpRIKaYBMg-EaApgm8P8HAQ
you know how it is, ppk'ers like to live on the edge!
Hello Mr.D wondering if you could go into some detail about starting seeds, I know you use a style like the cloner, but how do you get moisture all the way up the solo cup with the wick at the bottom. Just trying to wrap my head around it
Thank you, awesome job.
howdy! again, nothing exotic! i like to soak them in a cup of water until they become negative and sink. stir them once in a while to dislodge any air bubbles.
generally 3-4 hrs and then into paper towels for a while. i use a dinner plate with 2 layers of paper towel down first, then the seeds spread out, then 2 more layers on top.
moist but not sopping wet.
put a piece of plastic wrap over the plate to prevent drying.
into a dark cabinet for 24 hrs. usually i have tails by then.
i use the same exact rig that i use for cloning except the cups are only half filled wih perlite so the when the seedlings emerge and stretch you can back fill around the stem for support.
i plant the tails down and the seed cap up about 1/4" under the surface of the perlite after making a hole deep enough for the tail.
i water the perlite before the seeds go in. once the cups are in the container and it is filled with solution they will not dry out because of the wicks.
Hey delta looks great.
I'm about to setup a ppk with perlite and coco. You said that works well at a 1 coco to 5 perlite mix. Still works good?
thank you!
it worked ok but now there are products that are already mixed to an acceptable air filled porosity.
i used tupur from royal gold.
the advantage is that it is ready to go right out of the bag. huge labor saver!
newguy41410
Member
Checking in to THANK YOU and show you what I've got going so far! Here's some pics i took last night
https://imgur.com/a/dyYXL
https://imgur.com/a/dyYXL
Last edited:
Checking in to THANK YOU and show you what I've got going so far! Here's some pics i took last night
https://imgur.com/a/dyYXL
looking good! nice and neat! thank you!
Hey d9, any reason why one wouldn't do individual ppks that aren't linked up together rather than daisy chaining multiple? Don't know if this would be advantageous or it's just the gin giving me strange ideas?
Hey d9, any reason why one wouldn't do individual ppks that aren't linked up together rather than daisy chaining multiple? Don't know if this would be advantageous or it's just the gin giving me strange ideas?
it's the gin! the biggest argument against running and recirculating each sites solution individually is that the concentration and ph will be different in every one of them.
just monitoring them could be very time consuming.
also, the larger the overall body of solution the slower chemical changes occur and the more time you have to observe and correct.
i can see a quick and dirty ppk drain to waste being very simple, cheap, and deadly reliable.
high plant count, dense canopy, large sog style in in 2 or 3.5 gal buckets.
water level in lower bucket controlled arbitrarily by an overflow hole drilled at 4".
top watered several times a day by a wand and pump or a gravity feed tank.
could be done with solenoid valves.
or a halo set-up but there you go with fixed plumbing again.
given just enough each time to create a slight overflow from the hole in the lower bucket.
put a large saucer under each one and with controlled watering most of the overflow should evaporate before the next time.

