What's new
  • Happy Birthday ICMag! Been 20 years since Gypsy Nirvana created the forum! We are celebrating with a 4/20 Giveaway and by launching a new Patreon tier called "420club". You can read more here.
  • Important notice: ICMag's T.O.U. has been updated. Please review it here. For your convenience, it is also available in the main forum menu, under 'Quick Links"!

ReikoX's Workshop 2018

ReikoX

Knight of the BlackSvn
(Continued...)

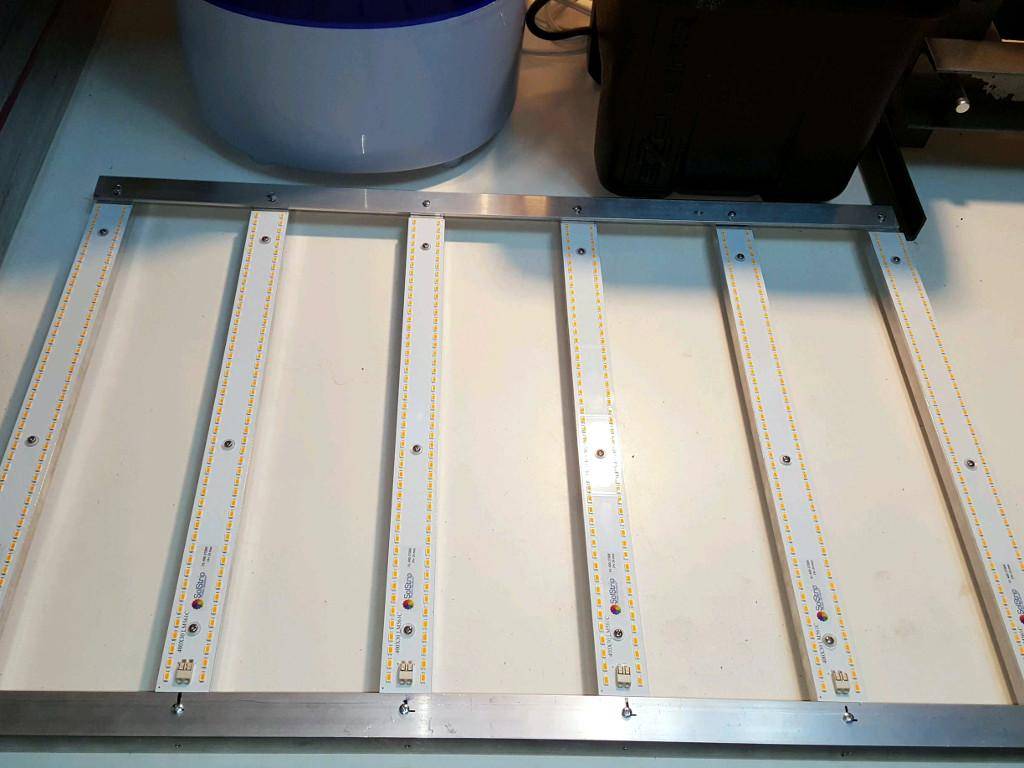
I cleaned each piece of aluminum with some alcohol to remove any oils or contaminants. Using the included hardware, each strip was screwed on to the heatsink with a nylon washer.
picture.php


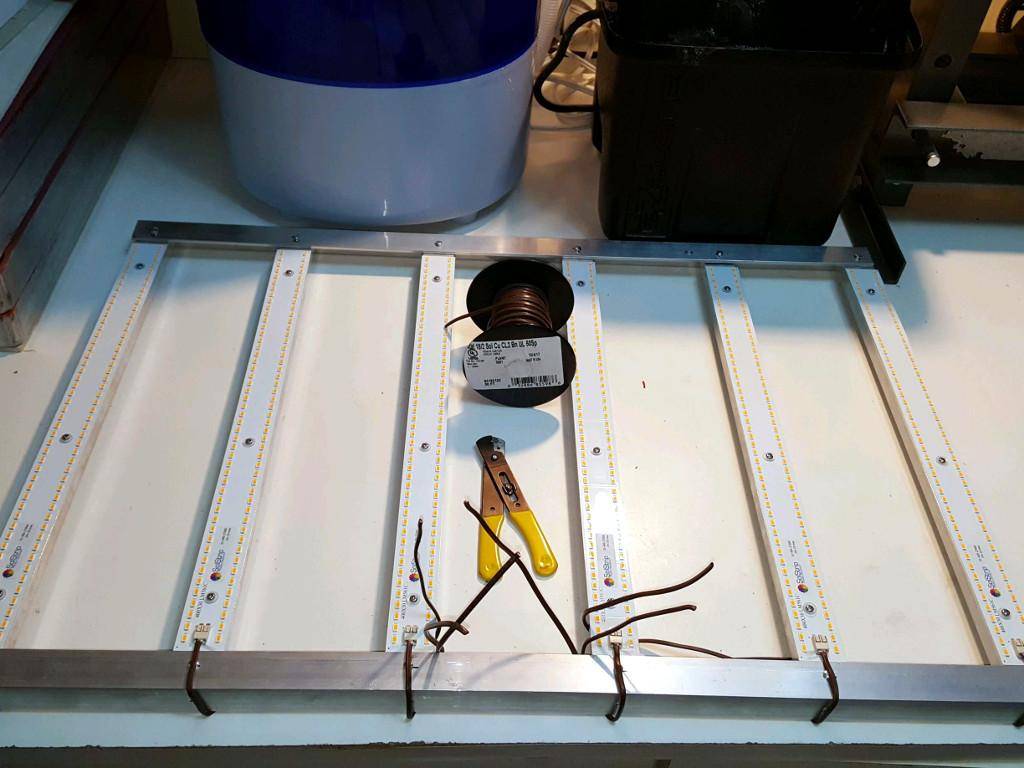
Next step was to wire up the SolStrips in parallel using 18/2 solid core wire. Three strips on each side are wired with a wago connector, then both sides connect to the driver with another wago connector.
picture.php


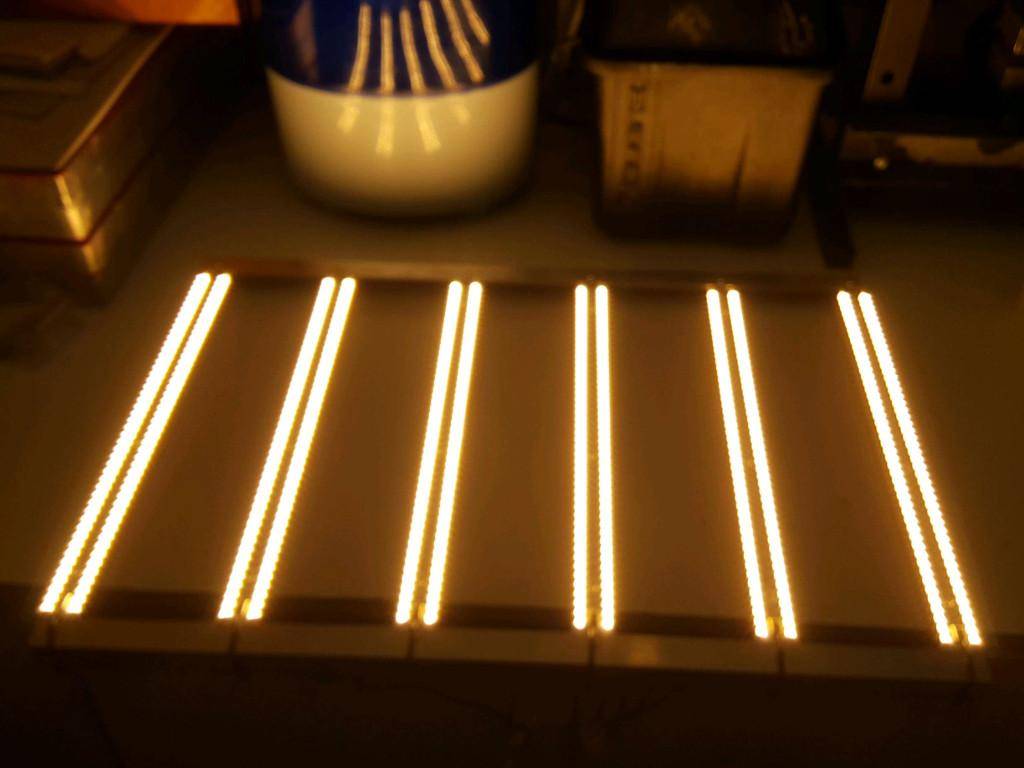
I hooked up the driver and all systems check out! Next step will be to solder the dimmer to the driver and drill a few holes to hang the light. I'm debating if I want to ditch the CMH and ballast and replace it with this (remote ballast), or just stick it in there like I did with the veg light. :thinking:
picture.php
 

ReikoX

Knight of the BlackSvn
The Blueberry in the 1x1x2 is still vegging slowly. The training has got me three good tops so far. There is no way this girl will be ready by 4/20 like I planned.
picture.php


The Grass Monkey have their second set of leaves coming in, so now is the time to take my leaf samples for the gender kit. This is different than the Phylos Biosciences test. That test had you take the cotyledon with a pair of tweezers, smash it in the collection packet, then remove the plant matter.

The Steep Hill kit said on the packaging not to mail outside of California or the test would be forfeit and the sample disposed of. Well, I called up my local Steep Hill lab and they assured me they will accept my package. They had done testing to determine that the THC in the samples was within legal limits. When I got home that afternoon I found my puppy chewing on the test package. Luckily the test itself was not damaged.

First I labeled the plant with the provided label.
picture.php


Then, using the collection envelope itself, the leaf tip was cut off and captured.
picture.php


This was then repeated for all the samples and they were placed in the collection folder (it's a bit chewed up). Note, the sample #4 (bottom right) sprouted with only one cotyledon.
picture.php


They got watered with a neem/kelp tea just like the rest of my garden. To make the tea, I put 1/2 cup of neem meal and 1/4 cup of kelp meal in a bag that worms came in. That is then soaked in five gallons of water for about 24 hours and then applied. The remaining kelp and neem were added to my worm bin.
 

ReikoX

Knight of the BlackSvn
Grass Monkey seedlings are happy being under the SolStrips. They got plain RO water today, just like the rest of my garden. I really don't like the Steep Hill GenKit labels, they get in the way and make it awkward to water. The Phylos ones came with normal plastic plant stakes.
picture.php


Just a random shot of the perpetual. Up front is the last run for Jilly Bean #4 at 8 weeks. She's not as good as the Jilly Bean #2 phenotype. Maybe a better yielder, but the effect and taste are better with the other. The mother has been culled. In the middle is the Zak Haze. The older and more mature this clone gets, the more she seems to express her NLD genetics. I'm tempted to get it tested again. When they first gave the clones, the tests were 21% THC and about 1% CBG. That CBG really is a mind eraser. Last batch seemed more psychoactive and less forgetful. The last time I got some from the dispensary it was tested at 25% THC (no mention of CBG). CBG is an intermediate that is usually transformed into THC or CBD by the plant. Finally int he back is Delicious Candy. This plant is on the chopping block so to speak. If she keeps doing as well as she is here, I will probably keep her around. The best freebie I've grown to date.
picture.php


I was at the dispensary the other day looking for some humidity packs. While I was there I there I decided to get some Zak Haze. It was tested at 25% THC. I told him I had some in flower and he was surprised. Apparently, only a few clones were given out because they counted against their plant count. As I was waiting for my order, I saw this Nectar Collector for $30 USD.
picture.php


It has a little bubbler, a mouthpiece, and two tips glass or titanium. The clip that holds the tip in place has a few legs on it so it doesn't roll around, and the bubbler holds just enough water so it is not poured out when laid down.
picture.php


This dab is for you!
picture.php
 

ReikoX

Knight of the BlackSvn
Grass Monkey seedlings are doing their thing. Last night they got fed TM-7 and a Yucca FPE, just like the rest of my garden. The TM-7 is has humic acids along with the 7 major trace minerals. The yucca FPE is mainly used for the saponins, as a wetting agent.
picture.php


The Blueberry isn't looking too great right now. I flipped her to 12/12 last night and gave her a good clover trimming. I wont be cloning this one, but may re-veg if she seems special.
picture.php
 

soil margin

Active member
Veteran
Man those seedlings look great, but yeah that blueberry needs some help. You got any idea what's causing the drooping?
 

thejact55

Active member
What breeder made the blueberry? Im runnin a pack of DJ blueberry, and they always looked like shit until they got fairly mature. Overwatered look when i watered em. Underwatered look when i didnt. Some yellow, twists and whatever. Got fristerating.
They pulled through it and blossomed into really nice plants.
 

ReikoX

Knight of the BlackSvn
What breeder made the blueberry? Im runnin a pack of DJ blueberry, and they always looked like shit until they got fairly mature. Overwatered look when i watered em. Underwatered look when i didnt. Some yellow, twists and whatever. Got fristerating.
They pulled through it and blossomed into really nice plants.
This one is from Dinafem.
 

ReikoX

Knight of the BlackSvn
I'm mixing up a couple of cubic feet of soil (15 gallons). This is a basic no-till recipe. First I got together my base mix: 5 gallons of hydrated sphangum peat moss, 5 gallons compost, and 5 gallons of aeration. The compost consists of 2 gallons of Malibu biodynamic compost and 3 gallons homemade vermicompost with worms. The aeration consists of 4 gallons scoria lava rock and 1 gallon of rice hulls.
picture.php


First, I dumped out the compost and mixed in my ammendments. I added 1 cup of kelp meal, 1 cup of neem meal, 1 cup of shrimp meal, and 2 cups malted barley powder (not shown). This was then mixed well.
picture.php


Next I add my minerals to the amended compost. I added 2 cups gypsum, 2 cups oyster shell flour, 2 cups glacial rock dust, 2 cups basalt, and 1 gallon (16 cups) of biochar. Again this was mixed well.
picture.php


Finally I added the hydrated sphangum peat moss and the aeration. This was all mixed well one final time.
picture.php


The soil was split evenly into four #5 fabric pots, then a cover crop of clover was sprinkled on the soil and covered with barley straw.
picture.php


Everything in the recipe brings something to the table. I would like to take the time to provide a brief description of each item and it's purpose(s). Feel free to skip the rest of this post if youre not interested.

Let's start with the single most important component of the recipe, compost. Compost brings beneficial microbes as well as providing some nutrition. Compost also provides disease, pathogen, and pest supression. Vermicompost brings everything in compost with even more beneficial microbes as well as calcium carbonate.

The sphangum peat moss brings microbes, water retention, carbon, and a high cation exchange capacity (CEC). This is the source of organic matter that will support the soil food web.

The aeration is what provides the roots with oxygen. The rice hulls provide short term aeration as well as a long term source of silica. And the lava rock is mainly just aeration and a minor source of minerals.

Next we move on to the ammendments. Kelp contains macro and micro nutrients, as well as chelating substances. The neem offers macro nutrients as well as pest suppression. The shrimp provides macro nutrients, calcium carbonate, and chitan. The malted barley powder provides a lot of different enzymes such as phosphatase, chitanase, urease, and amylase.

Finally the mineral mix provides, obviously minerals, but also improves soil texture. The gypsum provides calcium and sulphur. The oyster shell flower provides calcium carbonate and helps balance pH. And the glacial and basalt provide an array of micro nutrients and minerals. The biochar provides a lot of surface area for microbes and increases CEC.

Finally the mulch layer also serves a purpose. The clover are nitrogen fixers, they will absorb nitrogen from the air which when later chopped returns to the soil. The clover will also loosen the soil as the roots begin to grow deeper. The straw mulch keeps the soil moist and provides a home for soil life.
 

ReikoX

Knight of the BlackSvn
So here i the initial light bar. Here I have marked and punched the six new holes.
picture.php


Next I drilled the holes for the other three bars and the hanging chain. Then I added the 4000K and 5000K light bars. Here are the veg lights all the way turned down.
picture.php


Here are the bloom lights all the way turned down.
picture.php


All lights, all the way turned down.
picture.php


And finally everything turned up to 11!
picture.php
 

ReikoX

Knight of the BlackSvn
Time to transplant the monkey girls to their final 5-gallon containers. Good timing, the roots are just starting to wind around the bottom of the cup. They all looked nice and healthy.
picture.php


All four monkey girls in have been transplanted and sitting under the veg lights turned all the way down for the day. This is going to be a tight fit. Right now, I have about 18 inches from the top of the soil to the bottom of the lights. I will have to do some creative training on them. I didn't quite finish wiring the LEDs, so just the veg lights are wired currently. I want to put a switch on the AC side of both these drivers.
picture.php
 

starke

Well-known member
I like your LED setup. If I expand or have to replace I will definitely build mine in the future.
 

ReikoX

Knight of the BlackSvn
I like your LED setup. If I expand or have to replace I will definitely build mine in the future.

Oh man, I'm spending a ton of cash on this LED project, but soon they will all be Wi-Fi controlled! Keep an eye here in the next few weeks.
 

bsgospel

Bat Macumba
Oh man, I'm spending a ton of cash on this LED project, but soon they will all be Wi-Fi controlled! Keep an eye here in the next few weeks.

:laughing: Shit- I was getting all inspired to start building panels because I thought it would be cheaper! What's costing the most?

So- you've got separate drivers for the veg and flower (if I understand correctly?)- are they the same mA/wattage? Seems like 700 mA is super common for drivers. Can you imagine a scenario where a cab or closet would require more than that? Edit: nvm, found those Mau5 videos that explain it perfectly.
 
Last edited:

ReikoX

Knight of the BlackSvn
:laughing: Shit- I was getting all inspired to start building panels because I thought it would be cheaper! What's costing the most?

So- you've got separate drivers for the veg and flower (if I understand correctly?)- are they the same mA/wattage? Seems like 700 mA is super common for drivers. Can you imagine a scenario where a cab or closet would require more than that? Edit: nvm, found those Mau5 videos that explain it perfectly.
Ain't nothing cheap about LEDs. :biggrin:

The drivers are probably about half the cost. I can get the heat sinks and strips for about $30 a pop, but the drivers are about $65 each. Yes this light uses two seperate drivers, a 120-watt for the 3 cool lights and a 240-watt for the 6 warm strips. That equals about 500 mA when cranked all the way up.

This light would work pretty good in a 3x3 area delivering about 40-watts per square foot. My area is slightly smaller (30"x30") so I'm pushing closer to 50-watts per square foot, but dimming will allow me to control that.

So that's about $400 For the light plus shipping, aluminum angle, and wires etc. Works out to about $1.15 per watt. So thats cheaper than COBs IME. My 250-watt CXB3590 light cost me about $500 to build, closer to $2.00 per watt.

Now, I'm playing here, so I ordered some stuff for automation. I ordered up some Sonoff WiFi switches and a Bluefish LED Controller. The Bluefish was about $200 and the Sonoff switches ran me about $75. I'm testing out these WiFi switches before I build out my rooms.

So for about $700 I will have a two channel, fully dimmable, WiFi controlled light that I can control with my phone (or even Alexa and the like).
 

ReikoX

Knight of the BlackSvn
Here are this week's Jilly Bean #4. These will be the last run of this pheno. I'm thinking this may go straight to rosin, not sure. Nice fat single colas though.
picture.php


Making a batch of malted barely tea, and my puppy is helping me with quality control.
picture.php


Shhh.. the little monkeys are sleeping. They got a feeding of malted barley tea Saturday, just like the rest of the garden. To make the malted barley tea I added 5 oz. (weight) of freshly ground malted barley to 5 gallons of water and bubbled it for about 4 hours. After bubbling I added 1 teaspoon 200x aloe vera powder, 25 ml silica, and 2.5 oz. of Ful-power.
picture.php
 
Top