What's new
  • Happy Birthday ICMag! Been 20 years since Gypsy Nirvana created the forum! We are celebrating with a 4/20 Giveaway and by launching a new Patreon tier called "420club". You can read more here.
  • Important notice: ICMag's T.O.U. has been updated. Please review it here. For your convenience, it is also available in the main forum menu, under 'Quick Links"!

Greenbeans

Greenheart

Active member
Veteran
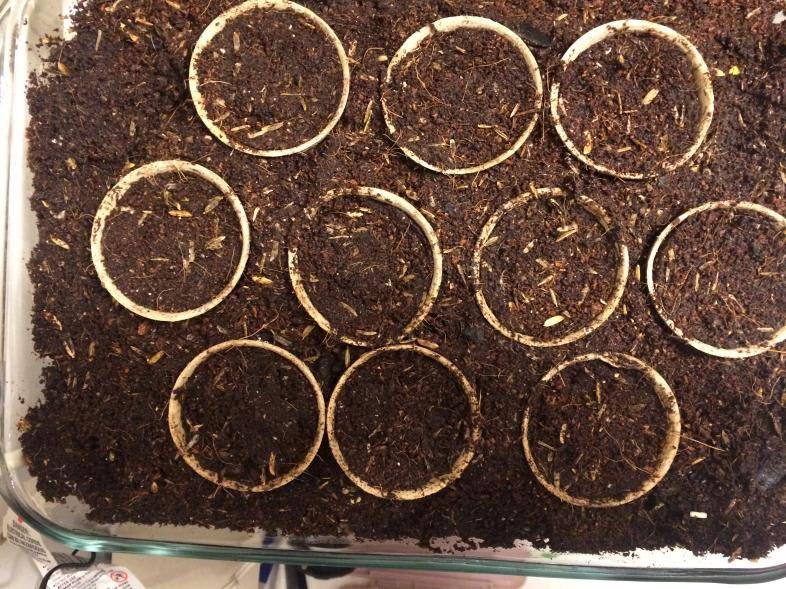
I still need to build the bloom box and a plethora of other things. The beans are a home brew.

I crossed this one

picture.php
picture.php
picture.php


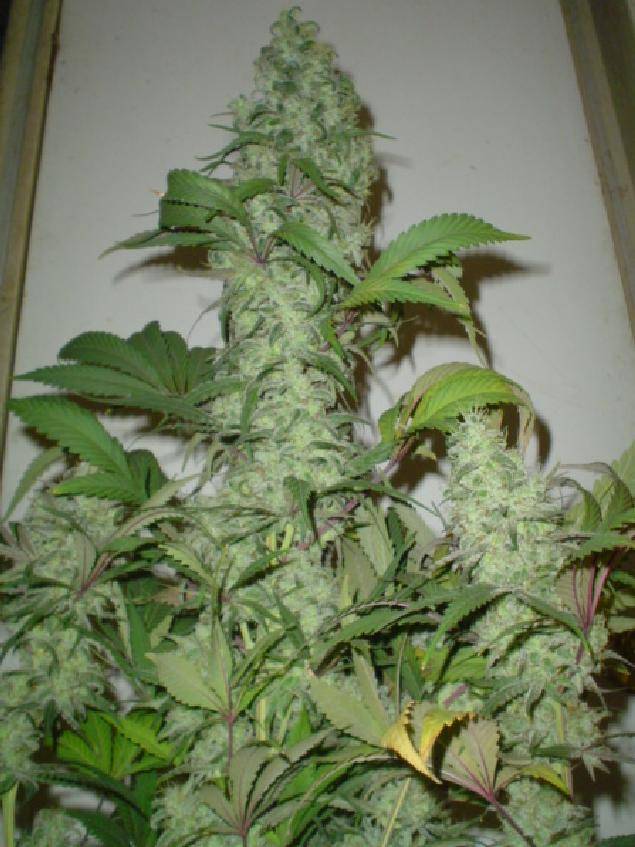
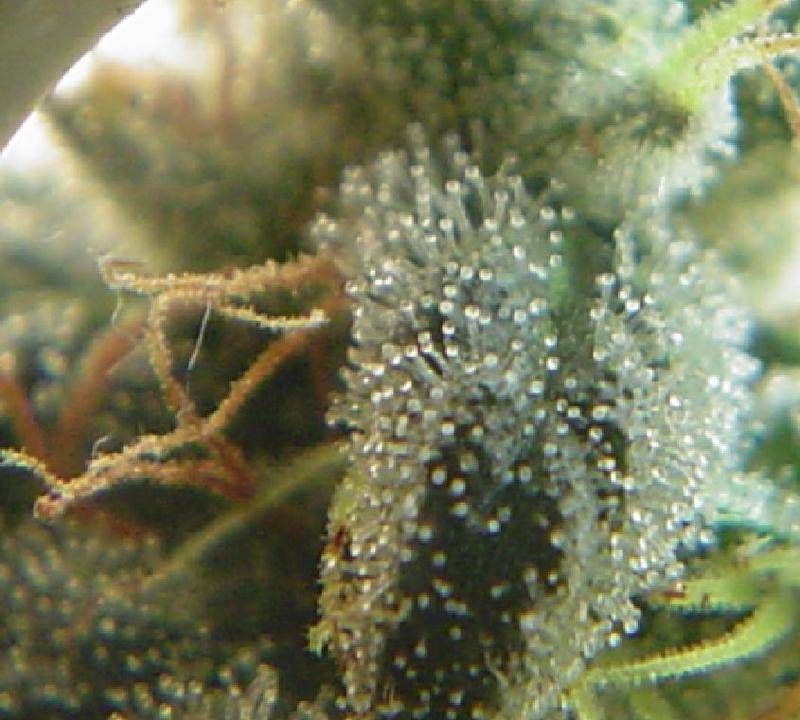
With a male white widow. Then I selected a male from those and crossed it to a DJS BB clone I had in my stable. As you might expect there is a large variety of pheno's showing themselves in the beans.

That was where I left off when I took down the grow years back. Locking in the genetics with f2's is no longer possible. I do believe there will be some amazing plants showing themselves soon.

picture.php


Cheers to 2021 and all the recreational fun!
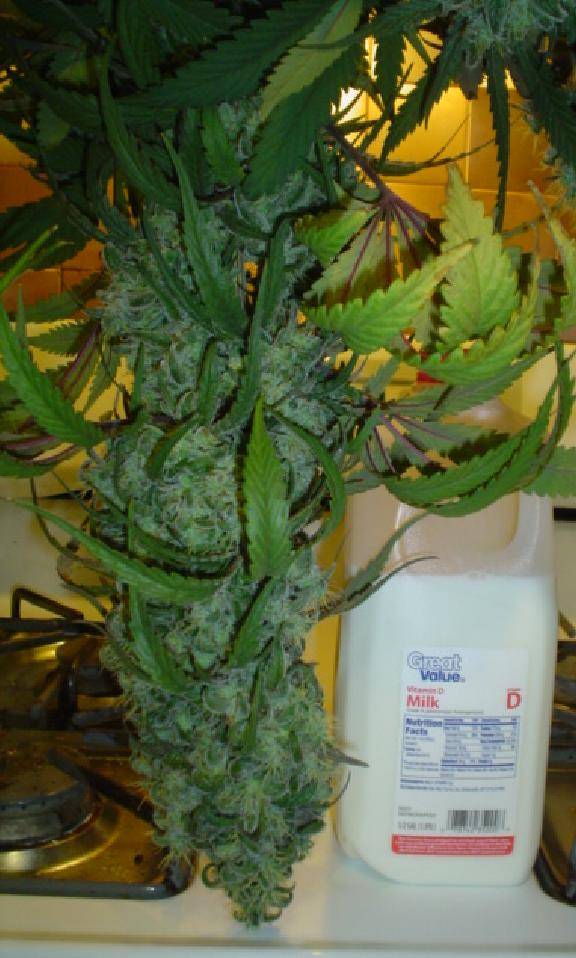
 

Greenheart

Active member
Veteran
Day 5
Seems the ol' beans still have some life left in them.
:yay:
picture.php


Now let's see how lucky I get.
 

Greenheart

Active member
Veteran
Thanks Gizmo

Up to 70% germination day 7. The first one to pop had 3 cotyledons. I might have another trifoliate on my hands. :dance:

picture.php


picture.php


Far left middle row is a helmet head popping up. I split the husk away a bit more and gave it a drop of water to help it shed
the inner skin from the cotyledons. It seems to be doing better now.

picture.php


Lets hope my mix isn't too warm. I'm a bit concerned with the coloring and curling.
 

Greenheart

Active member
Veteran
Welcome to ghetto growing 101 lol

picture.php


Timers and lights as bad as it may look we gots the grow on now bitches!!! :biglaugh:

The cheap $20 ufo said not to run more than 16 hours. I've decided to put them on a bloom cycle already even though they don't know it yet. The ghetto bulbs on both sides of the ufo will be used to extend the main lighting's 12/12 hours to 19 total light hours while I get the rooms setup. They will come on an hour before the main bulb and shut off 30 minutes after it strikes. Then it will pop on an hour before the main lamp goes dark and continue on for an additional 6 hours.

I went over my design with a pencil and paper this weekend and came up with a parts list. Should be about $150 total for the bloom box. Already have the reflectix and the closet was already set up as a veg area. So all I really need it to relocate fixture sites, build the bloom area, and pull out the old equipment. I bought some "new" cdm's. We shall see if they survive ebay shipping. I've both a 330 and an 860 on the way.

We have 90% germination at this point. The helmethead is looking good. The trifoliate is spreading it's wings. I'll probably move it to the center of the tray so it spreads evenly.

picture.php


Edit 1/7 I am going to leave it here for a little bit. I will update more once I get the bloom box built. Adding a final pic of the three I suspect to have stronger blueberry phenotypes.

picture.php
 
Last edited:

Greenheart

Active member
Veteran
UPDATE TIME!!!

picture.php


They are looking better. The tray is drying out and roots are coming thru the starter cups. I will be moving them to 1 gallon fiber pots as soon as I can make time. I don't have too many excuses since I broke down and bought some premix Roots Organic microgreens. Don't have much choice really. I got them started with some coir, castings, and light amendments. There really isn't any life in that soil yet. A microshot of Blackstrap Molasses with an eyedropper helped get them on the right side of looking good. That and letting the medium dry out. It was saturated when I sowed them in the coir.

The only real watering they have had was when I pulled the 1 that wasn't there. I repacked with moir core and top dressed the rest so most of the starter pots were fully buried. I then misted with a spray bottle and went a little heavy on the area I packed with fresh coir so that it would help moisten the cardboard cups next to it.

Then I got busy and drove my rustbucket to town. All total we purchased

Board Lumber

(7) 2"x4"x8'
(9) 2"x2"x8'
(4) 1"x12"x4'

1 roll 4'x25' reflectix
some reflectix aluminum tape

I had some reflectix on hand and the existing closet was already lined from my previous adventure. I haven't used the stuff I had laying around yet. I think the 1 roll will cover it. I've not made the entryway yet.

The pond liner I will be using was $19 from amazon.

Oh and because of the cool ass microgrow sil thread sampas hooked me on I bought one of these:

picture.php


It was $25. Not quite the thrifty one but I did it for you bud. Okkkk well me and the ladies too. Can you blame me. This was perfect for the clone and seedling stage. I can max out the lux from 5" away on the phone app. That's the only tool I have to measure so bear with me on that. I needed to replace that $20 led fixture I bought online. I saw rice husks getting into the vent ports. Not sure how from 15" away but they did.

AND NOW WE HAVE THIS!!!! (drumroll and choir of angels singing)

picture.php


Inside will measure 2.5'Wx 4'Lx64"H with 12" of that height being soil bed. I'll likely use some of that headspace for exhaust ducting, cables, and pulleys. I plan on building a droppable ceiling. Hopefully we shall see. So far the build is about $200. I could have bought a tent for that much but then I wouldn't have a bed of worms to play with or all the fun of building it. Besides they all opened on the wrong side and had lousy reviews. Ok well some got good ratings but I didn't want to deal with pinholes, zippers, and windsock adjustments. Each to their own. Just keep it growing however you can!

I should have room for 6 ladies comfortably at 12 inch diameter. I could probably pack the other two I'm allowed in there but I need a mum and a next in line. Hopefully if I get it dialed in and good pheno's I'll be able to put one in every 2 weeks and take 2 ounces dried or more out. That's going to be my goal.

bye for now :wave:
 

Sampas92

Just newbin
UPDATE TIME!!!

View Image

They are looking better. The tray is drying out and roots are coming thru the starter cups. I will be moving them to 1 gallon fiber pots as soon as I can make time. I don't have too many excuses since I broke down and bought some premix Roots Organic microgreens. Don't have much choice really. I got them started with some coir, castings, and light amendments. There really isn't any life in that soil yet. A microshot of Blackstrap Molasses with an eyedropper helped get them on the right side of looking good. That and letting the medium dry out. It was saturated when I sowed them in the coir.

The only real watering they have had was when I pulled the 1 that wasn't there. I repacked with moir core and top dressed the rest so most of the starter pots were fully buried. I then misted with a spray bottle and went a little heavy on the area I packed with fresh coir so that it would help moisten the cardboard cups next to it.

Then I got busy and drove my rustbucket to town. All total we purchased

Board Lumber

(7) 2"x4"x8'
(9) 2"x2"x8'
(4) 1"x12"x4'

1 roll 4'x25' reflectix
some reflectix aluminum tape

I had some reflectix on hand and the existing closet was already lined from my previous adventure. I haven't used the stuff I had laying around yet. I think the 1 roll will cover it. I've not made the entryway yet.

The pond liner I will be using was $19 from amazon.

Oh and because of the cool ass microgrow sil thread sampas hooked me on I bought one of these:

View Image

It was $25. Not quite the thrifty one but I did it for you bud. Okkkk well me and the ladies too. Can you blame me. This was perfect for the clone and seedling stage. I can max out the lux from 5" away on the phone app. That's the only tool I have to measure so bear with me on that. I needed to replace that $20 led fixture I bought online. I saw rice husks getting into the vent ports. Not sure how from 15" away but they did.

AND NOW WE HAVE THIS!!!! (drumroll and choir of angels singing)

View Image

Inside will measure 2.5'Wx 4'Lx64"H with 12" of that height being soil bed. I'll likely use some of that headspace for exhaust ducting, cables, and pulleys. I plan on building a droppable ceiling. Hopefully we shall see. So far the build is about $200. I could have bought a tent for that much but then I wouldn't have a bed of worms to play with or all the fun of building it. Besides they all opened on the wrong side and had lousy reviews. Ok well some got good ratings but I didn't want to deal with pinholes, zippers, and windsock adjustments. Each to their own. Just keep it growing however you can!

I should have room for 6 ladies comfortably at 12 inch diameter. I could probably pack the other two I'm allowed in there but I need a mum and a next in line. Hopefully if I get it dialed in and good pheno's I'll be able to put one in every 2 weeks and take 2 ounces dried or more out. That's going to be my goal.

bye for now :wave:

Oh boy kkkkk
Hi greenheart thanks bud but my thread isnt nothing special :bump::)
Keep in mind that when you remove the plastic cap that covers the led diodes, the lumen output and intensity will be higher, by a good bit, keep that in mind while distancing it from the girls, they have great penetration, even one single sil.
Also keep in mind that my phone is a samsung s10 and older or newer camera sensors may give different readings..
Great build green.
I hope everything goes good for you in this grow.
 

Greenheart

Active member
Veteran
Thanks Sampas. I took the caps off the other sils I had laying around (9w). I think the diffuser will be a good thing for what I want to do. Without it the beams are pretty narrow coverage but more intense.

Your thread it great! Good info on sils and light distances. You are also documenting things really well! Some good discussion and shared info in there. I'm sure a number of people will be looking at it as time goes on.

I am considering putting 6 daylight sils into the room at I higher distance. 1 for each plant. Then putting the CMD in the middle like I did for verts. The 860 is a vertical style bulb so I don't have much choice in how I position it. The 330 is Universal. I might be able to go with it if I'm running sils as well. That will be a future plan however. For startup I will try building an adjustable ceiling and using my old mag ballast. Later I can mount some sockets into the ceiling panel and be good to go.

That will be helpful during power loss as well. I have an UPS system handy that I can run the SILS. In the event of a short term power loss some light will still be getting to them.
 

Sampas92

Just newbin
Thanks Sampas. I took the caps off the other sils I had laying around (9w). I think the diffuser will be a good thing for what I want to do. Without it the beams are pretty narrow coverage but more intense.

Your thread it great! Good info on sils and light distances. You are also documenting things really well! Some good discussion and shared info in there. I'm sure a number of people will be looking at it as time goes on.

I am considering putting 6 daylight sils into the room at I higher distance. 1 for each plant. Then putting the CMD in the middle like I did for verts. The 860 is a vertical style bulb so I don't have much choice in how I position it. The 330 is Universal. I might be able to go with it if I'm running sils as well. That will be a future plan however. For startup I will try building an adjustable ceiling and using my old mag ballast. Later I can mount some sockets into the ceiling panel and be good to go.

That will be helpful during power loss as well. I have an UPS system handy that I can run the SILS. In the event of a short term power loss some light will still be getting to them.

From what ive seen other growers do with sils, i think you will find you dont need anything else besides them.
:thank you: for the compliments
 

Greenheart

Active member
Veteran
From what ive seen other growers do with sils, i think you will find you dont need anything else besides them.
:thank you: for the compliments

Blynx showed beyond doubt how well they work. The other thread where some of them are pushing close to 1kw in sils is pretty convincing too.

I like the strip lights PCbuds is using. Those might be ideal for mounting to a drop panel. One issue I might run into with a perpetual setup is light distances from the plants. By the end of bloom I noticed most sils are right up on top of the plants. It may be that I have to drop the octopus cords down on tops and then have some strips up high for the spread coverage.

It will also be an easier investment over time than trying to save up $500 to $1000 all at once for a commercial quality led fixture. It will be awhile before I'm ready for that jump. I've some reading and calculating to figure before I get there.

For now the next goal is getting the soil box built into the bloom room. I have 500 red wigglers arriving today and so far only a 20 gallon trash can for a worm bin. I ran into an issue with Gnats 6 years ago and I don't want to repeat that mistake.

My plan this round is to bury a tub in the center of the room. I will put amendments and vegetable/fruit scraps in there. It will serve as my watering hole as well. The water should wick out and spread along the bottom. The worms will crawl in and out processing and spreading the compost. If I keep a lid on it Gnats should will not be able to get into it and my top layer of soil will be too dry for them to have a party in. At least that is the hope.

Do you all think I should run some perforated pipe along the bottom to help with water movement along the bottom of the bed?
 

PCBuds

Well-known member
I like the strip lights PCbuds is using. Those might be ideal for mounting to a drop panel.

There is also quantum boards available.
The come complete with built-in driver and rope and pullies.

I don't think that they are too thick, and may give you more clearance than bulbs.

You may be able to get it closer to the plants as well, because the light is more spread out.

I don't know how much clearance they need above the board.
The driver and LEDs may need to breathe and keep cool.


They start at around $100 and go up from there.


Check out the specs and numbers carefully.

It might say 1000 Watts, but be 1000 Watt equivalent.

Try to find the total lumen output.
If they don't list it, they might be fudging their numbers.
 

PCBuds

Well-known member
Thanks Sampas. I took the caps off the other sils I had laying around (9w). I think the diffuser will be a good thing for what I want to do. Without it the beams are pretty narrow coverage but more intense.


The globes absorb about 30% of the light.
With them removed, the light is a lot more direct and a lot more intense.
 

PCBuds

Well-known member
There is also these available.
They can be surface mounted.
I don't know how they compare as far as lumens per $ though.


Greenheart

Active member
Veteran
Thanks for sharing the info PCbuds. Also all the help with updating me on how the new LED tech works. I was a bit lost when threads were discussing drivers, led types, and wiring. It wasn't so difficult in the end depending on what lights you were wiring.

I was at my local hardware store. There was a case of t8 retrofit LED tubes (19) of them for sale at $50. I probably should have jumped on it. I backed out last minute since I wasn't sure. The dispersal is a good thing too.

That is why I'll leave the caps on my sils and buy a few extra to compensate for the lost lux. Between the globes and reflectix the light will diffuse pretty well in the chamber.

I'm considering 9 of the 33W bulbs for a total of 3 rails. I think I might go octopus style so I can drop them all at different heights. I'm more familiar with vert style growing so I'll have main stalks closer to the sides with 1 bulb over each plant and the 3 center bulbs filling the middle. With the drop ceiling I can lower it to the highest bulb and really keep the light use maximized.

I really appreciate you all stopping by with words of wisdom and encouragement. Right now there is not much action for the grow part of things aside from planning and building. Again I encourage anyone to help point out possible flaws in the design. It's good to know before you get there what you are up against.
 

PCBuds

Well-known member
Just thinking,...

If you had 27 of some 11 watt bulbs, you could spread out your intensity and heat, and the bulbs would be about half as tall.

It would cost more with all the sockets though, and the 11 Watt bulbs might cost more than 1/3 of the price.


If you were running lower watt bulbs that were shorter, you could probably be able to remove the globes, and take advantage of the 30% gain in lumens.
 

PCBuds

Well-known member
This is the quantum board I made out of six 10 watt SILs and a cookie sheet.
It cost about $13 all in.


Greenheart

Active member
Veteran
You are correct I will get more intensity without the globes. I'm not sure that is what I really want. I think the intensity with the diffusion is worth the sacrifice going to the higher wattage bulbs. If say I was running 10 of the lower wattage bulbs in the center without diffusion globes I would be lighting a lot of soil until the plants grew into them.

With the higher wattage and globes I hope to keep the main focus over each plant but still diffuse the light to better reach the center of the room and side buds. If the cab were say half the size it might be worth going the other way. I decided to take advantage of the full 7' ceiling when I built the chamber so there is plenty of headspace left Sampas and Blynx helped me decide against the 4Lx3Wx4H. B does wicked works in the tight spaces but it showed me that is not the way I grow. I'm a vert addict!

The heat will be almost a nonissue compared to the HID/Halogen spectrum I was running. I'll be in at 330W instead of 2k. Even if I accent with another 100W of Halogen lighting I'll still be coming in at 1/4 the electric bill.

Looking at my old notes 9 bulbs will be more than sufficient. Placing 1 above each plant on an octopus will allow me to give the tops maximum lighting. At 5" these sils will max out the lux meter with the globes on. That also means I can drop the center ones to the lowest of the rest and help maximize the side lighting as they grow towards the center of the room.

Keep in mind vertical growing is a whole different process. The top of your canopy is not the top of your plants but the center of the room. Your main cola's become the side growth. In general it is the same principle as SCROG but in a 360 degree pattern instead of 180.

Not that I will be making any records or anything but I do see the logic of it.

I think I've decided on my bulbs. I'll probably sucker into the "grow" version of them as well. I'm betting they have enhanced spectrum. That has also been a very important part of growing to me.

I will note the globe is already showing some discoloration from the heat. I'm betting they are overamped to gain the intensity. They are also putting out significantly more heat than the 11W I had on hand. I noticed I can't keep my hands resting on the ballast when in operation. Once you go past the ballast half of the bulb you can touch them without any issue. I still haven't decided 4" or 6" fan setup. At 1 sq/m I should be able to go with 4". I suppose I can always reduce a 6" in speed. I would prefer not to. Even with solid state voltage reducers it doesn't feel quite right. I think I will try the cheapy 4" vivosun kit with filter. If it becomes a problem I will hook up the 10" in the main room. I have no doubt it will pull the bloom chamber without being directly installed. The can fan filter alone is 4' long. lmao

That home brewed Quantum SIL is awesome! Thanks PCBuds for posting it. I know a guy that thrives on the free and DYI. That is the stuff that makes pipe dreams reality!

In the interest of safety I'm going to stick to prefab aside from the bloom chamber design. The cost is negligible if it is small chunks over time. I also have the luxury of previous equipment that will serve the need until I get what I want.

At the moment my focus is on the soil bed. I think I will go with some perforated PVC like they use for septic. A 4"x10' length is only $10. I can cut that into 4 x 2.5' lengths. Run it diagonally and mount my compost bucket over the top of them. The compost bucket will be a square 35# mayonnaise tub. I plan on drilling some 1/2" holes in the sides and cutting the bottom off. I will then bury it about 8" deep in the soil with the pipes taking up the last 4 inches of soil bed. The run off water in theory will be compost tea that is wicked up from the bottom of the soil bed. It will be active with red wigglers and other micro-life. It will take time for it to develop but I've been there before. I think this will give excellent results.

Anyone who does vermicomposting can attest to how quickly seeds sprout in the bin. Or some of the compost matter even. In the past transplants usually took off fairly quickly when I put them in the bloom chamber. I had strawberries, tomatoes, potatoes and celery all trying to grow just from the scraps I was top dressing with.

I learned my lesson though. It was a giant house party for the winged creatures once they found it, Gnats and root aphids both. I tried mosquito dunks, lady bugs, predatory mites, neem, diatomaceous earth, I even got the top of my soil to an almost concrete like consistency. They made it clear they weren't leaving.

I like the benefit of organics but I hope to avoid that this time. I'm pretty sure if the top of the beds are dry and any composting material is sealed off they won't be there. You were right when we talked p.m. about mites. They are a good thing. Worth the investment. In time I hope all kinds of beneficial microlife establishes itself in my soil. I generally try not to disturb it much aside from pulling and planting. Different layers of soil have different webs. My goal is to feed them all and let them feed my plants.

K enough stoned wall of text. :) I really love the input. Even if I don't use it in my setup I'm sure others might find it at some point and go "that's perfect!"

Keep it coming my friends. Mahalo
 

Sampas92

Just newbin
You are correct I will get more intensity without the globes. I'm not sure that is what I really want. I think the intensity with the diffusion is worth the sacrifice going to the higher wattage bulbs. If say I was running 10 of the lower wattage bulbs in the center without diffusion globes I would be lighting a lot of soil until the plants grew into them.

With the higher wattage and globes I hope to keep the main focus over each plant but still diffuse the light to better reach the center of the room and side buds. If the cab were say half the size it might be worth going the other way. I decided to take advantage of the full 7' ceiling when I built the chamber so there is plenty of headspace left Sampas and Blynx helped me decide against the 4Lx3Wx4H. B does wicked works in the tight spaces but it showed me that is not the way I grow. I'm a vert addict!

The heat will be almost a nonissue compared to the HID/Halogen spectrum I was running. I'll be in at 330W instead of 2k. Even if I accent with another 100W of Halogen lighting I'll still be coming in at 1/4 the electric bill.

Looking at my old notes 9 bulbs will be more than sufficient. Placing 1 above each plant on an octopus will allow me to give the tops maximum lighting. At 5" these sils will max out the lux meter with the globes on. That also means I can drop the center ones to the lowest of the rest and help maximize the side lighting as they grow towards the center of the room.

Keep in mind vertical growing is a whole different process. The top of your canopy is not the top of your plants but the center of the room. Your main cola's become the side growth. In general it is the same principle as SCROG but in a 360 degree pattern instead of 180.

Not that I will be making any records or anything but I do see the logic of it.

I think I've decided on my bulbs. I'll probably sucker into the "grow" version of them as well. I'm betting they have enhanced spectrum. That has also been a very important part of growing to me.

I will note the globe is already showing some discoloration from the heat. I'm betting they are overamped to gain the intensity. They are also putting out significantly more heat than the 11W I had on hand. I noticed I can't keep my hands resting on the ballast when in operation. Once you go past the ballast half of the bulb you can touch them without any issue. I still haven't decided 4" or 6" fan setup. At 1 sq/m I should be able to go with 4". I suppose I can always reduce a 6" in speed. I would prefer not to. Even with solid state voltage reducers it doesn't feel quite right. I think I will try the cheapy 4" vivosun kit with filter. If it becomes a problem I will hook up the 10" in the main room. I have no doubt it will pull the bloom chamber without being directly installed. The can fan filter alone is 4' long. lmao

That home brewed Quantum SIL is awesome! Thanks PCBuds for posting it. I know a guy that thrives on the free and DYI. That is the stuff that makes pipe dreams reality!

In the interest of safety I'm going to stick to prefab aside from the bloom chamber design. The cost is negligible if it is small chunks over time. I also have the luxury of previous equipment that will serve the need until I get what I want.

At the moment my focus is on the soil bed. I think I will go with some perforated PVC like they use for septic. A 4"x10' length is only $10. I can cut that into 4 x 2.5' lengths. Run it diagonally and mount my compost bucket over the top of them. The compost bucket will be a square 35# mayonnaise tub. I plan on drilling some 1/2" holes in the sides and cutting the bottom off. I will then bury it about 8" deep in the soil with the pipes taking up the last 4 inches of soil bed. The run off water in theory will be compost tea that is wicked up from the bottom of the soil bed. It will be active with red wigglers and other micro-life. It will take time for it to develop but I've been there before. I think this will give excellent results.

Anyone who does vermicomposting can attest to how quickly seeds sprout in the bin. Or some of the compost matter even. In the past transplants usually took off fairly quickly when I put them in the bloom chamber. I had strawberries, tomatoes, potatoes and celery all trying to grow just from the scraps I was top dressing with.

I learned my lesson though. It was a giant house party for the winged creatures once they found it, Gnats and root aphids both. I tried mosquito dunks, lady bugs, predatory mites, neem, diatomaceous earth, I even got the top of my soil to an almost concrete like consistency. They made it clear they weren't leaving.

I like the benefit of organics but I hope to avoid that this time. I'm pretty sure if the top of the beds are dry and any composting material is sealed off they won't be there. You were right when we talked p.m. about mites. They are a good thing. Worth the investment. In time I hope all kinds of beneficial microlife establishes itself in my soil. I generally try not to disturb it much aside from pulling and planting. Different layers of soil have different webs. My goal is to feed them all and let them feed my plants.

K enough stoned wall of text. :) I really love the input. Even if I don't use it in my setup I'm sure others might find it at some point and go "that's perfect!"

Keep it coming my friends. Mahalo

The way you want to do it seems pretty much a SIP system but still watering the soil from above..
Keep in mind between the water and the soil should be a gap of air to avoid root rot..
I like thr way you are thinking, tske some pics of it :good:
 

Latest posts

Latest posts

Top