What's new
  • Happy Birthday ICMag! Been 20 years since Gypsy Nirvana created the forum! We are celebrating with a 4/20 Giveaway and by launching a new Patreon tier called "420club". You can read more here.
  • Important notice: ICMag's T.O.U. has been updated. Please review it here. For your convenience, it is also available in the main forum menu, under 'Quick Links"!

ScrogMonster Does Cabinets

ScrogMonster

Active member
Veteran
Hey everybody. Been a minute since I’ve done any posting. I moved and I decided to switch from the two 2x4’ tents I used to use for flowering, to building some cabinets.

Here’s some picks of my first custom cabinet build. It took me waaaay to long. I want to build 8 of these bitches... my second one is maybe 1/3 underway atm.

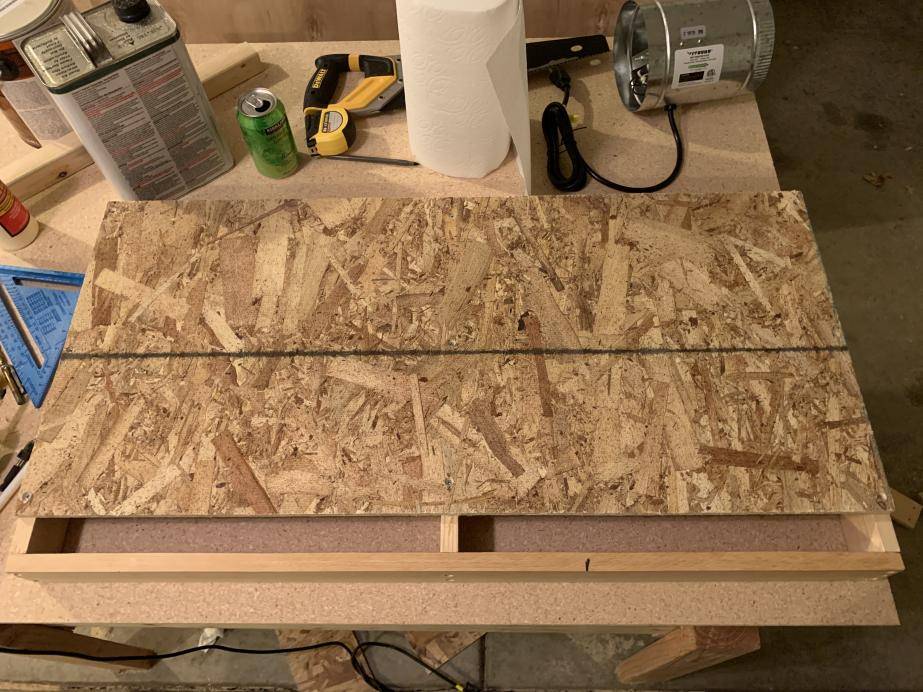
The base of the cab with a 1 1/2” gap in the front for air intake.

picture.php


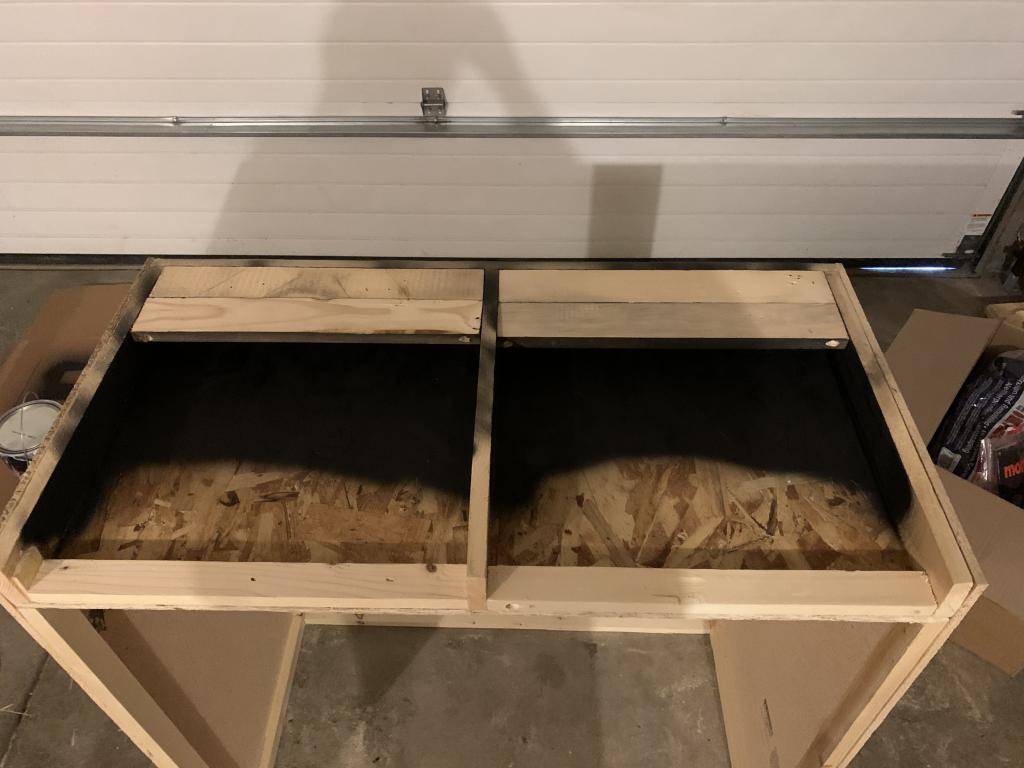
Here’s the underside of the base, I put some black spray painted boards across to make a light trap.
picture.php


picture.php


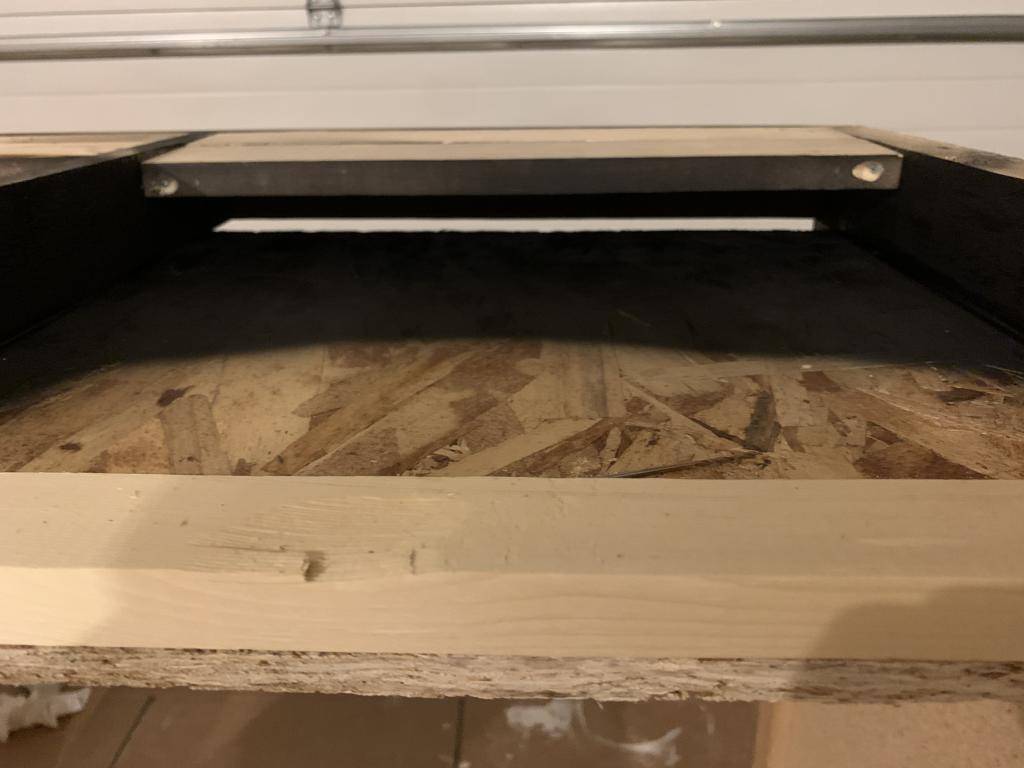
Intake goes in the bottom back, through the light trap and through the 1 1/2” gap of the floor

picture.php


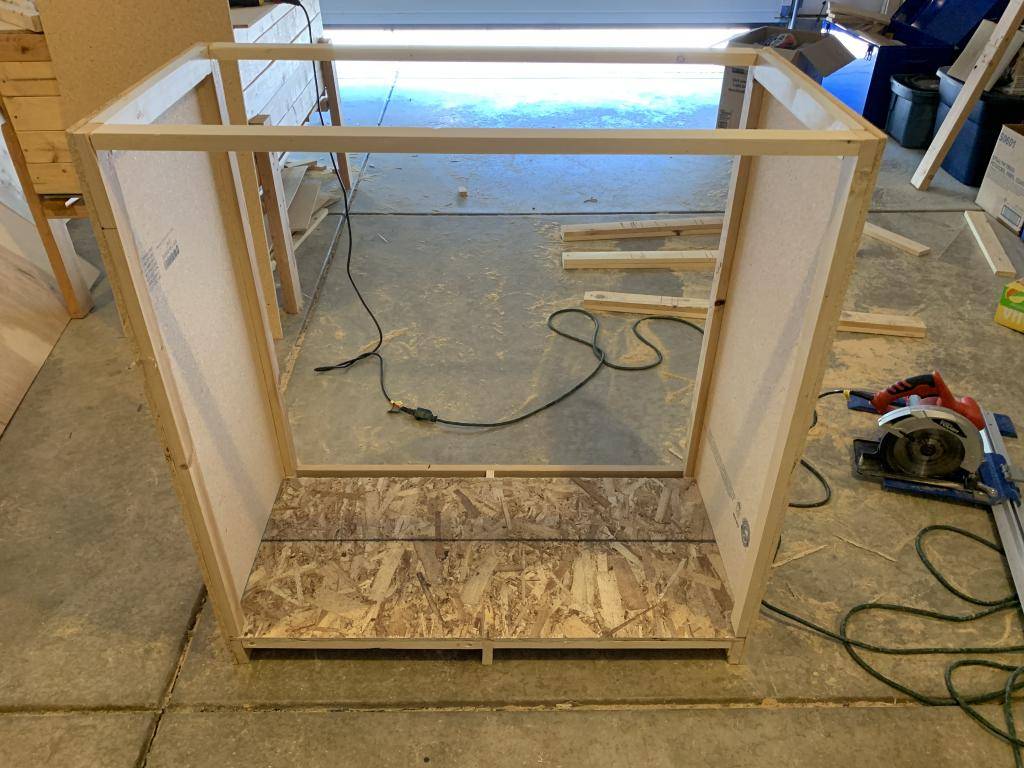
I kind of built a cabinet frame with 1x2 boards to attach the 3/8” particle board too. It’s the cheapest material at $11 for a 4x8ft sheet. The cabinet turned out slightly wonky because instead of building the frame nice then adding the particle board like I should have, I put the particle board sides on the base first then attach 1x2’s to the particle board and finished the frame at the top. I didn’t screw the 1x2’s down at the bottom to base. It all worked out okay but on my second cabinet I built the frame first screwed into the base and the frame seems much more square and level.

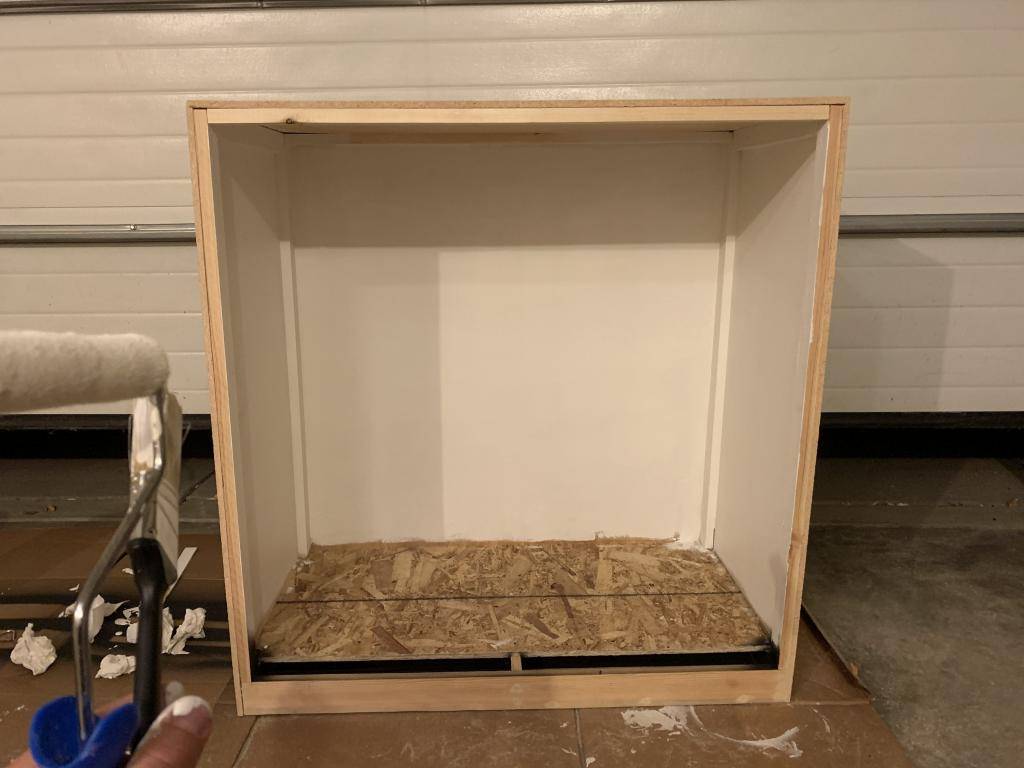
Here’s the first one starting to shape up and with some flat white acrylic exterior 2 in 1 paint+primer.
picture.php
 

ScrogMonster

Active member
Veteran
I used this $7 “grain rocker” aka “wood grainer” and some cherry wood Gel Stain (16$/qt) over a sort of orange yellow tan color interior paint ($12/qt) to create a wood grain look and feel for the cabinet exterior. This was crazy fun and satisfying. Makes the cabinet look more like real furniture. If your interested you can search the technique on YouTube for more details. (Foax wood grain).

The tool
picture.php


The result
picture.php


Filter in place
picture.php


Coming together. Fan and filter in place. I’m going to make Tute thread for the custom carbon filter after the plants get smelly enough to know it’s working nicely. The fan is a 6” Vivosun axial style duct booster. Rated at 240cfm. Will have a speed controller. Runs pretty quite with adequate ventilation and only costs $20.

picture.php
 

ScrogMonster

Active member
Veteran
Here it is all finished. Doors on, weather stripping in place, magnet catches installed for the door, lights hung: 8 -17w 1600lm 90CRI Fiet electric brand, 5000k SIL’s, I turned the lights on, saw a little too
Much light leaning out of the back and decided to spray paint the bottom of the doors and such to help lesson the amount of light getting through the intake. Also I added a 2x3 board to the edge of the floor and put two layers 6mil black poly down to waterproof the floor. Aaaand there’s a piece of particle board screwed/glued onto the inside of the right hand door to bridge the tiny gap between the doors and help with light/air sealing. Surge protector, light timer and fan speed controller installed as well.

Cabinet interior dimensions are 18” deep, 36” wide and 38.5” tall. About waist height.

picture.php


I had 5 GG girls waiting to get in the cab. I put them in 1gal fabric pots. I’m going for exactly 18 cola’s with approx 6”sq of space each. So each of these five GG are mainlined. 3 have 4 mainlined growths and 2 have 3 mainlined growths. It just kind of worked out that way I meant for each to have 4 branches when I was topping. Works out well though.

picture.php


So I’m going for 18 LARGE heavily lollipopped cola/buds. Pretty much for novelty and to see also how efficient it is or isn’t. In the next pic you can see that the plants have been growing for a while 3-4 weeks maybe and we’re getting kind of tall so, ScrogMonster needs to scrog. I made small sections of tomato screen and fixed em in place with bamboo. I took a picture with one plant left to go so the height difference can be seen before and after style.

picture.php
 

ScrogMonster

Active member
Veteran
Almost forgot to show the cabinet doors. I made them “shaker style” sort of, by cutting 1 1/2” pieces of particle board to use as trim and just glued them around the boarders. This was for aesthetics but also turned out to be 100% necessary for the hinges screws to have enough wood to go into. Wow just look at those sexy doors. Can you believe it’s all cheap 3/8” particle board? :peacock:
picture.php


Here’s a bunch of pictures of the girls days later after being restrained. I just got them all dripping wet some delicious LCPT. I seriously love that stuff. Takes care of the deadly russet mites no fkn problem and I can spray it on myself and huff it all I want. Screw poison. I used to use Bayer 4bid for russets before I found this stuff, talk about polar opposites. That stuff is toxic af. The girls are about 6 days into flower at this point. Pics taken today.

picture.php


picture.php


picture.php
 

ScrogMonster

Active member
Veteran
This picture shows how much head space I still have left right now.
picture.php


Twisty turnt lollipop

picture.php


This is one of the smaller girls in the room. Just a took a few extra days to root. Makes a big difference :/

picture.php


Well that’s all for now to get it started. Soon I’ll post some pictures of a stealth veg cab I slapped together real quick because I needed the space. Hope every one is doing well and loving their plants. <3
 

ScrogMonster

Active member
Veteran
Thanks Angent Pothead :wave:

Here’s a small stealth veg cab I slapped together cause I needed the room.


picture.php


But what that’s just two moving boxes stacked on top of each other.... but turn it around....

picture.php

I framed the walls of two large Walmart moving boxes with 1x3 boards. Then screwed the bottom boards of one box into the top boards of the other box, then cut out the cardboard between them, and put the intake, outtake, door and power chord all on the one side so that I can turn the cab around when needed and it just looks like two stacked moving boxes. The boards and the reflective insulation lining the walls between the boards were repurposed materials from a much larger mom/veg/clone/dry box cabinet from my last house. Added a small strip of cardboard to the bottom to level/flatten it out before putting a black 6mil poly floor down. It’s got a 6” Vivosun 240cfm axial duct booster with a speed controller for venting, it’s turned way down of course and I think I’m gonna make at least one more double stack screw it into the side of this cabinet and open the sections between them to double the veg space and the fan will have no problem venting all of it. I might keep using my boxes from moving and make a triplet double stack with a 4” inline fan and filter for flowering. Just to save time and get some other stuff flowering while I’m building more actual cabinets.
picture.php


Here’s a better look inside, oh there’s 6 - 1600lm 17w 5000k SIL’s. There’s 4-5 more GG cuttings in there and some Amnesia Lemon and or Skittlez Seedling’s and also two GG auto’s flowering away in
Solo cups.

picture.php
 

OldSSSCGuy

Active member
Love your joints.
yummy.gif


Why such a tall filter box? Looked like maybe 8"? Just seemed like precious headroom is all.
 

ScrogMonster

Active member
Veteran
Here’s two Skittlez seedlings, one of them is male and the other is female. You’d think the taller would be the male... but nope. I’m really glad out of my 4 seedlings I recently sprouted that I got 1 male. I want to make a small pollen catching flower chamber and catch pollen to make a bunch of different seeds to have and grow. I might even try to get a ton of seeds and try the whole 12/12 from sprout SOG deal. Watching Terpene catch pollen and make his own crosses and grow out a bunch of seedlings inspired me. I’ve always used moms/clones as my main source of plants. It’ll be nice to switch it up and have some seedling vigor and characteristic variety in my garden. I’m very excited for this.
picture.php


How small young and cute is this preflower?
picture.php


Here’s a more pronounced small female preflower.

picture.php


Both my Amnesia Lemon seedlings are female! Yayyyy! Here’s one of them now chillin in the corner.
picture.php


Here’s the other one, I was taking cuttings of all of them yesterday, including the male, I also transplanted them to 1gal nursery pots and trimmed em down.

picture.php
 

ScrogMonster

Active member
Veteran
Love your joints. View Image


Why such a tall filter box? Looked like maybe 8"? Just seemed like precious headroom is all.

Hey thanks! I’m no carpenter but I do my best. I have a miter box now so the cuts are perfect for better joints on my next cabinet.

Good eye, with the filter protruding a decent bit out of the bottom the of the filter box it is almost 8” tall. I took apart a large 6” Vivosun carbon filter that I was using with me tents before and am trying to make several smaller filters out of the materials to be used in a series of cabinets. I went with a really simple design with some cool features. I have enough head space in my cabinet and I wanted to make sure that the air flow through the filter was good. The rectangle shaped carbon filter that rests at the bottom of that filter box is like 6x18 inches and 1 1/2 inches deep layer of carbon. I didn’t do carbon filter building math that’s out there I just kinda winged it and hoped for the best. I considered making the space above the carbon in the filter box 4” tall instead 6” tall but I decided I had enough head space and was thinking the extra space above the carbon will help with airflow/operation of the filter. :dunno:

I realize that I could have gone with maybe two or three 120mmx38mm 100cfm pc fans each with their own individual small carbon filters on them and that would take up a lot less space in the cab. I might have been able to save myself a good 4” of head space that way. But those pc fans are about $20 each and I’d want 3 of them in one cabinet to make sure there’s adequate ventilation, plus the ac adapters, probably talkin $80 vs about $20 for the 240cfm 6” duct
Booster fan, and about $10 for the speed controller. Plus making many more smaller carbon filters for all the cabinets I want to make sounds like more of PITA. I wish I didn’t need carbon.... if I only owned my house. Thats the reason for the stealth cabinets and boxes... I want to be able to have property management come inside and fix things or what have you with out any worry of them catching on.
 
Last edited:

blynx

WALSTIB
Moderator
ICMag Donor
Veteran
Awesome cabs! Looking forward to seeing the new ones and the buds they'll all produce!
 

ScrogMonster

Active member
Veteran
Awesome cabs! Looking forward to seeing the new ones and the buds they'll all produce!

Thanks Blynx! :wave: I should look through some of your threads at your cabs for ideas and inspiration. You like those Dayton blowers right? When I tried searching for them I found them to be kind of pricey.
 

VerdantGreen

Genetics Facilitator
Boutique Breeder
Mentor
ICMag Donor
Veteran
Looks great. Nice build and great training of the plants.
Have you considered using a soil 'bed' in there or wider pots ? the extra soil might help increase yield - although it would maybe mean a bit more scrogging as well.


VG
 

ScrogMonster

Active member
Veteran
Looks great. Nice build and great training of the plants.
Have you considered using a soil 'bed' in there or wider pots ? the extra soil might help increase yield - although it would maybe mean a bit more scrogging as well.


VG

Thanks VG! I’m actually thinking about going to a SOG in repurposed 1gal water jugs. If I was gonna go less plants and one scrog screen I’d probably just do two or three 3 gallon smart pots. Just feels easier/more convenient to me.
 

ScrogMonster

Active member
Veteran
looks killer bro, great job!!


love the faux wood grain, just too cool

Thanks Amigo. I did my next cab the same way. But I made one big door and put foax drawer faces on it. I just cut the same particle board to drawer size pieces.

picture.php


picture.php
 

ScrogMonster

Active member
Veteran
Here’s some photo updates of those GG girls in the first cab. 5 weeks and 6days of flower.

My cat likes to help me trim the fan leaves.

picture.php


picture.php


picture.php


picture.php


picture.php
 

Blazeee

Well-known member
Veteran
Great build and your plants are looking lovely.

Not sure if I missed it, but just curious on the dimensions of your cabs?
 

Latest posts

Latest posts

Top