What's new
  • Happy Birthday ICMag! Been 20 years since Gypsy Nirvana created the forum! We are celebrating with a 4/20 Giveaway and by launching a new Patreon tier called "420club". You can read more here.
  • Important notice: ICMag's T.O.U. has been updated. Please review it here. For your convenience, it is also available in the main forum menu, under 'Quick Links"!

78w LED scrog Cabinet 1.17 sqft

Parallax

Member
Finished building my cab recently. Inspired by Blynx. Stealth & safety are super important to me. This is my first ever indoor grow.

I started off buying this cabinet at a local cheap furniture store, bought it new for $9. What I really liked about this cabinet is that it has holes on the insides so it's easy to adjust heights of the shelves in the future without any real trouble. Dimensions are approx 17" wide x 12" deep x 35" tall. Surface growing area inside the cabinet is 1.17 square foot.


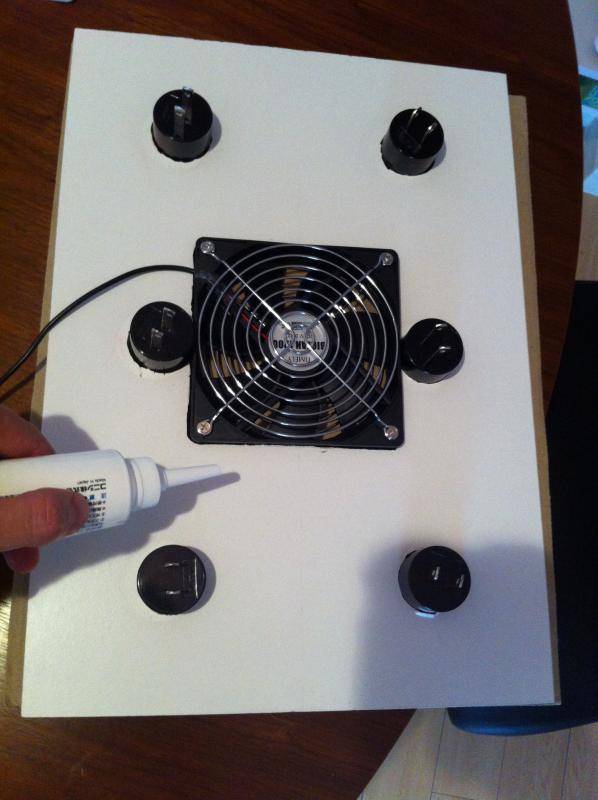
The cabinet came as a DIY unit so it was was to drill vent holes in the bottom shelf using a regular drill and then saw the actual hole using a coping saw. The holes are approx 1 inch wide (I used a formula to decide on the number and size of this, can post this later). I used a sealant to make everything tight and prevent light from getting in. The large hole is the passive exhaust vent hole, it also makes sure the power cord can enter the box from here.


Then I started with the middle shelf that will basically support the light connectors and fan. I liked these connectors (about $3 each) because I don't know much about soldering/wiring and like I said before - safety is a top priority. The fan is a 69cfm USB fan so I can easily plug it into a power outlet with a USB connector.

Middle shelf (top - exhaust side)


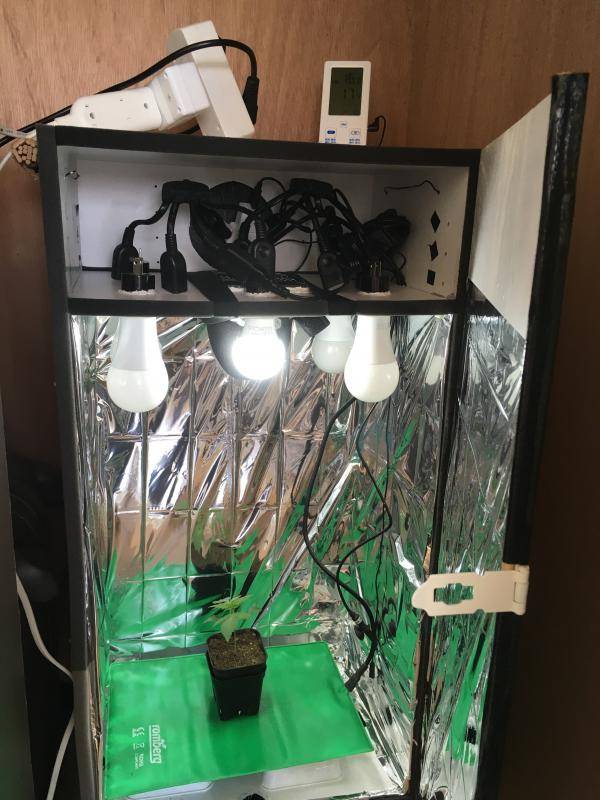
I added emergency blanket mylar sheets (dollar store) and attached them to the sides using double sided tape. In this photo it has a 40w 6500k bulb to promote stretching of the Blue Mystic seedling grown from seed, although I've changed it to a 100w because I suspect the light wasn't strong enough - temps are about 68 during the day, but the heatmat makes sure the roots are much warmer than that, probably high 70's. The heatmat and fan are on 24/7, the lights are on 18/6. The fan is barely audible, especially when the doors of the large walk in closet are closed. Now let's get this baby stretching!
 
M

Mr. Sparkle

Very good start, two suggestions pop the dome off the lights, and just paint the inside of the cabinet with a good flat white paint, as the emergency blankets aren't as reflective especially in the long run, if it was high quality Mylar sure, but hold up a chunk of that emergency blanket to a light and you'll probably be able to see lightly through it.

But again good start, ill be watching what you can grow in your setup.
 

LedLara

Member
Looking great! good start indeed.

You are at double the lights per sqft I'm at, so curious how it will turn out!
 

bsgospel

Bat Macumba
Veteran
Looks great! I'm thinking of doing something similar with the fan on a future build soon but I'm not strong with wiring/electrical elements. The USB solves that problem easily. How much/where does one find such a fan? A search last night only turned up pin connectors/diy wiring :/

Edit: Nvm, got it...
 

Parallax

Member
Very good start, two suggestions pop the dome off the lights, and just paint the inside of the cabinet with a good flat white paint, as the emergency blankets aren't as reflective especially in the long run, if it was high quality Mylar sure, but hold up a chunk of that emergency blanket to a light and you'll probably be able to see lightly through it.

But again good start, ill be watching what you can grow in your setup.


Thanks for the tip Mr. Sparkle - yes I did a quick test and indeed I can see light shine through the mylar sheet.. so guess I should get some paint for the next grow!
 

Parallax

Member
looking good Parallax. What are you going to be growing in this cabinet?

Well the one I'm growing now is a Blue Mystic (from royal queen seeds) - an indica dominant strain from Oregon, I guess it would be a good strain to start with as it's a northern light cross so little odour and should stay quite small which is what I'm looking for in this microcab. It's one month old now. I transplanted it into this container about a week ago.

But I do have some sativa seeds as well, really curious how those ones will do. Planning to grow all from seed in this microcab, as I don't have a clone/mother room.
 

Parallax

Member
Looking great! good start indeed.

You are at double the lights per sqft I'm at, so curious how it will turn out!

Thanks man. I will use six 13 watt LED bulbs I bought online - one 6500k and five 2700k bulb. Approx 1600 lumen per bulb, so that's a total of about 9500 lumen in total.
 

Safe Gardener

Active member
Nice little cab man. For $9 that's a steel and looks to be perfect for what you're doing.

Keep up the good work, I'll be keeping an eye on this thread.
 

Parallax

Member
Some more photos of the cab itself...


The black piece of wood faces the hole to prevent light from outside getting into the cab. I used draft strips on the top of the cab, the bottom has no strips, this is where all the air escapes the cab. I can feel air flow when I hold my hand there.


The front view of the cab. It's positioned in the corner of a large closet. I used black duct tape on the sides where the cab meets the door to make sure it's all light-tight. And it worked - even with all the lights on I couldn't see any light coming through when I put it in a pitch-black room. The cab is placed on those small jelly-like earthquake pads to reduce vibration/sound.
 

Parallax

Member
Thanks for all the replies :)

Here a quick update of the Blue Mystic (week 5) - grown from seed. She's looking quite healthy. I transplanted her into this container last week. It holds 1.3 gallons of soil and the container is 4" tall. I found the container at the local dollar store - it's one of those dvd boxes. Then I drilled holes in the bottom and used the lid as the drain pan.

She's under one 13w 6500k bulb now. I'm not quite sure if this will provide too much light to get her to fill up the screen nicely. Thinking to place the screen later this week at 4" above the soil line.


Parallax

Member
Very good start, two suggestions pop the dome off the lights, and just paint the inside of the cabinet with a good flat white paint, as the emergency blankets aren't as reflective especially in the long run, if it was high quality Mylar sure, but hold up a chunk of that emergency blanket to a light and you'll probably be able to see lightly through it.

But again good start, ill be watching what you can grow in your setup.

Mr Sparkle you have any tips on how to remove the dome? Should I just try to twist it off? I'm afraid I'll break it. I've been searching on this forum and net but I can't find any useful practical info...
 

blynx

WALSTIB
Moderator
ICMag Donor
Veteran
Nice cab! Looking forward to seeing the Blue Mystic take off and fill up the cab.

Some of the LED domes you have to cut off with a hacksaw/dremel. Others you can pry off with a screw-driver and some just pop off by hand.
 

bsgospel

Bat Macumba
Veteran
Mr Sparkle you have any tips on how to remove the dome? Should I just try to twist it off? I'm afraid I'll break it. I've been searching on this forum and net but I can't find any useful practical info...

Haha, I have the same issue. I can tell you smacking it with a hammer is not the way to go. Phillips should be making tanks!

Blynx- can you tell us which brands were easier to work with when taking the cover off?
 
M

Mr. Sparkle

Nice cab! Looking forward to seeing the Blue Mystic take off and fill up the cab.

Some of the LED domes you have to cut off with a hacksaw/dremel. Others you can pry off with a screw-driver and some just pop off by hand.


Parallax it all depends on the bulb unfortunately like blynx has said, but once that is figured out the rest of them becomes easy, and the domes are just usually plastic so they take quite a bit to actually break.

as for bsgospel i know for some of the philips ones they are glued/siliconed at a couple point where the dome meets the base, and if you run a razor blade through those points or all the way around the junction point, you then can pry off the dome, but saying that the 9w bulbs can pretty much be done by hand where as the 14w ones take a bit more force to do so and you usually have to use a flat head screw driver to pop them off.
 

Chevy cHaze

Out Of Dankness Cometh Light
ICMag Donor
Veteran
Mr Sparkle you have any tips on how to remove the dome? Should I just try to twist it off? I'm afraid I'll break it. I've been searching on this forum and net but I can't find any useful practical info...

I can recommend to use a hammer and flat screwdriver for Philips bulbs. At least for the 13w ones, they're the only ones I'm using.
Hold the bulb flat on on a hard surface with your palm on the bulb, put the screwdriver to the gap between housing and bulb with the fingers of the same hand and use your other hand to swing the hammer. A good knock on the back of the screwdriver will drive the flat head in. Watch the angle, so you don't crush your chips. Then twist the screwdriver- the bulb will lift a bit in that spot, move the crewdriver further along the gap, twist again and do this until the dome is off (one or two twists in total is normally sufficient).
Once you get the hang of it- piece of cake. Osram bulbs i found much harder to open though...
Good luck!

CC
 

ReikoX

Knight of the BlackSvn
I believe it was HuffnPufferfish who suggested this one, drill a hole through both sides of the plastic dome, then stick a screw driver through both holes and pull it off.
 
Top