
The VolksLED –
After my experience with building up my hybrid fixture, I wanted to come up with a way for people to house their DIY LEDs without going to the amount of work (and material cost) that was required in that design. While having a bare heatsink with a bunch of components attached to it will work, I like the idea of having everything enclosed so that the wiring is protected and the fixture is more aesthetically appealing. This is my answer to a DIY fixture for the masses!
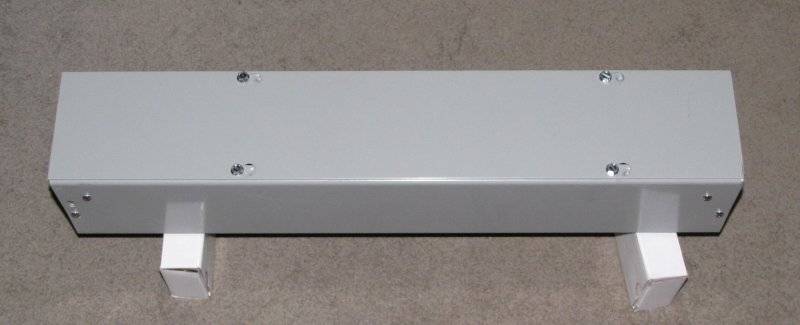
I had a spare heat sink left over from my hybrid project, and decided to use it for a foundation. The design of the California Lightworks Solar Flare caught my fancy – the top center fan placement, pressurizing the housing and allowing the exit air to escape through ports at the end of the heat sink all seemed both very effective and easy to duplicate. It struck me that an electrical “gutter”, or wiring trough, commonly used in industrial wiring could be readily adapted to form a housing that incorporated these design elements. The spare heat sink was 4” x 22”, so a 2’ long section of 4” gutter was purchased.
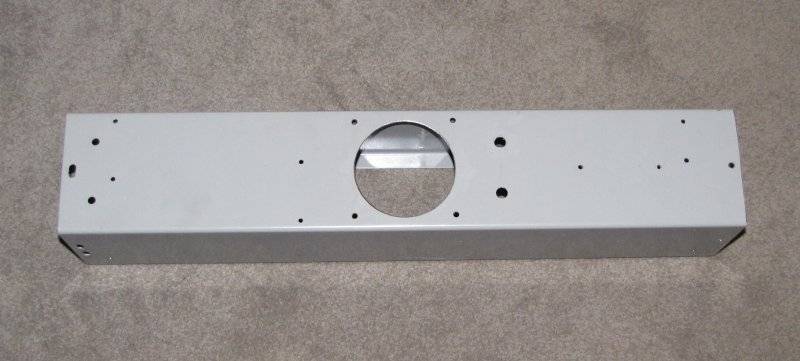
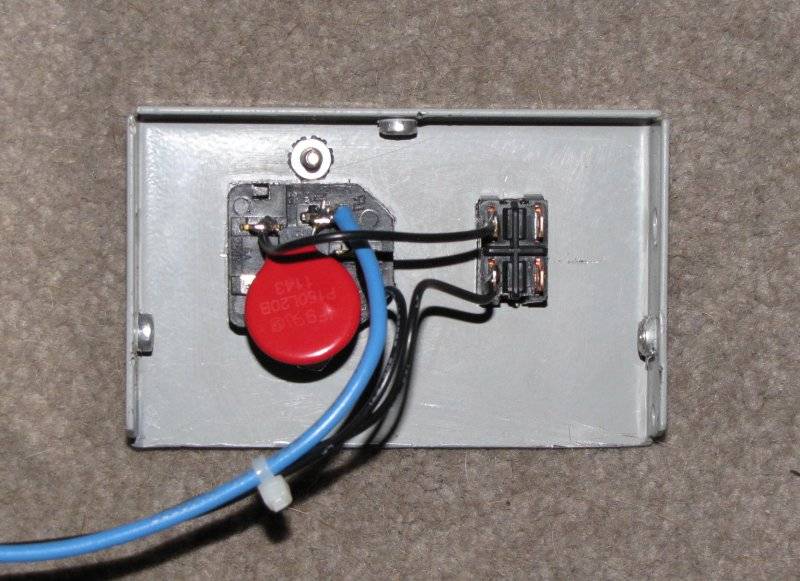
A sawzall was used to trim the extra 2” of length off, and also to trim down the gutter endplates for exhaust-air ports. Cutting the holes for the power switch and the fused power-cord header were probably the most tedious part of the project. You would think that since the parts are made out of plastic rather than some high-dollar material that they could give you more than .025” of flange to cover the hole, but being user friendly obviously wasn’t in the design criteria. This minimal flange, plus the odd shape of the device, made it necessary to do a lot of file work and test fitting to try and avoid a gaping fit. A MOV was placed across the power leads on the back-side of the header to help with spike suppression. The LEDs come with Zener diodes installed on the MCPCBs to further protect the devices.
The cooling fan was selected for it’s quiet performance – Noctua fans are well known by computer enthusiasts for their exceptionally low noise levels while still being able to move a reasonable amount of air. This model is a NF-B9-1600, which will move 38 cfm while generating less than 18 decibels. The fan is an 80mm unit, so a 3-1/4” hole saw worked well for creating a hole for it in the gutter.
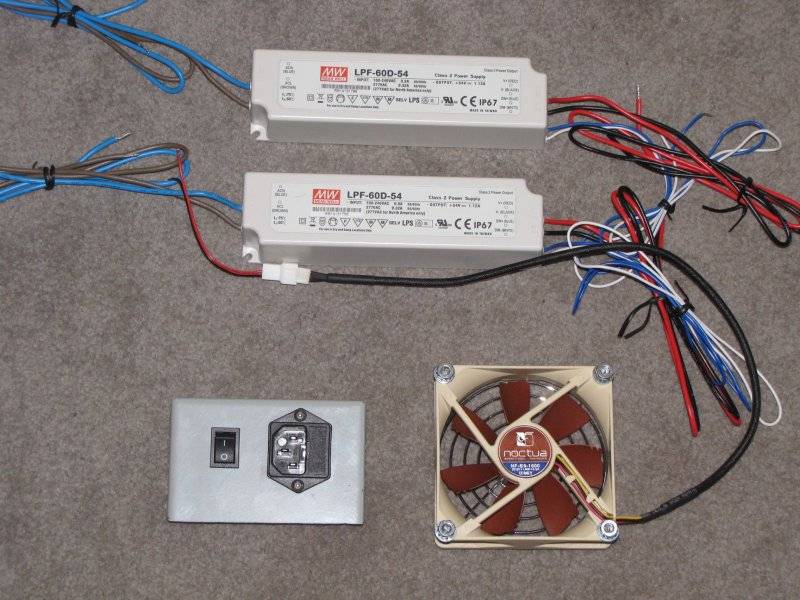
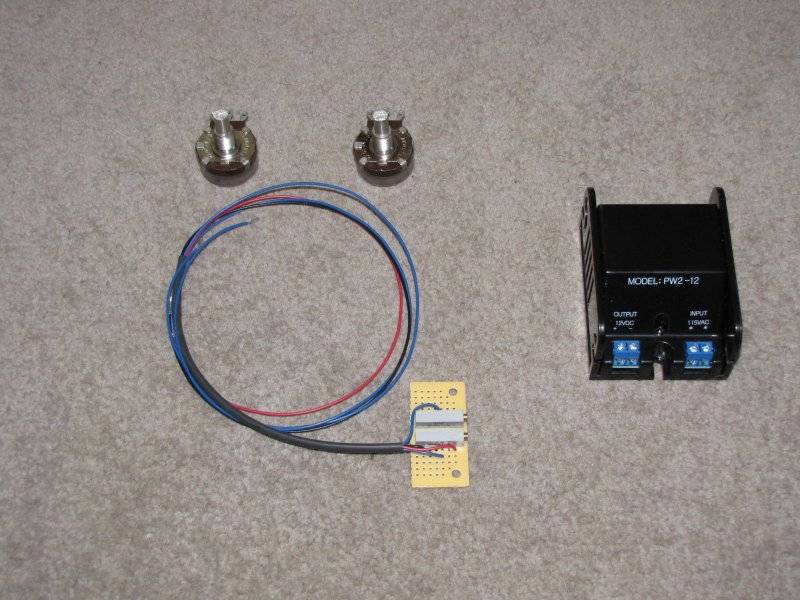
Since the fan is intended for the computer market, it is 12vdc and required a separate 12v power supply. This worked out well because the two Meanwell drivers could use a 0-10vdc signal (optionally using resistance or Pulse Width Modulation) to control their dimming function. Using the voltage option makes it very simple to limit the maximum current that the LEDs will see, in this case using two small trim pots (potentiometers) that are mounted on a piece of Radio Shack circuit board. These pots were set up as a voltage divider, and the output from them was directed to the large dimming pots accessible on the top of the housing. The 2-watt power supply is from Digikey – the fan pulls 1.3 watts and the dimming circuits are only a couple of milliamps.
After my experience with building up my hybrid fixture, I wanted to come up with a way for people to house their DIY LEDs without going to the amount of work (and material cost) that was required in that design. While having a bare heatsink with a bunch of components attached to it will work, I like the idea of having everything enclosed so that the wiring is protected and the fixture is more aesthetically appealing. This is my answer to a DIY fixture for the masses!
I had a spare heat sink left over from my hybrid project, and decided to use it for a foundation. The design of the California Lightworks Solar Flare caught my fancy – the top center fan placement, pressurizing the housing and allowing the exit air to escape through ports at the end of the heat sink all seemed both very effective and easy to duplicate. It struck me that an electrical “gutter”, or wiring trough, commonly used in industrial wiring could be readily adapted to form a housing that incorporated these design elements. The spare heat sink was 4” x 22”, so a 2’ long section of 4” gutter was purchased.
A sawzall was used to trim the extra 2” of length off, and also to trim down the gutter endplates for exhaust-air ports. Cutting the holes for the power switch and the fused power-cord header were probably the most tedious part of the project. You would think that since the parts are made out of plastic rather than some high-dollar material that they could give you more than .025” of flange to cover the hole, but being user friendly obviously wasn’t in the design criteria. This minimal flange, plus the odd shape of the device, made it necessary to do a lot of file work and test fitting to try and avoid a gaping fit. A MOV was placed across the power leads on the back-side of the header to help with spike suppression. The LEDs come with Zener diodes installed on the MCPCBs to further protect the devices.
The cooling fan was selected for it’s quiet performance – Noctua fans are well known by computer enthusiasts for their exceptionally low noise levels while still being able to move a reasonable amount of air. This model is a NF-B9-1600, which will move 38 cfm while generating less than 18 decibels. The fan is an 80mm unit, so a 3-1/4” hole saw worked well for creating a hole for it in the gutter.
Since the fan is intended for the computer market, it is 12vdc and required a separate 12v power supply. This worked out well because the two Meanwell drivers could use a 0-10vdc signal (optionally using resistance or Pulse Width Modulation) to control their dimming function. Using the voltage option makes it very simple to limit the maximum current that the LEDs will see, in this case using two small trim pots (potentiometers) that are mounted on a piece of Radio Shack circuit board. These pots were set up as a voltage divider, and the output from them was directed to the large dimming pots accessible on the top of the housing. The 2-watt power supply is from Digikey – the fan pulls 1.3 watts and the dimming circuits are only a couple of milliamps.


