What's new
  • Happy Birthday ICMag! Been 20 years since Gypsy Nirvana created the forum! We are celebrating with a 4/20 Giveaway and by launching a new Patreon tier called "420club". You can read more here.
  • Important notice: ICMag's T.O.U. has been updated. Please review it here. For your convenience, it is also available in the main forum menu, under 'Quick Links"!

Mini PPK Full Build Tutorial with Pics

Rocketman64

Member
Credit for developing the growing system known as the Passive Plant Killer goes to a member here on ICMAG. delta9nxs is the one responsible for putting together this type of simple, rock-solid approach to hydroponic growing. This tutorial will demonstrate how I built a mini version of what Delta uses to grow astonishing, healthy and huge-producing plants. I tried to mimic his technique as closely as possible using just what I had on-hand.
My system isn't nearly as expansive as Delta's so my approach allows me to follow the general guidelines without being too precise. I would encourage anyone interested in this technique to visit Delta's grow threads to become familiar with the science involved here. Most of those details will not be covered in this tutorial. The following is a rough, step by step pictorial showing my basic hardware assembly for the Mini PPK I built.

Sorry, no item list:
I'm not providing a specific item list for things needed because it's easy enough to substitute what you have on hand for what I've used. I'm not one to buy anything new if I have something similar available for free. To me, that's the beauty of DIY projects. If you're reading this and are interested in the project, I'll assume you have already taken on DIY projects in the past, therefore, I will not bore you with science details, specific measurements or even what drill sizes to use for what I've built.

Start like this:
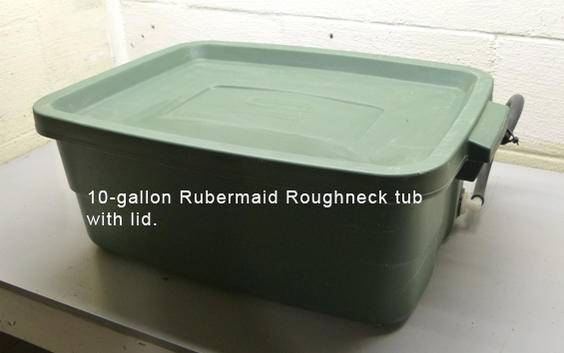
Find yourself a ten-gallon Rubbermaid tub or something similar. Make sure it's opaque, allowing no light to penetrate to the nutrient solution. Your container should also have a fairly sturdy lid that snaps onto the container. The lid will serve to hold your growing container full of grow media and the plant itself so make sure it can handle some weight. If not, add some braces underneath for added support.


Go get your drill, jig saw or whatever tool you need and cut a 3-inch hole in the center of the lid of your container. I've done this with a pair of tin snips before, sturdy scissors may work as well.


Decide on a growing container:
It's really tough to beat this one:

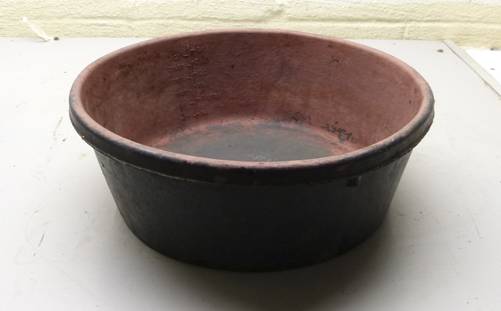
This is a recycled rubber livestock feeding dish found at Tractor Supply for $5. It's heavy-duty, drills and cuts well, solid black and is never, ever going to wear out. Can't find one? Find something else, not a big deal. The idea here is it must be opaque(light proof), should be wider than it is tall and should fit nicely on top of the lid of the 10-gallon tub you're using.

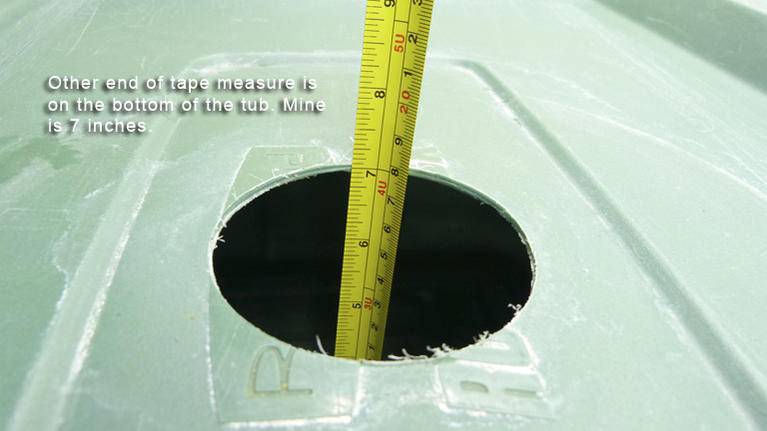
Find a piece of tubing with an inside diameter of 2 ½ inches and somewhere around 6 inches long. PVC is the obvious choice here and it's what I've used on mine. Use what you have but do make sure it is no smaller than 2 ½ inches inside diameter. After cutting the hole in the tub lid place it on the 10-gallon tub. Measure the distance from the lid surface to the bottom of the tub. Subtract roughly two inches from that measurement and cut your 2 ½-inch ID tube to that length.
 
Last edited:

Rocketman64

Member
Mini PPK continued

Mini PPK continued

https://www.icmag.com/ic/picture.php?albumid=59176&pictureid=1386579 Measure the outside diameter of the tube you selected. Cut a hole in the bottom of the growing container equal to or slightly smaller than the outside measurement of your tube. Shove the tube into the hole in the container so it makes as good of a seal as possible. It is not critical to obtain a perfect seal here because if it does leak, the solution will simply flow down to the reservoir anyway. Make sure the tube doesn't protrude too far into the growing container. It needs to be almost flush with the bottom but again, this is not critical.
https://www.icmag.com/ic/picture.php?albumid=59176&pictureid=1386590 https://www.icmag.com/ic/picture.php?albumid=59176&pictureid=1386586
You should now be able to place the grow container with the tube attached onto the lid of the 10-gallon container without the tube hitting the bottom of the tub. If it does, cut the thing until it doesn't. Now is a good time to find some screen or nylon panty hose to put over the bottom of the tube to keep the media in.
 
Last edited:

Rocketman64

Member
Mini PPK build continued

Mini PPK build continued

Make a few Decisions:
You don't have to build this exactly as I did but there are some basic needs here. I'm using a cheap-ass pond pump I found at a local hardware store years ago and an old aquarium air pump with one air outlet complete with air hose. I also had a 50-watt aquarium heater with adjustable thermostat. Again, use what you have but make sure you have a pump, air bubbles and a way to keep your reservoir above 72 degrees farenheit. Here's my junk:

On this particular version I've chosen to use a plastic lid from some other container to mount my junk on. It fit perfectly inside the tub and allows me to remove all my junk at once by just lifting the plastic piece out of the tub. If for any reason I need to empty the tub, it's simple to get the crap out of it. Do what you want here, no need for the extra piece of plastic. Just mount your junk in the tub somewhere on the bottom that doesn't interfere with the drain tube from the growing container coming through the hole in the tub lid.

Once your junk is mounted in the tub, do something with the two wires (one from pump, one from heater if used) and the air hose. I just bundled it and routed it up one corner and out of the tub. I used a little screw and plastic clamp to keep it attached neatly.

I chose to mount my little air pump to the outside lip of the tub so I didn't have to hear the damn thing rumble on the counter top.


Pump hose and watering method:
With the tub lid off, connect a hose from the pond pump outlet straight up far enough so the hose goes through the lid of the tub and add about 8 inches. The hose needs to be long enough to reach the top edge of the growing container you chose to use.
 
Last edited:

Rocketman64

Member
Mini PPK build continued

Mini PPK build continued

Here's a shot of a watering ring I made from some red plastic hose just for the hell of it. This has small holes drilled through the under side pointing down into the media. Solution squirts out of the holes into the media at the correct rate to fill the container within 30 seconds. You don't need anything like this for this to work. All you need to do is make sure the hose from the pond pump is able to deliver the solution to the growing media without splashing all over hell. I made the ring because I was tired of pulling growing media out of the end of the pump hose. Each time the pump shuts off, the back-flow of solution in the hose pulls growing media into it if it's laying on the surface. The watering ring eliminates the problem. I also found a small piece of nylon stocking over the end of the hose worked pretty well.


A couple options if you choose:
I drilled a hole near the bottom of the tub and inserted a feed-through barb for a drain hose. With a small length of hose attached to the barb I can drain the tub at anytime. I simply store the hose already attached with the open end above the water line. When I want to drain solution from the tub I lower the open end of the hose to allow it to drain into a bucket.

I also use a product called MicroKote to coat the inside of my growing container. This coating is designed to chemically prune the roots as they reach the side of the container. The pruning prevents 'spin-out' of the root ball as it expands. This will also serve to create more of the intricate, smaller root structure which will greatly aid the health of the roots as well as increase the surface area available for nutrient uptake. You don't need to use anything like this but if you're plan is to grow big plants in this Mini PPK unit, expect roots to fill the entire container and begin to overrun it. MicroKote works well for me and a little goes a long way. I've never pulled a root ball out of one of my containers that showed any signs of crowding or spin-out.


You're done now:
Here's the finished unit ready for a plant. I put this under 4- 42watt CFL's of varying color temps and I grow my tiny plants with ease. In my experience, the PPK system grows plants fast and healthy. I don't worry about pump failure because the type of media used holds enough moisture for the plant to survive for weeks without even pumping solution into it. Furthermore, the capillary action of the floor dry media serves to wick solution up to the root level without saturating the root zone. If you're looking for something compact, easy to run and pretty cheap to build, the Mini PPK could be your answer.


That raps up the building part of this tutorial. My next posts will include a few details on growing media, cycle timers and a basic outline of how I run the Mini PPK.
 
Last edited:

Rocketman64

Member
Running the Mini PPK and other boring details

Running the Mini PPK and other boring details

Okay, growing media time:
Turface or oil-dry (floor dry absorbent) materials are ideal. Turface is surfacing material used for sports fields. It turned out to be tough for me to track down around here so I chose option #2. I'm using the cheapest garbage I could find, on sale, with a coupon, reward points, etc... they basically paid me to get the shit out of the store for them. Bottom line for me: any quality oil absorbent/floor-dry media should do the trick.
If you vary the particle size of the media, bad things start to happen. Stick with the oil dry absorbent or turface or you'll be sorry. Delta spent long hours figuring out the best particle size to make this work. Who am I to question his results? I'll just shut up and do what he says.
Give it a general rinsing to get the dust off before putting it in the growing container. The more you get off now, the less ends up in the solution later. I've never had a problem with all the dust in the solution even when I don't rinse it off but it does make it pretty cloudy. I prefer not to deal with potential problems later in the grow with a crappy solution so I do tend to rinse well. After all, it's only about a gallon of media, takes me 5 minutes at best. I chose to use my wife's spaghetti strainer for this operation and no, I didn't tell her, nor should you.


A quick word on cycle timers for your pond pump:
You can spend whatever you want on these things. If you haven't picked up on this yet- I'm one cheap son-of-a-bitch and refuse to pay too much money for something that does so little. There are cycle timers on Ebay, at hydro stores or other retailers online. If you decide to go cheap, be prepared to replace it on a moments notice when it fails. That's the sacrifice I make for keeping money in my pocket. If you don't like those odds, get something reliable (read: double $$).
Your timer needs to have separate adjustable on and off times. I use a cycle of 30 seconds on time and 90minutes off time. It's important to be able to adjust the on time in 1 second increments, more explanation to follow.
I found this cycle timer to be the least expensive unit capable of doing what we need it to do:
https://www.hydroponics.net/i/138938

What the cycle timer is doing for you:
The PPK works by pumping fresh solution from the reservoir up to the grow container at a rate that fills the entire container with solution to the point of almost overflowing. In my system, this takes 30 seconds of pumping. Your time may vary a little based on any number of variables. This is why I recommend a cycle timer capable of being adjusted using 1 second increments. Play around before planting anything to determine the perfect pumping time. This becomes your on time. Set your cycle timer accordingly for this time. Set your cycle timer's off time for 90 minutes. Don't question it, just set it.
The important thing here is the entire grow container is filled with pumped solution and then allowed to drain through the tube and back into the reservoir within a minute or so after the pump shuts off. If the tube you chose was too small, the solution won't drain back through the media fast enough. In this scenario, drowning of the roots is bound to occur. Tweak whatever necessary to allow the solution to drain out of the media completely within roughly 60 seconds.


How I Run my Mini PPK
In this section I will outline general guidelines that have worked for several grows in the mini PPK. I'm only going to cover what I found to work consistently. There very well could be other nutrients, temperatures, pumps, grow media, timers and miscellaneous crap one could use to make this work. Experiment like I did, it's a lot of fun killing plants! After all, this isn't named Passive Plant Killer by mistake.

Nutrients I chose:
J.R.Peters Inc. Fertilizer Products and Services. The product I use is Jack's Professional 5-12-26 Hydroponic formula in combination with Jack's Professional 15-0-0 Calcium Nitrate.
This combo was recommended to me many years ago by a local florist growing flowers for resale. He swore by this stuff and made me promise I would try it.
Fast forward a couple years and what do I see Delta using in his PPK grow threads? Yep, the very same stuff I already had. Bonus!

I won't spend hours selling you on the product but I feel it's worth mentioning because it's an integral part of what makes this system so simple. Please keep in mind what I'm growing in this thing. My plants are small, short, stocky little girls that never reach 24 inches tall. They yield the perfect amount for my level of personal consumption. Obviously, growing larger plants will require more solution to take them to completion.

Once the Jack's is mixed according to directions for a 10-gallon batch, 8 gallons(aprox.) is poured into my tub. I hold back 2 gallons. I'm now done with the nutrient game. I really do mean done. Jack's has performed so consistently for me that I no longer check PH or PPM's of my working solution. Furthermore, I never change the reservoir throughout the entire grow. You read that correctly.
In addition, I never change formula throughout the entire grow. No bloom boosters, no PH up or down, no magical bud busters of any type. Jack's Hydro mixed according to directions is a complete solution start to finish. The one 10-gallon mix I make at the beginning of the grow is what I use until I'm harvesting. That's all I have to say about that.
 
Last edited:

Rocketman64

Member
Running the Mini PPK continued

Running the Mini PPK continued

8 gallons in the 10-gallon tub:
In order to maintain the proper balance of air space between the level of the solution in the reservoir and the bottom of the grow container, it may be necessary to experiment with how much solution goes into the tub to start. I mentioned earlier that I only fill my tub with approximately 8 gallons. This serves two purposes. With only 8 gallons in a 10-gallon tub the waterline is about three inches from the top of the tub. Keeping the solution at this level insures the perched water table stays below the roots. I italicized those bold words for a reason- Google is your friend.


The second reason I only use 8 gallons is to make sure I have two gallons of the exact same nutrient mix on reserve. During the grow the plant obviously starts consuming the solution. Keep an eye on the level in the reservoir and add when necessary. Try to maintain your three inches from the top as the grow goes along. Sometimes I add water, sometimes I add a little nutrient solution. Sometimes I mix the two and add the diluted solution. The beauty of the Jack's reliability and consistency really shines here. I'm just not that particular about the nutrients unless the plant gives me a reason to be, which in my case seems to be a rare occurance.


PPM's, EC, PH and blah, blah, blah:
If you're at all concerned with PPM's and PH and instinct simply won't allow you to ignore, then by all means check it. PH should be somewhere between 6-5.5. Keep your solution in the range of 600 PPM. I've run anywhere from 600 to 1000 with no noticeable changes in plant behavior. More water consumption by the plant generally means an escalating PPM value. More nutrient uptake by the plant generally means a lower PPM value. Go ahead. Play around, I know you're going to. Just beware: before you add your magical love potion to the solution, remind yourself what the acronym PPK stands for.


Solution temps:
I don't mess around with crazy temperatures. Every plant I've grown has been grown with the solution temperature at 75 degrees fahrenheit. That's where it works for me and that's the end of it. Having a heater with adjustable thermostat is a godsend for keeping consistent temps. Summer months are warmer in my grow area then winter months, duh. Being able to keep it where I need it leaves one less thing to screw around with or question if a problem arises. I keep a thermometer on-hand to periodically check the solution temp to make sure my junk heater is still working.


Bleach it or else:
If you've grown in Hydroponics before you're probably wondering why I haven't mentioned anything about keeping things sterile. If you feel better about keeping things sterile when assembling your unit then hell yes, sterilize. When I started working with the Mini PPK I was too lazy to worry about cleaning stuff. I threw the thing together, planted something and watched magic happen. I never gave a thought to algae, fungus, slime or any other abnormality. This is not normal.
Generally speaking, most hydroponic systems are going to suffer from slime, algae and other problems if things aren't kept sterile. Because my tap water has a higher level of chlorine than normal, it stayed healthy for me. I would not expect a large PPK system to operate without slime development if nothing is done to kill the pathogens. The bottom line? Don't take chances, clean your junk.
I add .5ml of household bleach to the nutrient solution in the tub. If you don't want to use bleach, don't use it. Please don't blast me with comments about the evils of bleach. Chlorine is a naturally occurring element and when used in proper proportions is extremely effective at keeping the nasties at bay.

Seedlings, clones or whatever:
I start my seeds in paper towels, plant sprouted seeds in a potting mix and allow to develop at least one full node, sometimes two or more if I'm lazy. I then transplant the seedling into the Mini PPK. I'm pretty sure you could plant a seed directly in the PPK or maybe even start a clone in it. I have no idea if either one of those ideas works as I've never tried it. Report back and let me know.
 
Last edited:

Rocketman64

Member
Mini PPK conclusion and summary

Mini PPK conclusion and summary

Okay, that's enough:
A brief summary:

  • Use the right media in your grow container. It must drain completely within 60 seconds.
  • Solution reservoir needs to block all light from penetrating.
  • Use a growing container that's wider than it is tall.
  • Drain tube in growing container needs to be no smaller than 2.5 inches inside diameter.
  • Use a quality nutrient solution and mix according to directions. Add bleach if you want.
  • A cycle timer for your pump is required- ON time determined by you. OFF time is 90 minutes.
  • Air bubbles in the reservoir are required to keep the solution aerated.
  • Maintain 75 degree fahrenheit solution temperature.
  • Maintain an adequate air space(roughly three inches) between the bottom of the growing container and the top of solution level.
  • Take the time to read Delta's PPK threads and then take the time to thank him for all his hard work putting together a rock-solid hydroponic performer.
  • NOW GO KILL SOME PLANTS!https://www.icmag.com/ic/picture.php?albumid=58623&pictureid=1380450
 

av8or

Member
Very awesome, Rocketman! Thank you very much for the thorough, yet easy to follow, tutorial. I'm wondering if by not heating my res (temps usually around 68-70) that I'm slowing growth?
 

jump /injack

Member
Veteran
I watched delta9nxs grow his plants with this outfit for a couple of years, it works and works very well. Your contraption is great just like the big one, you've done well in emulating delta9nxs as your plants attest. I started using Jack's because of those threads, like you I think its hard to beat, someone worked it out to .17 cents a gallon.
 

Rocketman64

Member
I watched delta9nxs grow his plants with this outfit for a couple of years, it works and works very well. Your contraption is great just like the big one, you've done well in emulating delta9nxs as your plants attest. I started using Jack's because of those threads, like you I think its hard to beat, someone worked it out to .17 cents a gallon.

Yep, I don't see myself switching anytime soon. It's not the product for someone who likes to tinker and experiment with nutrients. It's the product for when you've had enough with tinkering and experimenting with 12 different bottles of crap.
 

Snook

Still Learning
Veteran
well done rocketman, good tute... nappa 8822 floor dry is pretty good ($6/35lbs).

rez temps were proven to not make much of a difference by 'ImaginaryFriend' a few years back, he was PPKing in 90+*F and was being successful. as 'the man' (D9) once wrote (paraphrased) nute solutions temps in typical hydro is important because cooler water holds more O2. the PPK does not have a requirement for O2 in the solution as O2 is supplied by the retreating water 'pulse/flood' to the PPK. just saying and I thank him every chance I get.. sounds corny but the man is good.
 

Permacultuure

Member
Veteran
well done rocketman, good tute... nappa 8822 floor dry is pretty good ($6/35lbs).

rez temps were proven to not make much of a difference by 'ImaginaryFriend' a few years back, he was PPKing in 90+*F and was being successful. as 'the man' (D9) once wrote (paraphrased) nute solutions temps in typical hydro is important because cooler water holds more O2. the PPK does not have a requirement for O2 in the solution as O2 is supplied by the retreating water 'pulse/flood' to the PPK. just saying and I thank him every chance I get.. sounds corny but the man is good.

Truth :tiphat:
 

Rocketman64

Member
I haven't played around with temps but now I'm wondering. I get pretty fast results running at 75 Fahrenheit but I wonder if it improves with even warmer temps. The 50w heater I have could probably bring things up to 90 or better. Maybe on this next run I push the envelope a little. Anybody want to throw their opinion in here? So far, I have the general consensus that warmer is good. I'm willing to jack it up if the experts agree on the idea.
 
Top