
Excerpt Cut from my journal. I thought a copy would fit nice in the Hydro section:
Pirate’s DIY Low Pressure Aeroponic System for Dummies
Alrighty then:
I have had many requests for some info on my Aeroponic tables. This will serve as a tutorial for anyone interested in this style of growing. Now, there is a lot info around for DIY Aeroponic cloners and seed starters but we are going to shift our focus to BLOOMING tables this time. I don't claim to have all the answers on Aeroponics or to be some kind of authority. I'm only passing along what I found to be solid working ideas through actual usage in my grow room.
We will be building this unit: But I will discuss other options along the way.
How did I end up with that table ?
My very first grow was started in Rock-wool / Grow Rocks with Flood & Drain tables. I knew before I even started my 1st grow.........through pre-grow research, I was gonna end up with Aeroponics since it is the most advanced, technical & modern form of growing and that’s my personality. I always say "if Aeroponics is good enough for NASA......Its good enough for me". They have been using Aero for years in space. It’s the only practical method in zero gravity. (I have no gravity in my cave…..It can be a bitch)
With that said.........Aeroponics is FAR from hard and many people stay away from it because it’s always touted as being for "advanced growers". NOT SO. Don't be fooled........ANYONE can grow in Aero. After growing with DWC, Dirt, Coco, Ebb & Flo... I can honestly say.........Aero to me is the easiest. One of the benefits I like the most about any form of HYDRO in general is: When you make a change to say......PH or EC you see instant results in readings and the plant will respond within hours. Not so with dirt. Dirt can take days or even weeks to show a PH change and requires the soil to stabilize. I don't have weeks......... I have minutes when a parameter is off. I want it fixed now and I want to walk away KNOWING its right. Not find out 10 days from now that my changes didn't work or worst……….were wrong.
Now I am not bashing any other form of growing..........I am simply stating the reasons why I choose to use Aeroponics. All forms of growing have there place and there are "different strokes for different folks" so if your happy with what ya got going......... then by all means…........stick with it. But if your looking for a SUPERCHARGED growing experience or want to try something new. Give Aeroponics a whirl. You won’t be sorry.
I'm not going to go into detail about things like history and other Aero methods......if ya want that go here: http://en.wikipedia.org/wiki/Aeroponics I will say that there are various forms of Aeroponics with the 2 most common being......Low Pressure Aero & High Pressure Aero. We will deal with Low Pressure. I have considered High Pressure but the expense is WAY up there and with the results I am getting….. I don’t see a reason to upgrade. Not to mention.......High Pressure brings in a whole new level of problems with the pumps, jets or foggers required.
LOW PRESSURE AEROPONICS Uses regular fountain pumps (or similar) found at the hardware store, hydro shop, garden supply center or ?? You probably have 1 or 2 in your stash of goodies right now. LP Aero disperses a mist or spray through micro sprinklers, sprayers and/or misters. Everything can be purchased at your local hardware store and NOTHING special is required unless you want to use the FOGGER type unit which I will not go into here. (very expensive) A fogger can run $500.00 just for the fogger unit alone) Not me Baby!!!
HIGH PRESURE AEROPONICS Uses High Pressure pumps to create a very fine mist through high pressure rated pipes or hoses, sprayers or misters. It will require you to use special fittings and more elaborate construction methods. Everything involved will cost more and be more complicated. We will not use HP Aero for our DIY unit. K.I.S.S !!
There are many reason why I chose Low Pressure Aeroponics.
Here is a small list of PROs:
Here is a small list of CONs:
POWER FAILURES:
Before we go into anything else......lets get power failures out of the way. This idea can work for anyone that uses any system with a pump. A very simple way to prevent your garden from drying out in the event of a power failure is to install a Computer UPS backup system. You can grab one for $100.00 and it will run several pumps. ($100.00 is cheap insurance when your 90 days or so into a grow that might bring a pound of more). If power goes out for ANY REASON......The UPS (Universal Power Supply) will kick in and SAVE YOUR CROP !! This is especially important if your running Aeroponics since the moment water stops flowing........Your roots start to dry out. You don't have a lot of time if this happens. I did leave a pump off one time (like an idiot) and didn''t catch it for 18 hours. I thought I lost the whole crop but I saved it. I did lose 3 plants out of 48 though. The rest recovered and went on as if nothing happened. Now you don't need to have the UPS to run Aeroponics. I'm just mentioning it as an option if the possibility of losing power worries you. ( I do not have one if that makes ya feel any better) (But it is on my list of things to buy in the near future) Like I said.........Insurance.
I’m going to show ya 3 or 4 different units that I have built over the years. All are good and worked well. But the one I am going to HIGHLIGHT is my latest version and could be considered Commercial Quality. If ya saw it in person you would swear I bought it from a manufacturer. And it works quite well. I was never happy with my first 2 and was searching for an answer until one day I decided to convert a basic flood table I had to Aero. And you can do the same with the one ya got now.
One of the inspirations for going Aero was the DVD “See More Buds” “15 pounds in 80 days”. I actually went out and bought the same Aquamist Unit as shown in the film. But after spending 500 Golden Pieces….. I quickly said to myself (out-loud)………”I’m gonna have to build my own if I want more of these”. And that’s just what I did. But getting to my Battleship Model was a long learning process. Maybe I can save you the headaches.
Here is an Aquamist as seen in the DVD: It's a Pre-made unit that can cost $350 to $500. It is 24 x 46 inches and you can harvest a pound of dried bud from it but it's just to expensive to be practical if ya need more than one. It came with the 2 inch holes and I made the top with the 3 inch holes. I abandoned the 3 inch hole idea soon after. I'll explain later.
Shall we get to building our own? OH GOODIE !! My favorite part……….. building stuff.
I'm gonna show ya a few units to give you an idea to the range of possibilities. Use your imagination to build the unit that fits into your space. You can use anything that works for you and build it anyway you want. Its yours. I love to browes the hardware stores, lumber yards, thrift shops, etc to get ideas or find that tub, part or whatever I need or have been searching for. If your American.........Home Depot is the DIYers best friend.
UNIT #1 My DINGY !!This was my first attempt at some sort of Aeroponic plant starter. It's kind of cheesy but after a few years its still alive. I rarely use it much. Mostly sits on a shelf since I robbed a few parts from it for other things. Not going into details on how to build it. You get the idea. I bought the tub for $4.00 at a .99 cent store. (shouldn't it have been .99 cents ?) Total cost to build was around 25 or $30.00 with the pump costing the most.
GUTS
Next is the very first unit I built to flower in. This unit is good and I would suggest it as a first build. With the right strain you could get close 1 pound from it but 12 ozs is more practical for a strain giving up 12gs per plant in a SOG. It hold 32 plants. The tub is a MORTAR Mixer tray from Lowes and cost $12.00. The top is a 1/4 inch sheet of Plexi-glass with holes cut for 2 inch net cups. I painted the top with black paint and then 2 coats of white. Total build time is around 6 hours and total cost around $75.00 with the pump and plexi glass being the most money. Again.......I'm not gonna detail this unit. This is just to give you ideas: But I will give a headache saving tip. DO NOT use silicone or glue between the plexi lid and the tub. It will end up leaking because it just won't stick to the plastic. Use 1/2 round weather stripping and you will get ZERO leaks.
My first Aeroponic Bloom machine: My Cruiser Model
Micro Sprinkler close up:there are 3 of these
I like Cantalope
Sprayer Access points
Sprayer Access Lids:
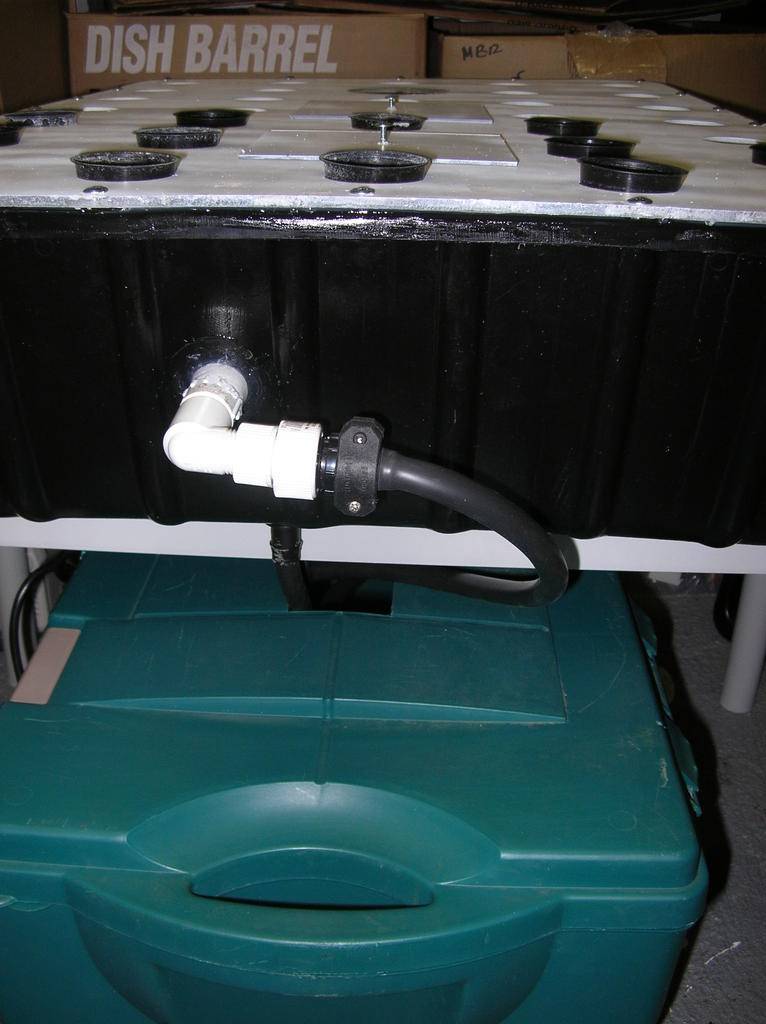
Nutrient feed line and return to Rez
Ready to Grow:
The next generation:
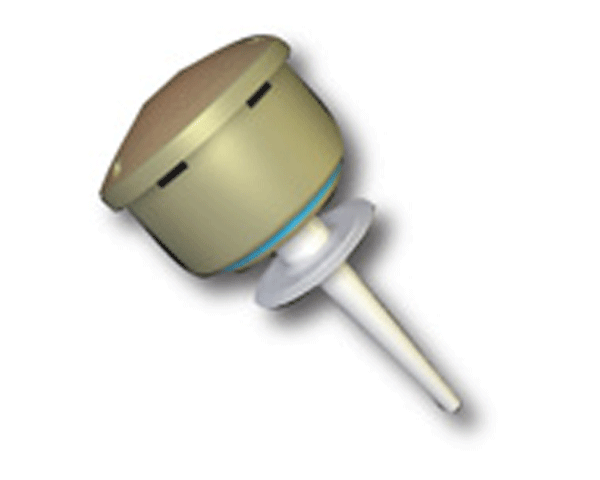
I was browsing EBay one day and came across a guy that was selling all his hydro stuff. He started at $500.00 but he had a stipulation that it had to be picked up by a certain time. I am not sure why no one jumped on this but I made an offer of $250.00 and would pick it up the same day. (he was moving and was under the gun) I freaking scored on that buy for sure. When I drove up and he took me to the pile I was buying…….I about shit my pants !! I drove away with a pickup truck LOADED :whoohoo: so high with stuff that I had to use Plywood sides to contain it all. Among that load was 16 - GH Rain Forest units with Vortex sprayers. I came up with the idea of converting my first unit to utilize the vortex sprayer. (A vortex spray is basically a small motor incased in a plastic dome that has a funnel shaped tube extending down into a rez of water. As the tube spins it sucks the water up and sprays it out the top. They are pricy at $130.00 each but they are the bomb for Aeroponics and I got 16 of em for $250.00 (plus the rest of the truck load of nutrients, 2 x 4 trays, pumps fittings, hoses, buckets of gro rocks.....and tons more)
GH Vortex Sprayer;
Here is the conversion: My Nuclear Powered Cruiser Model Although this is not the unit I am highlighting in this Tutorial……….I will suggest this method if ya want to drop the cash for a vortex or have one laying around. Very easy maintenance and will produce well. In fact……….I have been using these units (I built 12 of them) for almost 2 years now. They have gone through a few changes but it is a good option if your spaces is 24 inches x 36 inches. The only reason I decided to design another type of unit is that I have 12 of these tables and EACH ONE is its own self contained 10 gallon rez which is fine but when ya have 12……….changing nutes can be very labor intensive. If ya only need 1 or a few………Go this way. They work great. You can use the sprayer method (above) to save $100.00.
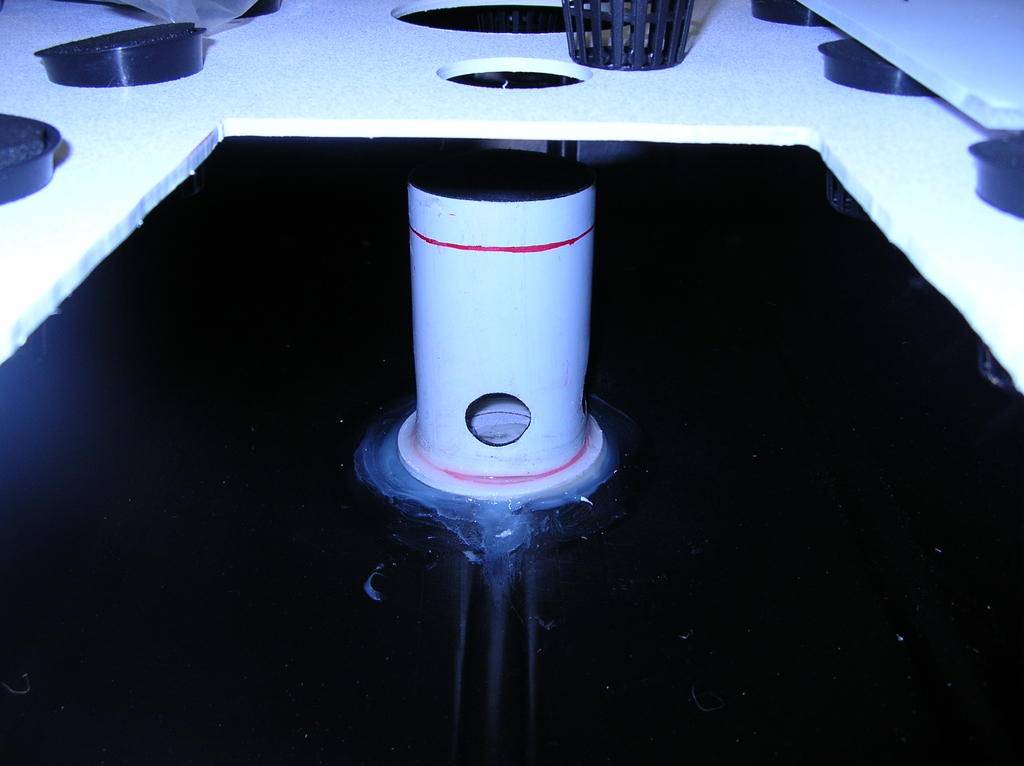
In order to use the Vortex.......You need to install a root guard to prevent roots from wrapping around the spinning tube. The red line is the 10 gallon Mark. Use Lexan glue for the best bond.
This is after I abandond the Micro Sprinkler method and went with the Vortex only. The top is ABS plastic. You can see how each unit is progressing as I learn and figure out new ideas.
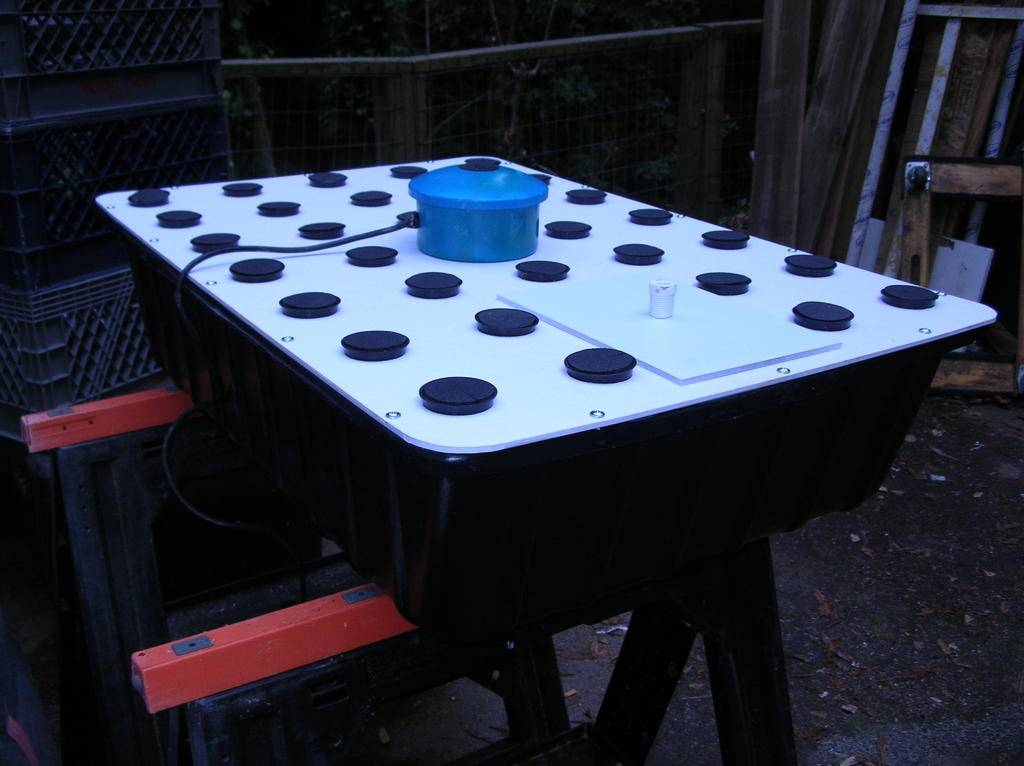
The Vortex method in action. Again......I am still using these as I slowly replace them with my newest model. There good.......I just made it better is all.
And Finally………..We get to my favorite !! Yeah I know…….It took a while to get here but I figure there has to be some ideas here for everybody dependant on your grow space size or budget.
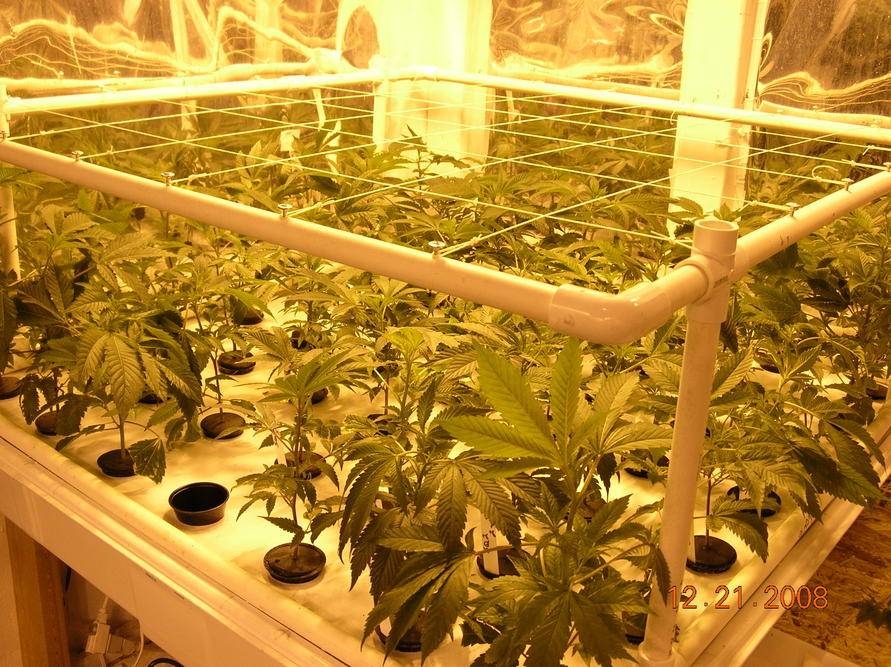
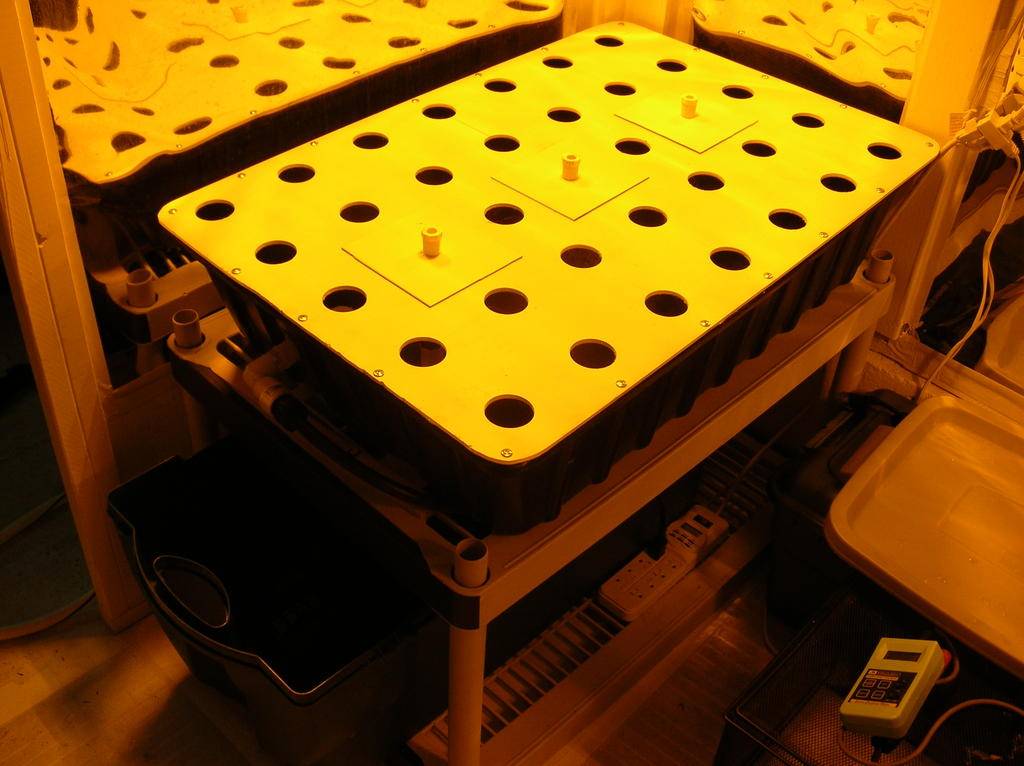
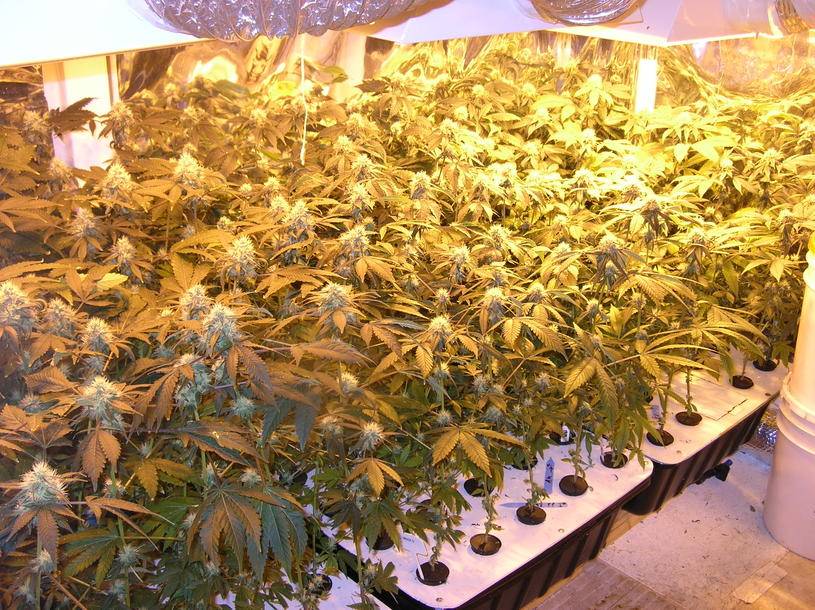
Now this is my Battleship Model Like I said…….I came up with this so I could use 2 tables of 3 x 3 ( 3 foot by 6 foot total ) to 1 rez which really cuts down on labor. I’ve only run this unit one time to harvest as a test and the next run is 2 weeks in but it’s shown excellent results and produced 1 pound of dried bud for a 3 x 3 table. Who could ask for more ……(all hands go up…….”I could…….I could” !!......yeah me too.) LOL
Anyway, keep in mind that you can build one of these ANY SIZE YOU WANT. If your in a small cabinet you can build one that is 2 x 2 if ya want. Or you can go 4 x 4. It’s up to you. 3 x 3 works for me and my set up. You can also drill more holes in the top and use this set up as a cloner or whatever……..The whole point of DIY is to do exactly that…….Do it yourself and make it work for you. There is no set rule or guideline. Necessity is the mother of all invention.
The total cost for this unit will be in the $300.00 range assuming you have most of the tools already. That includes a pump that can be shared with more than one table if ya tee off. The 3 big ticket items will be…….Pump,.Tray, Top. Now that cost is for a 3x3 so if ya build a smaller unit it will be cheaper all the way around.
The problem I have with Pre-Made units is that they are Pre-designed for a mass market and thats it. One size fits all. NOT !! I can never find a system that's ideal for me so the next best thing is to build one myself. A unit that wil hold the same amount of plants as my Battleship Model would run 5 to $700.00 an dnot fit my space. That,s just to much when I can easily build one myself that to me.........Is Better.
Here is a list of the materials you would need to build it MY WAY. My way being a 3x3.
Top Option #1
OK…..The last thing I will mention is the top. You can use Plexi glass from any Hardware store. You will need ¼ inch minimum. You will need to paint it. Use black spray paint as a base and then FLAT white. I found that the cheap spray paints work just fine. SPRAY OUTSIDE !! (We want to get high on the pot we'll grow.....Not the fumes we'll make trying to get there) The top for a 3 x 3 will cost around 30 or 40 bucks if using plexi-glass. CAUTION: Plexi Glass with crack or break if your not careful while drilling. Just go slow. You can use Lexan Glass instead of plexi but the cost is a lot more and isn't that much more durable. If you need to glue or silicone plexi……..Use the LEXAN glue found in the window section. It sticks the best and is removable later if ya need to tale it off.
Top Option #2 (and best) I searched for a local plastics supplier and bought White ¼ inch ABS sheet plastic. I know you can find this online and probably buy cut sizes. I bought 2 – 4 x 8 sheets for $85.00 each and had a local pickup so there was no shipping. That gave me 4 tops total with lots of extra left over for building all kinds of things. I use if for tons of stuff from cutting boards to small shelves to Reservoir lids. (Again………Invent) I ordered it and they Pre-cut it for me it my exact dimensions at no charge. The only thing I had to do was drill my cup holes. If you can find a local shop or get it online………THIS IS THE WAY TO GO. !! There will be all kinds of plastics to choose from. I use the ABS since most hydro stuff is made from this and silicone seems to stick to it well. ABS sheeting is practically unbreakable, cleans easily and is light proof.
To Cut Plexi Glass or ABS sheeting……..Get a Lexan Glass cutter in the window repair section of your hardware store. It will look like a paint Scraper or Mud Knife with a hook. Just score the plastic a few times……place score on a table edge and do a quick snap down. Perfect clean cuts every time. Cost is 5 or 6 bucks.
Whew !!! This puppy is getting way long and I am trying to do most of it offline in WORD…
…. OK……OK……Ya wanna build it. I know.
Drum Roll Please !!!…………………….
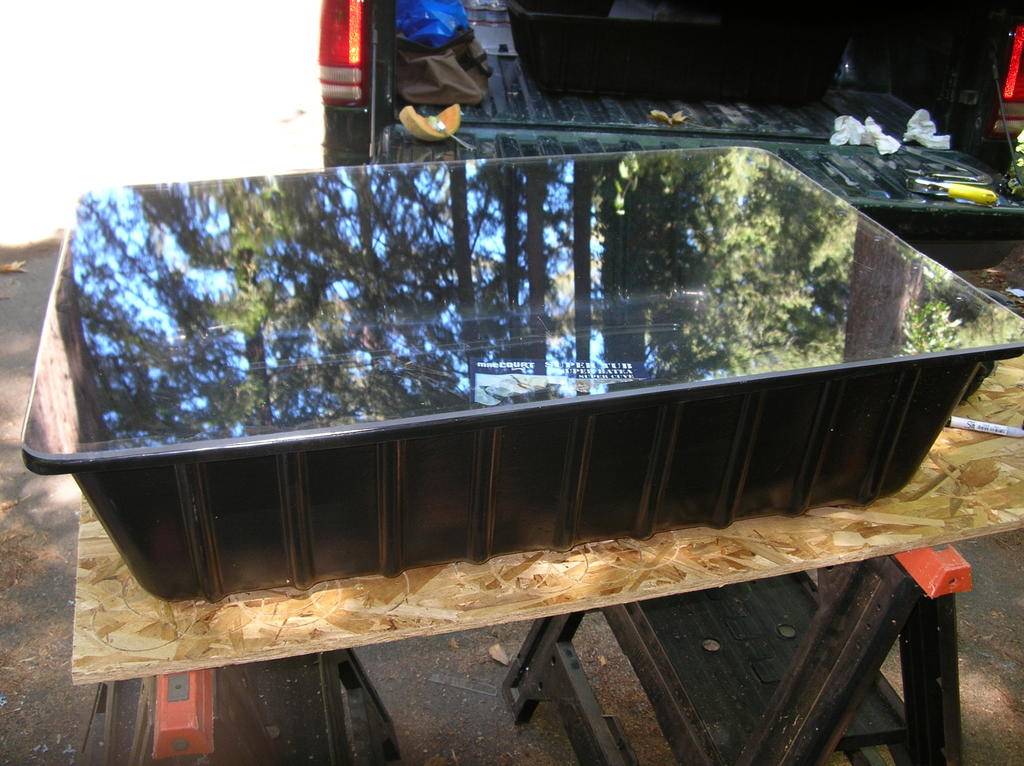
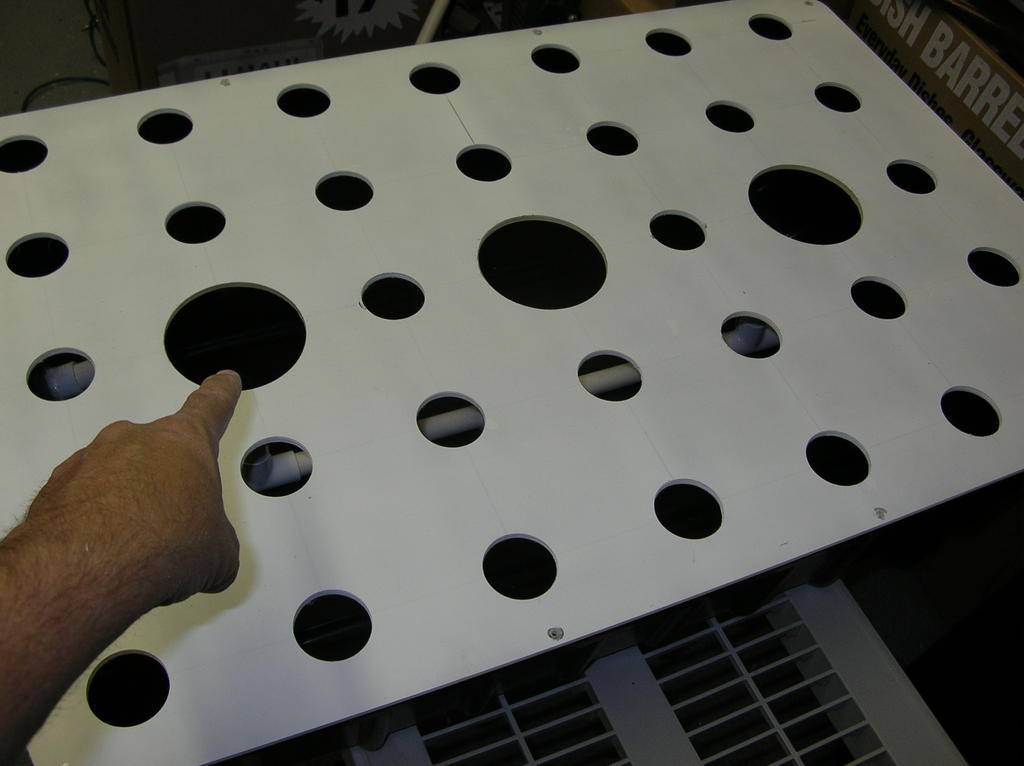
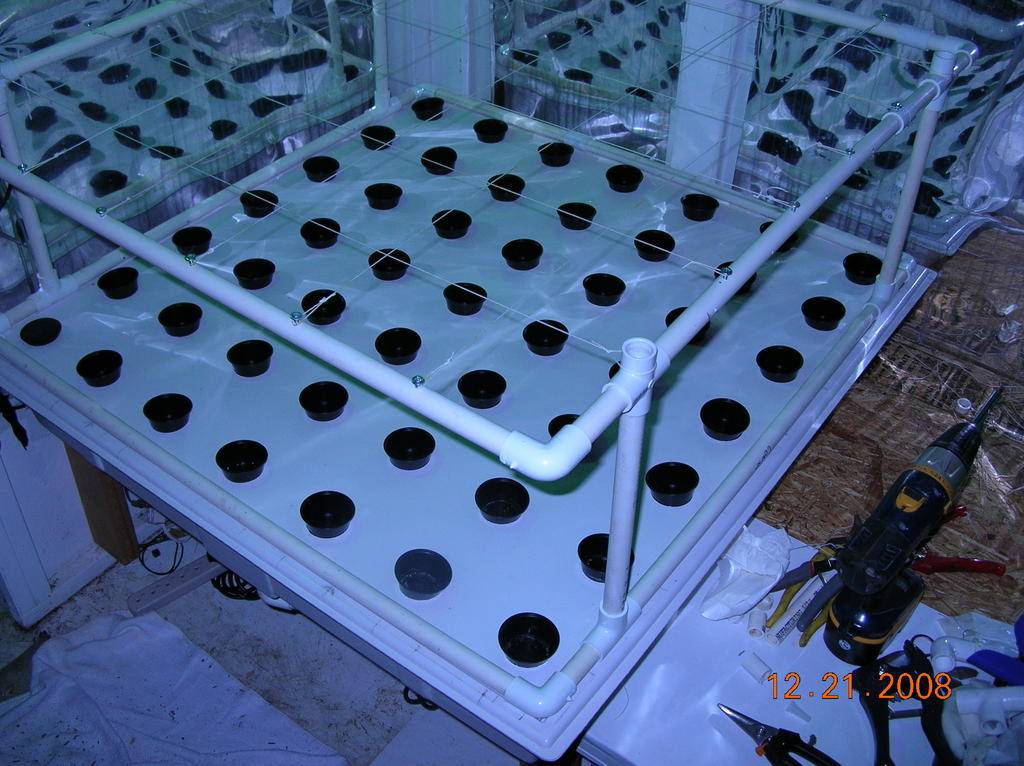
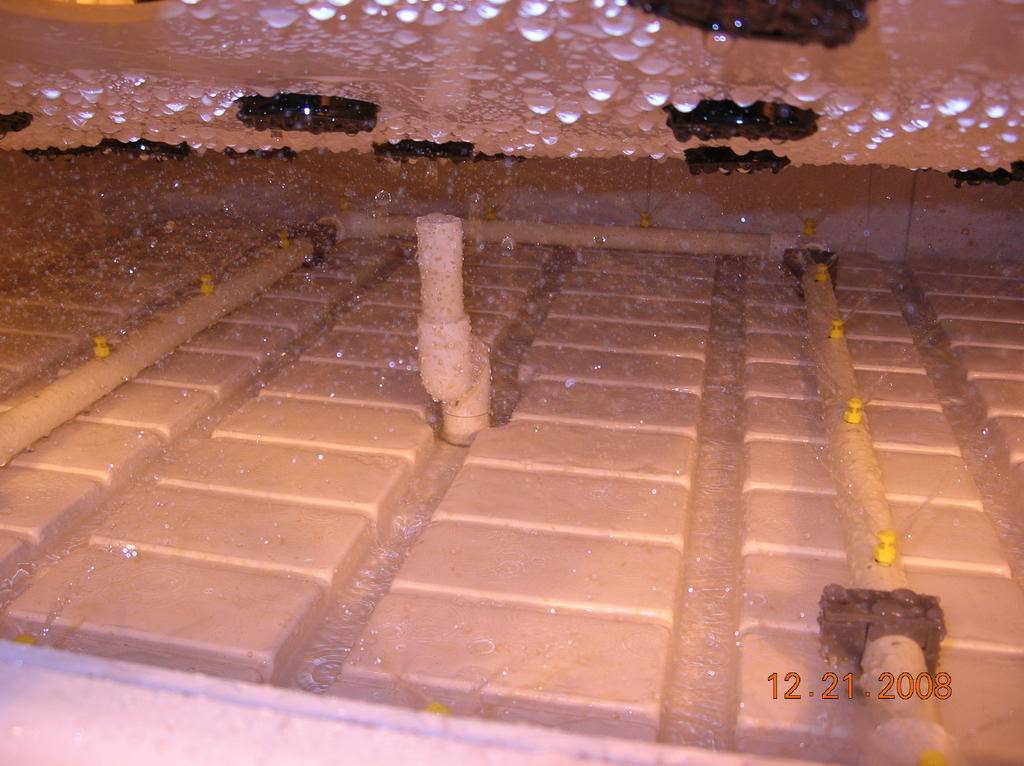
Here is the finished table and what we are after MY top is drilled with 49 - 1 7/8 inch holes that will accept 2 inch net cups. This places my plants 5 inches on center in a SOG set up. Drill your top according to your own personal requirements.
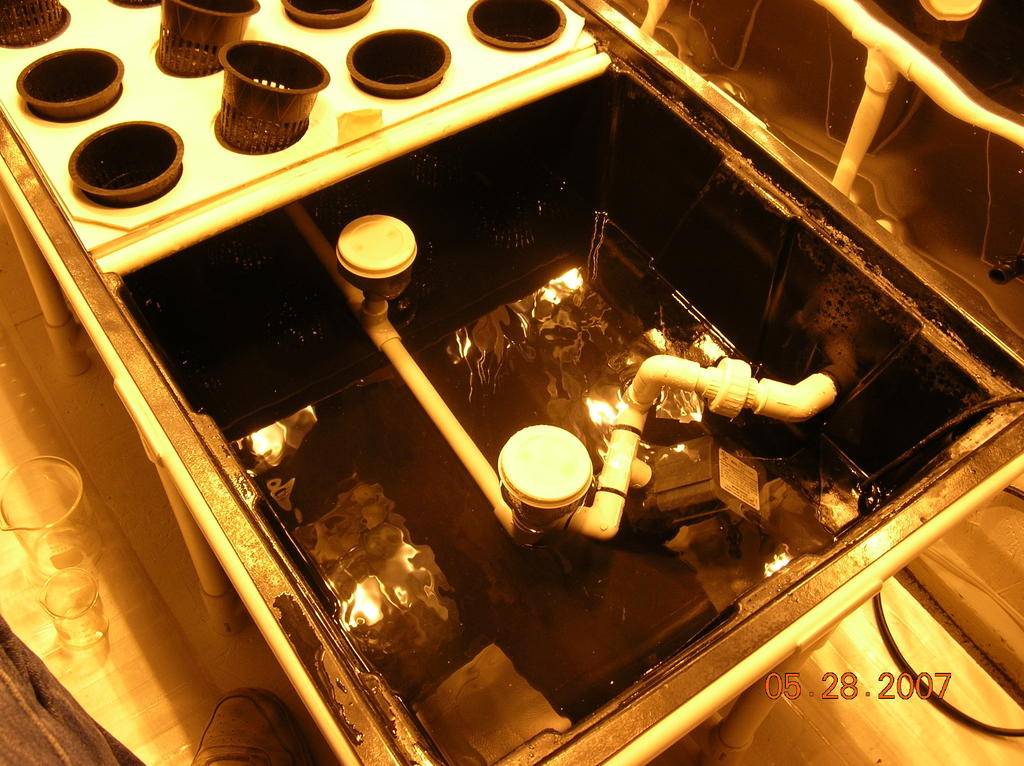
Start by drilling the hole required. PLAN before you drill. My table came from a Flood & drain table I was using so I already had some holes in it I didn't want. I tried to use them up with the new layout. Anyway.......I drilled my Nutrient feed line hole in the side.......In the future I will install it right next to the Drain to Rez pipe.
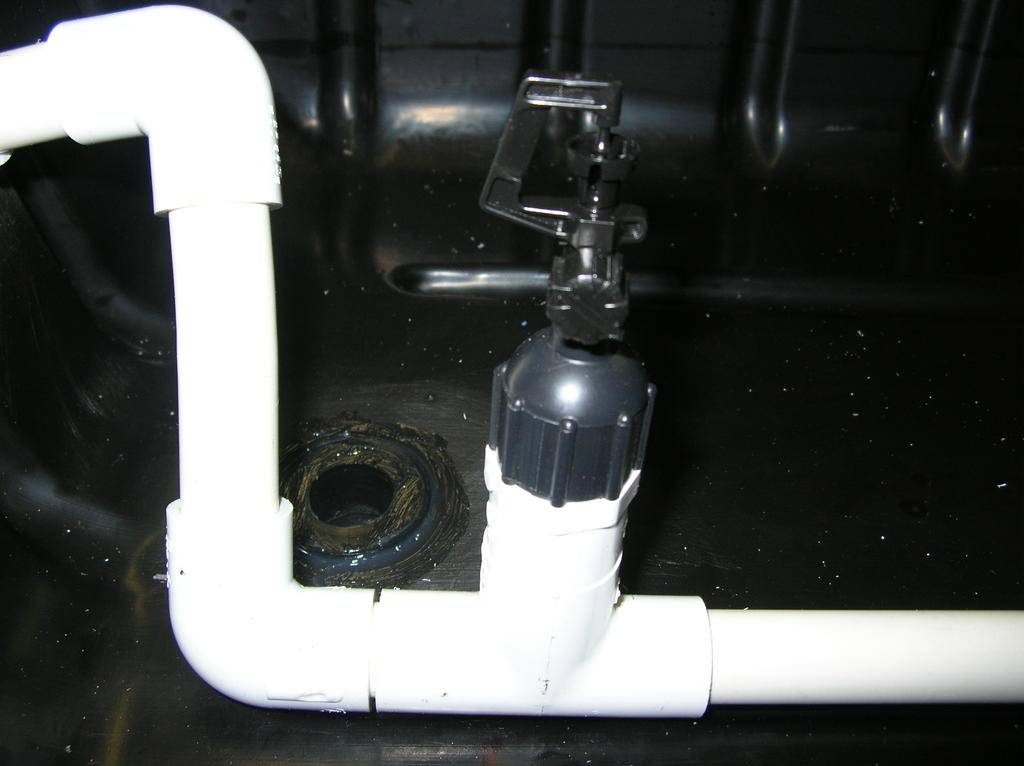
Install your feed line as required by your layout. Mine comes in the side for this first attempt. Install the INLINE filter any where you want it. But after the pump and before the Sprayers. NOTE: Not shown is a pre-filter on my pump to catch any debris that may clog the sprayers or filter to soon.

650 GPH Pump, 20 gallon rez, In line filter:
Here is the removable / cleanable part of the inline filter. Clean this or at least check it DAILY !! Ways to prevent build up and clogging of your sprayers is to: Clean the filter daily, Use the LUCAS FORMULA, Don't use additives that are not needed (and none are), Use a filter on the Drain return form the tray to the rez.
FILTER ITSELF:
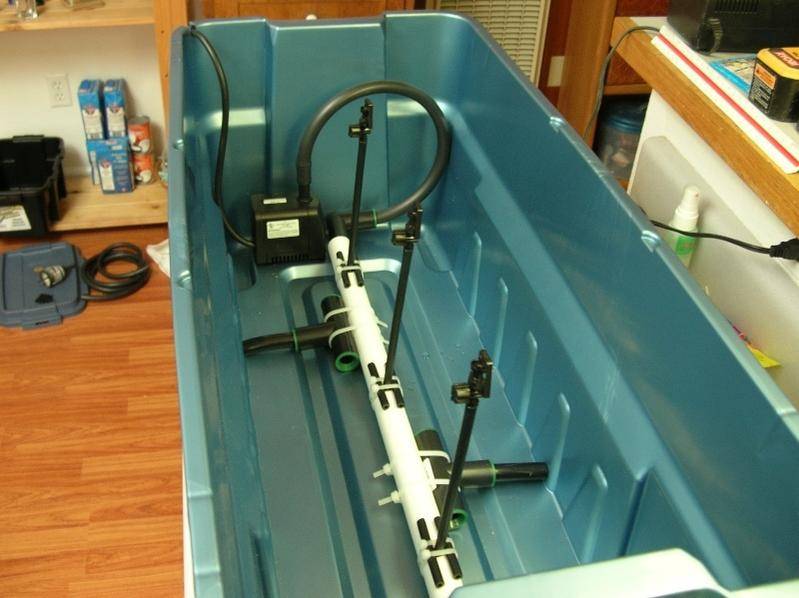
NEXT: Build the PVC pipe manifold into a square (you do not need to glue it) and make sure the pipe runs BETWEEN the plant rows so that the roots do not cover the sprayers as they grow. Drill your sprayer holes and TAP according to the thread size of your sprayer. Screw the Sprayers in. I have 12 sprayers. This photo shows the Gro-clone type but I have replaced 6 of those with mini sprinklers for better coverage to the corners of the tray. I installed some PVC pipe holders found in the electrical section of Home Depot......Glued them down with Lexan glue to the tray and set the pipe manifold into those holders to prevent any movement. The lids snap shut. The 1/2 inch TUBE BARB mentioned in the material list is used where the feed line enters the tray. Use the grommet to install the barb. Attach the feed line from the pump to the outside of the barb and the then from the inside barb to the manifold using the 1/2 inch pipe to tube connector (make sense?) Photo will help explain:
Here is the Manifold in action: The Pipe in the center of the tray that is bent 2 times is a center support for the Top. Once the plants put on weight they will get quite heavy. I used the old drain hole to attach the CENTER SUPPORT and offset it away from the CENTER PLANT. (hey......it works for me) INVENT !!
OUT OF SPACE………Continues below:
Pirate’s DIY Low Pressure Aeroponic System for Dummies
Alrighty then:
I have had many requests for some info on my Aeroponic tables. This will serve as a tutorial for anyone interested in this style of growing. Now, there is a lot info around for DIY Aeroponic cloners and seed starters but we are going to shift our focus to BLOOMING tables this time. I don't claim to have all the answers on Aeroponics or to be some kind of authority. I'm only passing along what I found to be solid working ideas through actual usage in my grow room.
We will be building this unit: But I will discuss other options along the way.
How did I end up with that table ?
My very first grow was started in Rock-wool / Grow Rocks with Flood & Drain tables. I knew before I even started my 1st grow.........through pre-grow research, I was gonna end up with Aeroponics since it is the most advanced, technical & modern form of growing and that’s my personality. I always say "if Aeroponics is good enough for NASA......Its good enough for me". They have been using Aero for years in space. It’s the only practical method in zero gravity. (I have no gravity in my cave…..It can be a bitch)
With that said.........Aeroponics is FAR from hard and many people stay away from it because it’s always touted as being for "advanced growers". NOT SO. Don't be fooled........ANYONE can grow in Aero. After growing with DWC, Dirt, Coco, Ebb & Flo... I can honestly say.........Aero to me is the easiest. One of the benefits I like the most about any form of HYDRO in general is: When you make a change to say......PH or EC you see instant results in readings and the plant will respond within hours. Not so with dirt. Dirt can take days or even weeks to show a PH change and requires the soil to stabilize. I don't have weeks......... I have minutes when a parameter is off. I want it fixed now and I want to walk away KNOWING its right. Not find out 10 days from now that my changes didn't work or worst……….were wrong.
Now I am not bashing any other form of growing..........I am simply stating the reasons why I choose to use Aeroponics. All forms of growing have there place and there are "different strokes for different folks" so if your happy with what ya got going......... then by all means…........stick with it. But if your looking for a SUPERCHARGED growing experience or want to try something new. Give Aeroponics a whirl. You won’t be sorry.
I'm not going to go into detail about things like history and other Aero methods......if ya want that go here: http://en.wikipedia.org/wiki/Aeroponics I will say that there are various forms of Aeroponics with the 2 most common being......Low Pressure Aero & High Pressure Aero. We will deal with Low Pressure. I have considered High Pressure but the expense is WAY up there and with the results I am getting….. I don’t see a reason to upgrade. Not to mention.......High Pressure brings in a whole new level of problems with the pumps, jets or foggers required.
LOW PRESSURE AEROPONICS Uses regular fountain pumps (or similar) found at the hardware store, hydro shop, garden supply center or ?? You probably have 1 or 2 in your stash of goodies right now. LP Aero disperses a mist or spray through micro sprinklers, sprayers and/or misters. Everything can be purchased at your local hardware store and NOTHING special is required unless you want to use the FOGGER type unit which I will not go into here. (very expensive) A fogger can run $500.00 just for the fogger unit alone) Not me Baby!!!
HIGH PRESURE AEROPONICS Uses High Pressure pumps to create a very fine mist through high pressure rated pipes or hoses, sprayers or misters. It will require you to use special fittings and more elaborate construction methods. Everything involved will cost more and be more complicated. We will not use HP Aero for our DIY unit. K.I.S.S !!
There are many reason why I chose Low Pressure Aeroponics.
Here is a small list of PROs:
[*]Easy DIY setup (pre-made units are available for the less inclined to build)
[*]100% of the materials can come from the hardware store. (for a basic unit)
[*]Far less expensive than High Pressure
[*]Simple maintenance
[*]Spare parts are readily available
[*]Easy and Fun
[*]Supercharged growing experience (things can happen fast)
[*]Fantastic results
[*]Lots of hands on (spending time with your plants is a good thing and they will reward you for it)
Here is a small list of CONs:
[*]Clogged Sprayers (Easily prevented. Explained later))
[*]Pump Failure
[*]Power Outages (Easily prevented. Explained later)
[*]Requires more attention
[*]Higher set up cost than dirt or Flood & Drain
[*] Things can go wrong fast (but I have not lost a single crop yet) Knock on my wooden head)
[*]DIY units will require special tools to build with (but again……there are many inexpensive pre-made units out there)
POWER FAILURES:
Before we go into anything else......lets get power failures out of the way. This idea can work for anyone that uses any system with a pump. A very simple way to prevent your garden from drying out in the event of a power failure is to install a Computer UPS backup system. You can grab one for $100.00 and it will run several pumps. ($100.00 is cheap insurance when your 90 days or so into a grow that might bring a pound of more). If power goes out for ANY REASON......The UPS (Universal Power Supply) will kick in and SAVE YOUR CROP !! This is especially important if your running Aeroponics since the moment water stops flowing........Your roots start to dry out. You don't have a lot of time if this happens. I did leave a pump off one time (like an idiot) and didn''t catch it for 18 hours. I thought I lost the whole crop but I saved it. I did lose 3 plants out of 48 though. The rest recovered and went on as if nothing happened. Now you don't need to have the UPS to run Aeroponics. I'm just mentioning it as an option if the possibility of losing power worries you. ( I do not have one if that makes ya feel any better) (But it is on my list of things to buy in the near future) Like I said.........Insurance.
I’m going to show ya 3 or 4 different units that I have built over the years. All are good and worked well. But the one I am going to HIGHLIGHT is my latest version and could be considered Commercial Quality. If ya saw it in person you would swear I bought it from a manufacturer. And it works quite well. I was never happy with my first 2 and was searching for an answer until one day I decided to convert a basic flood table I had to Aero. And you can do the same with the one ya got now.
One of the inspirations for going Aero was the DVD “See More Buds” “15 pounds in 80 days”. I actually went out and bought the same Aquamist Unit as shown in the film. But after spending 500 Golden Pieces….. I quickly said to myself (out-loud)………”I’m gonna have to build my own if I want more of these”. And that’s just what I did. But getting to my Battleship Model was a long learning process. Maybe I can save you the headaches.
Here is an Aquamist as seen in the DVD: It's a Pre-made unit that can cost $350 to $500. It is 24 x 46 inches and you can harvest a pound of dried bud from it but it's just to expensive to be practical if ya need more than one. It came with the 2 inch holes and I made the top with the 3 inch holes. I abandoned the 3 inch hole idea soon after. I'll explain later.
Shall we get to building our own? OH GOODIE !! My favorite part……….. building stuff.
I'm gonna show ya a few units to give you an idea to the range of possibilities. Use your imagination to build the unit that fits into your space. You can use anything that works for you and build it anyway you want. Its yours. I love to browes the hardware stores, lumber yards, thrift shops, etc to get ideas or find that tub, part or whatever I need or have been searching for. If your American.........Home Depot is the DIYers best friend.
UNIT #1 My DINGY !!This was my first attempt at some sort of Aeroponic plant starter. It's kind of cheesy but after a few years its still alive. I rarely use it much. Mostly sits on a shelf since I robbed a few parts from it for other things. Not going into details on how to build it. You get the idea. I bought the tub for $4.00 at a .99 cent store. (shouldn't it have been .99 cents ?) Total cost to build was around 25 or $30.00 with the pump costing the most.
GUTS
Next is the very first unit I built to flower in. This unit is good and I would suggest it as a first build. With the right strain you could get close 1 pound from it but 12 ozs is more practical for a strain giving up 12gs per plant in a SOG. It hold 32 plants. The tub is a MORTAR Mixer tray from Lowes and cost $12.00. The top is a 1/4 inch sheet of Plexi-glass with holes cut for 2 inch net cups. I painted the top with black paint and then 2 coats of white. Total build time is around 6 hours and total cost around $75.00 with the pump and plexi glass being the most money. Again.......I'm not gonna detail this unit. This is just to give you ideas: But I will give a headache saving tip. DO NOT use silicone or glue between the plexi lid and the tub. It will end up leaking because it just won't stick to the plastic. Use 1/2 round weather stripping and you will get ZERO leaks.
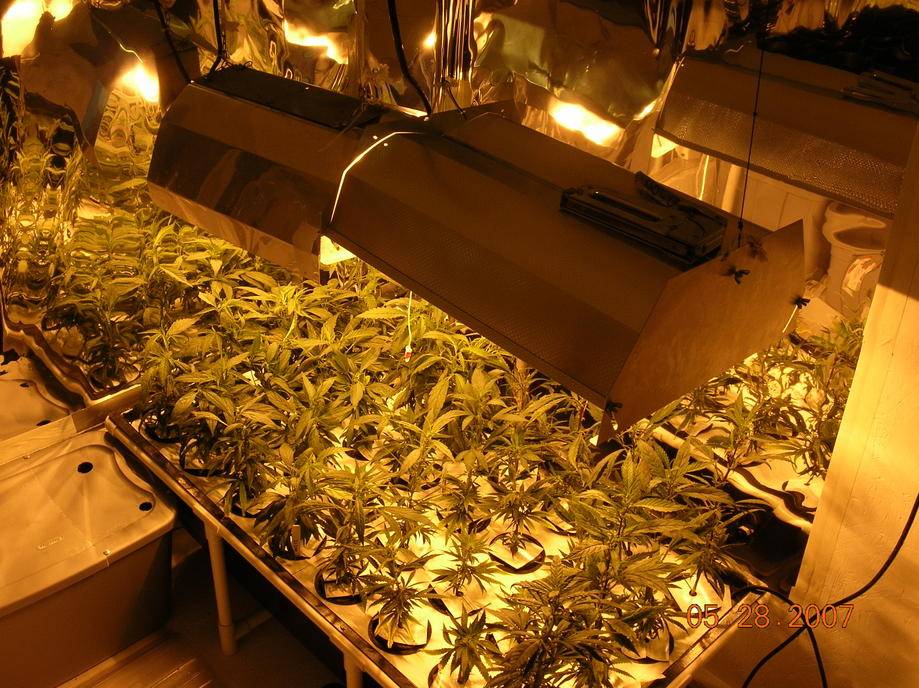
My first Aeroponic Bloom machine: My Cruiser Model
Micro Sprinkler close up:there are 3 of these
I like Cantalope
Sprayer Access points
Sprayer Access Lids:
Nutrient feed line and return to Rez
Ready to Grow:
The next generation:
I was browsing EBay one day and came across a guy that was selling all his hydro stuff. He started at $500.00 but he had a stipulation that it had to be picked up by a certain time. I am not sure why no one jumped on this but I made an offer of $250.00 and would pick it up the same day. (he was moving and was under the gun) I freaking scored on that buy for sure. When I drove up and he took me to the pile I was buying…….I about shit my pants !! I drove away with a pickup truck LOADED :whoohoo: so high with stuff that I had to use Plywood sides to contain it all. Among that load was 16 - GH Rain Forest units with Vortex sprayers. I came up with the idea of converting my first unit to utilize the vortex sprayer. (A vortex spray is basically a small motor incased in a plastic dome that has a funnel shaped tube extending down into a rez of water. As the tube spins it sucks the water up and sprays it out the top. They are pricy at $130.00 each but they are the bomb for Aeroponics and I got 16 of em for $250.00 (plus the rest of the truck load of nutrients, 2 x 4 trays, pumps fittings, hoses, buckets of gro rocks.....and tons more)
GH Vortex Sprayer;
Here is the conversion: My Nuclear Powered Cruiser Model Although this is not the unit I am highlighting in this Tutorial……….I will suggest this method if ya want to drop the cash for a vortex or have one laying around. Very easy maintenance and will produce well. In fact……….I have been using these units (I built 12 of them) for almost 2 years now. They have gone through a few changes but it is a good option if your spaces is 24 inches x 36 inches. The only reason I decided to design another type of unit is that I have 12 of these tables and EACH ONE is its own self contained 10 gallon rez which is fine but when ya have 12……….changing nutes can be very labor intensive. If ya only need 1 or a few………Go this way. They work great. You can use the sprayer method (above) to save $100.00.
In order to use the Vortex.......You need to install a root guard to prevent roots from wrapping around the spinning tube. The red line is the 10 gallon Mark. Use Lexan glue for the best bond.
This is after I abandond the Micro Sprinkler method and went with the Vortex only. The top is ABS plastic. You can see how each unit is progressing as I learn and figure out new ideas.
The Vortex method in action. Again......I am still using these as I slowly replace them with my newest model. There good.......I just made it better is all.
And Finally………..We get to my favorite !! Yeah I know…….It took a while to get here but I figure there has to be some ideas here for everybody dependant on your grow space size or budget.
Now this is my Battleship Model Like I said…….I came up with this so I could use 2 tables of 3 x 3 ( 3 foot by 6 foot total ) to 1 rez which really cuts down on labor. I’ve only run this unit one time to harvest as a test and the next run is 2 weeks in but it’s shown excellent results and produced 1 pound of dried bud for a 3 x 3 table. Who could ask for more ……(all hands go up…….”I could…….I could” !!......yeah me too.) LOL
Anyway, keep in mind that you can build one of these ANY SIZE YOU WANT. If your in a small cabinet you can build one that is 2 x 2 if ya want. Or you can go 4 x 4. It’s up to you. 3 x 3 works for me and my set up. You can also drill more holes in the top and use this set up as a cloner or whatever……..The whole point of DIY is to do exactly that…….Do it yourself and make it work for you. There is no set rule or guideline. Necessity is the mother of all invention.
The total cost for this unit will be in the $300.00 range assuming you have most of the tools already. That includes a pump that can be shared with more than one table if ya tee off. The 3 big ticket items will be…….Pump,.Tray, Top. Now that cost is for a 3x3 so if ya build a smaller unit it will be cheaper all the way around.
The problem I have with Pre-Made units is that they are Pre-designed for a mass market and thats it. One size fits all. NOT !! I can never find a system that's ideal for me so the next best thing is to build one myself. A unit that wil hold the same amount of plants as my Battleship Model would run 5 to $700.00 an dnot fit my space. That,s just to much when I can easily build one myself that to me.........Is Better.
Here is a list of the materials you would need to build it MY WAY. My way being a 3x3.
- 1 - 3x3 Bottnicare or General Hydroponics flood tray (bottanicare is better)
- 1 - 650 GPH pump minimum. (Bigger is better)
- 10 feet of ½ inch PVC water pipe
- Misc ½ inch PVC fittings. (couplings, connectors, 90*s, 1 – Tee, 1 – female connector, 1 – ½ rubber tubing to ½ inch pipe connector
- 1- inline filter
- 6 feet of ½ inch rubber tubing
- 1 small tube of silicone
- 1- ½ inch rubber grommet
- 1- ½ barbed tubing connector
- 1 pack of mini sprinklers. (better than hydro sprayers) I use both in one unit)
- 2 inch net cups
- 1 – Reservoir. ( you can use a Rubbermaid or whatever??)
- Drill…..cordless or not
- PVC cutter or hacksaw. (you can cut PVC with string as well)
- 1 micro sprinkler thread tap (for a drill) (I‘ll get the size later)
- Drill bit for rubber grommet (size ??)
- Uni-Bit - Hole saws or Paddle Bits. (Paddle bits are cheap and work well on plastic)
- 1 – 1 7/8 inch hole saw. DO NOT USE a 2 inch for the cup holes. They will be too loose.
- File or rough sand paper to clean up drilled holes and cut edges
Top Option #1
OK…..The last thing I will mention is the top. You can use Plexi glass from any Hardware store. You will need ¼ inch minimum. You will need to paint it. Use black spray paint as a base and then FLAT white. I found that the cheap spray paints work just fine. SPRAY OUTSIDE !! (We want to get high on the pot we'll grow.....Not the fumes we'll make trying to get there) The top for a 3 x 3 will cost around 30 or 40 bucks if using plexi-glass. CAUTION: Plexi Glass with crack or break if your not careful while drilling. Just go slow. You can use Lexan Glass instead of plexi but the cost is a lot more and isn't that much more durable. If you need to glue or silicone plexi……..Use the LEXAN glue found in the window section. It sticks the best and is removable later if ya need to tale it off.
Top Option #2 (and best) I searched for a local plastics supplier and bought White ¼ inch ABS sheet plastic. I know you can find this online and probably buy cut sizes. I bought 2 – 4 x 8 sheets for $85.00 each and had a local pickup so there was no shipping. That gave me 4 tops total with lots of extra left over for building all kinds of things. I use if for tons of stuff from cutting boards to small shelves to Reservoir lids. (Again………Invent) I ordered it and they Pre-cut it for me it my exact dimensions at no charge. The only thing I had to do was drill my cup holes. If you can find a local shop or get it online………THIS IS THE WAY TO GO. !! There will be all kinds of plastics to choose from. I use the ABS since most hydro stuff is made from this and silicone seems to stick to it well. ABS sheeting is practically unbreakable, cleans easily and is light proof.
To Cut Plexi Glass or ABS sheeting……..Get a Lexan Glass cutter in the window repair section of your hardware store. It will look like a paint Scraper or Mud Knife with a hook. Just score the plastic a few times……place score on a table edge and do a quick snap down. Perfect clean cuts every time. Cost is 5 or 6 bucks.
Whew !!! This puppy is getting way long and I am trying to do most of it offline in WORD…
…. OK……OK……Ya wanna build it. I know.
Drum Roll Please !!!…………………….
Here is the finished table and what we are after MY top is drilled with 49 - 1 7/8 inch holes that will accept 2 inch net cups. This places my plants 5 inches on center in a SOG set up. Drill your top according to your own personal requirements.
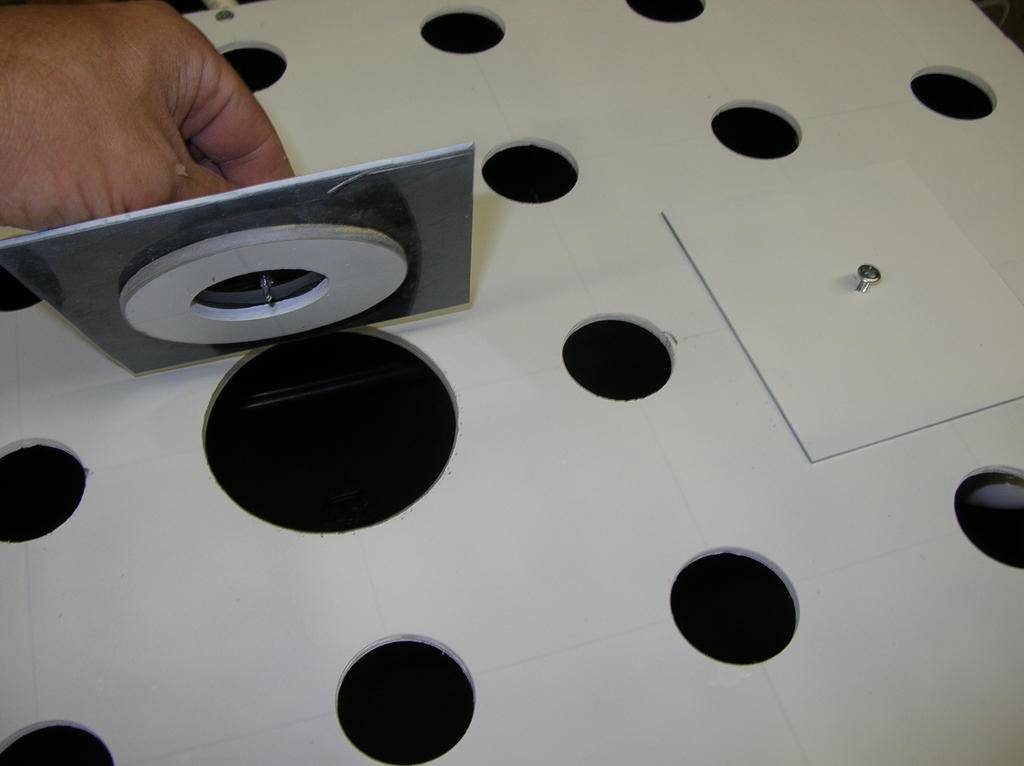
Start by drilling the hole required. PLAN before you drill. My table came from a Flood & drain table I was using so I already had some holes in it I didn't want. I tried to use them up with the new layout. Anyway.......I drilled my Nutrient feed line hole in the side.......In the future I will install it right next to the Drain to Rez pipe.
Install your feed line as required by your layout. Mine comes in the side for this first attempt. Install the INLINE filter any where you want it. But after the pump and before the Sprayers. NOTE: Not shown is a pre-filter on my pump to catch any debris that may clog the sprayers or filter to soon.
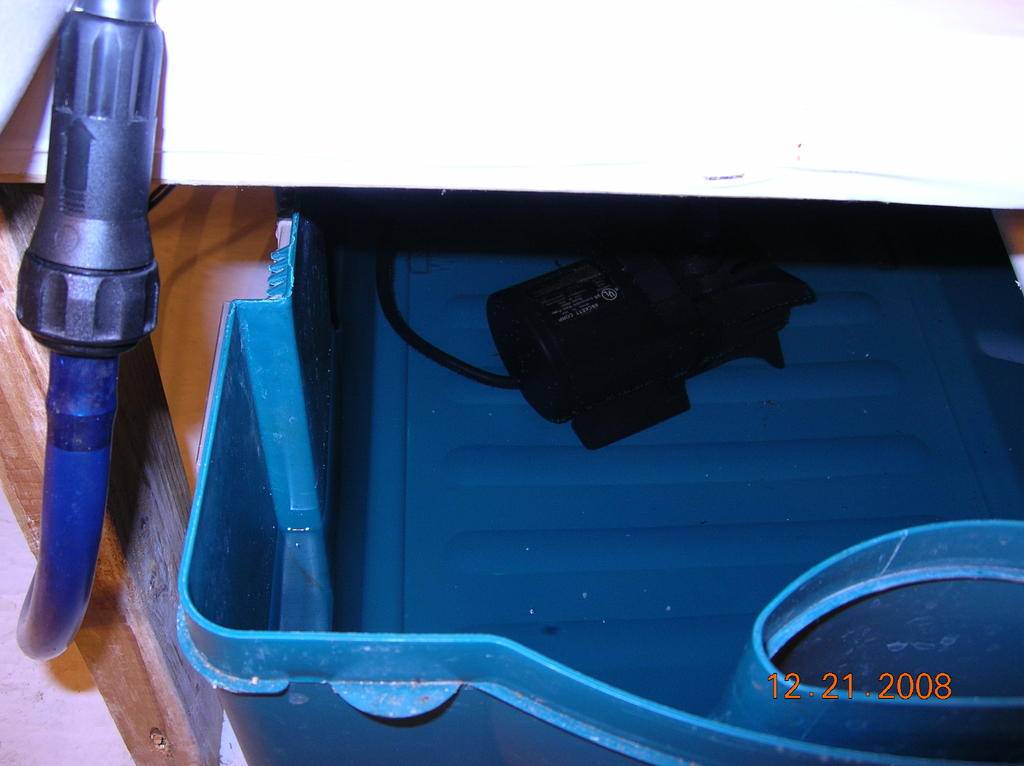
650 GPH Pump, 20 gallon rez, In line filter:
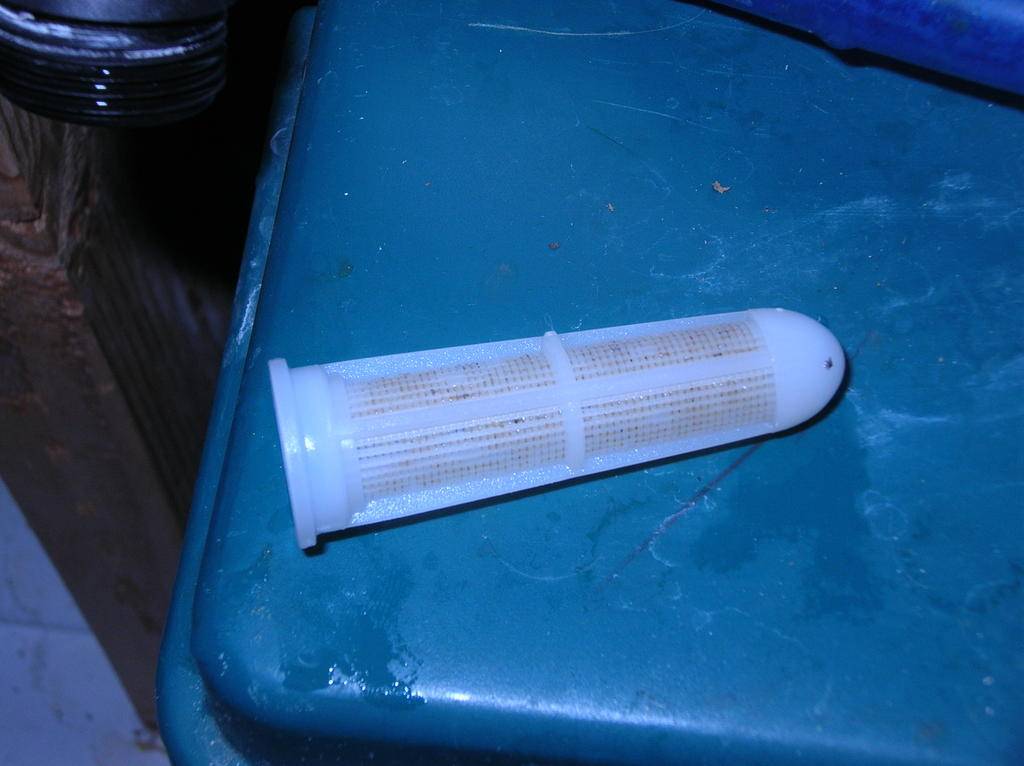
Here is the removable / cleanable part of the inline filter. Clean this or at least check it DAILY !! Ways to prevent build up and clogging of your sprayers is to: Clean the filter daily, Use the LUCAS FORMULA, Don't use additives that are not needed (and none are), Use a filter on the Drain return form the tray to the rez.
FILTER ITSELF:
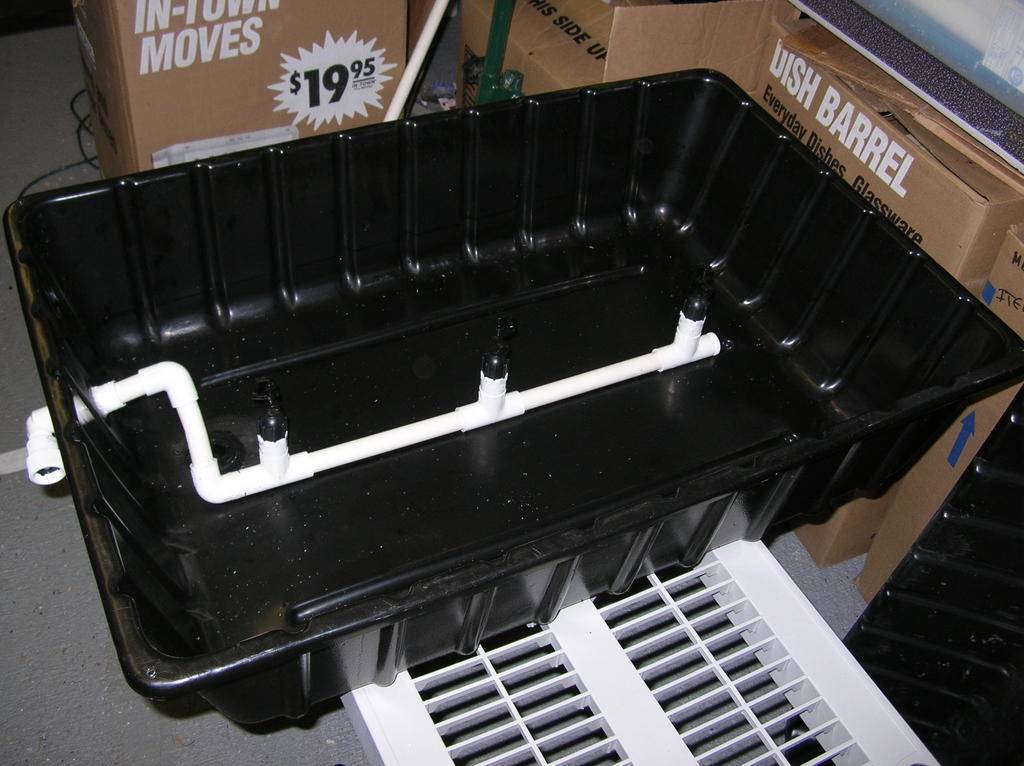
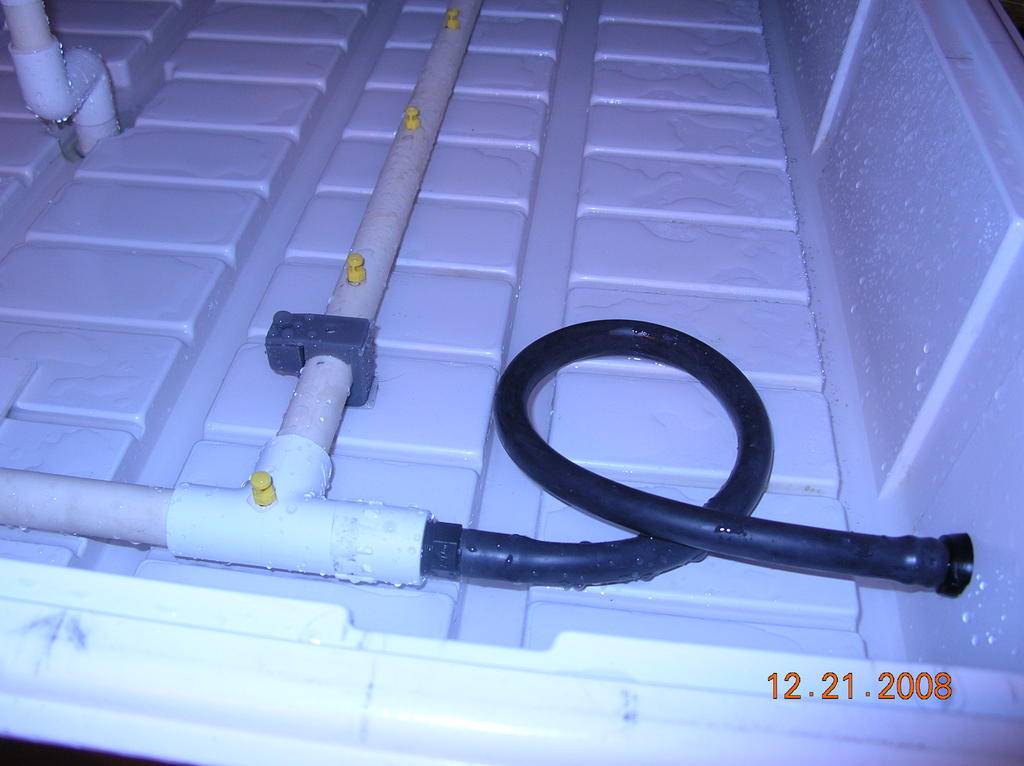
NEXT: Build the PVC pipe manifold into a square (you do not need to glue it) and make sure the pipe runs BETWEEN the plant rows so that the roots do not cover the sprayers as they grow. Drill your sprayer holes and TAP according to the thread size of your sprayer. Screw the Sprayers in. I have 12 sprayers. This photo shows the Gro-clone type but I have replaced 6 of those with mini sprinklers for better coverage to the corners of the tray. I installed some PVC pipe holders found in the electrical section of Home Depot......Glued them down with Lexan glue to the tray and set the pipe manifold into those holders to prevent any movement. The lids snap shut. The 1/2 inch TUBE BARB mentioned in the material list is used where the feed line enters the tray. Use the grommet to install the barb. Attach the feed line from the pump to the outside of the barb and the then from the inside barb to the manifold using the 1/2 inch pipe to tube connector (make sense?) Photo will help explain:
Here is the Manifold in action: The Pipe in the center of the tray that is bent 2 times is a center support for the Top. Once the plants put on weight they will get quite heavy. I used the old drain hole to attach the CENTER SUPPORT and offset it away from the CENTER PLANT. (hey......it works for me) INVENT !!
OUT OF SPACE………Continues below:
 DO NOT use a screen that will clog the pipe end when debris build up. I make a balloon shape out of the root barrier cloth so that it will never clog up with matter. But I check for water flow daily just to be safe. I'll upload a photo of it later.


 . As for the PPM targets that is a big help the way you covered all aspects of life in the garden. I have switched the PH of my setup to match your recommendations and am charting the growth of the plants for comparison to what they were doing before . I love experiments
  ! Thanx again YARRRRRRR!!!!
")

