What's new
  • Happy Birthday ICMag! Been 20 years since Gypsy Nirvana created the forum! We are celebrating with a 4/20 Giveaway and by launching a new Patreon tier called "420club". You can read more here.
  • Important notice: ICMag's T.O.U. has been updated. Please review it here. For your convenience, it is also available in the main forum menu, under 'Quick Links"!

Cannabis Seed Storage

acespicoli

Well-known member
In all cases, all remaining ungerminated seeds have been tested by means of the tetrazolium test (International Seed Testing Association, 1996). Seeds were cut through the embryo prior to imbibition in a 1 % tetrazolium staining solution, stained at 24 °C for one night and seeds were classified as viable when the embryo was well stained and not damaged.


Modeling and optimizing in vitro seed germination of industrial hemp (Cannabis sativa L.)​

Author: Mohsen Hesami, Marco Pepe, Adrian Scott Monthony, Austin Baiton, Andrew Maxwell Phineas Jones Source: Industrial crops and products 2021 v.170 pp. 113753 ISSN: 0926-6690 Subject: Cannabis sativa, culture media, genotype, glucose, hemp, juveniles, neural networks, prediction, seed germination, sucrose, walnuts Abstract: In vitro seed germination of cannabis as the first physiological stage in the plant life cycle is not only important for studying factors affecting cultivation conditions but also crucial for obtaining juvenile tissue as a potential explant for different in vitro procedures. On the other hand, in vitro seed germination is a multi-variable biological process that can be influenced by genetic (genotype) and physical factors (medium composition and environmental conditions). Therefore, a powerful mathematical methodology such as artificial neural networks (ANNs) is well suited to analyze the data and optimize the conditions this complex system. The current study was aimed to evaluate the effect of different types and concentrations of carbohydrate sources (sucrose and glucose) as well as different strengths of DKW (Driver and Kuniyaki Walnut) and mMS (Murashige and Skoog Medium, Van der Salm modification) media on seed germination indices as well as morphological features of in vitro-grown cannabis seedlings by using three ANNs including multilayer perceptron (MLP), radial basis function (RBF), and generalized regression neural network (GRNN). The GRNN model displayed higher predictive accuracy (r²>0.70) in both training and testing sets for all germination indices and morphological traits in comparison to RBF or MLP. Moreover, non-dominated sorting genetic algorithm-II (NSGA-II) was subjected to the GRNN to find the optimal type and level of media and carbohydrate source for obtaining the best seed germination indices (germination rate and mean germination time). According to the optimization process, 0.43 strength mMS medium supplemented with 2.3 % sucrose would result in the best outcomes. This result showed that a moderate level of salts existing in culture media (0.43 strength of mMS medium) supplemented with a moderate level of sucrose (2.3 %) can improve in vitro seed germination of hemp. The results of a validation experiment revealed that there was a negligible difference between the experimental data and the optimized result. Therefore, GRNN-NSGA-II provided an accurate prediction of seed germination and can likely be employed to optimize different factors involved in in vitro culture of this multi-purpose crop. Agid: 7423019

Bio Protoc. 2021 Jan 5; 11(1): e3875.
Published online 2021 Jan 5. doi: 10.21769/BioProtoc.3875
PMCID: PMC7952943
PMID: 33732764

Development and Standardization of Rapid and Efficient Seed Germination Protocol for Cannabis sativa

Aleksei Sorokin,# Narendra Singh Yadav,# Daniel Gaudet, and Igor Kovalchuk*
Author information Article notes Copyright and License information Disclaimer
See "Transient expression of the β-glucuronidase gene in Cannabis sativa varieties" in Plant Signal Behav, volume 15, 1780037.

Go to:

Abstract

Cannabis seed germination is an important process for growers and researchers alike. Many biotechnological applications require a reliable sterile method for seed germination. This protocol outlines a seed germination procedure for Cannabis sativa using a hydrogen peroxide (H2O2) solution as liquid germination media. In this protocol, all three steps including seed sterilization, germination, and seedlings development were carried out in an H2O2 solution of different concentrations; 1% H2O2 solution showed the fastest and the most efficient germination. This protocol also exhibited high germination efficiency for very old cannabis seeds with lower viability. Overall, this protocol demonstrates superior germination compared to water control and reduces the risk of contamination, making it suitable for tissue culture and other sensitive applications.
Keywords: Cannabis sativa, Rapid germination, Hydrogen peroxide, Seed sterilization, Seedling development
Go to:

Background​

Cannabis sativa, otherwise known as marijuana or hemp, is an annual primarily dioecious flowering plant in which male/female sex is determined by heteromorphic chromosomes (X and Y) ( Gaudet et al., 2020 ). Cannabis is grown for a variety of agricultural uses; nearly all parts of cannabis plant are used, seeds for food, stem for fiber, and flowers/leaves for medicine. Flowers produce a mix of cannabinoids and aromatic compounds valued for their therapeutic and recreational effects ( Chandra et al., 2017 ). Cannabis plants are propagated either clonally through cuttings or via seed germination. Seed germination is very important for researchers, breeders, and growers alike, especially since seeds from elite cultivars can be very expensive and valuable. Additionally, older seeds may have a reduced germination rate while bacterial and fungal contamination can compromise germination, especially when seeds are germinated for tissue culture propagation. To address these issues, we have developed a rapid, sterile, and efficient seed germination protocol using a 1% hydrogen peroxide (H2O2) solution. In this protocol, all three steps including seed sterilization, germination, and seedlings development were carried out in a 1% H2O2 solution. This presents a significant advantage over other sterilants, such as mercuric chloride or bleach, which require additional washing of seeds and a separate germination step on MS solid medium. Our protocol resulted in faster germination and increased seed germination percentage as compared to water control, with no bacterial or fungal contamination, making it suitable for tissue culture and other sensitive applications. In comparison to previous germination methods which take between 4-7 days for radicle appearance and 5-15 days for seedling development ( Wielgus et al., 2008 and references therein), our germination method resulted in radicle appearance in 1 day and allowed us to obtain cannabis seedlings in a very short period (3-7 days) with minimal efforts. This protocol is also very efficient for germination of very old cannabis seeds with lower viability.
Go to:

Materials and Reagents​

  1. Biological materials
    1. Cannabis sativa (Finola, X59, and Blueberry varieties) seeds
      All seeds were harvested in our laboratory. Blueberry seeds were not older than 6 months, when employed in the experiments. Finola and X59 seeds were more than 5 years old.
  2. Chemicals
    1. Hydrogen Peroxide 30% (Merck®, catalog number: 1072091000)
    2. Murashige & Skoog Basal Medium with Vitamins (PhytoTechnology Laboratories®, catalog number: M519)
    3. Sucrose (Sigma-Aldrich, catalog number: S0389)
    4. MES (Sigma-Aldrich, catalog number: M3671)
    5. Agar type E (Sigma-Aldrich, catalog number: A4675)
    6. MS solid media (1 L) (see Recipes)
  3. Plasticware
    1. Sterile empty 100 x 15 mm Petri plates (VWR International, catalog number: 25384-342)
    2. Sterile disposable 15 or 50 ml screw-cap centrifuge tubes (BD, FalconTM, catalog number: 352070)
Go to:

Equipment​

  1. Laminar flow hood (Microzone Bio Klone 2, catalog number: 30193-086)
  2. pH meter (Corning Model 430, catalog number: 475303)
  3. Sterile forceps and scalpel (sterilized by heat treatment using a Bunsen burner)
  4. Growth chamber (Sanyo MLR-350, catalog number: 859-600-06): 24 °C, 18 h light/6 h dark cycle, light intensity 200 μmol·m-2·sec-1
  5. Pro-Mix HP Mycorrhizae Growing Medium (Pro-Mix, catalog number: 20381RG)
Go to:

Procedure​

Seed germination assay
  1. Soak seeds overnight in various concentrations of hydrogen peroxide solution (liquid germination media or germination solutions) as well as in sterile water control (H2O, 1% H2O2, 3% H2O2, 5% H2O2, or 10% H2O2) in 15 or 50 ml screw-cap (Falcon tube). Falcon tubes with submerged seeds in various germination solutions were kept in the dark at room temperature.
  2. Next day, record the percentage of germinated seeds in germination solution (appearance of radicle is considered as germination event) and add fresh respective germination solution after removal of old solution simply by pouring out.
  3. Keep seeds soaked in the same solution for 3 more days in the dark at room temperature and record the percentage of germinated seeds every day.
  4. Thereafter, germinated seeds/seedlings were transferred with or without seed coats from H2O2 solution to MS medium plates to observe the growth of H2O2 solution-germinated seeds/seedlings on MS medium. To transfer, first germinated seeds/seedlings were poured together with H2O2 solution from the Falcon tube to the empty petri plate. Then seedlings were transferred to sterile paper by using forceps to remove excess H2O2 solution. Finally, the germinated seeds/seedlings were transferred to MS media plate by using forceps. The whole transfer process has been carried out in the laminar flow hood.
  5. Parafilm sealed MS medium plates with germinated seeds/seedlings are then transferred to the growth chamber (24 °C, 18 h light/6 h dark cycle and light intensity 200 μmol·m-2·sec-1) for 3 days to observe the growth and survival of H2O2 solution germinated seeds/seedlings on MS medium.
  6. The H2O2 solution-germinated seeds/seedlings growth was also observed in soil. Pro-Mix HP Mycorrhizae Growing Medium used for soil experiment. The cannabis seeds were soaked in the H2O2 solution (germination solutions) for four days and thereafter, germinated seeds/seedlings were transferred from H2O2 solution to soil pot (Pro-Mix HP Mycorrhizae Growing Medium) to observe the growth and survival of H2O2 solution germinated seeds/seedlings on soil. The soil pots were transferred to the growth chamber (24 °C, 18 h light/6 h dark cycle and light intensity 200 μmol·m-2·sec-1). The photographs were taken on day 12.
Go to:

Data analysis​

Mean seed germination percentage under various concentrations of H2O2 solution as well as water control were calculated in an excel sheet. Data were shown as mean ± SE.
Results
In this study, we have described a rapid and efficient seed germination protocol for Cannabis sativa. The brief description of this protocol has been reported in Sorokin et al. (2020) . In the current study, we have standardized the optimum concentration of hydrogen peroxide (H2O2) solution media for efficient sterilization and rapid germination. We have tested various concentrations of H2O2 solution as well as sterile water control (H2O, 1% H2O2, 3% H2O2, 5% H2O2, or 10% H2O2) for sterilization and germination efficiency. All three steps of germination (seed sterilization, germination, and seedlings development) were carried out in various concentrations of H2O2 solution and seeds were kept in liquid media for four days. Hydrogen peroxide presents several significant advantages over mercuric chloride or bleach sterilants, which require additional seed washing, and separate germination/seedling development step in Murashige and Skoog (MS) agar medium ( Sorokin et al., 2020 ). The 1% H2O2 solution showed rapid and higher germination than higher H2O2 concentrations solution and water control at day 1 (Figure 1). On day 1, 1% H2O2 solution exhibited 82.5% germination as compared to 22.5% germination for 3% H2O2 group, 17.5% germination for 5% H2O2 group and 47.5% germination in water control group (Figure 1B). Interestingly, 10% H2O2 did not show any germination on day 1 due to its toxic effect (Figure 1). In 1% H2O2 solution, radicle appearance (germination) occurred within 24 h and seedling development (two fully developed cotyledons and two immature true leaves stage) occurred in 72-96 h (Figure 1A). In comparison to previous germination methods which take between 4-7 days for radicle appearance and 5-15 days for seedling development ( Wielgus et al., 2008 and references therein), our germination method resulted in radicle appearance in 1 day and allowed us to obtain cannabis seedlings in a very short period (3-7 days) with minimal efforts (Figures 1-2). Considering the possible toxic effect of H2O2 (since germinated seeds/seedlings stayed continuously in H2O2 solution for 4 days), we have checked further survival of germinated seeds/seedlings on MS media and soil (Figures 2-3). On MS media, 1% H2O2 solution seedlings survived better than other treatments (Figure 2). The water germinated seeds exhibited contamination and did not survive on MS media (Figure 2). Similarly, due to the toxic effect of higher concentration of H2O2, the 10% H2O2 germinated seeds did not survive on MS media (Figure 2). The 1% H2O2 solution seedlings also survived well on soil (Figure 3). Apart from this, we have also tested our method for more than 5-years old cannabis seeds with lower viability, which demonstrated that 1% H2O2 solution medium exhibited a very high germination percentage (~50%) as compared to water control (~10%) (Figure 4). In conclusion, we have developed a rapid and efficient method for C. sativa seed germination under sterile conditions for tissue culture and other sensitive applications.

1677160167876.png

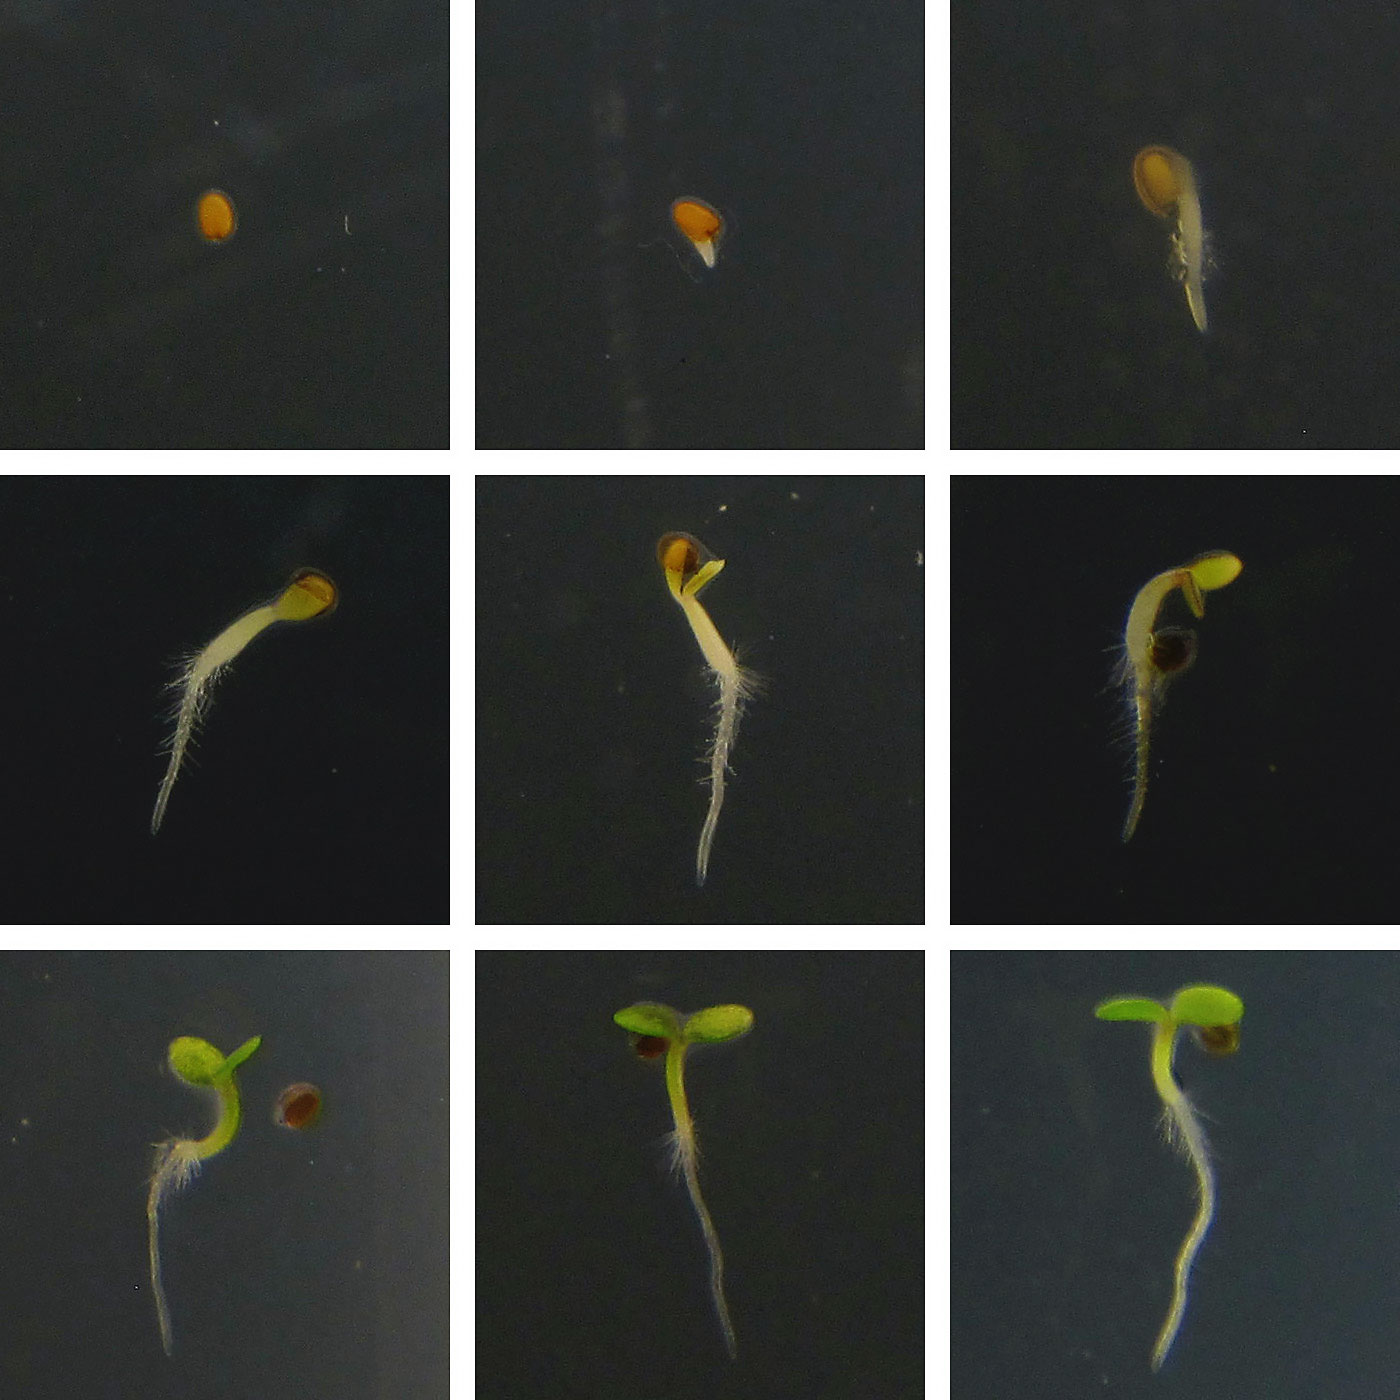
Germination of 6-month-old seeds of Blueberry variety in various concentrations of hydrogen peroxide solution and water control.
A. Representative photographs of germinated seeds/seedlings in the H2O2 solution of various concentrations or water control on day 1 to day 4. B. Comparison of germination percentage between the various concentrations of H2O2 solution or water control. Data are shown as mean ± SE (n = 4). In each replicate, 30 seeds were used.
1677160244771.png

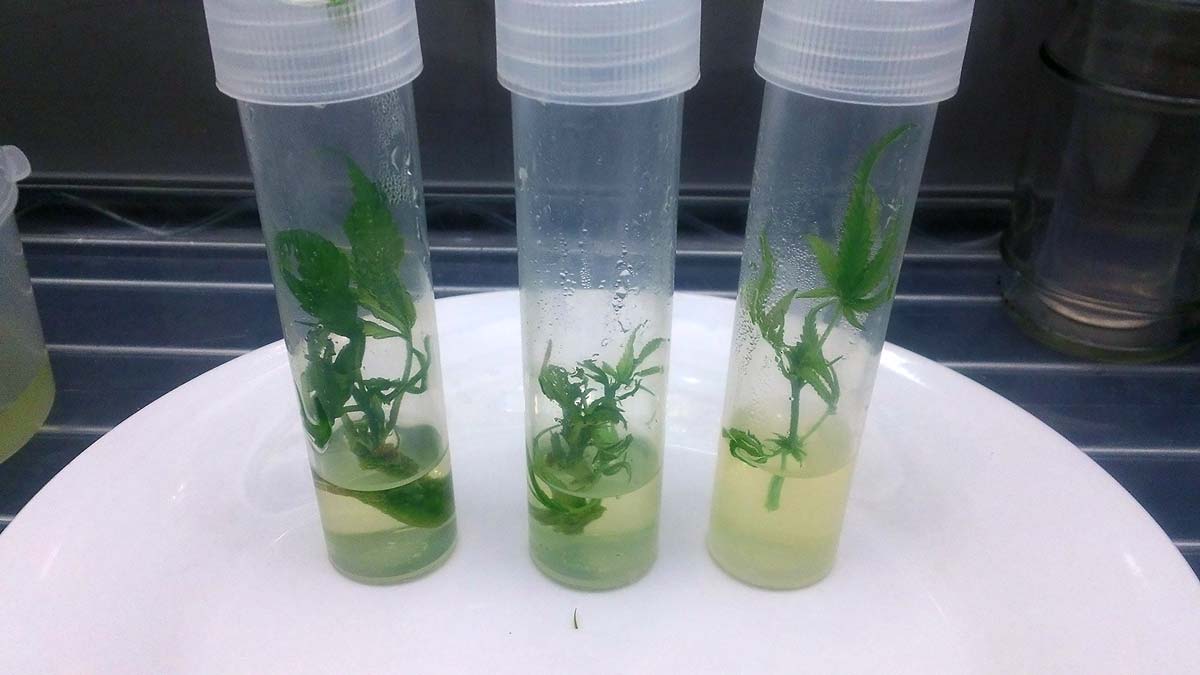
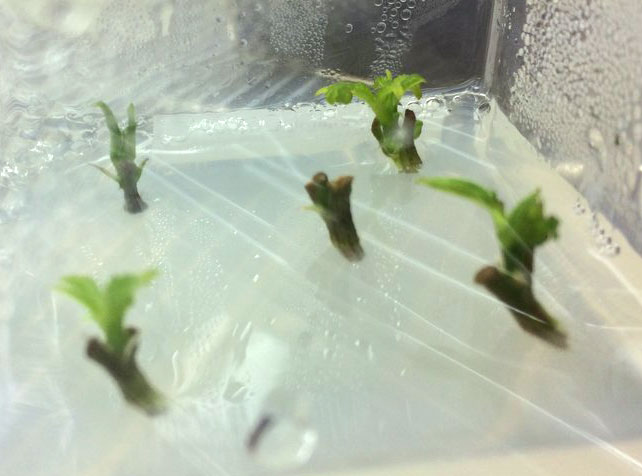
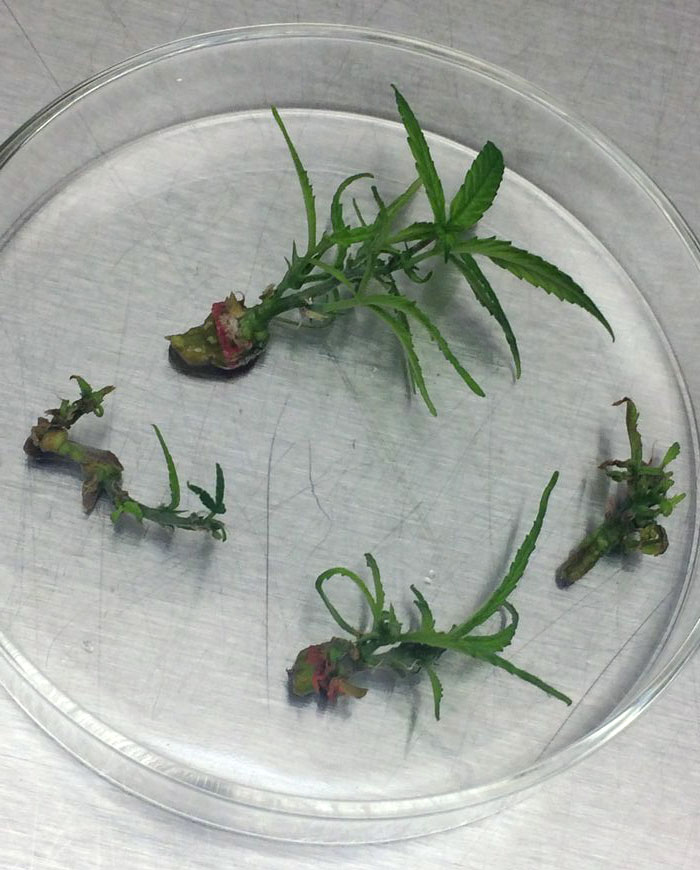
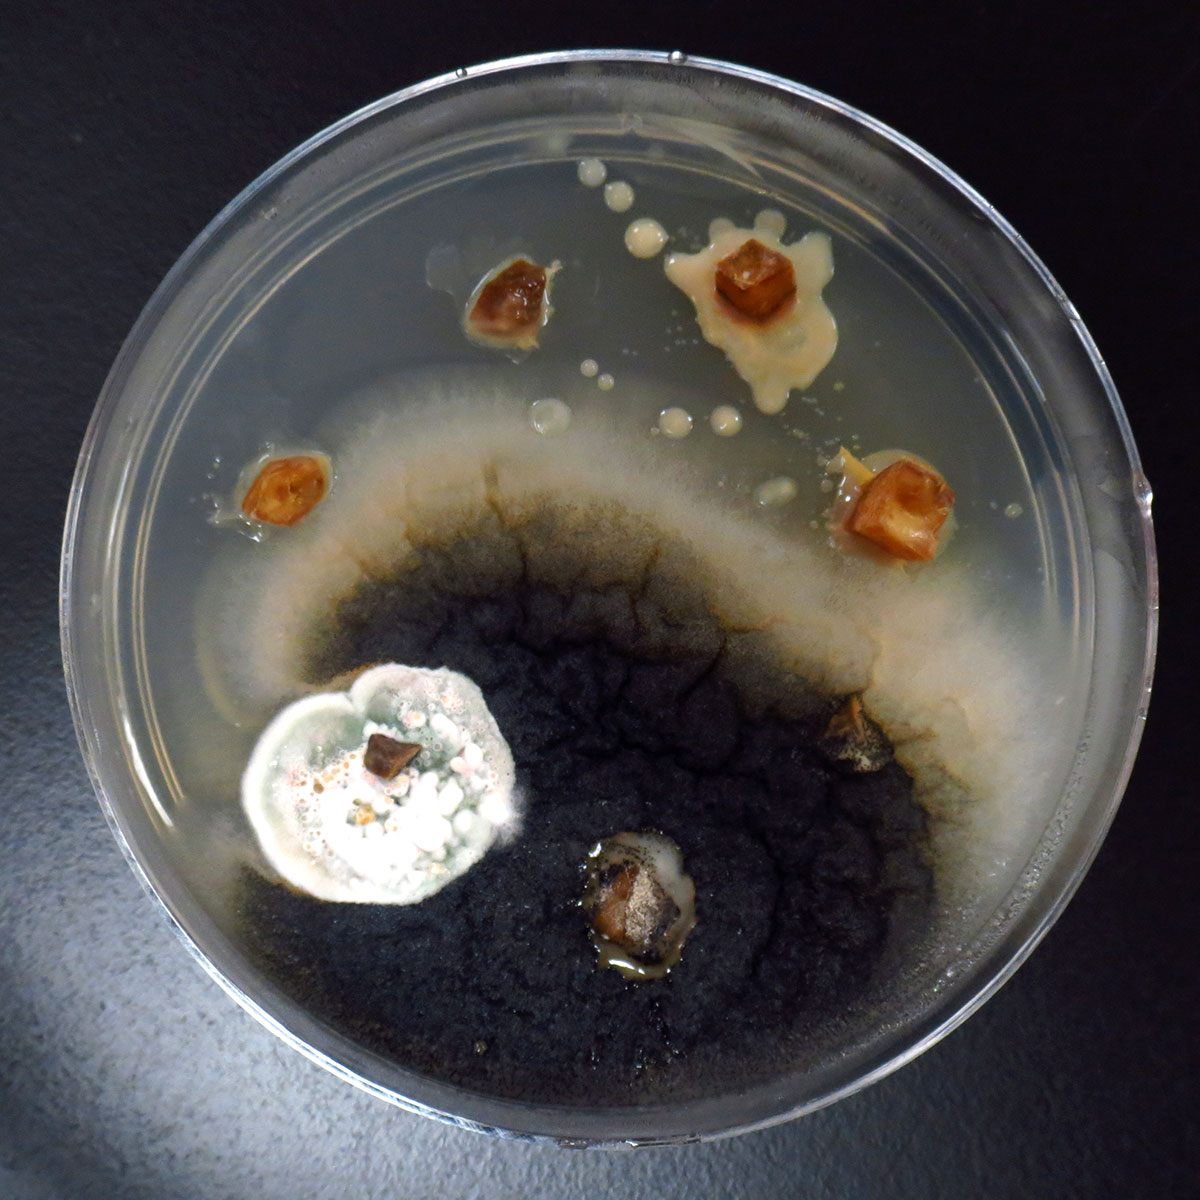
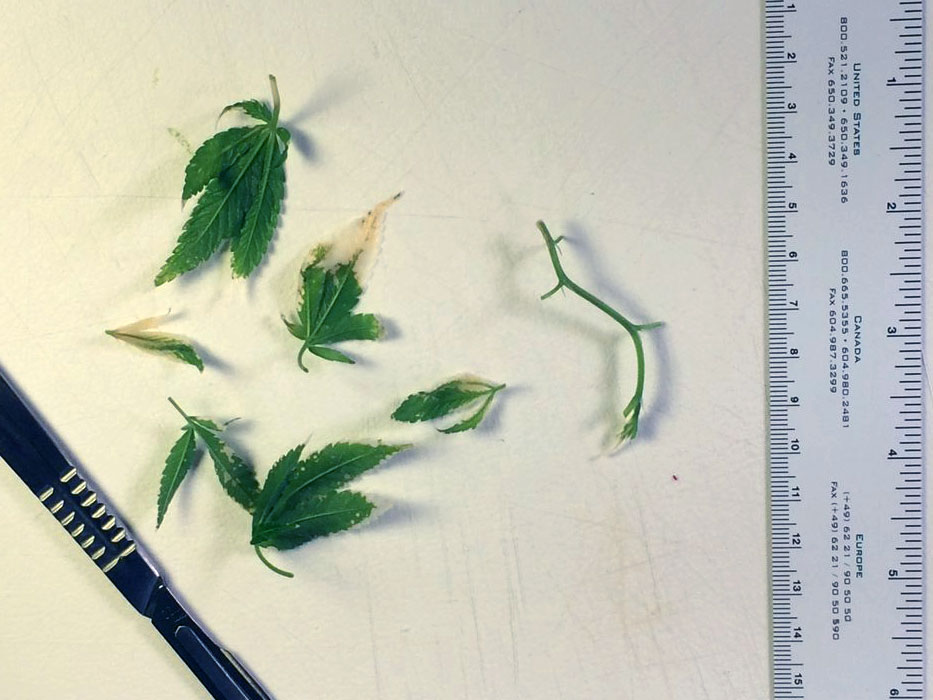
Representative photographs of growth and survival of H2O2 solutions germinated seeds/seedlings of Blueberry variety on MS media.
The Blueberry variety seeds were soaked in the H2O2 solution (germination solutions) for four days and thereafter, germinated seeds/seedlings were transferred from H2O2 solution to MS medium plates to observe the growth and survival of H2O2 solution germinated seeds/seedlings on MS medium. The photographs were taken at day 0 (just after transfer to MS medium plates), day 1 (after 24 h of the transfer to MS medium plates), and day 3 (after 72 h of the transfer to MS medium plates) on MS media.
1677160279559.png

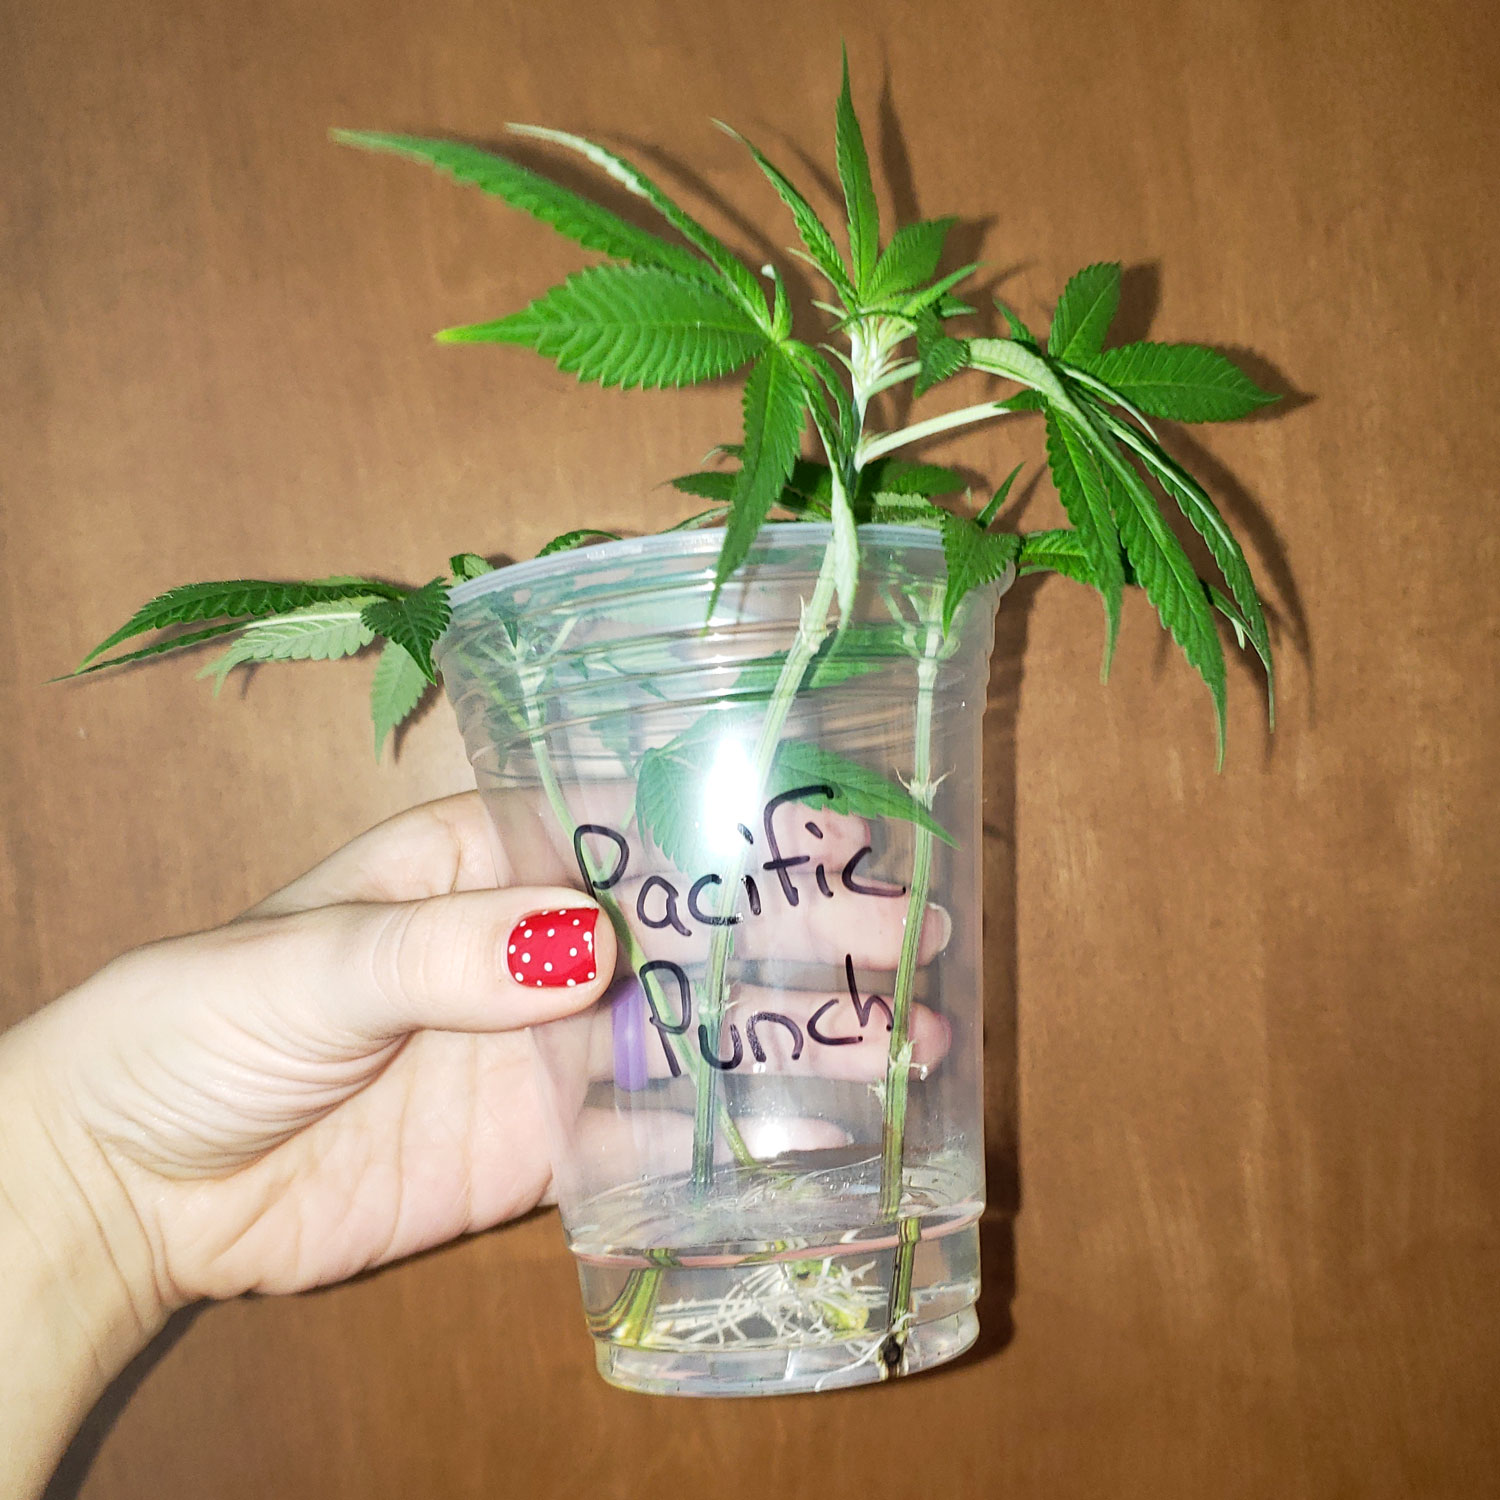
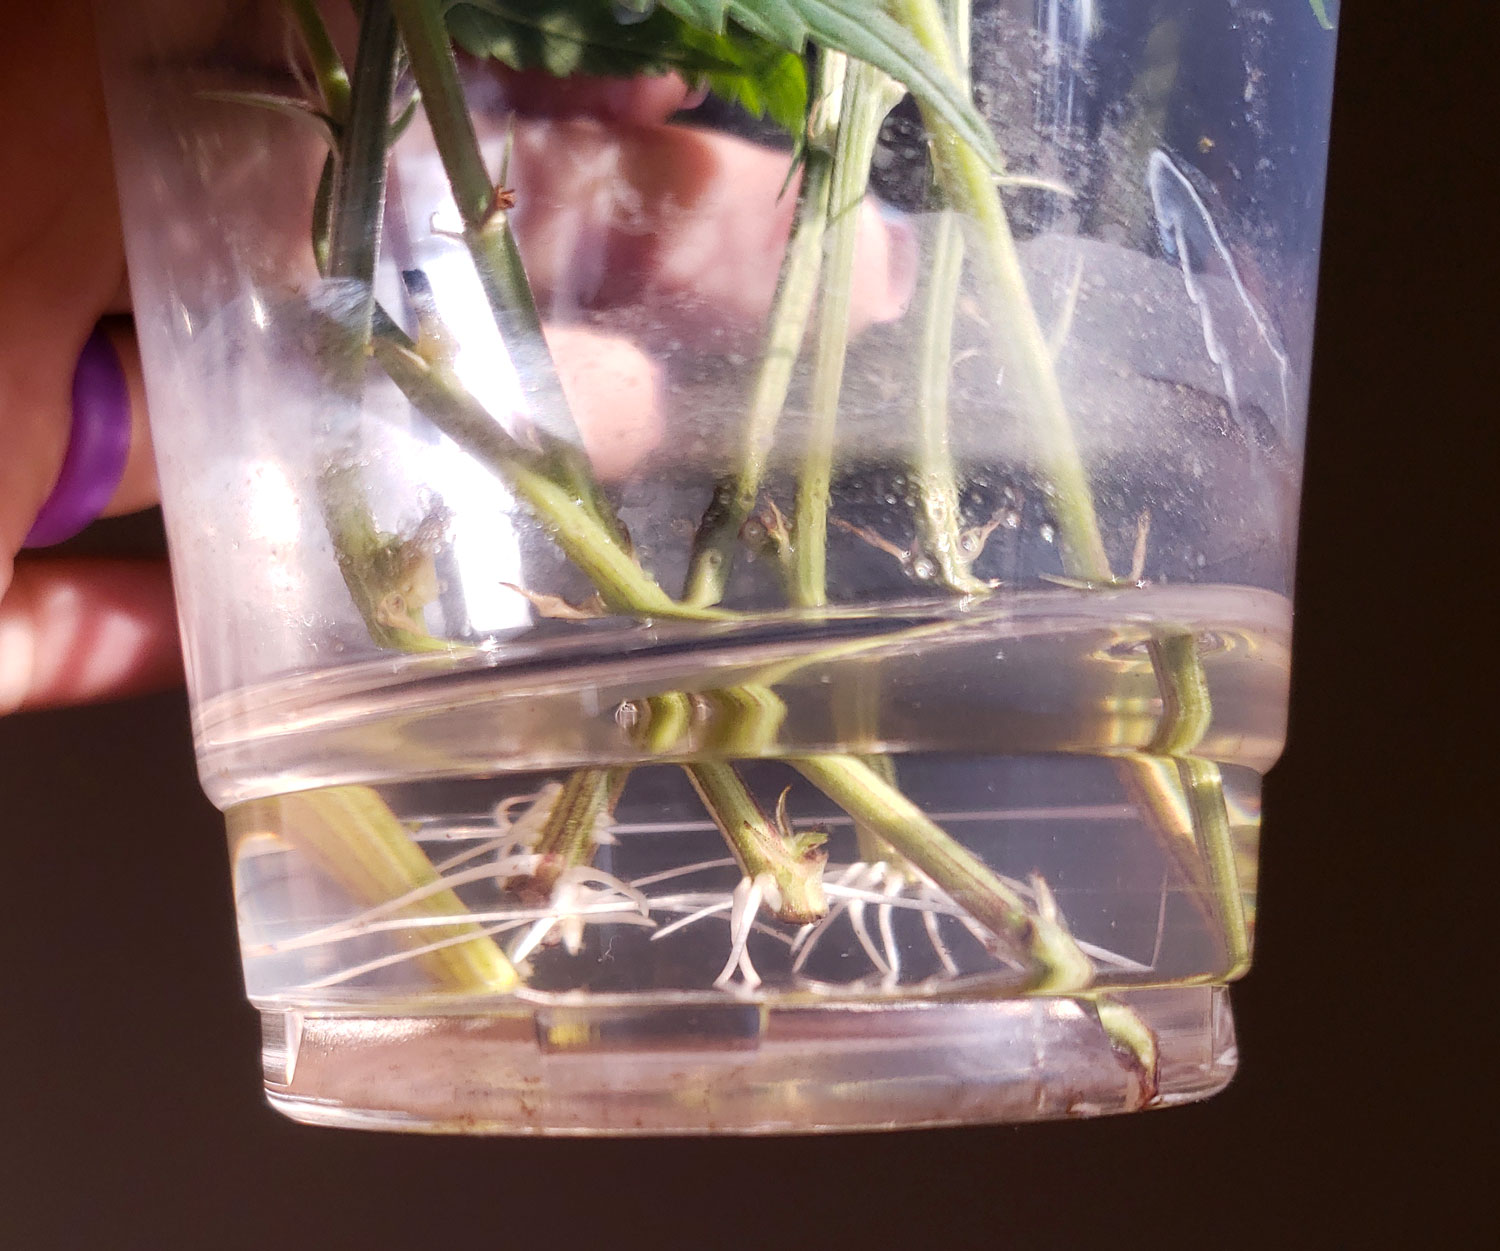
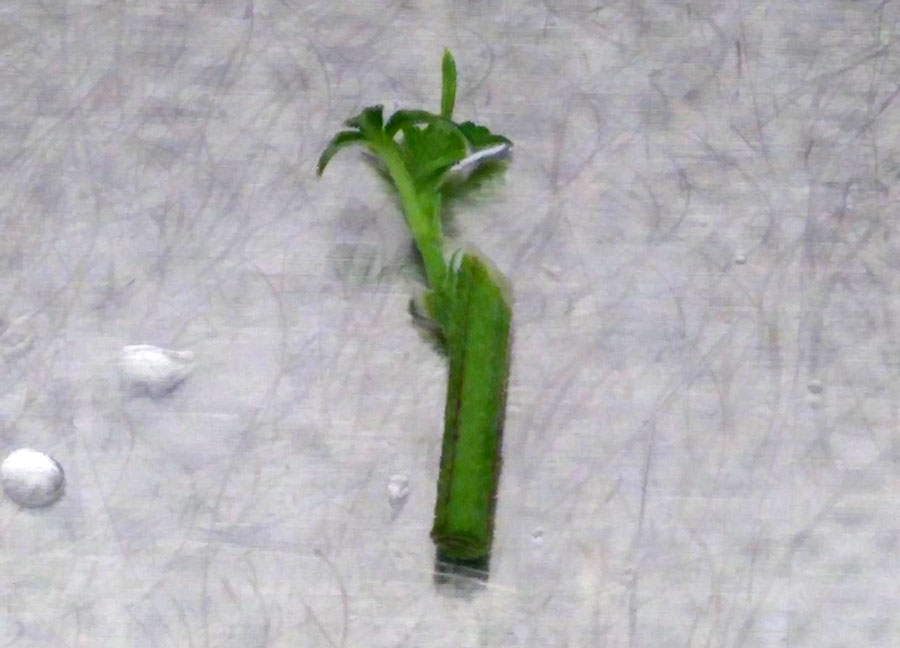
Representative photograph of Blueberry variety young plantlet growing in soil (Pro-Mix HP Mycorrhizae Growing Medium).
The Blueberry variety seeds were soaked in the H2O2 solution (germination solutions) for four days and thereafter, germinated seeds/seedlings were transferred from H2O2 solution to soil pot (Pro-Mix HP Mycorrhizae Growing Medium) to observe the growth and survival of H2O2 solution germinated seeds/seedlings on soil. The photographs were taken on day 12.
1677160338229.png

Germination of 5-years old seeds of Finola and X59 varieties in 1% hydrogen peroxide solution and water control.
Comparison of germination percentage between 1% H2O2 solution media and water control. Data are shown as mean ± SE (n = 5). In each replicate, around 30 seeds were used.
Go to:

Recipes

  1. MS solid media (1 L)
    4.43 g Murashige & Skoog Basal Medium with Vitamins
    500 mg MES
    30 g Sucrose
    8 g Agar
    Adjust pH to 5.7 with KOH and sterilize by autoclaving at 121 °C for 40 min. 25 ml of MS media on each Petri plate.
Go to:

Acknowledgments​

This protocol is derived from Sorokin et al. (2020). We thank the Natural Sciences and Engineering Research Council of Canada (NSERC) and MITACS for funding our work.
Go to:

References​

1. Chandra S., Lata H. and ElSohly M. A.(2017). Cannabis sativa L.-botany and biotechnology. Chandra, S., Lata, H. and ElSohly, M. A.(Eds.). Springer International Publishing: Cham, Switzerland. ISBN: 9783319545639. [Google Scholar]
2. Gaudet D., Yadav N. S., Sorokin A., Bilichak A. and Kovalchuk I.(2020). Development and optimization of a germination assay and long-term storage for Cannabis sativa pollen . Plants 9: 665. [PMC free article] [PubMed] [Google Scholar]
3. Sorokin A., Yadav N. S., Gaudet D. and Kovalchuk I.(2020). Transient expression of the β-glucuronidase gene in Cannabis sativa varieties . Plant Signal Behav 15(8): 1780037. [PMC free article] [PubMed] [Google Scholar]
4. Wielgus K., Luwanska A., Lassocinski W. and Kaczmarek Z.(2008). Estimation of Cannabis sativa L. tissue culture conditions essential for callus induction and plant regeneration . J Nat Fibers 5: 199-207. [Google Scholar]

1677160835796.png

Sanyo MLR-350H Pervious Panasonic MLR-352 Previous Sanyo MLR-351
 
Last edited:

acespicoli

Well-known member
This protocol outlines a seed germination procedure for Cannabis sativa using a hydrogen peroxide (H2O2) solution as liquid germination media. In this protocol, all three steps including seed sterilization, germination, and seedlings development were carried out in an H2O2 solution of different concentrations; 1% H2O2 solution showed the fastest and the most efficient germination.

Procedure​

Seed germination assay

  1. Soak seeds overnight in various concentrations of hydrogen peroxide solution (liquid germination media or germination solutions) as well as in sterile water control (H2O, 1% H2O2, 3% H2O2, 5% H2O2, or 10% H2O2) in 15 or 50 ml screw-cap (Falcon tube). Falcon tubes with submerged seeds in various germination solutions were kept in the dark at room temperature.
  2. Next day, record the percentage of germinated seeds in germination solution (appearance of radicle is considered as germination event) and add fresh respective germination solution after removal of old solution simply by pouring out.
  3. Keep seeds soaked in the same solution for 3 more days in the dark at room temperature and record the percentage of germinated seeds every day.
  4. Thereafter, germinated seeds/seedlings were transferred with or without seed coats from H2O2 solution to MS medium plates to observe the growth of H2O2 solution-germinated seeds/seedlings on MS medium. To transfer, first germinated seeds/seedlings were poured together with H2O2 solution from the Falcon tube to the empty petri plate. Then seedlings were transferred to sterile paper by using forceps to remove excess H2O2 solution. Finally, the germinated seeds/seedlings were transferred to MS media plate by using forceps. The whole transfer process has been carried out in the laminar flow hood.
  5. Parafilm sealed MS medium plates with germinated seeds/seedlings are then transferred to the growth chamber (24 °C, 18 h light/6 h dark cycle and light intensity 200 μmol·m-2·sec-1) for 3 days to observe the growth and survival of H2O2 solution germinated seeds/seedlings on MS medium.
  6. The H2O2 solution-germinated seeds/seedlings growth was also observed in soil. Pro-Mix HP Mycorrhizae Growing Medium used for soil experiment. The cannabis seeds were soaked in the H2O2 solution (germination solutions) for four days and thereafter, germinated seeds/seedlings were transferred from H2O2 solution to soil pot (Pro-Mix HP Mycorrhizae Growing Medium) to observe the growth and survival of H2O2 solution germinated seeds/seedlings on soil. The soil pots were transferred to the growth chamber (24 °C, 18 h light/6 h dark cycle and light intensity 200 μmol·m-2·sec-1). The photographs were taken on day 12.
1677160338229.png


Germination of 5-years old seeds of Finola and X59 varieties in 1% hydrogen peroxide solution and water control.

Recipes

  1. MS solid media (1 L)
    4.43 g Murashige & Skoog Basal Medium with Vitamins
    500 mg MES
    30 g Sucrose
    8 g Agar
    Adjust pH to 5.7 with KOH and sterilize by autoclaving at 121 °C for 40 min. 25 ml of MS media on each Petri plate.

To summarize the above two posts
get some 3% peroxide and mix it
1:2 one part 1 part peroxide with 2 parts distilled water
for your 1% peroxide solution ... simple


Then use that solution thru until you have a healthy vigorous seed from old seed stocks for repro
all three steps including seed sterilization, germination, and seedlings development
In place of regular tap water

Very simple very cheap from walmart or practically any grocery store the material may be aquired
The scientific data for 5 year old seeds is very plain to see
Then the other stock may be ordered from amazon MS and Agar etc

1677166080709.png
^screenshot linked
1677166341423.png

1677166520609.png

1677166383198.png
1677166410440.png

1677166582648.png

1 gallon of water to 4 - 16oz 3% peroxides
obviously not much is needed to start a couple plants

DO NOT SOAK AND SPROUT SEEDS IN PEROXIDES FOR EXTENDED PERIODS
THIS IS RECOMMENDED AS A SEED CLEANING
FOLLOW UP WITH DISTILLED WATER RINSE TO REMOVE PEROXIDES
AFTER THEY HAVE KILLED THE FOREIGN MATTER
 
Last edited:

beta

Active member
Veteran
For what it's worth I have a very simple seed germination method that uses H202 for sterilization and is great for older seeds, I tried to make it as easy and scalable as possible. Coincidentally it uses the same 1% H202 solution you mention above, though I came to that rate through my own experimentation:


acespicoli

Well-known member

@beta that is fabulous very nice pictures and well documented
Will be giving the seedlings the utmost care as well as passing clean seeds free of fungus and bacteria
Very nice feel free to post more pics of your methods anywhere you like I will reference your thread to others
 

acespicoli

Well-known member
elbow length gloves hole saw drilled
in a clear tubberware with lid
sprayed with bleach solution and closed
provides a fine sterile work station
still air room no fans or drafts spray with lysol... keep it simple
wear mask shower lysol your self
just plant some old seeds :)
 

beta

Active member
Veteran
I built a flow hood that was good enough for mycology work with a box fan and furnace HEPA filter, it worked waaaay better than I thought it would:


The only modification I'd use from that method is to use metal HVAC duct tape instead of that fabric duck tape.
 

acespicoli

Well-known member


Indian Journal of Agricultural Sciences 84 (11): 1303–9, November 2014/Article
Effect of seed moisture content and storage temperature on
seed longevity of hemp (Cannabis sativa)

S S PARIHAR1, M DADLANI2, S K LAL3, V A TONAPI4, P C NAUTIYAL5 and SUDIPTA BASU6
Indian Agricultural Research Institute, New Delhi 110 012
Received: 28 December 2012; Revised accepted: 3 June 2014

ABSTRACT
Hemp (Cannabis sativa L.)
Studies conducted on effect of five seed moisture contents (5, 7, 8, 10 and 12% on fresh weight basis),
three storage temperature (ambient, 15°C and -20°C)
and eight storage periods (0, 3, 6, 9,12, 18, 24 and 36 months)
on seed longevity

revealed that the critical moisture content (moisture content required in
seeds for retaining initial germination after storage of seeds up to 36 months) of seeds for ambient storage conditionof Delhi was 5 %, which increased to 7 % in 15°C


and 12 % at -20°C storage temperature.
The seeds are desiccation as well as chilling tolerant, therefore,
exhibit orthodox storage behavior and are ideal for ex-situ conservation of seeds in seed/gene banks.
Key words: Cannabis sativa, Hemp, Orthodox seeds, Storage behaviour


1677204825019.png

1677204845012.png

1677204712523.png

1677204932378.png

1677204997973.png

1677205034572.png

1677205130848.png
 
Last edited:

acespicoli

Well-known member
 

acespicoli

Well-known member


acespicoli

Well-known member

Cannabis Tissue Culture: Grow Plants in a Test Tube​

by Nebula Haze (check out the end of the article for more resources)

What’s covered in this article:​

  • Introduction – Can cannabis plants be cultured?
  • Basic Overview of Process – Gain a general understanding of how plant tissue culture works
  • Tissue Culture Supplies – What type of equipment do you need to get started?
  • Further Resources – Where to learn more about making cannabis plants in test tubes
Example of cannabis explants in vials. Picture by MicroClone using a plant tissue culture kit.

What is plant tissue culture and can it be used to grow cannabis plants in a test tube? Is micropropagation feasible to do at home?

Introduction: What is Plant Tissue Culture?​

Have you ever heard of cloning cannabis plants? Essentially you cut off a piece of the plant and force it to grow roots. That gives you a brand new mini plant that’s an exact genetic copy of the “mother” plant.
But could you make clones with an even smaller piece of plant? That’s what plant tissue culture does. It takes a tiny piece of a plant and gets it to grow. Once it starts growing and a little plant has formed, you get the little piece of plant to grow roots using the same techniques as regular cloning. Voila! A new copy of your plant grown from just a tiny piece of plant tissue.
Plant tissue culture is the process of taking living tissue from a plant (for example a piece of a leaf, stem, flower, or even a cracked seed) and growing that “explant” into a full plant in sterile conditions. Although the process is more difficult with cannabis or hemp than some other plant species, it can be done.[1] [2] [3]
Closeup of cannabis explants propagating with new shoots. Pictures by Dr. Hope Jones.

The above cannabis explants were cultured in sterile conditions until they had grown into little plants. They are then transferred to a rooting medium to grow roots. Just like coaxing a cutting to grow roots when cloning!

Terms often used interchangeably with plant tissue culture:
  • Micropropagation – Taking tiny pieces of plants and making them grow
  • Growing in vitro – Growing plants in a test tube or other similar environment (“in vitro” means “in glass”)
  • De Novo – growing full new plants out of something that normally wouldn’t grow on its own, such as leaves (“de novo” means “anew”)

How Does Plant Tissue Culture Work?​

How does it work? Plant tissue culture is similar to how many growers take a cutting from a cannabis plant and coax it to make roots. This creates a genetically identical plant known as a “clone”. Cloning a cannabis plant can be as easy as cutting off a stem and putting it in a glass of water for a few weeks. However, plant tissue culture lets you grow out much smaller pieces of living tissue. It can also be used to increase germination rates of older seeds,[4] allow for polyploidization,[5] eliminate disease from prized cultivars,[6] “reset” a sick mother plant, reset an autoflowering plant’s internal clock, and more.
You can force a piece of a cannabis plant to make roots to get a genetic clone of the original plant. Here’s a picture of cannabis cuttings that were cloned in a cup of water using traditional methods.

Plant tissue culture is similar to regular cloning methods except you start with a smaller piece of plant and get it to grow first before you start growing roots. This first step is where all the work goes in because the piece of plant must be treated to remove all pathogens, and grown out in test tubes under ultra-clean conditions.
How does plant tissue culture differ from typical germination and cloning methods?
Everything is sterilized – Tissue culture creates an ideal environment for plants to grow because it hand-delivers everything a plant needs in the most easily absorbable form. Yet that environment is even better for bacteria and other unwanted microorganisms. That’s why you must sterilize everything to kill all unwanted fungi, bacteria, or other microorganisms before starting the culture. Otherwise, they will take over your cultures and kill/outcompete your sensitive plants. It may seem excessive, but a huge aspect of success in tissue culture is proper sterilization. This includes not just the tools, vials, and transfer equipment, but also the living plant tissue (known as the “explant”). Each item is sterilized with its own steps. For example, tools are usually sterilized with heat or pressure while the piece of the plant (explant) is typically treated with something more gentle like a bleach or detergent solution. Sterilization takes more time than any other step of tissue culture and, honestly, is the part of the culture process that scares most people away from getting started.
The tissue culture environment is great for plants but even better for microorganisms. They must be destroyed at the beginning or they will take over your culture. Yuck! Picture by BlueRidgeKitties.

Aseptic conditions – At every step of the process, you need to take steps to ensure totally sterile conditions. In a lab, a special transfer chamber is created for touching tools or pieces of the plant that are already sterile. At home this can be accomplished with a glass aquarium or plastic storage tub turned on its side, cleaned with a bleach or alcohol solution, and sealed with clean plastic. Holes are cut through the plastic to put your gloved hands through. To be extra sure about sterility, you can take a spray bottle of 70% rubbing alcohol and spray the inside, which will kill any microorganisms in the air and any that remain on surfaces.
This sterile environment is used every time you transfer plant material or otherwise must expose sterile substances or tools to the air. You may even leave your growing plants inside until they’re ready to go into soil, to minimize the chance of contamination. The more steps you skip as far as sterile conditions, the greater the chance you’ll run into problems with unwanted stuff growing and killing your plants.
Aseptic conditions are key to successful plant tissue culture. Picture by THC Design.

Special grow medium – With plant tissue culture, a sterile grow medium is created that provides plants with nutrients, sugar, water, and a place to grow. Basically the grow medium provides your little explant everything it needs to survive and turn into a whole plant of its own. The most common medium is based on the Murashige & Skoog formula (“MS Medium”), which can be made at home according to a recipe or bought as a pre-made powder. The MS formula is combined with distilled water and sugar, then adjusted to 5.8 pH. It’s possible to grow plants directly in this liquid medium, but it is often heated together with a thickening substance from red seaweed known as “agar”, which turns the liquid grow medium into a gel. The resulting grow medium is sterile and provides explants a place to grow. Additionally, plant hormones can be included in the grow medium to cause the explant to grow the way you want. For example, a cytokinin such as BAP (benzylaminopurine) will promote the formation of new shoots/stems/growing tips, while an auxin rooting hormone like NAA (naphthalene acetic acid) can be mixed to encourage rooting. Cannabis plants seem to respond best to the cytokinin TDZ (Thidiazuron) and auxins IBA (Indole-3-butyric acid) for cannabis rooting and NAA (naphthalene acetic acid) plus TDZ for callus growth.[1] [2] [3] For many plant species including cannabis, you need to get your explant to grow shoots first using a grow medium with a cytokinin. Once your plant has formed shoots, you would carefully transfer it to your rooting grow medium so it grows roots. Once you’ve got a fully formed plant, you can transfer it to soil or other more traditional grow medium. This is just the beginning of what can be accomplished. Tissue culture gives you the ability to use a wide range of known plant hormones to produce a variety of different results.
In plant tissue culture, the Murashige & Skoog formula (“MS medium”) is the basis of most grow media. The MS medium provides explants everything they need to grow.

Requires less starting plant matter – With traditional cloning methods for cannabis, you need to cut off growing tips with stems that are at least a few inches long. That means each mature plant can only make a certain number of clones before it needs to be grown out more. Tissue culture lets you create hundreds of identical plants from a small piece of a plant, or even single plant cells.
The pieces of plant used in tissue culture are tiny compared to the stems needed for traditional cloning methods. Picture by u/Cannomics.

Plant hormones – By manually adding different plant hormones to your grow medium, you can encourage your explant to produce different types of tissue (roots, stems, etc.). That gives you control over almost every aspect of plant growth.
Plant hormones such as TDZ (Thidiazuron) are added to the grow media to help encourage cannabis explants to grow the way you want. Although it’s expensive to buy TDZ in bulk, tissue culture kits that are designed for cannabis typically provide smaller amounts.
 

acespicoli

Well-known member
Important Compounds for Cannabis Culture
  • Cytokinin – Cannabis plants respond to the cytokinin TDZ (Thidiazuron) [1] [2] [3]
  • Auxin – Cannabis plants respond best to auxin IBA (Indole-3-butyric acid) for cannabis rooting[3]
  • Callus growth – Can be produced and maintained on cannabis plants with a combination of auxin NAA (naphthalene acetic acid) plus cytokinin TDZ (at concentration 0.5 µM NAA plus 1.0 µM TDZ) [3]
  • Rooting – cannabis explants have been rooted successfully on an MS medium supplemented with 0.1 mg·L^-1 IBA and 0.05 mg·L^-1 NAA [7]
Tissue culture creates clones out of a small piece of plant such as a stem or leaf. The same general process (sterile conditions plus a sterile grow medium) can also increase germination rates for old seeds by preventing all contaminants while providing ideal growing conditions. This is an arabidopsis seed germination by BlueRidgeKitties in agar.

Explant cuttings from a mother cannabis plant. These cuttings will then be separated into smaller stem pieces that each have a single node. Picture by Dr. Hope Jones.

The first known example of plant tissue culture was by Gottlieb Haberlandt in 1898, but it wasn’t until the 1950s that it became more widespread as part of the orchid industry. Since then, the process has become popular with all kinds of plants all over the world. Interestingly, the technique has really not changed a lot since then, though now the information and supplies are available to more people than ever!

Tissue culture can be used for…​

  • propagating clones from a piece of the plant
  • rejuvenate a “tired” or sickly mother plant by inducing what’s essentially a “reboot”
  • remove epigenetic modifications that have built up over time in the plant tissue
  • eliminate disease while keeping genetics
  • sexual or asexual hybridization via protoplast isolation
  • germinating old seeds
  • produce botanical substances
  • cell mutation and selection
  • plant biotechnology
  • somatic embryogenesis
  • synthetic seed production
Did you know? Normally there is no way to clone an autoflowering plant once it’s close to harvest (and very difficult to do at any stage of life). You can preserve the genetics of auto-flowering cannabis plants by using a piece of one of their flowers to start your tissue culture. This “reverts” the tissue back to making stems and roots so the plant can be grown out again.[1]
It’s difficult to preserve genetics from auto-flowering plants with regular cloning techniques. Plant tissue culture lets you take “clones” of auto-flowering plants even after buds have fully formed. I wish I could have kept the genetics of this auto-flowering Creme de la Chem plant!

Overview of Cannabis Culture Process – 5 Stages of Micropropagation​

Here’s a general overview of the entire plant tissue culture process. This section will help you understand whether micropropagation is right for you.
Note: A tissue culture with cannabis plants typically takes 10-14 weeks before you have plants ready to put in soil.
  1. Identify the plant you want to use
  2. Put living tissue into a sterile environment*
    1. Remove a piece of the plant (this sample is known as an “explant”)
    2. Trim explant
    3. Clean explant (start here if using seeds)
    4. Put explant in a disinfected test tube with suitable grow medium (typically a gel or liquid that includes nutrients and specific plant hormones)
  3. Let tissue multiply(grow into actual plants)
    1. Ensure proper temperature, humidity, light, and nutrients
  4. Force plants to make roots (known as “in vitro rooting”)
  5. Transplant to final home and let plants acclimate to the outside world
*unwanted microbes can kill your new plant so it’s important to create a totally sterile environment (also known as “aseptic culture”)
The following plant tissue culture pictures are from Dr. Hope Jones. Thank you for everything you’ve done for the cannabis tissue culture community!
Remove a piece of the starting plant (harvest your explants) and sterilize them

After sterilization, the explants must be separated into smaller stem pieces with only a single node each

Closeup of trimmed explants propagating with new shoots in a grow medium

Continue culturing the cannabis explants until they produce significant new shoots

After the explants have grown the “top part” of the plant, it’s time to move them to a rooting grow media (to induce them to grow roots)

Important terms
  • Agar – Substance from red seaweed that is commonly used to thicken a liquid grow medium into a gel
  • Aseptic – sterile conditions that are free from any living contaminants or microorganisms including bugs, fungi, and bacteria
  • Explant – The starting piece of plant matter. This is a piece of the original plant that will be propagated (leaf, seed, roots, stems, flowers, etc.)
  • Murashige & Skoog formula (“MS Medium”) – Most common medium used for tissue culture. Contains everything a plant needs to grow
  • Sterile technique – #1 most important factor to success with plant tissue culture (boring but true)
  • Totipotency – a plant cell’s ability to divide and differentiate, which leads to the regeneration into a whole new organism
Terms often used interchangeably with “plant tissue culture”
  • De Novo – growing plants out of something that normally wouldn’t grow such as leaves (“de novo” means “anew”)
  • Growing in vitro – Growing plants in a test tube or other similar environment (“in vitro” means “in glass”)
  • Micropropagation – Taking tiny pieces of plants and making them grow
Basically, this is a method for multiplying plants by getting them to grow vegetatively.
Types of culture
  • anther culture (for haploid plants)
  • embryo culture – starting with the embryo inside a seed
  • callus and cell culture – more likely to be genetically unstable
  • flower culture – a viable way to culture cannabis plants [1]
  • meristem culture – propagating with virus-free meristem cells from the tips of a shoot
These cannabis explants have been cultured and grown into little plants. They will now be transferred to a rooting medium to grow roots. Picture by Skunk Pharm Research.

Basic Tissue Culture Supplies​

  • Plant tissue – cannabis seed or a piece of cannabis plant
  • Grow medium – typically a variation of Murashige and Skoog’s medium formula, sometimes combined with compounds like plant hormones or agar
  • Test tubes or Jars – a place for plants to grow
  • Sterilization equipment– A totally sterile environment is the #1 most important factor to success with plant tissue culture (boring but true)
    • Pressure cooker or microwave
    • Autoclave for high-pressure heat sterilization
    • Household bleach or alcohol (typically mixed with water)
  • Forceps or tweezers – For grabbing and moving pieces of plants
  • Lighted area– a bright place or shelf for your new plants to grow
    • Cool white or warm white fluorescent lamps – T8 grow lights work well
    • Gentle LED grow lights
  • Heat source (stove or hot plate) – For preparing medium
  • PH Test Kit – Test pH with either strips or a pH Pen, and adjust with PH Up or PH Down
  • Pure water– either water purification equipment or an extremely clean source of water
    • bottled distilled water
    • deionized water
    • reverse osmosis water
Cannabis explants being cultured under a fluorescent grow light. Picture by Skunk Pharm Research.

Other Helpful Supplies
  • PPM/EC meter to measure purity of water
  • A precision balanceor triple bean balance- accurately measure small amounts of chemicals
    • Alternative – use dilution method (if you need to measure 10 mg, mix 100mg into a solution and take 1/10)
  • Hot plate/stirrer
    • can stir by hand but may not work as well, better with a double boiler
    • combo hot plate with automatic stirrer is best
  • Media dispenser
    • 10-ml polypropylene pipet
    • heat resistant pyrex pitcher to pour hot medium into test tubes or jars
    • coffee urn can be used in a pinch
  • Explant cleaning equipment
    • Usually hot plate/stirrer is enough
    • Can also use a tightly closed jar
    • mechanical shaker or rotator
  • Sterilizing equipment for transfer tools
    • dip in (pure) alcohol and then burn it with a flame
    • Touch-O-Matic
    • Bleach solutions – household bleach containing 5.4% sodium hypoclorite. 1:10 bleach-to-water solution to soak instruments. 1:100 to rinse.
You want to sterilize all equipment before it touches your explants. Picture by MicroClone.

Where to make your “laboratory” for tissue culture
In order for tissue culture to work, you need to control the growing environment. You’ll get the best results if you ensure proper temperature, humidity, light intensity, light period/photoperiod, and nutrients. Aim for…
  • Low foot traffic
  • Stable temperature and the ability for temperature control around 21C/70F
  • Access to water and a drain
  • Easy to keep clean
  • Good air quality free from dust, smoke, mold, spores or chemicals
Design Your Space – 3 different rooms to keep everything separate maximizes cleanliness but most hobbyists keep everything all in one room out of necessity
  • A place to prepare media – for example, your kitchen table
  • A place to transfer cultures – for example, a glass aquarium turned on its side and sealed with a piece of plastic sheeting. Sterilize with a bleach or alcohol solution and cut holes in the plastic so you can reach through with gloved hands.
  • An area to grow out the cultures(sometimes called a “primary growth room”)
    • 75-85F (24-29C)
    • typically 16/8 light cycle
    • air circulation to reduce hot spots from lights
    • bookshelf with T8 fluorescent light works great!
Example of a plant tissue culture laboratory. Picture by Skunk Pharm Research.

“Quick and Easy” Guide to Making Grow Media​

All these ingredients can be found at the grocery store, pharmacy, and/or health food store. Perfect for beginners or those just getting involved with plant tissue culture. This recipe comes from Plants from Test Tubes: An Introduction to Micropropagation on page 77.
What you Need
  • 1/8 cup table sugar
  • 1 cup tap water*
  • 1/2 cup nutrient solution (1/4 tsp all-purpose 10-10-10 fertilizer dissolved in 1 gallon of water)
  • 125-mg tablet of inosital (1/2 of a 250-mg tablet)
  • 1/3 vitamin tablet with thiamine
  • 2 tablespoons agar flakes
*Coconut milk can be substituted for tap water but growth will be somewhat different (could be good or bad depending on the type of plant, it’s unknown what effect it has on cannabis)
  1. Combine ingredients in flask or beaker
  2. Boil while stirring until agar has melted
  3. Dispense medium into pint canning jars (or baby food jars)
  4. Cover and process in a pressure cooker for 15 minutes at 15 pounds pressure
    1. Sterilize tweezers and razor blades in the cooker at the same time (wrap in aluminum foil before putting in cooker)
    2. Also sterilize pint jars of water (for explant cleaning)

Further Resources​

Learn more about how to get started making cannabis plants in test tubes.
Articles
Books
Videos

Sources​

1 – Regeneration of shoots from immature and mature inflorescences of Cannabis sativa (https://www.nrcresearchpress.com/doi/10.1139/CJPS-2018-0308#.Xyo5QihKiUm)
2 – A rapid shoot regeneration protocol from the cotyledons of hemp (Cannabis sativa L.) (https://www.sciencedirect.com/science/article/abs/pii/S0926669015306245)
3 – High Frequency Plant Regeneration from Leaf Derived Callus of High Δ 9-Tetrahydrocannabinol Yielding Cannabis sativa L. (https://www.thieme-connect.com/products/ejournals/abstract/10.1055/s-0030-1249773)
4 – Plants from Test Tubes: An Introduction to Micropropagation. Page 13.
5 – Polyploidization for the Genetic Improvement of Cannabis sativa (https://www.frontiersin.org/articles/10.3389/fpls.2019.00476/full)
6 – Recent Advances in Plant in Vitro Culture (https://www.google.com/books/edition/Recent_Advances_in_Plant_in_vitro_Cultur/yfugDwAAQBAJ?hl=en)
7 – A Micropropagation System for Cloning of Hemp (Cannabis Sativa l.) by Shoot Tip Culture – (http://www.pakbs.org/pjbot/PDFs/41(2)/PJB41(2)603.pdf)
 

acespicoli

Well-known member

Also widely used as an indicator of superoxide production. The yellow color of NBT changes to
an insoluble purple diformazan upon reaction with superoxide. According to de Maagd et al.
(1993), a 0.05% NBT concentration in 10 mM sodium phosphate at a pH of 7.2 can be used to
stain Arabidopsis thaliana Col-O seedlings for superoxide in a matter of 60 minutes.


PhytoReady™ Murashige and Skoog Cannabis Multiplication Medium is a ready-to-use MS-based plant tissue culture medium gelled in polycarbonate culture tubes. This ready-made medium is formulated for the tissue culture of cannabis.
Each PhytoReady product arrives as a fully prepared gel in 25 x 150 mm polycarbonate tubes. The tubes are capped and vacuum sealed in sleeves of 10. Each tube contains approximately 20 mL of gelled media.
Recommended tissue preparation for PhytoReady products:
Tissue is generally disinfected for 5-15 minutes in a solution of bleach diluted anywhere from 1:10 to 1:2 with a few drops of Tween 20 added per 50 mL’s and gently mixed. It should then be rinsed with 3-4 volumes of autoclaved/pressure cooked sterile water. These are merely guidelines, and your tissue may require more or less time in more or less concentrated bleach solutions. The goal of tissue disinfection is to find the least harsh solution and amount of time in that solution that will remove fungi and bacteria, yet not induce plant cell and tissue death. Browning of the tissue can sometimes occur during disinfection. This can be reduced by reducing the time incubated in the bleach solution and the concentration of diluted bleach. The spread of browning on the tissue can also be reduced by dipping tissue in the Antioxidant solution following the final sterile water rinse.
PhytoAx™ is a solution for tissue culture that is used in your plant medium to promote axillary shoots in cannabis or other species. With PhytoAx, you get:

  • High Fidelity Tissue-Replication
  • Reproducible Multiplication-Rates
  • Enhanced Longevity in Culture
View Related Documents for our product info sheet with additional information on usage. For in vitro use only. Patent pending.
Our media optimization kit (DKW-based) allows the user to optimize the nutrient formulation using 5 different components which make up the macronutrients, mesonutrients, and micronutrients.
For the Media Optimization Kit (DKW) manual, click Related Documents for the D2400-Info document.
Contains:
  • MS/DKW Group I
  • DKW Group II
  • DKW Group III
  • DKW Group IV
  • DKW Group V

Link to Design of Experiments (DOE) spreadsheet, which allows you to:
  1. define the concentration ranges for each group within their design space for DOE, and
  2. quantify the working volume for each design point
 
Last edited:

acespicoli

Well-known member

1677721069581.png

1677721095572.png

1677721124108.png


1677721489797.png

1677721676606.png


Filters meeting the HEPA standard must satisfy certain levels of efficiency. Common standards require that a HEPA air filter must remove—from the air that passes through—at least 99.95% (ISO, European Standard)[4][5] or 99.97% (ASME, U.S. DOE)[6][7] of particles whose diameter is equal to 0.3 μm, with the filtration efficiency increasing for particle diameters both less than and greater than 0.3 μm.[8] HEPA filters capture pollen, dirt, dust, moisture, bacteria (0.2-2.0 μm), virus (0.02-0.3 μm), and submicron liquid aerosol (0.02-0.5 μm).[9][10][11] Some microorganisms, for example, Aspergillus niger, Penicillium citrinum, Staphylococcus epidermidis, and Bacillus subtilis are captured by HEPA filters with photocatalytic oxidation (PCO). A HEPA filter is also able to capture some viruses and bacteria which are ≤0.3 μm.[12] A HEPA filter is also able to capture floor dust which contains bacteroidia, clostridia, and bacilli.[13] HEPA was commercialized in the 1950s, and the original term became a registered trademark and later a generic trademark for highly efficient filters.[14] HEPA filters are used in applications that require contamination control, such as the manufacturing of hard disk drives, medical devices, semiconductors, nuclear, food and pharmaceutical products, as well as in hospitals,[15] homes, and vehicles.

Many types organisms are potentially detrimental to processes in a critical environment.
Seven of the most common contaminants are:


Last edited:

acespicoli

Well-known member
Furrows be glad, though earth is bare —
one more seed is planted there.
Give up your strength the seed to nourish —
that in course the flower may flourish.
Besançon Carol
 

acespicoli

Well-known member

Note on germinating wild Cannabis seeds​


Real Seed Co April 16, 2020

biodiversity, landraces
Recently, we’ve made some wild-type (‘wild’, weedy, ruderal etc.) accessions from South and Central Asia available. Wild-type seeds exhibit slow and staggered germination.
Almost all commercially available Cannabis seeds are of domesticated types such as hybrids or landraces. Domesticated seeds readily germinate in a dark warm environment on being watered. By contrast, wild-type seeds usually don’t. Typically, they need to be manipulated.
Wild-type Cannabis seeds germinate better after a period of storage at cold temperatures. This process is known as cold stratification and enables them to overcome germination inhibitors (Small and Brookes 2012).
Even then, wild-type seeds are somewhat dormant and germinate irregularly. These are adaptive features that enable the plants to overcome the environmental fluctuations typical of wild habitats.
Janischevsky’s 1924 study of Russian wild-type hemp seeds showed that fewer than 10% could be germinated immediately after maturation, but that repeated watering and drying cycles increased germination (water-soluble germination inhibitors may be present in wild seeds).
Vavilov and Scholz noted that the germination of Russian wild-type hemp proceeded very slowly and intermittently, the seeds often remaining dormant for weeks or even months, with typically only 10% germinating promptly.
Dormancy is a natural adaptation delaying germination, but in Cannabis the delay is not much longer than a few years. The seeds are not naturally long-lived. Haney and Kutscheid reported that seeds from ruderal Kansas populations declined in viability from 70% to 4.4% in 15 months of soil burial, an observation suggesting that seeds do not persist in a viable state in the soil for more than two or three years.
In summary, cold stratification of a couple of months followed by wet and dry cycles is likely to achieve best results.
Only germinate in real seed compost, not the excessively rich environment often used by growers familiar with modern hybrids. Never use tissue paper or other ridiculous fad methods such as closed plastic bags, which vastly increase the chance seeds will be killed by fungal or bacterial infections such as ‘damping off’.
This note is intended only for people living in regions where Cannabis can be cultivated without a license. For further information see Ernest Small’s Cannabis: A Complete Guide.
The photo above is by Landrace Genetics and shows a wild-type plant in northern Pakistan, 2019. In the new McPartland & Small taxonomy, this wild-type individual can be classified as C. sativa subsp. indica var. himalayensis. Northern Pakistan is the main centre of biodiversity for subsp. indica. Wild-type plants of var. himalayensis and var. asperrima, i.e. naturally diversified South and Central Asian populations, can be found in its mountains.
 

acespicoli

Well-known member

Basic quick start old seed.​


Step 1. Sterilization and germination, seeds are soaked in 1% H 2 O 2 solution for 24 hours until germination and then transferred into fresh solution. Seeds are then incubated in 1% H 2 O 2 until both cotyledons and epicotyl are visible.​

use 2 parts water and 1 part 3% peroxide.
For example, ½ cup of water and ¼ cup of 3% hydrogen peroxide = ¾ cup of 1% hydrogen peroxide.
Always use distilled water its like a 1$ gallon

Step 2. Seedlings are then transferred to MS media plates and incubated for three days in complete dark at 25°C. $5 makes one liter Amazon​

1678421216263.png

Step 3. Plants transferred to fine vermiculite shot cup sized depression in your hydro or organic mix, lightly spray with distilled water until you get true leaves.​

Planting media may be heated at 250 F for 1.5 hours like to use oven cooking bags and a cup of water
The turkey size bags do well and may be reused

Figure some seeds are 10-40$ ea 10-15$ usd more common
once the plant is vigorous I worry little about sterile soil and prefer living soil
DIY Organic Potting Mix's
 
Last edited:

acespicoli

Well-known member
1678848477963.png

we found that the optimal concentration of GA3 for hempseed is 400 mg/L and 600 mg/L in this study.

weigh 0.5 gram GA3 on scale and add to liter of distilled water (enough for 2 liters) $42.18 USD

GA3 pre-treatment increased SOD activity in hemp seedlings. SOD activity increased by 48.0% and 23.1% in YM and BM respectively, compared with 20% PEG treatment. GA3 pre-treatment also increased POD activity in hemp seedlings. POD activity in GA3 pre-treatment seedlings increased by 44.3% and 20.9% in YM and BM respectively, compared with 20% PEG treatment.
 
Last edited:

acespicoli

Well-known member

How to Professionally Germinate Cannabis Seeds: Award-Winning Seed Breeder’s Step by Step Instructions​


Popped cannabis seeds by Purple Caper Seeds. Photo by Lizzy Cozzi.


Popped cannabis seeds by Purple Caper Seeds. Photo by Lizzy Cozzi.

Cannabis germination: Otherwise known as “popping seeds”

Germination is the process by which a new plant grows from a seed. The process of moving from seed to seedling is sometimes referred to in growing vernacular as “popping” seeds or beans.
A grower’s germination rates (the % of seeds that yield a viable plant) vary based on a number of factors—these include:
  • The quality of the cannabis seeds
  • The conditions under which the cannabis seeds have been stored
  • The process the grower uses to pop their seeds (Perhaps most important and often overlooked factor!)
Why is the process a cannabis grower uses to germinate their seeds so important?
Money and time.
Cannabis seeds aren’t cheap. Higher germination rates save growers money and time. The process a grower uses to germinate can have as much of an impact on their success rate as the seeds themselves.
To prove this, Frank from Purple Caper Seeds, an award-winning cannabis genetics breeder for over 25 years, gave us a tour of his cannabis genetics facility and showed us his unique method of popping seeds.
Purple Caper’s genetics can be found in the clones you find in major west coast dispensaries. Recently, Purple Caper’s 4G, was selected as “a Cola of the Month” by High Times.
This guy knows what he’s talking about.
Having just had an embarrassingly low germination rate with some 10-year old cannabis seeds of our own, we were anxious to learn what we could have done differently.

Here’s Frank’s step-by-step process for how to germinate cannabis seeds and maximize your germination rates

Frank completely sterilizes his hands with alcohol before working with any of the materials in the cannabis germination process. Purple Caper Seeds photo by Lizzy Cozzi.


Frank completely sterilizes his hands with alcohol before working with any of the materials in the cannabis germination process. Purple Caper Seeds photo by Lizzy Cozzi.

Begin with a sterile environment and a methodical process

As anyone who has ever spoken to a group of cannabis growers knows, any process concerning this plant can be as simple or complex as the grower makes it.
This method is a simplified technique, with the home grower in mind.
The bar we’re setting here is not unreasonably high, but if you’ve been germinating on the fly and in paper towels, this 12-step process will require more preparation and individual steps than you’re used to.
Trust us; it’s worth it!
With this in mind, lets first go over same basic housekeeping and best practices. Before beginning to work, be prepared to:
  1. Sterilize everything you are planning to work with, except for the paper towels.
  2. Prepare everything you will need BEFORE you start.
  3. Work quickly but accurately. The faster you work the less chance pathogens such as gray, blue, black and white molds will affect your seeds.
  4. Keep your work area clean and organized.

You want to create as close to a clean room as you can get:

Purple Caper Seeds’ genetics facility has six air purifiers, and Frank does all his cannabis seed germination work in a sterile room with a laminar hood.
We’re going to assume not everybody has access to this kind of a setup. So as a stand-in practice, Frank recommends bleaching your bathroom clean and bringing in an air purifier.
Do your best to create a clean room. We used a kitchen island disinfected with 91% alcohol.
Materials needed to germinate marijuana seeds effectively. Purple Caper Seeds photo by Lizzy Cozzi.


Materials needed to germinate marijuana seeds effectively. Purple Caper Seeds photo by Lizzy Cozzi.

The materials you’ll need to pop seeds:

  • A gallon or more of distilled water.
  • Peroxide 3% solution.
  • Iso alcohol 91%.
  • Nutrient Solution—We’ll describe how to make this in the steps that follow.
    • Cal (Calcium) Mag (Magnesium) supplement – Frank recommends Cal-Mag Plus by Botanicare.
    • General Hydroponic Flora Microbe Series. This series comes in 3 bottles: Grow, Bloom and Micro.
    • PH Up or PH Down by General Hydroponics.
    • Organic agave extract.
  • PH meter —
  • Test Tubes—Frank recommends laboratory quality glass. Cheap test tubes will break when you sterilize them. While all of these materials can be purchased at Home Depot it is possible to buy a quality tissue culture kit for under $150, thus saving yourself a lot of running around.. Microclone.com – produces good basic kit.
  • Push Rod—Chopsticks work well.
  • Yeast tube Caps – Available at Home Depot.
  • Feeding Tube—Available at Home Depot.
  • Coco Coir (prewashed and charged)—Coco Coir is a natural fiber extracted from the husk of coconut. Often used as a soil amendment it adds organic matter, aerates the soil and improves water holding capacity near the root zone.
  • Small plastic cups with lids.
  • Liquid waste container.
  • Aluminum foil precut to size—You’ll use these to wrap the tubes.
  • Plastic tube holder.
  • Sterile plastic pipette—Make sure to open the plastic bag of pipettes only when you are ready to use them.

How to germinate cannabis seeds in 12 easy steps

A cannabis seed soaking in distilled water. Purple Caper Seeds photo by Lizzy Cozzi.


A cannabis seed soaking in distilled water. Purple Caper Seeds photo by Lizzy Cozzi.

Step 1:

Clean the seeds and soak in distilled water for 48 hours
Bring a gallon or more of distilled water to a complete rolling boil. You’ll use this sterile water in several steps in this process. (Contrary to what many believe distilled water is not sterile.)
Remove excess dirt from the seeds, cover them with the water and leave them to soak.

Step 2:

Make your nutrient solution
  1. Start with a ¾ gallon of sterile, distilled water.
  2. Add 2 ml organic agave extract into the distilled water when it is still hot. Let it dissolve and cool.
  3. Add 2 ml Cal (Calcium) Mag (Magnesium) supplement – Frank recommends Cal-Mag Plus by Botanicare
  4. Add General Hydroponic Flora Microbe Series. This series comes in 3 bottles: Grow, Bloom and Micro. Add 1ml of EACH to your solution.
  5. Use your PH meter to test the solution. The PH should be as close to 6.0 as possible. If the solution is too acidic or basic adjust with PH Up or PH Down by General Hydroponics.
  6. Put the solution back in the distilled water container for easy transport to your clean room.

Step 3

Soak your seed in the nutrient solution for 48 hours
Cover the seeds with the solution. Small, sterile plastic cups with lids are effective for this; they are easy to re-sterilize and reuse.
Once the seeds have sat in the nutrient solution for 48 hours, it’s time to move into the next phase of prep.

Step 4

Prep your tools
  1. Sterilize the test tubes, yeast caps, feeding tube, push rod and the coco coir.
    You can sterilize your equipment in two ways:
    • A simple, and often overlooked way to sterilize materials in your home is with the help of a pressure cooker.
    • If you don’t have a pressure cooker, submerging the equipment in boiling water is another sterilization technique. Sterilizing with boiling water works for all material except the coco coir, which becomes hard to work with when saturated with water. Coco coir is pre-washed but not sterilized. Frank recommends sterilizing the coco coir by pressure cooker, if possible.
  2. When using a pressure cooker, begin with the coco coir. Put some coco coir in a petri dish and place it inside the pressure cooker.
  3. Start the pressure cooker. As soon as it reaches its max temperature, release the pressure. Open the cooker in your clean area to minimize contamination.
  4. Sterilize the other tools in the same way.
  5. Store all tools in a clean environment.

Step 5:

Prep yourself
  1. Use a healthy dose of iso alcohol 91% and clean your hands. Take your time with this. Frank does not use gloves because he feels it gives him a better feel for working with the seeds.
  2. To further minimize contamination, it is recommended you wear a surgical mask while you work.
Alcohol and distilled water are necessary for cannabis seeds germination. Purple Caper Seeds. Photo by Lizzy Cozzi.


Alcohol and distilled water are necessary for cannabis seeds germination. Purple Caper Seeds. Photo by Lizzy Cozzi.

Step 6:

Prep your work area
  1. Begin by cleaning all surfaces with the 91% iso alcohol. Keep in mind it takes about 20 seconds for alcohol to do its job so don’t assume all surfaces are immediately sterile after you wipe them clean.
  2. Set up all the tools you need.
  3. Wipe down the top and sides of the nutrient solution bottle with the iso alcohol.

Step 7:

Sterilize, sterilize, sterilize
  1. Dip the test tube, the yeast cap, and pushrod in a solution of 3% peroxide.
  2. Let the peroxide sit in the yeast tube for several minutes.
  3. Discard the peroxide into the waste container and then flush and/or clean all items with the nutrient solution.
Sterilize everything you touch and use while you germinate your cannabis seeds. Purple Caper Seeds photo by Lizzy Cozzi.


Sterilize everything you touch and use while you germinate your cannabis seeds. Purple Caper Seeds photo by Lizzy Cozzi.

Step 8:

Create the Coco-Plug
  1. Take a pinch of coco coir and load it into a feeding tube. In this case, the feeding tube is used to keep the walls of the test tube clean when depositing the coir.
  2. Put the contents of the feeding tube into the test tube.
  3. Push the coco into the test tube with the push rod.
  4. Remove the feeding tube and rod leaving approximately ½” of coco at the bottom of the test tube.
Coco plugs inserted it into the feeding tube for Purple Caper Seeds cannabis germination. Photo by Lizzy Cozzi.


Coco plugs inserted it into the feeding tube for Purple Caper Seeds cannabis germination. Photo by Lizzy Cozzi.

Step 9:

Soak the seeds in peroxide
  1. Using tweezers, pick up a seed from the nutrient solution where it has been soaking for the last 48 hours. If using plastic cups with lids, open and close the lid before and after you remove the seeds.
  2. Drop the seed into the 3% peroxide solution.
  3. Soak for 15 seconds, NOT longer. The peroxide will damage the seed if you soak it for much more than 15 seconds.
  4. After removing it, clean the seed with the nutrient solution or with distilled water to neutralize the peroxide.

Step 10:

Prepare test tube
  1. Using tweezers, drop the seed into the test tube. Ideally it should sit in the middle of the coco but it need not be perfectly centered; the seedling will grow against the glass.
  2. Cap the tube with a yeast cap.
  3. Open the bag containing the sterile pipettes . Remove the yeast cap and add 2 ml of nutrient solution to the test tube with the seed in it.
  4. Seal the tube again with yeast cap. Don’t close it all the way. Yeast tube caps control airflow. If you don’t push the cap all the way down it will allow for a little external airflow. Yeast caps are made to burp. By not fully pushing down the cap you are allowing only about 1/64th of an inch of airflow, thus risking some contamination. But Frank swears by this process. He explained to us that the process still works when the yeast cap is fully sealed, but in his experience, the seedlings seem happier when a little airflow is allowed.
Ready to germinate cannabis seedlings: capped test tubes filled with seeds and coco coir. Purple Caper Seeds photo by Lizzy Cozzi.


Ready to germinate cannabis seedlings: capped test tubes filled with seeds and coco coir. Purple Caper Seeds photo by Lizzy Cozzi.
Step 11:
Wrap the capped test tube

  1. Wrap the test tube with a single layer of aluminum foil. Seedlings typically grow towards the light source. The goal here is to control the light, encouraging the seedling to grow north/south.
  2. Stack the sealed tubes in your tube holder.
  3. Continue until all seeds are used and all test tubes are placed in the holder.
Wrapping the test tubes in aluminum foil encourages the cannabis seedling to grow toward the light. This makes transplanting cannabis seedling easier. Purple Caper Seeds photo by Lizzy Cozzi.


Wrapping the test tubes in aluminum foil encourages the cannabis seedling to grow toward the light. This makes transplanting cannabis seedling easier. Purple Caper Seeds photo by Lizzy Cozzi.

Step 12:

Place the seedlings under a light source
Place under a florescent light in a 78F environment.
Check every other day on the progress
Close up of a newly sprouted cannabis seedling. Purple Caper Seeds photo by Lizzy Cozzi.


Close up of a newly sprouted cannabis seedling. Purple Caper Seeds photo by Lizzy Cozzi.
Don’t transplant the seeds immediately after germination. The optimum height for transplanting is about 1” in height, so use 1” as a guide. Ideally you don’t want to transplant too early or too late.
When the roots have generously filled the coco-plug, it’s time to transplant.

Part II: Transplanting your germinated seeds to soil

Beginning the process of transplanting cannabis seed into the coco coir. Purple Caper Seeds photo by Lizzy Cozzi.


Beginning the process of transplanting cannabis seed into the coco coir. Purple Caper Seeds photo by Lizzy Cozzi.
Once the seeds pop, it is time to transition them into a starter growing medium.

The materials you’ll need to transplant your seeds:

  • Tweezers
  • Root Riot cubes
  • Nutrient solution
  • Pipettes
  • Plastic containers—Root Riot cubes come with a 50 plug holding tray that works well.
  • A plastic tray

Step 1

Remove the Seedlings
When the seedlings are ready, use tweezers to remove them. Ideally grab the coco substrate or root ball so as not to damage the seedling.
Moving the cannabis seedling to the rooting cubes. Purple Caper Seeds photo by Lizzy Cozzi.


Moving the cannabis seedling to the rooting cubes. Purple Caper Seeds photo by Lizzy Cozzi.

Step 2

Create a Rooting Environment
  1. Frank uses Root Riot cubes to start the seedlings. Break the cubes in half.
  2. Place the seedling roots on one half of the Root Riot cube.
  3. Place the other half of the cube top of the roots to create a “sandwich.” Put the rooting cube in a plastic container or holding tray.
  4. Add 2 ml nutrient solution to the cube using a pipette.
Placing the cannabis seedling in the rooting cube. Purple Caper Seeds photo by Lizzy Cozzi.


Placing the cannabis seedling in the rooting cube. Purple Caper Seeds photo by Lizzy Cozzi.

Step 3

Move the Cubes into a Wet Environment.
  1. Put the plastic container in a plastic tray.
  2. Add a ¼ inch of water to the tray.
  3. Top off the tray with approximately ¼” water on top of each cube. This ensures the seedlings won’t dry out.
The cannabis seedling and rooting cube are placed in the tray. Purple Caper Seeds photo by Lizzy Cozzi.


The cannabis seedling and rooting cube are placed in the tray. Purple Caper Seeds photo by Lizzy Cozzi.
Voila! You’ve successfully germinated in test tubes and transplanted. Your seedlings will need some time to recover from the transplant, but when they are robust enough, they’re ready to move to a larger container.
We think you’ll find this process, while slightly more effortful than casual germination methods, will yield higher germination rates and more robust seedlings.
Once you’ve done it a few times, perfecting your timing and experimenting with the gear and sterilization methods that are right for you, it’s a process that can be done often and with relative ease.
Popped cannabis seeds by Purple Caper Seeds. Photo by Lizzy Cozzi.


Popped cannabis seeds by Purple Caper Seeds. Photo by Lizzy Cozzi.

Good old ed's got er figured out!
 

Latest posts

Latest posts

Top