What's new
  • Happy Birthday ICMag! Been 20 years since Gypsy Nirvana created the forum! We are celebrating with a 4/20 Giveaway and by launching a new Patreon tier called "420club". You can read more here.
  • Important notice: ICMag's T.O.U. has been updated. Please review it here. For your convenience, it is also available in the main forum menu, under 'Quick Links"!

The Groffice

Palindrome

King of Schwag
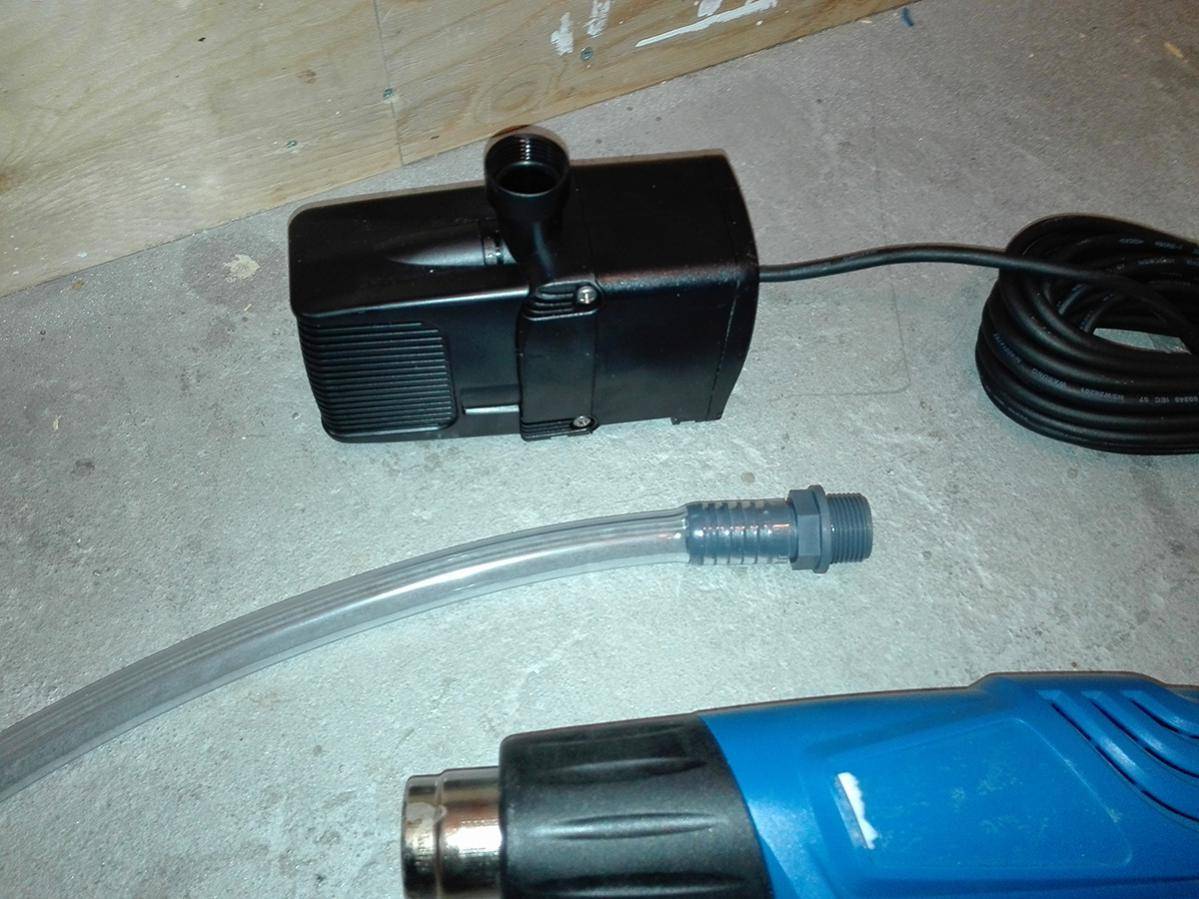
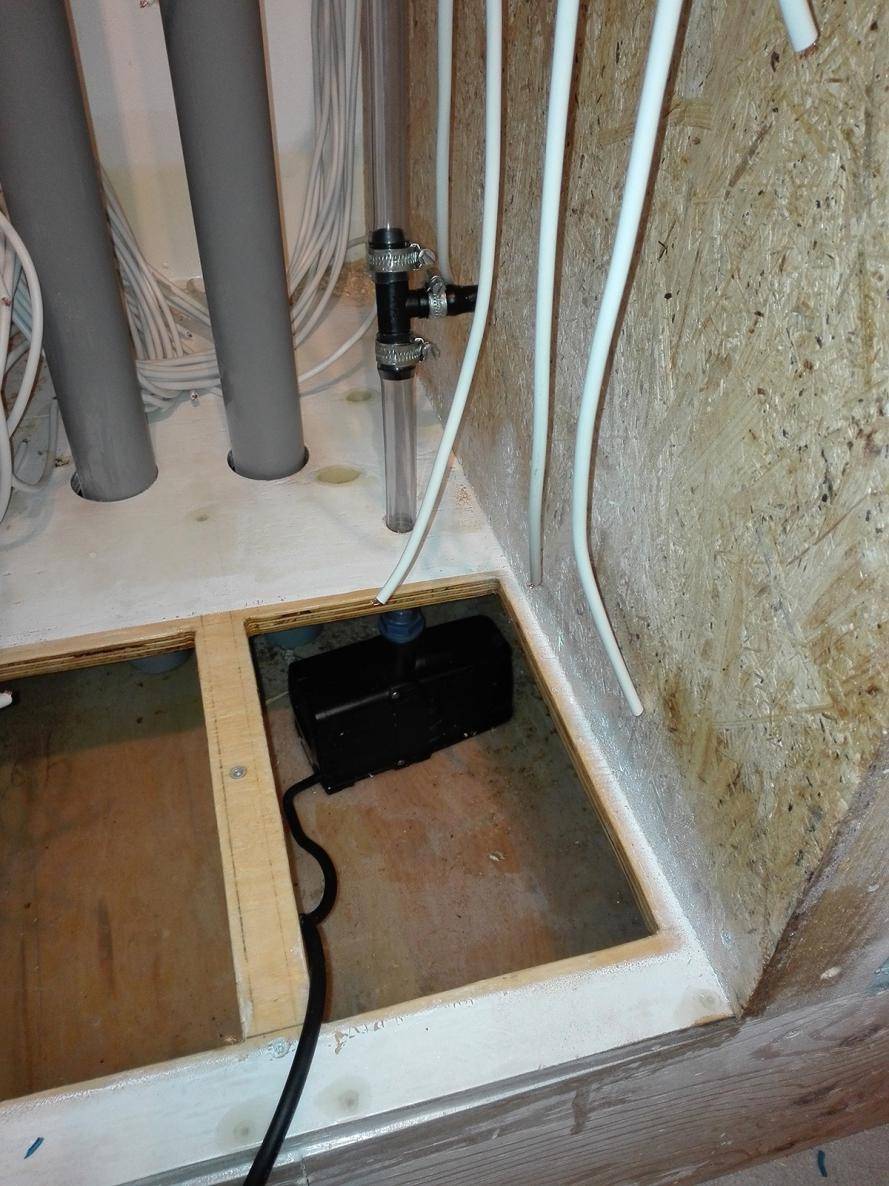
Pump getting installed


Pump getting turned on, this is an interresting moment. Will it have pressure enough, to feed the last sting on the top layer?
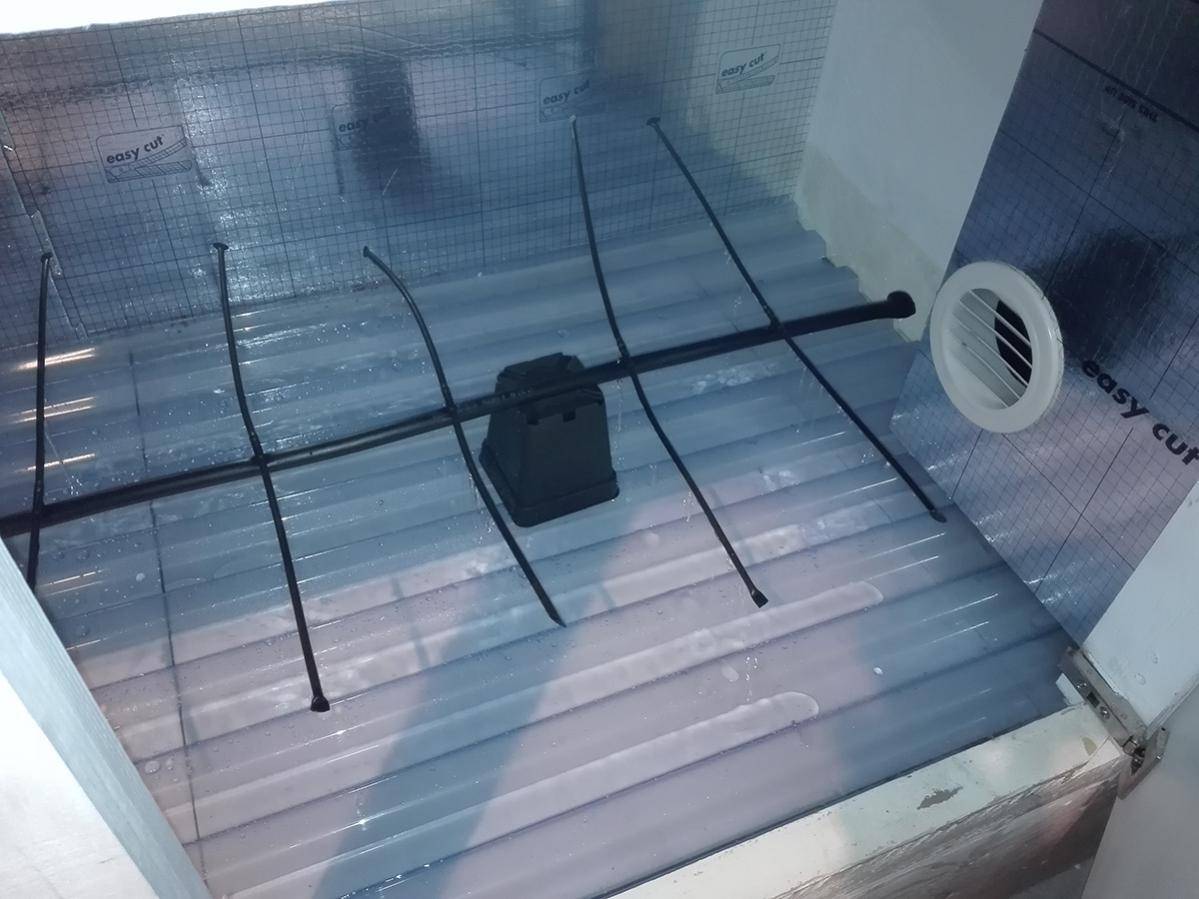
Bottom layer


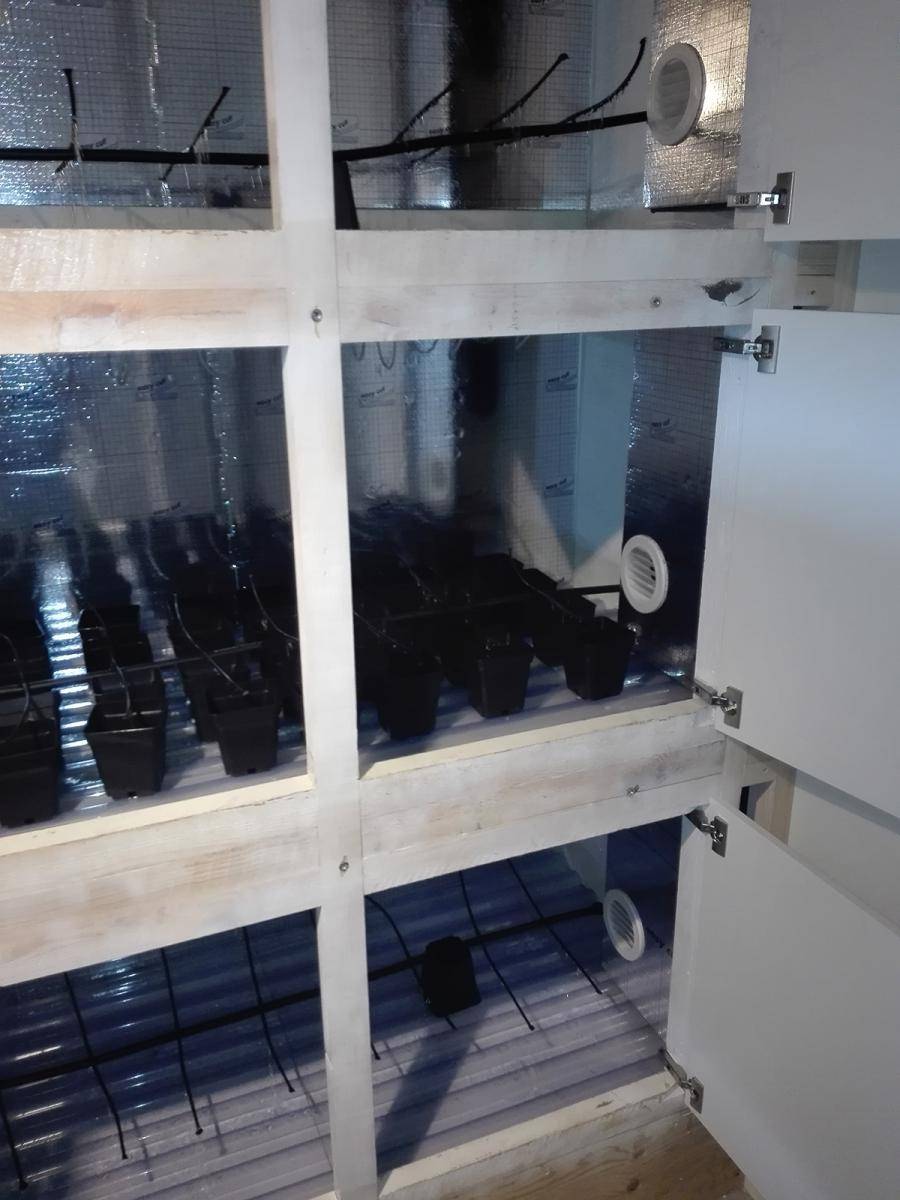
Both the bottom and midt section have a ball valve installed, so I can adjust how much water going to thouse strings.
Dialing them both a little down, evend out the pressure and all 3 tiers are getting about equaly amount of water.
It won't matter the first row's get more then the last rows, as long the last rows of plants get enough water and id say this is plenty!
 

hush

Señor Member
Veteran
Looking good, man. Been a while since I popped in here. Highly impressed! I mean, no exaggeration, but this is one of the most inspiring builds I've seen on the forums in a very long time. I haven't been this interested in a build since NewGanjaBoy's SCROG box back in the Overgrow days. Well done, dude.
 

Palindrome

King of Schwag
Looking good, man. Been a while since I popped in here. Highly impressed! I mean, no exaggeration, but this is one of the most inspiring builds I've seen on the forums in a very long time. I haven't been this interested in a build since NewGanjaBoy's SCROG box back in the Overgrow days. Well done, dude.

Thank you very much, big complements.
Trying to be humble, I can only hope this will inspire as many as the OG Scrog Box.

I am temporary connecting the right side LED's to the drivers, as the clones are getting ready to flower and I can't keep waiting on the relays.
This only means the flipflop box is delayed a bit, but I can get on with the grow and see if there are anything I need to change before I finishe the left side.
Mainly worried about light leaks, from the air intake.

First light hooked up
 

Palindrome

King of Schwag
3rd light is ready

Here is what I used:

9x C Alu profiles 20*40*2 mm (I predrilled the 5 mm holes)
4x 50 cm threaded M5 rod
2x 100 cm threaded M5 rod
A shit load of M5 nuts
a spanner tool
Thermal tape 20 mm wide
9 LED Strips 5x 4000K and 4x 3000K


Started by marking up the center of the two long rods, mounted the center profile and worked out to each side.
It takes a bit of time, spinning the nut's and mounting the center one first is the fastest way with least "screwing around"


And it's tedious, let's just be honest about that!
A little Tip!
Working both nut's at the same time, will speed things up.


Same design as the last one, but adjusted the width on this one.
So it's not quite as wide as the other two, and I'll see if that makes any difference or not.


Done - Ready to hang and connect tomorrow, the cables are all wired and connected.
With simple click connectors, so I can take it apart easy once the relays and last bits and peaces arrive.


Then it's on to connect a exhaust fan, but first I got to give that a clean up and install the Ozone bulp.

Getting closer and closer
 

Palindrome

King of Schwag
WOW this is the most amazing use of a small space I ever saw. Sir you have serious skill :tiphat::tiphat::tiphat:

Thanks for your kind words, I surely hope this will work out as planned.

Today I have temporary connected the ventilation to the right side,
wired the power line for the control box.
Hooked it up to a new breaker my main breaker box, independed from the rest of the house and the HPS grow.
In case of something cutting a breaker in the house, or one of the grows. It won't effect one or the other, just to play it safe.

Main power inlet 3x 240V, a neutral and a yellow/green ground wire.


Dialing in the ventilation, to see how the temperatures are gonna hold in the different layers.
So far the temps are looking good, and I have yet to install the fan's for air movement around the canopy.


Tomorrow I plan to program the timers, for the light and feeding and start making the front of the closet.
There is a great deal of light leaks from the cabinet doors, that the front panels should help eliminate.
So much I can't tell if any light, is coming thru the light traps.
Hoping I'll find time for it all tomorrow, so I can move the plants tomorrow evening.
 

Palindrome

King of Schwag
how have you planned the air circulation? one big fan for all boxes? are the outlets adjustable in air flow?

Not sure if I understand you right, but nothing have been winged.


So YES, YES and YES

If you go back to the very first post, there is a drawing/plan of the build.
 

Palindrome

King of Schwag
Made the front panels for the right side closet, fixing a bit of the light leaks from the doors.
It's not 100% perfect, as there is still a bit of light leaking around the doors.


Took a while to get them all fitted, and as you can see there is a little light coming out around the doors.
The light traps on the other hand, looks like they are working perfect.
As for the sound of the ventilation, it's not soundless in any way.
But I never expected it to be soundless, I am moving a fair amount of air.
There is no humming, hissing or sounds of air moving thru to narrow spaces.


As of fixing the last light leaks, I will cheat and just hang curtins.
At least for now, the misses just changed the drapes in the living room, so I'll give the old ones a try.
And see if they will do, also I expect it to help a bit on dampening the sounds, from the watering and ventilation.
 
Last edited:

Palindrome

King of Schwag


Two layers of drapes, should do the job of fixing the light leaks.
Got another set, for the other side.
A quick ironing, and it should look fairly well I think!
 

Palindrome

King of Schwag
Had to seam a bottom seam, in the bottom cabinet as I spotted moisture seeping into the wood.

While I had all the plants out, I figured I would install one of the Canopy fans. Now that I got all the supplies, even tho I don't think they will be needed. They would suck to need and not have, if the summer is gonna be like last year.

10" Car radiator fan, 12V 80Watt and max airflow 800 m3/h

It have been a bit of a trial, to get them dimmed and have them run even. The first dimmers and powersupplies I tried, didn't really work and the fan either didn't wanna slow down. If it did it sould rotate uneven and made a humming noise, that didn't sound "correct" :D


Im now able to simulate everything from a mild n soft breeze, to Hurricane Katrina running the fan on ludicrous speed.
 

Tentme

Member
This is absolutely beautiful. Great work. I’m still in the design phase of my own groffice and love how clean your build is. Can’t wait to see the updates.
 

Palindrome

King of Schwag
Thanks for the kind replys, I finaly got started on the left side cabinets.

I have been busy with lot's of other stuff, and the test grow in the right side is doing well. There is room for imporvements on the growing, but the enviroment and technical aspects have so far been spot on.
Still not done installing canopy fan's in the right side, but for now I don't worry about them.

I finished the 3 lights for the left side.


Hung the two of them, top and bottom. The middle cab is being used as a dry cab, will move them out tomorrow and get the last light installed.

I made these with M6 threaded rod, and they turned out much more stabil then the first 3 where I used M5 rods.

Next will be gettin the wire mess cleaned up!

On to the FlipFlop
 
Top