
-
Happy Birthday ICMag! Been 20 years since Gypsy Nirvana created the forum! We are celebrating with a 4/20 Giveaway and by launching a new Patreon tier called "420club". You can read more here.
-
Important notice: ICMag's T.O.U. has been updated. Please review it here. For your convenience, it is also available in the main forum menu, under 'Quick Links"!
You are using an out of date browser. It may not display this or other websites correctly.
You should upgrade or use an alternative browser.
You should upgrade or use an alternative browser.
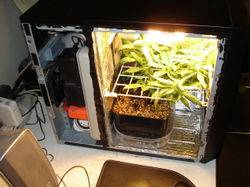
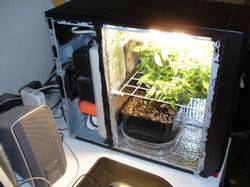
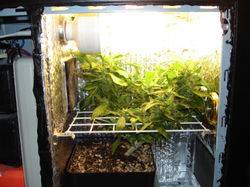
Mr Micro Presents : The Nanomachine
- Thread starter Mr_Micro
- Start date
Mr_Ed
Member
soft caulk?
soft caulk?
Mr Micro... First off this post got me to build my own grow computer so thanks.
I did the vaseline trick with black caulk but now it seems like the caulk is not setting up. I left the lights on and fan running over night and it is still a little soft. Did you notice this problem with your case? Will it set up eventually?
Thanks for the help.
soft caulk?
Mr_Micro said:Vaseline was applied to the door while the calk set so that the caulk would only stick to the parts I wanted to when it dried and would not stick to anything with vaseline on it.
Mr Micro... First off this post got me to build my own grow computer so thanks.
I did the vaseline trick with black caulk but now it seems like the caulk is not setting up. I left the lights on and fan running over night and it is still a little soft. Did you notice this problem with your case? Will it set up eventually?
Thanks for the help.
blakhash
Member
Mr_Ed said:Mr Micro... First off this post got me to build my own grow computer so thanks.
I did the vaseline trick with black caulk but now it seems like the caulk is not setting up. I left the lights on and fan running over night and it is still a little soft. Did you notice this problem with your case? Will it set up eventually?
Thanks for the help.
the caulk will stay soft. both my white and black caulk are both soft, as long as it dosent STICK to your finger whe you touch it, its fine.
G
Guest
Mr. Micro that thing is sick. Id buy that thing for 700 easy. Dont have the skills you do to make it. But would love to buy one from you
skill's? didn't look to complicated to me. awesome little setupt hough :__)Justin12421 said:Mr. Micro that thing is sick. Id buy that thing for 700 easy. Dont have the skills you do to make it. But would love to buy one from you
Mr_Micro
Member
Hello again everyone! 
It's been a week since the last update so it seems like a good time to do another update. But as usual, before I get to the update I'll take a minute or two here to respond to the new comments and questions
Blakhash - Thanks man! Yeah, this pheno isn't a very good one, but it does seem to be preforming a bit better in soil than it did in hydro. It's already starting to bulk up more than it ever did when I grew it hydro, so I think I'm still gonna get some pretty decent buds out of it.
Mr_Ed - Hey man! I'm really thrilled to hear that this PC case inspired you to do your own grow! The whole reason I decided to post this grow here was the hope that other people might be able to copy the design to create more safe and stealthy micro growboxes, so it's good to hear that other's are having success with this design too! It would be awesome if you could post a thread for your grow once you get it up and running, I'd love to see how it turns out
As far as the Sensi Seeds Skunk #1 goes, this Serious Seeds Bubblegum actually stinks just as much as any Skunk #1 I've ever grown and my carbon scrubber has kept the grow 100% odor free, so I think it will have no trouble handling the funk from the Skunk on the next grow.
And for the caulk, it never does become hard. Once it's fully set up it's still a little soft and plyable on the outside so it will conform nicely to the door of the PC case and create a good air tight seal everytime you take the door off and put it back on") So no worries man, the caulk should stay a little soft and rubbery.
So no worries man, the caulk should stay a little soft and rubbery.
MicroRU - Wow! I have no idea how you managed to keep a 70 watt HPS cool in that small of a box, but bravo! Excellent work! I think I'll keep sticking with my 42 watt CFL though. I'm getting really good results so far and my temperatures are only a few degrees above the ambient room temperature so I'm pretty happy with it. Still though, great work man!
Justin12421 - Thanks man! I really put a lot of hard work and time into the creation of this box so it's great to get such nice comments on it. I don't think I'll ever be going into retail production of these growboxes though, mostly because they are pretty time consuming to make. They're not really all that hard to make, they just take about 20 or 30 hours of time to build. It's definately something you could do yourself, as it's pretty simple and doesn't require a whole lot of technical skill to build, you just have to get the materials you need together and spend a lot of time with a tape measure and dremel tool measuring and cutting/drilling.
But who knows, maybe if someone offered me enough money I might be willing to make one for them on a one time basis
Teddybud - Thanks man! The overall functionality of the system is pretty simple but building it was quite a task. Like I said to Justin, it did take somewhere between 20 and 30 hours to build since there was a lot of careful measuring and cutting to be done, and fabricating the light trap and facade drives on the front was no easy task either. All in all though it was well worth the work, and while this may not be as straightforward and simple as Red Greenery's Rubbermaid design, I still strongly belive that it is something any grower could build regardless of their experiance in building a growbox. Plus it's a heck of a lot more stealthy than any other growbox out there, so that alone makes it well worth the time and effort involved if safety is your primary concern.
Whew! Now that the responses are all taken care of it's time for the weekly update!
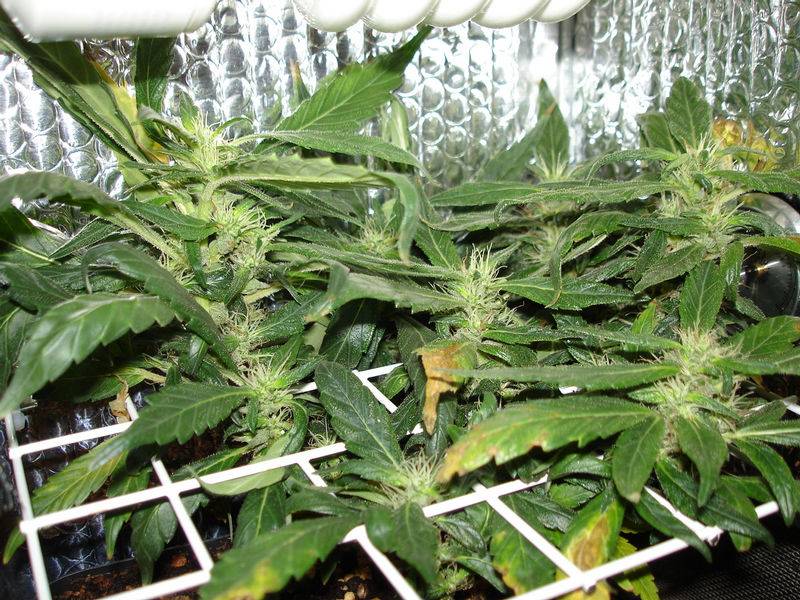
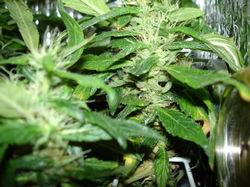
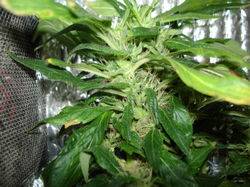
It's now day 80 of 12/12 from seed and my Bubblegum girl has actually bulked up quite a bit since my last update! I was a little worried that the buds were going to be pretty whispy and light since I've grown this pheno of Bubblgegum before in a DWC hydro system and the results just wern't very good, but this particular pheno seems to be doing a lot better in soil than she did in hydro. She's already starting to build density and is packing on some weight, so I think I'll get much better results with this pheno in soil than I did in hydro.
I do have a few more things to talk about, one being a concern I have about my plant, but before I get to those topics I think it's time for the weekly pics

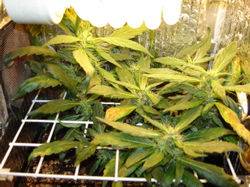


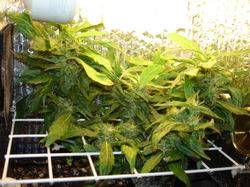
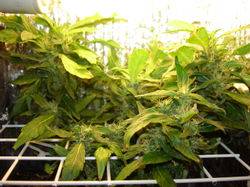
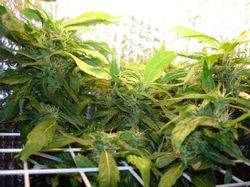
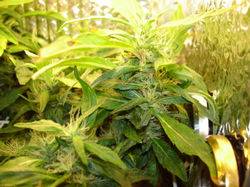
So as you can see she is starting to fill in a bit more nicely and is putting on a some weight, but the problem I'm concerned about should be pretty evident from the pics. A lot of the leaves are starting to turn a really funky yellowish color with brown spots and patches on them and I can't for the life of me figure out why! It doesn't look like the yellowing you'd see from a nitrogen defficincy and I thought I had my nutrients prety well balanced so I'm a little puzzled about it.
This is my first soil grow (since I've always done drip or DWC hydro up until now), so I'm still a bit unsure of myself and my techniques, but hopefully someone can fill me on what is going on here and let me know if this is normal or not for soil growing. I've never seen leaves start turning yellow with brown spots and patches before so I'm not sure what to make of it or how to fix it if it is something that needs fixing. And incase it helps in the diagnosis, here's the planting mix and feeding schedual one more time...
Mix = 2/3 Fox Farm Ocean Forest soil, 1/3 perlite, and 1 tablespoon of dolmetic lime per gallon of soil.
Feeding Schedual = I water with RO and UV filtered water every 3 to 4 days (when the top 3/4" or so of soil is dry) and I give nutrients every other watering. The PH of the water or nutrient mix is always anywhere from 5.8 to 6.5.
The nutrient mix I feed with every other watering consists of 1 gallon of water, 1 oz of Pureblend Pro Soil Formula, and 1 tablespoon of organic blackstrap molasses.
So, any ideas on whats causing the yellowing and brownish spots on the leaves? Any advice would be much appreciated.
And oh yeah, on a final note, the carbon filter is still working perfectly! This girl is smelling seriously skunky now and the carbon filter is still killing 100% of the odor in the air being exhausted from the case. Zero smell, total stealth. So thanks again to Suga_Bear for this excellent carbon filter design! It rocks!
Until next time, stay safe and grow smart my friends.
It's been a week since the last update so it seems like a good time to do another update. But as usual, before I get to the update I'll take a minute or two here to respond to the new comments and questions
Blakhash - Thanks man! Yeah, this pheno isn't a very good one, but it does seem to be preforming a bit better in soil than it did in hydro. It's already starting to bulk up more than it ever did when I grew it hydro, so I think I'm still gonna get some pretty decent buds out of it.
Mr_Ed - Hey man! I'm really thrilled to hear that this PC case inspired you to do your own grow! The whole reason I decided to post this grow here was the hope that other people might be able to copy the design to create more safe and stealthy micro growboxes, so it's good to hear that other's are having success with this design too! It would be awesome if you could post a thread for your grow once you get it up and running, I'd love to see how it turns out
As far as the Sensi Seeds Skunk #1 goes, this Serious Seeds Bubblegum actually stinks just as much as any Skunk #1 I've ever grown and my carbon scrubber has kept the grow 100% odor free, so I think it will have no trouble handling the funk from the Skunk on the next grow.
And for the caulk, it never does become hard. Once it's fully set up it's still a little soft and plyable on the outside so it will conform nicely to the door of the PC case and create a good air tight seal everytime you take the door off and put it back on
So no worries man, the caulk should stay a little soft and rubbery.MicroRU - Wow! I have no idea how you managed to keep a 70 watt HPS cool in that small of a box, but bravo! Excellent work! I think I'll keep sticking with my 42 watt CFL though. I'm getting really good results so far and my temperatures are only a few degrees above the ambient room temperature so I'm pretty happy with it. Still though, great work man!
Justin12421 - Thanks man! I really put a lot of hard work and time into the creation of this box so it's great to get such nice comments on it. I don't think I'll ever be going into retail production of these growboxes though, mostly because they are pretty time consuming to make. They're not really all that hard to make, they just take about 20 or 30 hours of time to build. It's definately something you could do yourself, as it's pretty simple and doesn't require a whole lot of technical skill to build, you just have to get the materials you need together and spend a lot of time with a tape measure and dremel tool measuring and cutting/drilling.
But who knows, maybe if someone offered me enough money I might be willing to make one for them on a one time basis
Teddybud - Thanks man! The overall functionality of the system is pretty simple but building it was quite a task. Like I said to Justin, it did take somewhere between 20 and 30 hours to build since there was a lot of careful measuring and cutting to be done, and fabricating the light trap and facade drives on the front was no easy task either. All in all though it was well worth the work, and while this may not be as straightforward and simple as Red Greenery's Rubbermaid design, I still strongly belive that it is something any grower could build regardless of their experiance in building a growbox. Plus it's a heck of a lot more stealthy than any other growbox out there, so that alone makes it well worth the time and effort involved if safety is your primary concern.
Whew! Now that the responses are all taken care of it's time for the weekly update!
It's now day 80 of 12/12 from seed and my Bubblegum girl has actually bulked up quite a bit since my last update! I was a little worried that the buds were going to be pretty whispy and light since I've grown this pheno of Bubblgegum before in a DWC hydro system and the results just wern't very good, but this particular pheno seems to be doing a lot better in soil than she did in hydro. She's already starting to build density and is packing on some weight, so I think I'll get much better results with this pheno in soil than I did in hydro.
I do have a few more things to talk about, one being a concern I have about my plant, but before I get to those topics I think it's time for the weekly pics
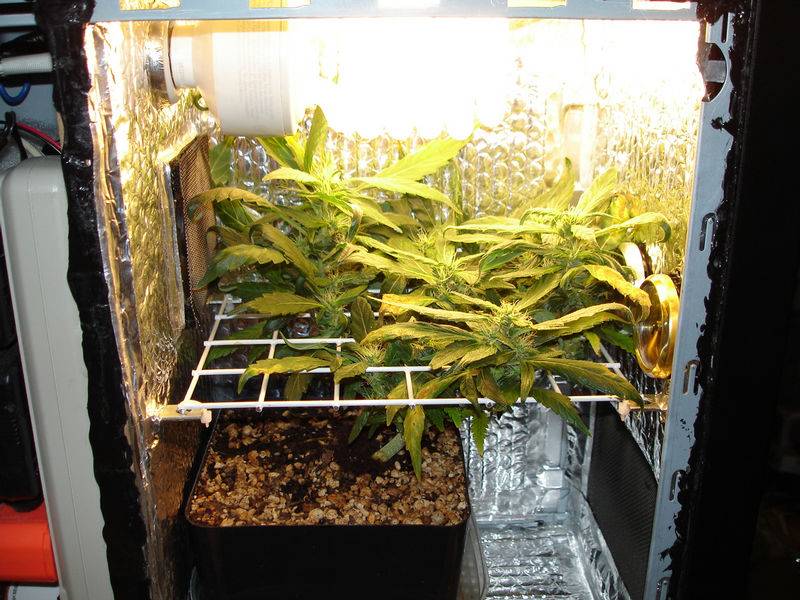
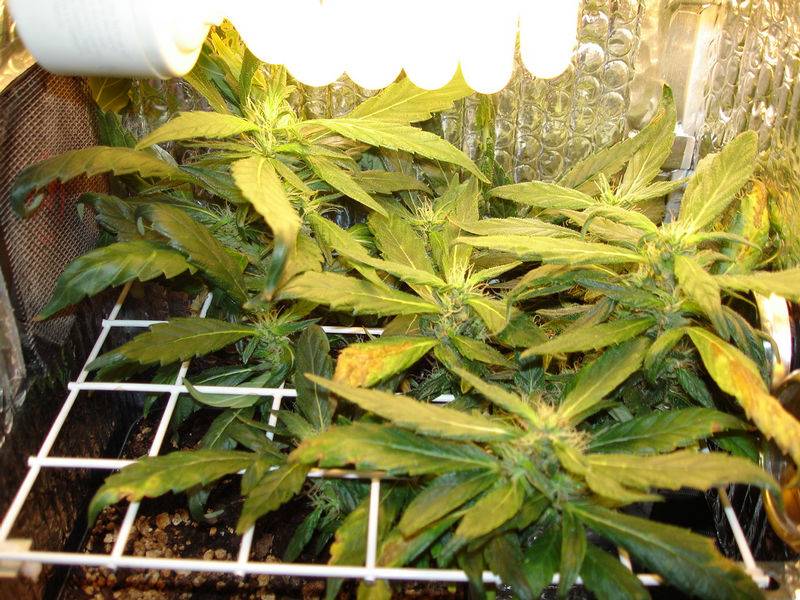


So as you can see she is starting to fill in a bit more nicely and is putting on a some weight, but the problem I'm concerned about should be pretty evident from the pics. A lot of the leaves are starting to turn a really funky yellowish color with brown spots and patches on them and I can't for the life of me figure out why! It doesn't look like the yellowing you'd see from a nitrogen defficincy and I thought I had my nutrients prety well balanced so I'm a little puzzled about it.
This is my first soil grow (since I've always done drip or DWC hydro up until now), so I'm still a bit unsure of myself and my techniques, but hopefully someone can fill me on what is going on here and let me know if this is normal or not for soil growing. I've never seen leaves start turning yellow with brown spots and patches before so I'm not sure what to make of it or how to fix it if it is something that needs fixing. And incase it helps in the diagnosis, here's the planting mix and feeding schedual one more time...
Mix = 2/3 Fox Farm Ocean Forest soil, 1/3 perlite, and 1 tablespoon of dolmetic lime per gallon of soil.
Feeding Schedual = I water with RO and UV filtered water every 3 to 4 days (when the top 3/4" or so of soil is dry) and I give nutrients every other watering. The PH of the water or nutrient mix is always anywhere from 5.8 to 6.5.
The nutrient mix I feed with every other watering consists of 1 gallon of water, 1 oz of Pureblend Pro Soil Formula, and 1 tablespoon of organic blackstrap molasses.
So, any ideas on whats causing the yellowing and brownish spots on the leaves? Any advice would be much appreciated.
And oh yeah, on a final note, the carbon filter is still working perfectly! This girl is smelling seriously skunky now and the carbon filter is still killing 100% of the odor in the air being exhausted from the case. Zero smell, total stealth. So thanks again to Suga_Bear for this excellent carbon filter design! It rocks!
Until next time, stay safe and grow smart my friends.
Classic fert burn those marks, just been through it myself, I didn't realize my plant was getting rootbound, and gave it a bit too much in the way of ferts, when there's not enough soil to buffer, salts build up really quickly.
It might be worth flushing her well, that's usually my 1st choice, let her dry out, and see if the burning stops.
It might be worth flushing her well, that's usually my 1st choice, let her dry out, and see if the burning stops.
microRU
Member
Mr.Micro, I shall be glad to see you in the string :friends:
"Romantica-turbo"/HPS70/nanoclass
"Romantica-turbo"/HPS70/nanoclass
Last edited:
floppyfundanglr
Member
that looks like overwatering thats what happened to mine and ive seen some outdoor plants that get heavy rains for a bit.
G
Guest
yes yes yes very nice Mr. Micro
today i think again to build pc case... well since last two years i thinking about that...
peace
today i think again to build pc case... well since last two years i thinking about that...
peace
Mr_Micro
Member
Sorry for the delay in updating everyone!
I've had a house guest here the past week or so who will be leaving in a few days, so I havn't had a chance to do any nice picture updates on the grow. But the upside is that my house guest spent at least an hour every night sitting at my desk using the computer (the real one) and never even looked twice at my PC case growbox!
So after having a house guest sitting next to the growbox for an hour a day every day for a week and never questioning it I think the Nanomachine passed the stealth test
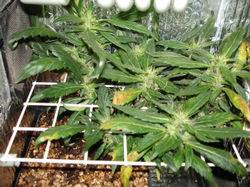
Anyway, the Bubblegum girl is doing pretty well now that I went to plain water only to flush out some of the nutrient and salt buildup. The leaves stopped yellowing and growth is returning to normal, so I think the problem has been taken care of now. And Floppyfundanglr, I'm quite sure it wasn't over watering. I tried waiting an extra day between watering cycles once and the plant was totally wilted and looked like it was on it's death bed when I waited an extra day to water, so I think I've got my watering frequency just right.
Anyway, I'll try to get some pics up for your guys tonight or tomorrow if the houseguest goes out for a while.
Thanks as always for all the great comments and help everyone! Pics will be coming soon
I've had a house guest here the past week or so who will be leaving in a few days, so I havn't had a chance to do any nice picture updates on the grow. But the upside is that my house guest spent at least an hour every night sitting at my desk using the computer (the real one) and never even looked twice at my PC case growbox!
So after having a house guest sitting next to the growbox for an hour a day every day for a week and never questioning it I think the Nanomachine passed the stealth test
Anyway, the Bubblegum girl is doing pretty well now that I went to plain water only to flush out some of the nutrient and salt buildup. The leaves stopped yellowing and growth is returning to normal, so I think the problem has been taken care of now. And Floppyfundanglr, I'm quite sure it wasn't over watering. I tried waiting an extra day between watering cycles once and the plant was totally wilted and looked like it was on it's death bed when I waited an extra day to water, so I think I've got my watering frequency just right.
Anyway, I'll try to get some pics up for your guys tonight or tomorrow if the houseguest goes out for a while.
Thanks as always for all the great comments and help everyone! Pics will be coming soon
G
Guest
J-Roc said:Dood this is definatly one of the coolest pc grows on this site.. and these days it sure seems like there is a lot.
thanks mr micro..
ill toss you some k's when the site lets me
the more the merrier i always say
T
trem0lo
This is an amazing and inspiring grow! And to think I just threw away an old Pentium III motherboard I could have sawed apart I wonder if you could pick up an 8-10 year old system at a computer recycling center or something, or find a dinosaur on ebay for $20-30, case and everything. I'm anxious to see the yield.
My only question is, given it's stealth, why would you NOT do this???
I wonder if you could pick up an 8-10 year old system at a computer recycling center or something, or find a dinosaur on ebay for $20-30, case and everything. I'm anxious to see the yield.My only question is, given it's stealth, why would you NOT do this???
Mr_Micro
Member
My appologies for the delay on this update! My house guest ended up staying an extra week so I didn't have a whole lot of time to tend to my Bubblegum girl and take pictures. But now that he has left I took a whole bunch of pictures yesterday and it's time for an update!
But before I get to the update I'll take the time to answer the responses since my last update...
HerbGlaze - Thanks man! This is certainly my favorite grow box I've ever built
haze12421 - Sorry for the delay man, but the pics are here today!
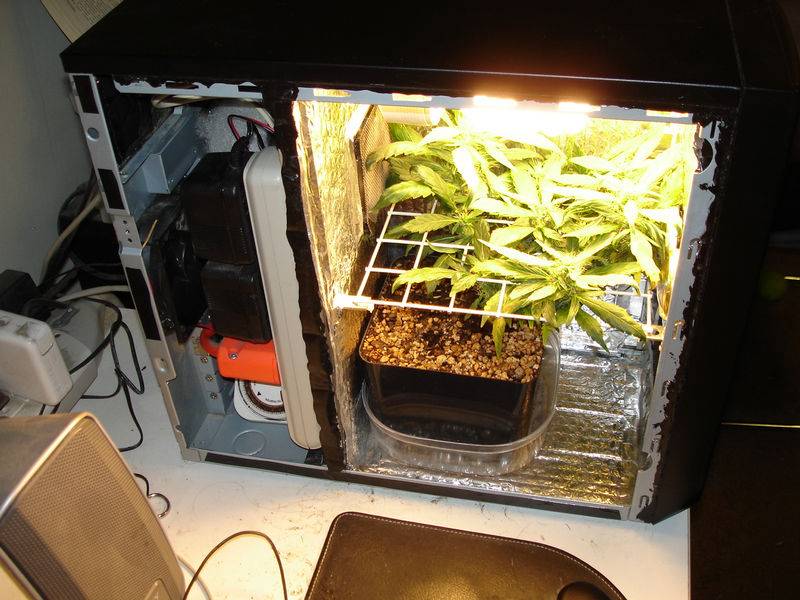
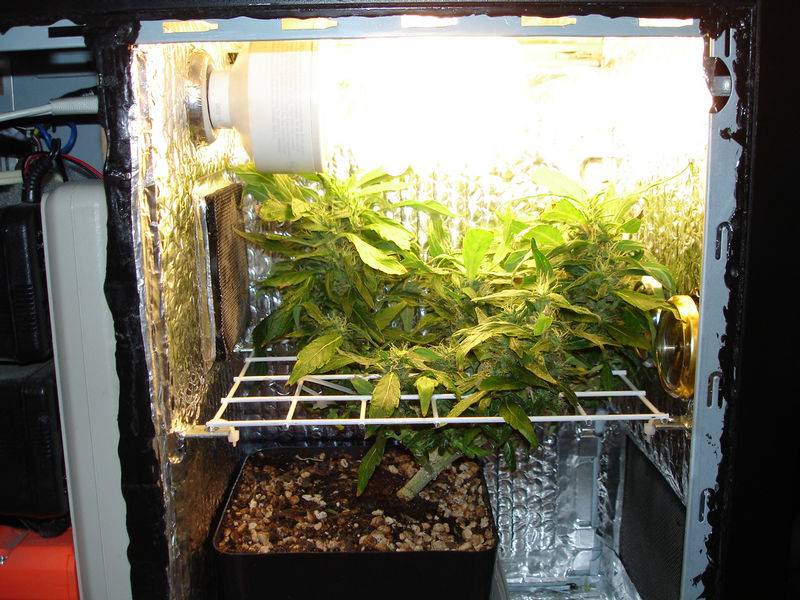
J-Roc - Thanks man! I think it's pretty darn cool too, if for no other reason than the total stealth and the fact that I think it's the smallest PC case grow I have ever seen done, with only 7" of available growing height from the top of the planter to the bottom of the CFL bulb. Bonsai bud!
rkrone - Indeed, but sometimes less is more
voher - It wasn't too difficult really. First I went to the hardware store and bought a 3 prong female connector. Then I just took the 3 wires that run out of the power jack on the inside of the PC case and wired them to the female 3 prong connector. After that I just plugged the male end from my power strip into the female connector for the power jack inside the PC case and plugged in the PC case power cord to the male end of the power jack on the outside of the case and voila! Instant stealth power. I also took the time to heavily wrap all connection points in electrical tape to make sure there was no risk of fire.
haze12421 - Sorry for the delay man! Hopefully you get to see this post before you head out on vacation (have a nice trip by the way!)
trem0lo - Thanks man! It certainly would be easy enough to do this grow really low budget and in a larger PC case by picking up an old tower from eBay or a computer recycling center. The design would still work just fine, but if the PC case is an old mammoth one you might need two 42 watt CFLs instead of a single one and boost the fan size up to a 120mm 72+ CFM one (which would also mean using larger net pots for the carbon filter). So you could take the design of this PC case and make a larger version with no problem. Just use a little more light, bigger fans, and bigger net pots for the carbon filter and you'd be good to go.
As far as why I wouldn't suggest this type of grow? Well, I love almost every aspect about it. The total stealth and safety, the ease of matience, it's incredibly cheap to run (it might raise my electric bill by $3 a month), wasn't very dificult to build, and you get all the fun and enjoyment that comes from being able to grow your own. Plus I love that if I ever need to go on vacation or if the apartment building I live in burns down I can pick up my entire grow room under one arm and carry it out of the building without anyone being suspecious of it. And I honestly can't think of a better safer way for someone who lives in a dorm room to grow their own smoke!
So why wouldn't I recommend this growbox? Well... it might be simply a matter of the time and money building it compared to the yield you get out of each grow. I spent $300 or $400 building this case, although I'm sure you could do it for less than $150 if you took the basic design and just threw it together out of stuff you had laying around and a cheap old PC case. And for all that time and money I'm hoping to get a half ounce of dry bud out of the harvest. For a lot of people a half ounce per grow just might not be worth the time and money involved. But for everyone else, I don't think there is a safer and more compact growing system anywhere
Now that the responses are taken care of, on with the update!
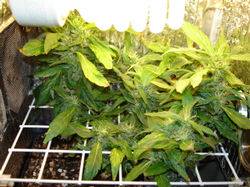
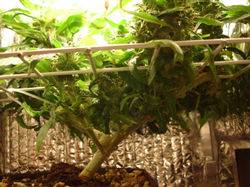
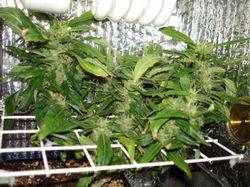
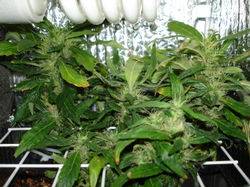
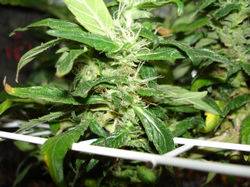
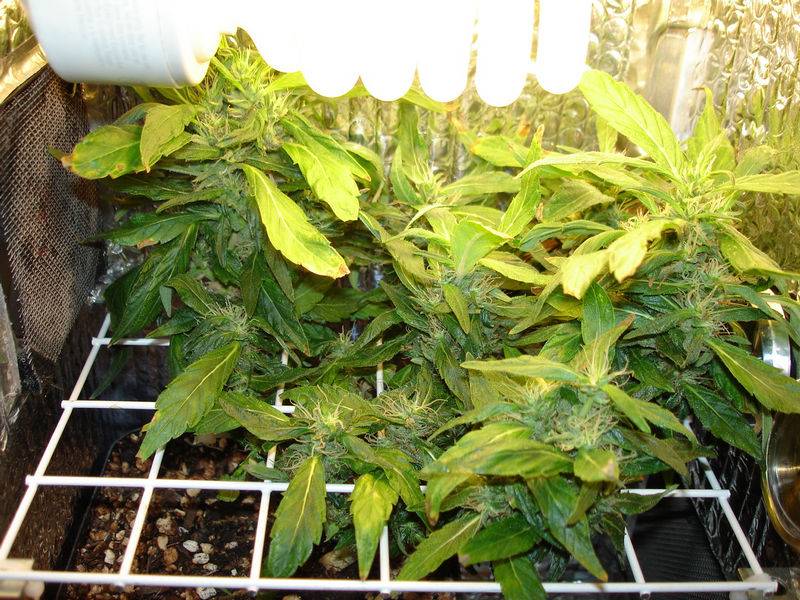
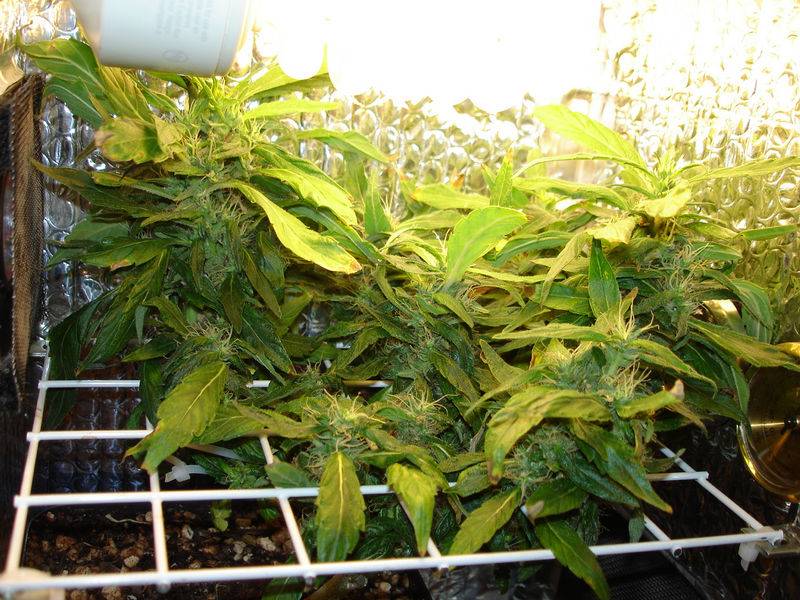
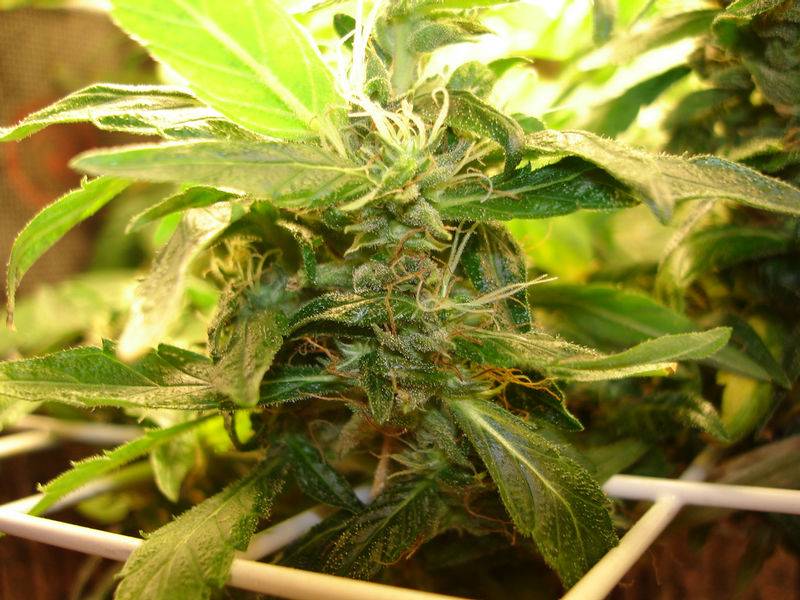
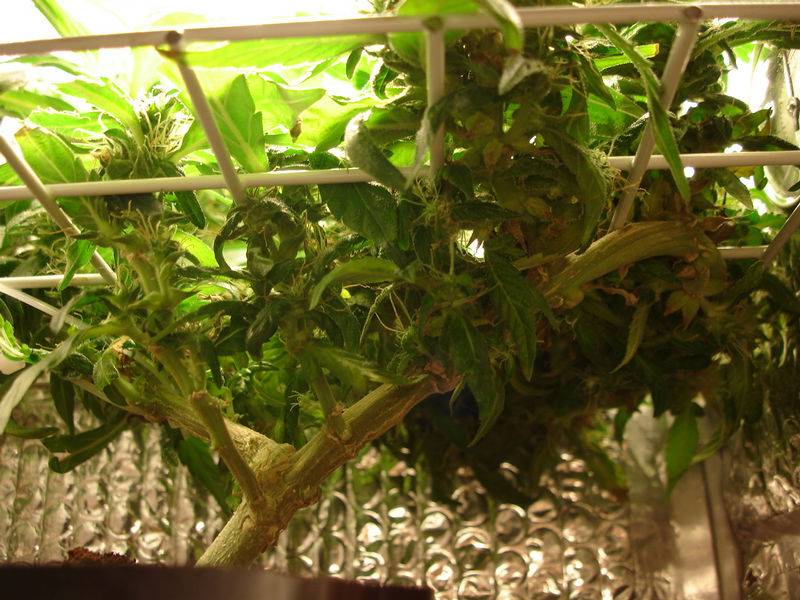
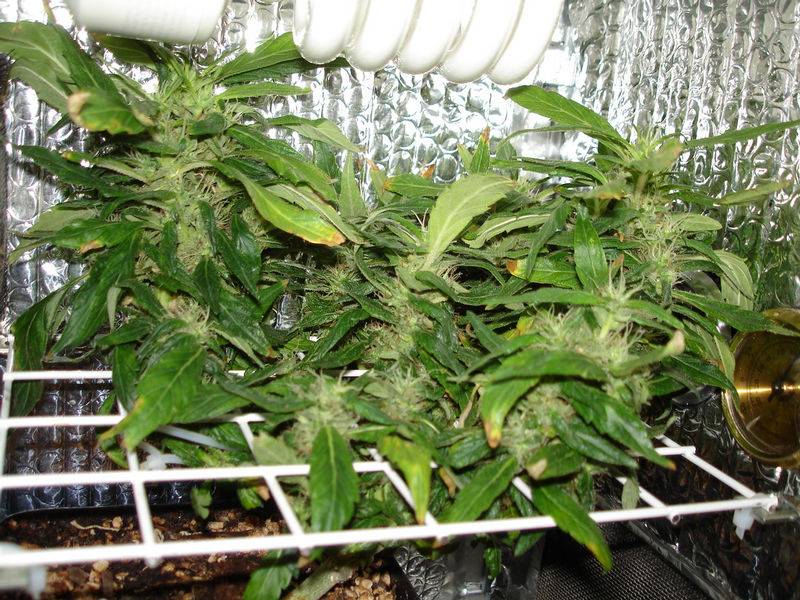
It's now day 100 of 12/12 from seed and my girl is coming to the end of her life cycle. She's got about 2 weeks left I'd say (I could probably harvest now, but I want her to bulk up a bit first) so from here on out I'm watering with plain water only to give her a good flush before harvest. This grow has taken a lot longer than I expected, I thought it would be done at least 2 or 3 weeks ago, but I think this ultra long flowering time has just been due to the rather crappy pheno I got this time around.
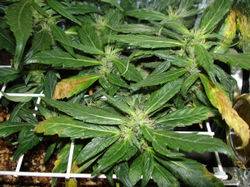
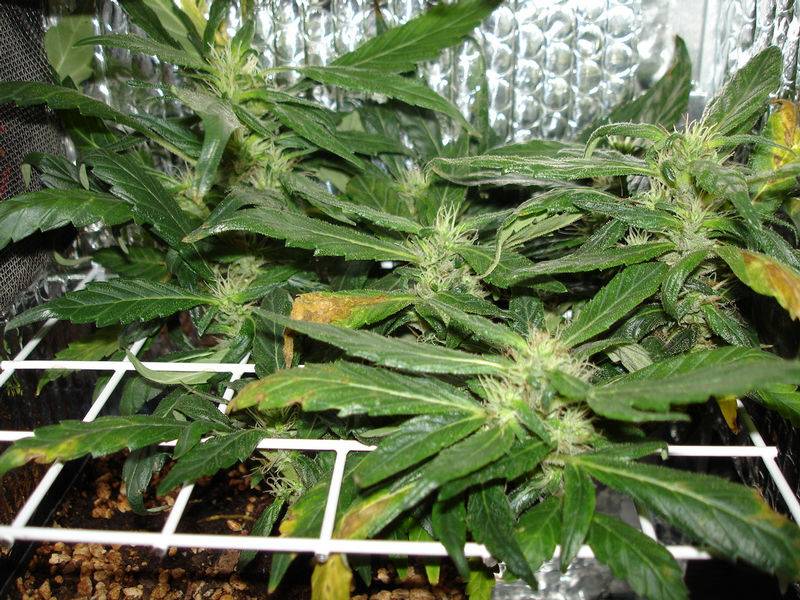
But despite the long flowering time, nutrient problems in the middle of the grow, and so-so phenotype, I think she's turning out quite well! The trichs are looking good and the flowers are starting to pack on the weight. So about 2 more weeks and she'll be done. At this point I'm thinking that my goal of a half ounce should be met, but there's no way of telling until it's all been dried and cured. The buds are still pretty light and fluffy compared to what I'm used to growing, but I think they should pack on a decent bit of weight over the next few weeks as she finishes up.
Since it's been so long since my last picture update I think I kinda went a little crazy taking pictures this time around, so I'll make up for lost time with a lot more new pictures than usual. I have 15 new pictures, all of which were taken last night (Day 99 of 12/12 from seed). The first 10 or so are with the light on, the last 5 or so are with the light off so you can get an idea of the true color of the leaves and flowers. Enjoy!


Thank you once again to everyone for your great replies and comments! I'll have another update within the next week or so. Until then, stay safe and grow smart my friends
But before I get to the update I'll take the time to answer the responses since my last update...
HerbGlaze - Thanks man! This is certainly my favorite grow box I've ever built
haze12421 - Sorry for the delay man, but the pics are here today!
J-Roc - Thanks man! I think it's pretty darn cool too, if for no other reason than the total stealth and the fact that I think it's the smallest PC case grow I have ever seen done, with only 7" of available growing height from the top of the planter to the bottom of the CFL bulb. Bonsai bud!
rkrone - Indeed, but sometimes less is more
voher - It wasn't too difficult really. First I went to the hardware store and bought a 3 prong female connector. Then I just took the 3 wires that run out of the power jack on the inside of the PC case and wired them to the female 3 prong connector. After that I just plugged the male end from my power strip into the female connector for the power jack inside the PC case and plugged in the PC case power cord to the male end of the power jack on the outside of the case and voila! Instant stealth power. I also took the time to heavily wrap all connection points in electrical tape to make sure there was no risk of fire.
haze12421 - Sorry for the delay man! Hopefully you get to see this post before you head out on vacation
(have a nice trip by the way!)trem0lo - Thanks man!
It certainly would be easy enough to do this grow really low budget and in a larger PC case by picking up an old tower from eBay or a computer recycling center. The design would still work just fine, but if the PC case is an old mammoth one you might need two 42 watt CFLs instead of a single one and boost the fan size up to a 120mm 72+ CFM one (which would also mean using larger net pots for the carbon filter). So you could take the design of this PC case and make a larger version with no problem. Just use a little more light, bigger fans, and bigger net pots for the carbon filter and you'd be good to go. As far as why I wouldn't suggest this type of grow? Well, I love almost every aspect about it. The total stealth and safety, the ease of matience, it's incredibly cheap to run (it might raise my electric bill by $3 a month), wasn't very dificult to build, and you get all the fun and enjoyment that comes from being able to grow your own. Plus I love that if I ever need to go on vacation or if the apartment building I live in burns down I can pick up my entire grow room under one arm and carry it out of the building without anyone being suspecious of it. And I honestly can't think of a better safer way for someone who lives in a dorm room to grow their own smoke!
So why wouldn't I recommend this growbox? Well... it might be simply a matter of the time and money building it compared to the yield you get out of each grow. I spent $300 or $400 building this case, although I'm sure you could do it for less than $150 if you took the basic design and just threw it together out of stuff you had laying around and a cheap old PC case. And for all that time and money I'm hoping to get a half ounce of dry bud out of the harvest. For a lot of people a half ounce per grow just might not be worth the time and money involved. But for everyone else, I don't think there is a safer and more compact growing system anywhere
Now that the responses are taken care of, on with the update!
It's now day 100 of 12/12 from seed and my girl is coming to the end of her life cycle. She's got about 2 weeks left I'd say (I could probably harvest now, but I want her to bulk up a bit first) so from here on out I'm watering with plain water only to give her a good flush before harvest. This grow has taken a lot longer than I expected, I thought it would be done at least 2 or 3 weeks ago, but I think this ultra long flowering time has just been due to the rather crappy pheno I got this time around.
But despite the long flowering time, nutrient problems in the middle of the grow, and so-so phenotype, I think she's turning out quite well! The trichs are looking good and the flowers are starting to pack on the weight. So about 2 more weeks and she'll be done. At this point I'm thinking that my goal of a half ounce should be met, but there's no way of telling until it's all been dried and cured. The buds are still pretty light and fluffy compared to what I'm used to growing, but I think they should pack on a decent bit of weight over the next few weeks as she finishes up.
Since it's been so long since my last picture update I think I kinda went a little crazy taking pictures this time around, so I'll make up for lost time with a lot more new pictures than usual. I have 15 new pictures, all of which were taken last night (Day 99 of 12/12 from seed). The first 10 or so are with the light on, the last 5 or so are with the light off so you can get an idea of the true color of the leaves and flowers. Enjoy!


Thank you once again to everyone for your great replies and comments! I'll have another update within the next week or so. Until then, stay safe and grow smart my friends

