What's new
  • Happy Birthday ICMag! Been 20 years since Gypsy Nirvana created the forum! We are celebrating with a 4/20 Giveaway and by launching a new Patreon tier called "420club". You can read more here.
  • Important notice: ICMag's T.O.U. has been updated. Please review it here. For your convenience, it is also available in the main forum menu, under 'Quick Links"!

Upsize into fabric pot issues.

Roadblock

Active member
This happened quick 14 hrs .

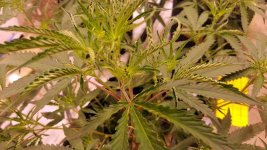
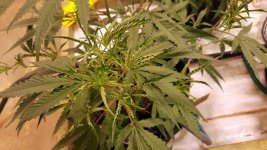
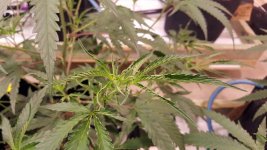
Went from 1/2 gal plastic pots to 3 gall fabric pots, water them in good and left for 12 or so hrs when I seen the cupping, pots felt a little on the dry side so wet them up again they are now on a minute every 4 hrs while lights on.

This is what I think has happened, the fabric pot was a lighter more fluffy mix than the coco in the plastic pot, this difference caused drying out from the outside too fast which sucked the moisture out the plant probably burning it.

This is all I can think of Ive never seen it before, what do you guys think is behind this kind off cupping and twisting tips.

Its hot 33celcius but lights cmh are very high 5ft away airflow is high , PH is 6.0 400ppm Aqua Flakes, DTW system.

https://www.icmag.com/ic/attachment.php?attachmentid=554044&stc=1&d=1607322296
https://www.icmag.com/ic/attachment.php?attachmentid=554045&stc=1&d=1607322296

https://www.icmag.com/ic/attachment.php?attachmentid=554046&stc=1&d=1607322296
 

Attachments

  • 004.jpg
    004.jpg
    66.7 KB · Views: 39
  • 003.jpg
    003.jpg
    64.9 KB · Views: 28
  • 002.jpg
    002.jpg
    53.7 KB · Views: 37
  • 001.jpg
    001.jpg
    86 KB · Views: 38

Switcher56

Comfortably numb!
You are running coco correct? If so you will need to set up some type of irrigation system. That said, they are great for soil.
 

Roadblock

Active member
Yes mate they are in Coco Perlite mix, they irrigated 1min every 4hrs lights on.

Its the cupping that bothers me not sure why it happened on the tips I think it was maybe they drying out to quick that first day, seems to have happened to quick to be a nutrient problem, Ive never had this before.
 

troutman

Seed Whore
33C is a bit hot. Cool that grow room ASAP. Heat is probably the #1 thing that causes leaves to Taco. ;)

Once the plants start growing new roots things should get better. :tiphat:

I also just transplanted from small pots to 3 gallon fabric pots last week and have some leaves that are Taco.
Raising my LED lights and lowering their power output while cooling the grow room is helping. I suspect fabric
pots initially cause the root ball to dry because of increase air contact over plastic pots.

Maintaining proper heat and humidity are important to avoid Taco issues.
Running a fan directly on plants can also cause Taco issues.
 

tobedetermined

Well-known member
Premium user
ICMag Donor
I always soak the new coco when I transplant. I want it to start wet. Then I continue with normal feedings.

33C is pretty hot & the plant searched for water it couldn’t uptake fast enough in the new larger pot & the tops suffered. Be generous with watering for a while to let it recover.
 

Roadblock

Active member
I think you guys nailed it.

We just went through a 5 day heat wave, I dont have any radiant heat from the lights as they are high its ambient temp, I run these of a night time but being on 18hrs they get there morning at 2pm the hottest part of day.

I cant do any more for cooling than move a lot of air through the room its a fully insulated room so that helps at best I can only equal outside ambient I got enough air the lights dont hardly add any heat, I got 3 600de Cmh over them up high .

Might dim the lights for a few days till established in the bigger pot.
 

Switcher56

Comfortably numb!
33C is a bit hot. Cool that grow room ASAP. Heat is probably the #1 thing that causes leaves to Taco. ;)

Once the plants start growing new roots things should get better. :tiphat:

I also just transplanted from small pots to 3 gallon fabric pots last week and have some leaves that are Taco.
Raising my LED lights and lowering their power output while cooling the grow room is helping. I suspect fabric
pots initially cause the root ball to dry because of increase air contact over plastic pots.

Maintaining proper heat and humidity are important to avoid Taco issues.
Running a fan directly on plants can also cause Taco issues.
That's affirmative.
 

Switcher56

Comfortably numb!
I think you guys nailed it.

We just went through a 5 day heat wave, I dont have any radiant heat from the lights as they are high its ambient temp, I run these of a night time but being on 18hrs they get there morning at 2pm the hottest part of day.

I cant do any more for cooling than move a lot of air through the room its a fully insulated room so that helps at best I can only equal outside ambient I got enough air the lights dont hardly add any heat, I got 3 600de Cmh over them up high .

Might dim the lights for a few days till established in the bigger pot.
FWIW... I run my lights from 4pm until 10 am on an 18hr cycle and 10pm to 10am on a 12hr cycle. I do not grow in coco though (HP Promix)
 

ridoo

Active member
got same issue with airpot some years ago

airpot + coco + hand watering.... not a so good idea especially during hot season...

maybe with automatic and well timed watering it's ok, maybe

you can use basic plastic containers and custom them with a good knife to make more holes, but not to much holes and not over the upside half of the container

good grow :)
 

troutman

Seed Whore
Maybe, fabric pots could use a plastic bag or plastic wrap around them at first to maintain the moisture until the roots really take off.
The plastic removed after 2 weeks or so. I'll try that next time with a side-by-side test of with and without to see if that reduces the
plant stress. I bet it helps.
 

ridoo

Active member
Maybe, fabric pots could use a plastic bag or plastic wrap around them at first to maintain the moisture until the roots really take off.
The plastic removed after 2 weeks or so. I'll try that next time with a side-by-side test of with and without to see if that reduces the
plant stress. I bet it helps.

funny, that's what i am building for test in my next run

i reuse big 5L bottle of distilled water, first use for the fogger, they have a perfect square shape that i can put 10 of them under my light...
but they are also a bit transparent, not totally but light goes through

so i'm gonna make them some kind of squirts of white of plastic wrap, only attached on the top, and make test of different holes under the plastic wrap which will stay in place all the grow.... i should make a draw... dunno...

good grow :)
 

Drewsif

Member
Fabric pot is like condom with air vent.

Coincidentally professional growers are wrapping their fabric beds in dental dams to prevent the "air pruning"
 

Switcher56

Comfortably numb!
Maybe, fabric pots could use a plastic bag or plastic wrap around them at first to maintain the moisture until the roots really take off.
The plastic removed after 2 weeks or so. I'll try that next time with a side-by-side test of with and without to see if that reduces the
plant stress. I bet it helps.
I have been working on a document, here are a few excerpts...

How to properly water...

[FONT=Arial, Helvetica, sans-serif]With a soft kiss, what does that mean?
When you 1st kiss a girl, it is normally a peck, on the lips, not a full blown "down the throater". The same applies to soil, especially a "peat" substrate. The latter is why folks don't like using peat. Once again it is because they don't understand how peat functions.
[/FONT]

[FONT=&quot]o [/FONT]I give my 3gal pots a "soft kiss" over the entire surface Using the rosette attachment, never allowing the water to pool. This is important because water will flow through the path of least resistance. This primes the soil. I let it soak for 10 min or so;

[FONT=&quot]o [/FONT]After a sufficient soak, I water the "perimeter" (without the rosette) of the pot only, circling towards the center but, never watering the 4" plug. This is important, as I don't want lazy roots. I want them to seek water or feed. Keeping in mind that the soil is moist throughout. As the pot dries, the roots will go down in search of water. The last bit of the remaining water, gets applied to the plug (approx 250ml); and

[FONT=&quot]o [/FONT]This is only for a couple of weeks. The plant dictates when I augment e.g they are drying before it is time to feed or water them. This is really insignificant, because when I come across a light pot, I check via moisture meter. I have been doing it for so long now, I know what is required but, more importantly, I know where my root zone is, and that is not at the bottom of the pot, where you will get a fault positive (saturation zone, although the zone is not as significant as a "normal" container). A cloth pot will dry uniformly, from the outside in. That is because it receives air circulation at the bottom via pieces of lighting grills. :tiphat:

PS: I start off with 1l working all the way up to 1.5l I, W D D F D D W Where:

  • W = water;
  • D = dry; and
  • F = feed.
 

ridoo

Active member
the containerX thing :)
I fix the plastic wrap with a toothpick because i want it cheap, easy to change, easy to remove, i'll test some "hole and wrap" combination and keep one without wrap and only basic holes like a casual container...


Roadblock

Active member
Another problem I had with this one was the perlite mix, it was well mixed but obviously it cant be as some pots hold a lot more water than others, so I have a group of plants that are cows and calves.

I had to pull 4 out and take the demand off them and let them dry out, they are starting to show root issues being too wet, the Cows are thriving their pot was always lighter.

Next time no perlite and dry them out a little more early, I did push these a little getting them on a auto cycle feeding.

Its a new strain as well Bubba Kush, I find it way more sensitive to everything than the White Rhino I had before.
 

WaterFarmFan

Active member
Veteran
Been using fabric pots with coco for a long time. I usually go from 2" pots to 5" pots to 3 gallon fabric. I use Lucas Formula (GH Micro/Bloom 6:9) with 1ml cal mag and 1ml fulvic acid at 1/2 strength for 2" and full for 5" and larger. Here is my transplant procedure:

1.) Mix full strength nutes and flush every plant with significant drain to waste. Plants are root bound and likely have some ph and unprocessed salt issues. Flushing helps get a clean slate going.

2.) Setup mixing station. For smaller pots and fewer plants, this can simply be a large bowl next to sink. I use a 35 gallon tub and 3x 5 gallon buckets. 2x upside-down buckets go into tub to raise working height and last 5 gallon bucket is used for mixing nutes. 3 gallon fabric pot goes on top of 1 bucket and nute bucket on the other.

3.) Add minimal amount coco to 5 gallon bucket of pre-mixed nutes. The idea is go slow enough to allow coco to fully soak in nutrient solution but also to wash the coco and filter to an extent. I have found that coco has 3 basic components. The first (~90%) is the lighter fraction that floats to top with larger fibers. This is the only part that I add to my pots. The second (~10%) is a very fine but dense pulp that sinks to the bottom of 5 gal nute bucket. I discard this layer because it does seem to have the wicking properties and stays too wet. The final (<1%) is a bit of sand and small gravel that also sinks.

4.) Using both hands and careful NOT to agitate the solution too much, as this causes the second layer to mix, scoop out and squeeze excess nute solution from coco and dump into fabric pot. This is messy business!!! As you add more coco, solution will drain from fabric pot over 5 gal bucket and into 35 gal tote. I make a ~3" layer of coco on bottom of pot and press to make sure no voids.

5.) With your base of coco set, place an empty 5" pot in center of fabric pot and begin to tightly pack wet coco around evenly. I like to leave about 1" of empty space at top of fabric pot to make watering faster. Once enough coco is added and pressed down to eliminate any voids, pull out the empty 5" pot to reveal the exact size needed for transplant. I often reach in to scoop a bit of coco from hole to make sure transplant sits low enough.

6.) Drop plant into hole and add or remove coco to make a perfectly level top. Plant is now ready for final veg.

7.) Add more coco to 5 gallon nute bucket to repeat process. I have found that I get 2x 3 gallon pots worth of coco before I dump the bucket (outside not in toilet!!!) to remove fine material that sinks and get fresh solution for next round.

The goal for the next few weeks is to make roots for flower, which means letting your pots fully dry out before wetting again. With this method of pre-soaking coco in your nutes, I have found 2-3 gallon fabric pots take 7-8 days to dry out under 18/6 to 24/0 HID. Once pots have fully dried, I only give h2o the first feeding as there are still a lot of unused nutrients in coco. It usually takes 3-4 days to dry out a second time. Then, they get full strength nutes after. When they dry out the third time (another 3-4 days), they are ready to flower.

Hope this helps...

WFF
 

Latest posts

Latest posts

Top