What's new
  • Happy Birthday ICMag! Been 20 years since Gypsy Nirvana created the forum! We are celebrating with a 4/20 Giveaway and by launching a new Patreon tier called "420club". You can read more here.
  • Important notice: ICMag's T.O.U. has been updated. Please review it here. For your convenience, it is also available in the main forum menu, under 'Quick Links"!

Problems with germination peat pellets

eebbnflow

Member
Hello , I have been having this issue a lot when I buy seeds and try sprouting them , I’ve kinda gave up . I use to use coco then found better success in peat pellets .

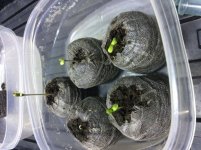
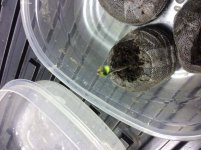
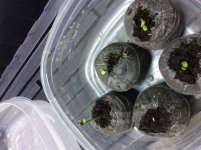
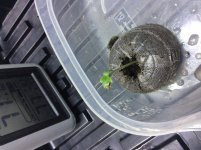
I soak the pellets for hours in bottled water .nestle . Put the seed in the pellet put the pellets in a humidity dome . I ring the pellets out a bit so they are not water logged . Out of 6 I get maybe 1 survivor. I’ve done it many different ways . Paper towel method . Soak seeds in a glass of water ect. They look like they are yellow and. Out of food. Plz help
 

Attachments

  • DF08BFB4-7E91-40EC-B5CD-864D597E05E9.jpg
    DF08BFB4-7E91-40EC-B5CD-864D597E05E9.jpg
    92.3 KB · Views: 22
  • 1C656B4F-CC15-4729-B18E-3B0F80D13F8D.jpg
    1C656B4F-CC15-4729-B18E-3B0F80D13F8D.jpg
    68.7 KB · Views: 34
  • 9E3AB0D4-5368-4092-BCAB-CC1F904C7186.jpg
    9E3AB0D4-5368-4092-BCAB-CC1F904C7186.jpg
    77.1 KB · Views: 21
  • 2F3CDD0F-21E9-4FF4-BF76-905E0B891E62.jpg
    2F3CDD0F-21E9-4FF4-BF76-905E0B891E62.jpg
    67.6 KB · Views: 29

eebbnflow

Member
I can tell from past experience that these will stall where they are . The small tiny leaves in the middle will never grow anymore . These are GG#4 :(
 

brickweeder

Well-known member
it looks like roots are poking out of some of the pellets...get them in some soil or whatever media you use.
 

Cantharellus

Well-known member
Plant them up and forget about the humidity dome. They look wet. Once you plant them don't keep them wet like that. Give them a little water and then let them dry out a little before you water again. Ditch the Nestle bottled water. For one they are evil. For two it is tap water from somewhere else. Use your own tapwater or rainwater or r/o water whatever you want. You need to know the PH of the water I am assuming you don't know that or you would not be using Nestle bottled water. The ph you will need the water to be will depend on your medium. Soil is the most forgiving...


Those will grow for sure. If I use pellets like that I usually wait for a root to shoot out before planting them up. If you keep them too wet that will not happen...
 

Creeperpark

Well-known member
Mentor
Veteran
bury 1/2 pellet

bury 1/2 pellet

Hay bro, if you plant the peat pellet 1/2 deep in the top of the soil you are going to use in a pot. It will sponge up the nutrient from the soil and feed the sprout. Plus it will adjust to the new environment. If you are in a big hurry you can cut 1/2 off the peat pellet off and bury it in the new soil pot. Don't wait!!!

So in the future when you first see the sprout pop then bury the pellet in soil half way and water the pot not the pellet, and your good to go from there.
 

aridbud

automeister
ICMag Donor
Veteran
It's been our experience that peat pellets are a tad hot for cannabis seed propagation. Vegetables are no problem, but cannabis seems to suffer. Better to use Root Riot or rock wool to start. We just use perlite/peat/sand mix.
 

J-Icky

Active member
I gave up on peat pellets really quick after I tried sprouting 6 seeds, 2 at a time and not one lived.
I always soak the seeds in a cup of water over night, then into a paper towel if needed. Sometimes the seeds crack open in the water, if not never more than a few days in the towels. From there I went into the pellets and only 1 ever popped out and that one never did anymore. The other 5 rotted inside the pellet.
Now I just use a mix of equal parts promix organic and coco in party cups. Haven’t had a single issue but man do I have a ton of extra peat pellets I’ll never use.
 

Shmavis

Being-in-the-world
Is Fox Farm's Light Warrior available in Canada? If not, get a mix specific for starting seeds and start them in seed starter peat pots. Or even the cheap plastic starter trays. I like peat pots for burying when up-potting so not to disturb (possibly damaging) young roots. But the cheap plastic ones are not too hard to rip carefully.

Good luck!
 

Lost in a SOG

GrassSnakeGenetics
I messed around with root/propagation cubes on quite a few occasions over the years but found seedlings just dont prefer them to sterile weak finely graded soiless medium because they have taproots unlike clones, which only form lateral roots, and the taproot gets stifled easily which pisses seedlings off. It just wants to zoom down through soil.

I soak seeds in 3% h2o2 water solution until tails are out then in to presoaked through and left to drain light soiless mix and under about 1-2 cm of that lightly soaked mix.. 100% everytime no stress.. just mist the top of the soil a few times a day until they're up and keep at 75-80% RH until flower..
 

dank.frank

ef.yu.se.ka.e.em
ICMag Donor
Veteran
5 gal peat
2.75 gal coir
.75 gal EWC
.75 gal black kow
.5 gal chunky perlite
.5 gal vermiculite

2/3c crab meal
2/3c kelp meal
2/3c oyster shell flour
1/2c dolomite limestone
1/3c gypsum
2 tbsp DE/Calcium Bentonite

1 tbsp Bio-Ag Endo Vam
1 tbsp Bio-Vam

Seeds and clones like this as a basic planting mix.


dank.Frank
 

DTOM420

Member
I feel for ya, I’ve struggled with germination issues before; and at as much as $15 a seed, that’s a big disappointment and a big stress. The peat pots SUCK, as others have said, for cannabis seeds! Here’s the method I use:

1. Drop seed(s) into smaller clear plastic cup filled 1/2 way with bottled water or filtered tap water with about 7-10 drops of Hydrogen peroxide. Push seeds below water surface once and set the cups on a warming source - like a cable box, stereo receiver, warming mat, etc - in a dark room. After a few hours tap any seeds that haven’t sunk on their own, to see if they’ll drop. If they don’t settle to the bottom, wait a few hours and try again. Repeat this until all your seeds are submerged. Leave seeds in the water until the crack open (usually 12-30 hours) and you see a tap root begin to protrude/emerge..

2. Take a full sheet of paper towel and fold it in half, and then in half again. Pour some of the seed water onto the paper towel until it’s soaked and, then, squeeze it gently to remove most of the water - so it’s just less than dripping. Open the last fold you made and place the seeds on the towel about 3/4”/2cm from the fold; making sure that the little tap roots are pointed away from the fold and, preferably, parallel to the fold- you don’t want them growing towards and into the fold. DO NOT TOUCH THE SEEDS with your fingers! I pour the excess water off and dump the seeds onto the towel. Troublemakers are carefully plucked from the bottom of the cup with tweezers and placed on the paper towel. Once your seeds are on the paper towel, close the fold of the paper towel, like closing a book. Then, fold the paper towel one last time in half, enclosing the seeds in the towel. Sometimes I’ll fold it a fourth time but it’s not necessary. Just make sure the folds are a little ways away from the seeds so there’s less chance of the tap root growing into the fold! Place the folded towel onto a small plate (I use saucer plates) and place an identical plate upside down over the top. This will keep things dark and retain moisture but the slight imperfections in the edges of the plates will allow a TINY bit of air to go in and out. Your new plant needs to be able to breathe! Place the plate back on your warming source. Check it every 12 hours to see taproot growth.

3. Once the taproot is 3/4” long you’re ready for the next step..... Take a Root Riot or Rapid Rooter plug and push a straightened coat hanger wire into the hole at the top and all the way through the bottom. Those plugs are designed for rooting cuts and making the hole provides the taproot an unimpeded pathway to grow down. Note: if the plug is dried out at all, I’ll sprinkle some mycorrhizae into some water and pour it onto the cube until it’s saturated; and then give it a gentle squeeze between thumb and forefinger to remove excess water. Next, put a small amount of mycorrhizae inocculant (I use Great White for this) on a plate fill a small cup of bottled or filtered H2O. Then, with the utmost gentleness, carefully pluck one of your sprouted seeds from the paper towel (grasping it by the seed hull) and dip the taproot into the water and then onto the myco powder until the entire surface of the taproot has a light coat of the myco innoculant on it. Then, carefully feed that tap root down into the hole in the top of the plug. Sometimes it’s necessary to spread the top of cube slightly to enlarge the starter hole. If the taproot is hard to fish into the hole, you can use the wire to auger out the hole at the top a bit- to make it easier to insert the tap root. You DONT want to damage the tender tap root when you insert it! Once you get the tap root started, keep inserting it until the seed itself is slightly less than 1/2” below the top surface of the Rooter plug. I have a mark on my tweezers that I use to make sure I don’t go past 1/2” depth. Finally, I take a pinch of fine soil particles (no perlite chunks or pieces of solids) over the seed, to insure that it’s protected from ANY light before it emerges on its own!

4. Place the rooter plug into a plug tray with a little water at the bottom of the tray. This is important: Do NOT push the plug deep enough to come into contact with the bottom water. The plug has the proper amount of water for several days and coming into Co tact with the bottom water will cause the plug to draw up water and become more saturated than we want for germinating seeds! The water on the bottom is simply to create humidity - a key to early germination. Then place a humidity done over the tray with only a slight opening in 1 vent hole. We don’t want to lose too much humidity. Finally, place the tray in a warm place and cover with a bath towel to keep things dark. Better yet, place the tray on a warming mat. Those seedling warming mats are the BOMB and while they’re an investment ($27 with a thermostat on Amazon) mine has seriously increased my success rate; and given the price of premium genetics seeds, it’ll pay for itself VERY quickly! I put the sensor between a rooter cube and the plastic holder and set the desired temperature at 78°F.

5. As SOON as the seeds emerge (and I notice it! Lol!) I pull the cube, plant it into a bigger pot or it’s ‘forever pot.’ Seedlings don’t need ANY nutrients for the first couple weeks so, I prepare my pots that will receive a seedling with a ‘core’ of seedling starter like FoxFarm Light Warrior or some well washed coco with perlite or rice hulls. IMO, rice hulls are better but most people who’ll be interested in seed starting recommendations will have perlite on hand. Any quality ‘seed starting soil mix’ will be fine - it just needs to be nutrient free or have very light nutrient content. I take a 16-32oz (depending on the pot size) cup and dig a hole in my pot that the cup will fit into. Put the cup in, fill in around it, water slightly and lightly tamp the soil around the cup down. Then, spin the cup ‘round a bit and carefully remove it. Now, fill the cup with your dampened seedling mix and pour - the perfect amount to fill your hole! Fill the hole and your pot is ready to receive your rooter plug and baby seedling! Finally, place a clear plastic cup or a 2L soda bottle (with the top 1/3 cut off) upside down over the baby seedling. I only use this humidity dome for 2-3 days and then it comes off. Note: I prefer starting under T5 6500k fluorescent bulbs for the first week or two before transitioning to the LEDs.

Before coming up with this regimen, which I cobbled together from lots of people’s methods, my success rate varied substantially. With this method I’m consistently over 90% success and I’m often having 100% success rates. I hope it doesn’t sound complicated because it’s really not! It’s mostly just some common sense and common practices; but I tried to describe it in as minute and fool-proof way that it can be fully explained and without leaving questions in people’s heads, on how to do it.

I hope this helps!

FWIW- Sometimes, especially with autos, I’ll put the sprouted seeds from the paper towel directly into their forever pot, into the seed started core. When I do this, though, I’ll either use the plug to hold the seed and put a cut-off 2L soda bottle over the seed to retain humidity OR I’ll make a tiny core within the starter core that’s perlite free. I don’t want to accidentally get a chunk of perlite over the top of the seed as it tries to push its way to the surface because often times the seed can’t push past it. So, I’ll mix a few punches of coco coir with a few pinches of peat or I may just fish some pinches of fine compost material out of a bag and use that. It just needs to be light and airy without any chunks that could obstruct the seeds ability to push its way topside!
 

Shmavis

Being-in-the-world
I agree, nice write up, DTOM!

Shortly after joining here I did a thread sharing how I go about it - my method is very similar.
 

DTOM420

Member
Nice write up. Very similar to my method and very successful.

I agree, nice write up, DTOM!

Shortly after joining here I did a thread sharing how I go about it - my method is very similar.

Thanks y’all! Glad to hear others are doing similarly. Just hope it helps the OP. Man, did I ever waste some seeds before I got my system down! Lol! I’m always open to improvements, though. Sure wish I could get 100%. :biggrin:
 

Shmavis

Being-in-the-world
5 gal peat
2.75 gal coir
.75 gal EWC
.75 gal black kow
.5 gal chunky perlite
.5 gal vermiculite

2/3c crab meal
2/3c kelp meal
2/3c oyster shell flour
1/2c dolomite limestone
1/3c gypsum
2 tbsp DE/Calcium Bentonite

1 tbsp Bio-Ag Endo Vam
1 tbsp Bio-Vam

Seeds and clones like this as a basic planting mix.


dank.Frank

How far would this mix take a seed or clone - all the way through veg? Or is it strictly a starter mix to get through seedling and or established clone phase?

I expect to be ready by next fall to work on trying an organic soil recipe. But have lots to learn before then.

Thanks y’all! Glad to hear others are doing similarly. Just hope it helps the OP. Man, did I ever waste some seeds before I got my system down! Lol! I’m always open to improvements, though. Sure wish I could get 100%. :biggrin:

Same here about lost seeds, until I got a system down that works for me. That's really what it's all about, honing a method. And the method I use is just gathered bits and pieces from others. That's what's cool about this site, all the bits and pieces folks share. Info that is so much more accessible than when I started trying to pop seeds. Lots here to consider for improvement. Because there's always room for it! And it's nice to think you might've helped a fellow grower get on the road to greater success. :dance013:
 

eebbnflow

Member
Update : thank you everyone for all of the suggestions , 4 of 6 survived but I was certain they were doomed .a day or two after the post the were green and growing . I am ditching the peat pellets from the responses here .
I grabbed some rapid rooters and some DNA sorbet stash to try next time . I always thought the RR were unnecessary,now I will try them
 

eebbnflow

Member
I feel for ya, I’ve struggled with germination issues before; and at as much as $15 a seed, that’s a big disappointment and a big stress. The peat pots SUCK, as others have said, for cannabis seeds! Here’s the method I use:

1. Drop seed(s) into smaller clear plastic cup filled 1/2 way with bottled water or filtered tap water with about 7-10 drops of Hydrogen peroxide. Push seeds below water surface once and set the cups on a warming source - like a cable box, stereo receiver, warming mat, etc - in a dark room. After a few hours tap any seeds that haven’t sunk on their own, to see if they’ll drop. If they don’t settle to the bottom, wait a few hours and try again. Repeat this until all your seeds are submerged. Leave seeds in the water until the crack open (usually 12-30 hours) and you see a tap root begin to protrude/emerge..

2. Take a full sheet of paper towel and fold it in half, and then in half again. Pour some of the seed water onto the paper towel until it’s soaked and, then, squeeze it gently to remove most of the water - so it’s just less than dripping. Open the last fold you made and place the seeds on the towel about 3/4”/2cm from the fold; making sure that the little tap roots are pointed away from the fold and, preferably, parallel to the fold- you don’t want them growing towards and into the fold. DO NOT TOUCH THE SEEDS with your fingers! I pour the excess water off and dump the seeds onto the towel. Troublemakers are carefully plucked from the bottom of the cup with tweezers and placed on the paper towel. Once your seeds are on the paper towel, close the fold of the paper towel, like closing a book. Then, fold the paper towel one last time in half, enclosing the seeds in the towel. Sometimes I’ll fold it a fourth time but it’s not necessary. Just make sure the folds are a little ways away from the seeds so there’s less chance of the tap root growing into the fold! Place the folded towel onto a small plate (I use saucer plates) and place an identical plate upside down over the top. This will keep things dark and retain moisture but the slight imperfections in the edges of the plates will allow a TINY bit of air to go in and out. Your new plant needs to be able to breathe! Place the plate back on your warming source. Check it every 12 hours to see taproot growth.

3. Once the taproot is 3/4” long you’re ready for the next step..... Take a Root Riot or Rapid Rooter plug and push a straightened coat hanger wire into the hole at the top and all the way through the bottom. Those plugs are designed for rooting cuts and making the hole provides the taproot an unimpeded pathway to grow down. Note: if the plug is dried out at all, I’ll sprinkle some mycorrhizae into some water and pour it onto the cube until it’s saturated; and then give it a gentle squeeze between thumb and forefinger to remove excess water. Next, put a small amount of mycorrhizae inocculant (I use Great White for this) on a plate fill a small cup of bottled or filtered H2O. Then, with the utmost gentleness, carefully pluck one of your sprouted seeds from the paper towel (grasping it by the seed hull) and dip the taproot into the water and then onto the myco powder until the entire surface of the taproot has a light coat of the myco innoculant on it. Then, carefully feed that tap root down into the hole in the top of the plug. Sometimes it’s necessary to spread the top of cube slightly to enlarge the starter hole. If the taproot is hard to fish into the hole, you can use the wire to auger out the hole at the top a bit- to make it easier to insert the tap root. You DONT want to damage the tender tap root when you insert it! Once you get the tap root started, keep inserting it until the seed itself is slightly less than 1/2” below the top surface of the Rooter plug. I have a mark on my tweezers that I use to make sure I don’t go past 1/2” depth. Finally, I take a pinch of fine soil particles (no perlite chunks or pieces of solids) over the seed, to insure that it’s protected from ANY light before it emerges on its own!

4. Place the rooter plug into a plug tray with a little water at the bottom of the tray. This is important: Do NOT push the plug deep enough to come into contact with the bottom water. The plug has the proper amount of water for several days and coming into Co tact with the bottom water will cause the plug to draw up water and become more saturated than we want for germinating seeds! The water on the bottom is simply to create humidity - a key to early germination. Then place a humidity done over the tray with only a slight opening in 1 vent hole. We don’t want to lose too much humidity. Finally, place the tray in a warm place and cover with a bath towel to keep things dark. Better yet, place the tray on a warming mat. Those seedling warming mats are the BOMB and while they’re an investment ($27 with a thermostat on Amazon) mine has seriously increased my success rate; and given the price of premium genetics seeds, it’ll pay for itself VERY quickly! I put the sensor between a rooter cube and the plastic holder and set the desired temperature at 78°F.

5. As SOON as the seeds emerge (and I notice it! Lol!) I pull the cube, plant it into a bigger pot or it’s ‘forever pot.’ Seedlings don’t need ANY nutrients for the first couple weeks so, I prepare my pots that will receive a seedling with a ‘core’ of seedling starter like FoxFarm Light Warrior or some well washed coco with perlite or rice hulls. IMO, rice hulls are better but most people who’ll be interested in seed starting recommendations will have perlite on hand. Any quality ‘seed starting soil mix’ will be fine - it just needs to be nutrient free or have very light nutrient content. I take a 16-32oz (depending on the pot size) cup and dig a hole in my pot that the cup will fit into. Put the cup in, fill in around it, water slightly and lightly tamp the soil around the cup down. Then, spin the cup ‘round a bit and carefully remove it. Now, fill the cup with your dampened seedling mix and pour - the perfect amount to fill your hole! Fill the hole and your pot is ready to receive your rooter plug and baby seedling! Finally, place a clear plastic cup or a 2L soda bottle (with the top 1/3 cut off) upside down over the baby seedling. I only use this humidity dome for 2-3 days and then it comes off. Note: I prefer starting under T5 6500k fluorescent bulbs for the first week or two before transitioning to the LEDs.

Before coming up with this regimen, which I cobbled together from lots of people’s methods, my success rate varied substantially. With this method I’m consistently over 90% success and I’m often having 100% success rates. I hope it doesn’t sound complicated because it’s really not! It’s mostly just some common sense and common practices; but I tried to describe it in as minute and fool-proof way that it can be fully explained and without leaving questions in people’s heads, on how to do it.

I hope this helps!

FWIW- Sometimes, especially with autos, I’ll put the sprouted seeds from the paper towel directly into their forever pot, into the seed started core. When I do this, though, I’ll either use the plug to hold the seed and put a cut-off 2L soda bottle over the seed to retain humidity OR I’ll make a tiny core within the starter core that’s perlite free. I don’t want to accidentally get a chunk of perlite over the top of the seed as it tries to push its way to the surface because often times the seed can’t push past it. So, I’ll mix a few punches of coco coir with a few pinches of peat or I may just fish some pinches of fine compost material out of a bag and use that. It just needs to be light and airy without any chunks that could obstruct the seeds ability to push its way topside!
Wow thank you very much , very well written
 

TychoMonolyth

Boreal Curing
Update : thank you everyone for all of the suggestions , 4 of 6 survived but I was certain they were doomed .a day or two after the post the were green and growing . I am ditching the peat pellets from the responses here .
I grabbed some rapid rooters and some DNA sorbet stash to try next time . I always thought the RR were unnecessary,now I will try them

DTOM420 has you.

Don't hesitate to put the plugs in soil/pot once you see roots. Check them daily. It's important.
 

eebbnflow

Member
So I have just realized that the RR are peat based ...

I could try coco but I have always burned them :( holding out for now watching the 4 I have . I will definitely plant as soon as the root comes out next time. I find at that stage the baby plant is very fragile and tended to wait a bit before touching it
 
Last edited:

TychoMonolyth

Boreal Curing
Here's what I do.

1. Soak seeds in 1 cup of water + 1 cap of hydrogen peroxide. Keep the seeds/water in a warm spot for 2 days.

2. Fold a paper towel in two/four, soak with the same water, put the seeds in the paper towel (folded over). Put in a ziploc baggie and put the baggie in a warm spot (like on top of your router). It MUST be a warm spot. When you look at the baggie, you should see water droplets from the humidity after a day or two.

2. 2 days after you put the seeds in the baggie, soak 2.5-3 inch Peat Pots. I mean really soak for about 20 minutes to hydrate them. Pull them out and fill with a good seedling starter (ProMix or the like). Put the filled pots in a tray and water them by the TOP until they're soaked and well drenched. Run off is OK. Once you've watered your pots, fill your tray to 1/2 inch deep with water. THIS IS THE ONLY TIME YOU WATER FROM THE TOP. From here on out, you only add water to the tray and let the pots wick up the water. Water PH should be between 6.5-7. No higher.

3. Check the seeds @4 days to see if they've spouted. If not, replace in the baggie. If they have sprouted, poke a hole in your pots with a pencil or crayon or something, deeper than the root or course, and insert a sprout root side down. BE GENTLE. Break the root and it's dead. Pinch the soil gently to close the hole.

4. I use CLF tubes and keep them 2 inches above the pots. I keep the lights no more than 2 inches above the seedlings. I keep the lights on 24/7 for 4-5 weeks, then they go out. This year I'll put the lights on a timer and give them 4 hours of darkness every night (off at midnight/on at 4am).

My germination rate last year was 495/500, of which 475 seedlings survived and ended up in the field.

picture.php


picture.php


You can see the water in the tray in this picture.
Never let it go dry. Start feeding it half strength at 2 weeks. Full strength at 4 weeks.
Test your water PH after you add your nutes.
picture.php


These are small but the roots will get very long if you keep water in the trays.
picture.php


picture.php


Every once in a while you'll get a seedling droop like it's kicking the bucket at about a week old. A little TLC will bring it back. Fill a small narrow glass (like a juice glass or something) with water and a few drops of hydrogen peroxide. GENTLY and slowly pull it out of the soil. It should come out in one shot with a single tap root. Put it in the water on a window sill and let it be. It should pick up after a day or two. When you see hairs growing on the tap root, you can put it in a new pot (pre-hydrated) with new soil to hold it up. Plant it deep.
 
Top