What's new
  • Happy Birthday ICMag! Been 20 years since Gypsy Nirvana created the forum! We are celebrating with a 4/20 Giveaway and by launching a new Patreon tier called "420club". You can read more here.
  • Important notice: ICMag's T.O.U. has been updated. Please review it here. For your convenience, it is also available in the main forum menu, under 'Quick Links"!

Cannabis Seed Storage

acespicoli

Well-known member
From a DJ Short article:

Your friend the freezer
A benevolent tool in our trade is the refrigerator and freezer. The fridge is extremely useful in extending the longevity of seed and pollen. The trick to successful freezing is to freeze deep (-10 to -40°F/-20 to -35°C) and then keep the seed undisturbed. Hard frozen objects are very fragile. The slightest shock may shatter crucial, delicate cell structures within the seed. Double wrap the seed in paper; little manilla envelopes work great.
I like to do small amounts, in one-time-use packets, to keep waste to a minimum. Then place the wrap into a plastic freezer bag, then place the freezer bag into a plastic tub or tupperware container. Now the seed is ready for the deep-freeze. In the fridge, storing seed in airtight, brown glass jars with a little rice or other non-toxic desiccant seems to work best.
I have had pollen last for years in a deep freeze. It must be frozen immediately after fresh collection from the plant, in as low a humidity as possible (preferably 0%). I like to shake the productive male flowers over a flat and clean piece of glass. The pollen pile is sifted to rid the unwanted plant material from the pure powder.
It is also useful to cut pollen with flour to stretch the amount. A pollen-to-flour ratio of 1:10 or even 1:100 works best. The cut pollen may then be separated into small, one-time-use amounts, stored in a flap of paper and frozen the same way as the seed. The frozen pollen must be applied to the live female flower immediately after thawing to increase viability.
 
Last edited:

acespicoli

Well-known member
djzed
Dec 21, 2011 #1

Seed Sprouting Issues.

My preferred sprout method is as follows: Seeds are soaked in distilled water for 6 to 18 hours, seeds are then transferred to 5 or 6 stacked sheets of white (non-printed) paper towel, folded twice (to about 5” sq. or13 cm. sq.), soaked with distilled water. Folded paper towel containing seed is placed on a clean (sterile) plate or pan, preferably glass or glaze, and put in a warm, dark place—top of the fridge works good. Keep the paper towel moist but not too soaked, dripping but not in a puddle. Most sprouts appear within 48 hours, a few take up to one week or more. Some people prefer to plant at the first sign of sprouting, others prefer to wait until the taproot is elongated. Both ways have their advantages and disadvantages and are therefore a matter of preference. If a longer time is spent in the paper towel, the paper towel should be changed every several days. The main focus is cleanliness—sterility, throughout the process.

Note that some seed have stubborn casings, especially when the taproot is planted and the shell casing covering the cotyledon is allowed to dry before sloughing off. The cotyledon will wither and die of strangulation unless the casing, and a cellulous sheath are ‘surgically’ removed (i.e. removed with surgical precision and sterility). Keeping the seedling, and its casing, sufficiently moist helps to avoid this problem. Scuffing seeds (exposing the seam on the seed to an abrasive ‘scuffing’ usually with sandpaper or an emery board), or ‘popping’ seeds (gently squeezing the seed ‘popping’ the seam open) will also facilitate sprouting and hasten sprout time. Again, special attention needs to be given to cleanliness and the sterility of the sprout area and process.

While on the subject, the general ‘guarantee’ in the current seed market (in California) is as follows: Out of a ten-pack of seeds, eight would be guaranteed to sprout. Of the eight that sprout, four should be female and four male and due to the law-of-odds ratios vary. Out of the ones that sprout, two female (and two male) should equal or exceed the strain description, again given the law of odds. So in other words, 40% of the plants from the seeds (really 50% given a 100% sprout rate) should equal or surpass the strain description. Ideally, one or all of the desirable parent plants are kept alive via clone copies or re-greening. These copies are capable of providing a lifetime of very satisfying medicine.

The small amount of variation in the strain was intentionally left to allow the end user the opportunity to explore and experiment. Full stabilization of one or two specific traits is possible via two further forward filial crosses. However, crossing beyond two further generations will acclimate most phenotype toward the current (usually indoor) environment and be more distant from its unique landrace origins. Remember: Most of the DJ Short lines are guaranteed f5’s from true region-of-origin landrace P1’s.

Regarding seed-sprout ratios, all of the DJ Short products go through rigorous testing before being sent to market. Wholesale sprout tests are done every six months to insure at least a 95% (most often 100%) sprout rate. Similar sprout tests are performed by some of the resale distributors with (hopefully) the same success rates. There was an issue with a batch of ‘Grape Krush’ that I’ve heard Chimera provided &/or replaced and hopefully that issue has been resolved. I am not yet aware of the full details. Perhaps Chimera would ‘chime’ in on this one?

Part of certain complaints regarding sprout rates may have to do more with climate conditions (heat) during transport and/or storage; live seeds hate excessive heat (>100-110 degrees F) especially for any extended periods of time. In route heat issues are not that uncommon, it’s simple as leaving the seeds in a sealed car on a sunny day. At any rate, this is my observation/advice regarding certain sprout rate issues—avoid excessive heat!

I hope that you find this information useful and may your future sprouting ventures prove fruitful!


1. Do as you will.
1.a) Do no harm.
 

acespicoli

Well-known member
Seed Germination Citations
Liu, J., Wang, Q., Karagić, Đ. et al. Effects of ultrasonication on increased germination and improved seedling growth of aged grass seeds of tall fescue and Russian wildrye. Sci Rep 6, 22403 (2016). https://doi.org/10.1038/srep22403

Download citation

  • Received21 August 2015
  • Accepted12 February 2016
  • Published01 March 2016
  • DOIhttps://doi.org/10.1038/srep22403
The optimization of germination rates and seedling performance is of utmost importance in the agricultural practices. Ultrasound treatment have emerged as a promising technique for seed treatment due to their efficiency and eco-friendliness, but improvements and optimizations are still needed to meet the demands of industrial sector. Here, the optimization and performance of a prototype sonicator was tested on four economically important seed species (tomato, turnip, maize, and watermelon) subjected to 19.8 kHz of frequency and a power output of 200 W. The ultrasound effects and the optimal sonication time varied among the seed species, resulting in significant stimulations in tomato, turnip and maize. In tomato and maize, the sonication consistently stimulated the germination and seedling development: increased the germination percentage (43 and 20%, respectively) and reduced the mean germination time (19 and 17%, respectively); increased the seedling emergency percentage (41% in maize) and reduced the mean emergency time (10 and 7%, respectively). Measurement of the seedling vigor index revealed a remarkable stimulation in tomato, turnip, and maize (up to 121%), reflecting a stimulation in both seedling height and biomass gain of turnip (121 and 188%, respectively) and maize (26 and 23%, respectively). Bivariate correlation rank coefficients showed strong positive correlations between different germination and seedling growth parameters for all tested species. The promising results of sonication on seed germination and seedling growth in tomato, maze and turnip emphasizes the technology’s immense potential within the seed industry and might lead to the enhancement of agricultural productivity and sustainability in the near future.
 
Last edited:

acespicoli

Well-known member
Removing virus from seeds and clones
Wang MR, Cui ZH, Li JW, Hao XY, Zhao L, Wang QC. In vitro thermotherapy-based methods for plant virus eradication. Plant Methods. 2018 Oct 6;14:87. doi: 10.1186/s13007-018-0355-y. PMID: 30323856; PMCID: PMC6173849.
 

acespicoli

Well-known member

Hop Latent Viroid in Cannabis

Hop latent viroid (HLVd) occurs worldwide in hops, but in recent years, it has jumped to cannabis, causing significant reductions in yield, cannabinoid concentrations, and profits across the US and Canada. Some experts have started to call HLVd “the COVID of cannabis”.


HLVd is a single-stranded, circular, infectious RNA. Similar to viruses, viroids are completely dependent on their host plant’s metabolism for replication. However, unlike viruses, viroids do not have a protective layer, such as a protein coat. In fact, viroids are the smallest known plant pathogens, measuring approximately 40nm in size.

Figure 1: Size comparison of pathogens affecting cannabis plants.

How Widespread is Hop Latent Viroid?

One study estimates as much as 90% of California cannabis is infected with HLVd, costing nearly $4 billion in lost yields. Another study, conducted by Dr. Zamir Punja of Simon Fraser University, found that 40% of cannabis flower sold in Canadian dispensaries tested positive for HLVd. Thankfully, the HLVd is not harmful to humans.

What are the Symptoms of Hop Latent Viroid?

The symptoms of HLVd vary widely, depending on the stage of development the plant is in when the infection occurs.

Figure 2: Infected cannabis clone (left) showing reduced root development and root emergence compared to healthy clone (right). Image credit: Zamir Punja, PhD

Propagation Stage
Root length and root emergence are greatly reduced in clones taken from HLVd-infected mother plants. This reduction in root development results in slower-developing clones and poor-quality rooted cuttings. Reduced root development may also make plants more susceptible to root-infecting pathogens, such as fusarium and pythium.

Figure 3: Infected cannabis plant (left) is shorter with smaller leaves and tighter node spacing compared to the healthy plant (right). Image credit: Zamir Punja, PhD

Vegetative Stage
Plants that become infected with HLVd during the vegetative stage will often have stunted growth, including the following symptoms:

Figure 4: Plant infected with HLVd exhibiting unexpected yellowing of leaves near the bud sites. Image credit: Zamir Punja, PhD


Flowering Stage
Signs of HLVd infection are often most apparent during flowering. In fact, the concentration of detectable viroid is higher during flowering than vegetative stage. Researchers are still unsure why HLVd concentrations increase during flowering, but it may have something to do with added stress on the plants.
Just like during vegetation, flowering HLVd-infected plants will appear smaller than healthy plants; and they may also exhibit unexpected yellowing of leaves near the bud sites, similar to the photo below.

Figure 5: Trichomes from infected cannabis plant (right) appear deflated when compared to trichomes found on healthy plant (left).
http://google.com

Not only will HLVd-infected plants produce smaller flowers, but they will also produce fewer cannabinoids (up to 50% less). Electron microscope images captured by Dr. Punja show that HLVd-infected plants have under-developed trichomes, which are the cannabinoid-producing glands in the cannabis plant.

How Does Hop Latent Viroid Spread?

HLVd transmits from one plant to another via contact with infected plant sap. This most commonly occurs via tools, equipment, and workers that have come into contact with infected plant sap. Cultivators should always sterilize tools, equipment, and hands with a 10% bleach solution before starting work on a new plant. Experiments performed by the Medicinal Genomics team showed that leafhoppers, which are known vectors for beet curly top virus and lettuce chlorosis virus, may also have the ability to spread HLVd. When leafhoppers feed on plants, they ingest infected plant sap, which can then be transmitted to their next meal.
HLVd can also spread through cloning when cuttings are taken from an infected mother. And because symptoms of HLVd are not always obvious in the vegetative stage, it can be hard to identify infected mother plants. This is especially true when infection occurs later in the plant’s development since stunted growth will not be as apparent. Growers should test mother plants before taking new cuttings to make sure they are producing clean clones.
Since HLVd is highly concentrated in roots, it can spread through water in hydroponic systems. Healthy plants that share water with infected plants may pick up the viroid, without any root-to-root contact.
Lastly, experiments have shown that HLVd can be transmitted via seed, either from infected males crossing with healthy females or healthy males crossing with infected females. In both cases, HLVd was detected on the seed coat and inside the seed.

How Does Hop Latent Viroid Infect Cannabis Plants and Replicate?

HLVd has figured out how to high jack Rolling Circle Amplification (RCA) and RNA ligase in the host plant. When RNA or DNA molecules are circular, they can be replicated like a wheel that becomes and infinite template. This creates long concatemers of the viroid genome. These concatemers are then sliced and diced into 256 base segments with the Ribozyme activity of the original double stranded viroid. Once the genome is diced, plant RNA ligases seal it back into many circles and the process can repeat itself. Take a look at Viropedia.net, This tool maps the variants found in your HpLVd genome to the Jamaican Lion transcriptome so you can see the regions in the Viroid that have homology to the cannabis mRNAs.

Screenshot 2023-05-30 at 10.20.46 AM
Figure 6. Rolling circle model (adapted from Clark et al., 2019)
A few studies in closely-related hops (humulus lupulus) suggest that HLVd may exert its pathology through RNA interference, which occurs when short viroid sequences interfere with the expression of genes with which they have sequence homology.
http://google.com
The most likely candidate is the COG7 gene, which is involved in the formation of the organized shoot apical meristem. So far, the Medicinal Genomics team has found that 69% of the published HLVd genomes have homology to the COG7 gene, which may explain how HLVd affects plant growth. There are 24 other genes in the cannabis genome that have short homologies to HLVd genomes described in our latest preprint.

Is Hop Latent Viroid Systemic?

HLVd moves systematically throughout the plant via the phloem over a period of approximately 6 weeks. HLVd enters the plant’s phloem at the point of infection where it travels to the roots and then throughout the entire plant.
Experiments conducted by Dr. Punja’s team at Simon Fraser University have shown that:

Figure 7: Infection progression of HLVd in cannabis.

This means that If one were to test a plant fewer than 6 weeks after infection, some tissues will test positive for HLVd, while others will test negative. That is why it is important to survey multiple parts of the plant when screening for HLVd.

Are Some Cannabis Cultivars Resistant to HLVd?

Yes. Certain cannabis cultivars have demonstrated an ability to withstand HLVd infection. At CannMed 23, Kevin McKernan shared data from an experiment where he intentionally inoculated the Jamaican Lion cannabis cultivar with HLVd. Soon after, the researchers were able to detect HLVd in the plant’s roots; however, leaf and flower tissue tested negative up until harvest time. It was only after the plant was allowed to grow 3 weeks past the typical harvest time that lower branches began to test positive for HLVd.
The flower quality and yield also appeared to be unaffected. Other tests have shown that certain cultivars have a lower proportion of HLVd-positive plants.
The long-term solution to HLVd is to breed resistant cultivars that do not experience yield or potency loss. This is the case in hops, where HLVd is rampant, but it does not cause significant financial harm to the crop.

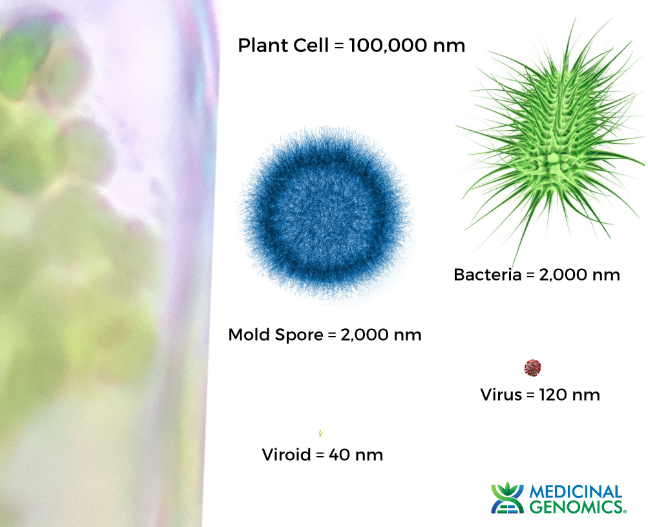
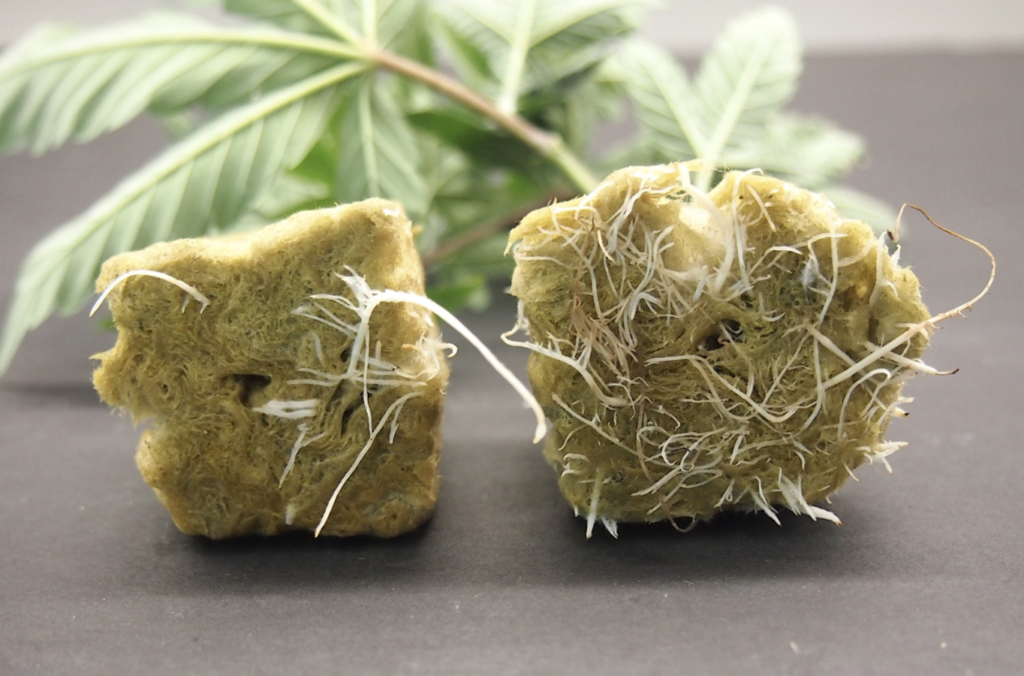
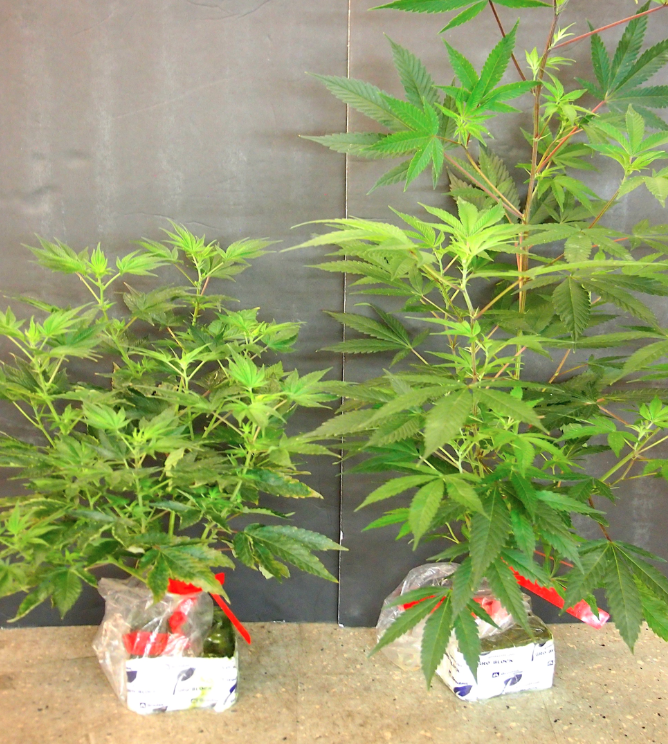
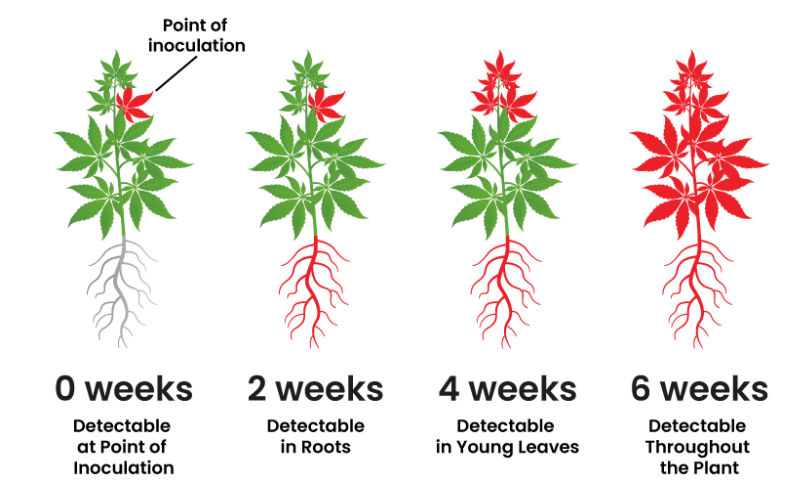
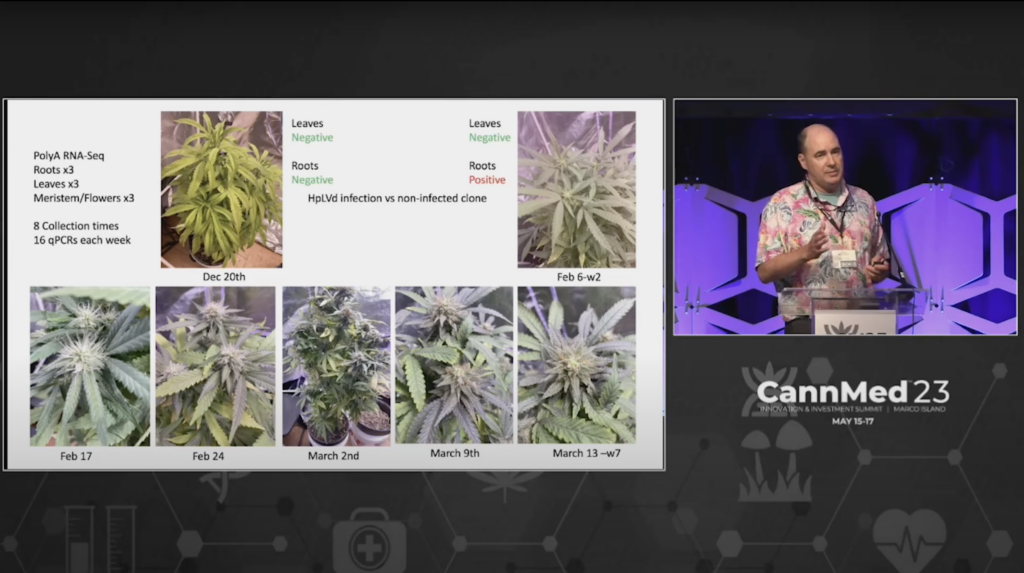
Kevin McKernan shares data that shows HLVd infection stays in Jamaican Lion root at CannMed 23. Click image to view the video.
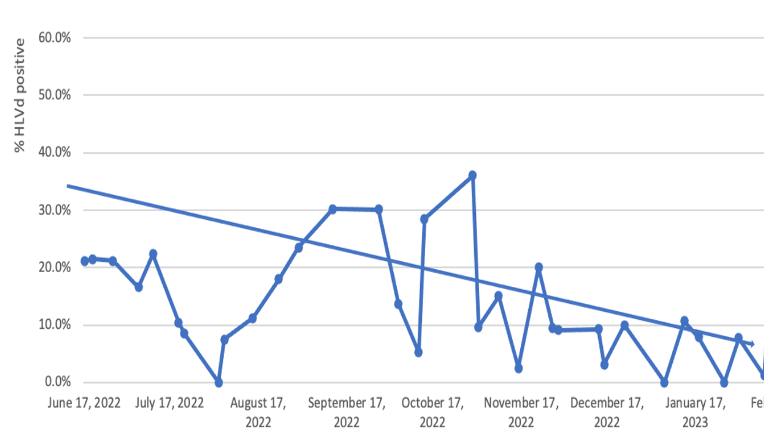
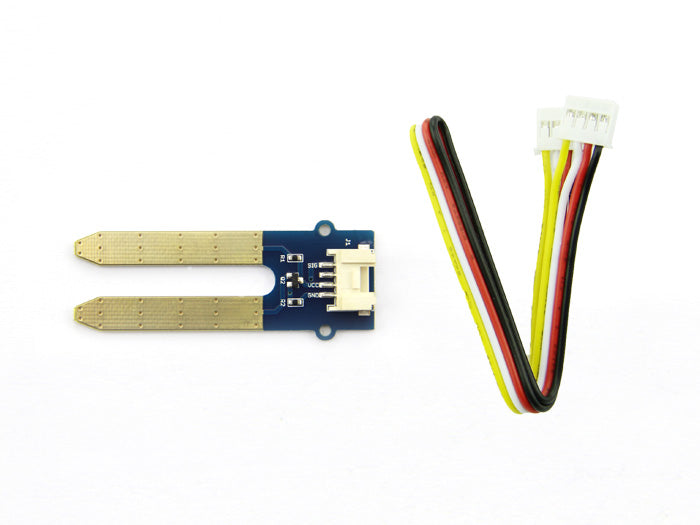
How Long Does Hop Latent Viroid Stay on Surfaces?

HLVd is surprisingly stable. Experiments have shown that at room temperature the viroid remains detectable for up to 5 days on gloves and 4 weeks on dry leaves.
Additionally, exposing HLVd-infected tissue to high heat (up to 70C), UV-C, and disinfecting chemicals such as Virkon, Zerotol, Bleach, and Hypochlorous acid will not destroy the viroid.

How Can Growers Get Rid of Hop Latent Viroid?

It takes time, but the best method for eliminating HLVd from a growing facility is with a process of testing and removing infected plants. At CannMed 23, Dr. Zamir Punja demonstrated that his team used this process over a period of 7 months and reduced the percent positive rate in his facility from 35% to 7%.


Figure 8: A systematic process of testing for HLVd and removing infected plants reduces the % HLVd positive rate over time. Image credit: Zamir Punja, PhD

Meristem tissue culture can also be used to produce viroid-free clones; however,it is a long and laborious process that should only be reserved for cultivars that are critical to your business. As with most plant pathogens, prevention is key.
Additionally, tissue culture is not always effective. HLVd is not uniformly distributed throughout the tissue culture, and in some cases, viroid replication may be delayed during tissue culture only to reemerge once plant growth resumes.
Heat therapy is not effective in eliminating HLVd, and cold therapy is still unproven.

How Do You Test for Hop Latent Viroid?

The best way to test for HLVd is with a qPCR assay that is designed for, and validated on cannabis. Medicinal Genomics’ PathoSEEK® Hop Latent Viroid Detection Assay is a reverse-transcriptase quantitative PCR (RT-qPCR or QRT-PCR) assay that screens for the presence of Hop Latent Viroid in cannabis leaves and roots. DNA can be extracted from infected fan leaves using Leaf Punch Lysis Solution and the assay can be run on most qPCR machines with FAM, HEX, and ROX optical channels.
 
Last edited:

acespicoli

Well-known member
1705631726352.png

seed treatments read more... the cure must not affect germination
Hop latent viroid: alternative treatment


How to get rid of the hop latent viroid when cloning.


Just remember that this may not work in 100% of the cases depending on the products you're using and how you're doing it, but when done properly there is a really high chance that it will clear up “dudding”,
so make sure you give it a try before resorting to more extreme measures.


  • Mix 8ml of any broad-spectrum bactericide/fungicide such as OxiDate 2.0 (or Zerotol) per liter of water;
  • Dunk freshly cut clone (right after being cut) for 2-3min and then continues the process, letting cutting root as usual;
  • After they root dunk the clone in a mix of 0.5ml of broad-spectrum bactericide/fungicide (such as OxiDate 2.0) per liter of water.
1705632066082.png

What is peroxyacetic acid?
Peroxyacetic acid (also known as peracetic acid or PAA) is an organic peroxide
based, colorless liquid with a low pH and a strong, pungent, vinegar-like odor.
 
Last edited:

acespicoli

Well-known member

STS​

Smokin Moose


Fallen Cannabis Warrior & Ex Moderator​


The following is a safe, inexpensive, and successful method for reversing the sex of female cannabis plants. Individual plant responses may vary based upon strain, but I can verify that this process is fully effective in stimulating profuse staminate flower production.

This process can be used to:
A: create new feminized seeds from solitary prize mothers that you currently have
B: create interesting feminized-seed hybrids from different prize strains that you currently have
C: create feminized seeds for optimum outdoor use
D: accelerate the "interview" phase of cultivation, in searching for interesting new clone-mothers
E: reduce total plant numbers- great for medical users with severe plant number restrictions
F: increase variety, by helping to create stable feminized seedlines to be used as an alternative to clones

At the bottom of this post are some specific details about the chemicals used, their safety, their cost, and where to get them.

It is important to educate yourself about cannabis breeding theory and technique prior to using a method like this one. Here is a link to Robert Clarke's "Marijuana Botany", which is a very good reference.

"Marijuana Botany" by Robert Connell Clarke
(unfortunately missing the appendices)

It is also important to use basic safety precautions when mixing and handling these chemicals, so read the safety data links provided. The risk is similar to mixing and handling chemical fertilizers, and similar handling procedures are sufficient.

Remember: nothing will ever replace good genetics, and some of your bounty should always go back towards the professional cannabis breeders out there... the ones who have worked for many generations to come up with their true-breeding F1 masterpieces. Support professional breeders by buying their seeds.

Preparation of STS:
First, a stock solution is made. It consists of two parts (A and B) that are initially mixed separately, then blended together. Part A is ALWAYS mixed into part B while stirring rapidly. Use distilled water; tap water may cause precipitates to form.

Wear gloves while mixing and using these chemicals, and mix and use in a properly ventilated area. A mask will prevent the breathing of any dust, which is caustic. STS is colorless and odorless, and poses minimal health risks if used as described here. (See material safety data sheet links below). Note that silver nitrate and STS can cause brown stains upon drying, so spray over newspaper and avoid spilling.

Part A: .5 gram silver nitrate stirred into 500ml distilled water
Part B: 2.5 grams sodium thiosulfate (anhydrous) stirred into 500ml distilled water

The silver nitrate dissolves within 15 seconds. The sodium thiosulfate takes 30-45 seconds to dissolve.

The silver nitrate solution (A) is then mixed into the sodium thiosulfate solution (B) while stirring rapidly. The resulting blend is stock silver thiosulfate solution (STS).

This stock solution is then diluted at a ratio of 1:9 to make a working solution. For example, 100ml of stock STS is added to 900ml of distilled water. This is then sprayed on select female plants.

Both the stock STS and the working solution should be refrigerated after use, as well as the powdered chemicals, to avoid activity loss. Excess working solution can be safely poured down the drain after use (with ample running water) with negligible environmental impact. It's pretty cheap.

Each liter of stock STS will make ten 1-liter batches of working solution of STS. With the minimum amount of base chemicals ordered from Photographer's Formulary (see link below), this means that each 1-liter bottle of working solution STS costs less than 9 cents, and can treat 15-20 mid-sized plants. That's 200 1-liter batches of STS for $18. Note that the distilled water costs far more than the chemicals.

Application:
The STS working solution is sprayed on select female plants until runoff. Do the spraying over newspaper in a separate area from the flower room. You probably won't smell anything, but ventilate anyway. You now have what I call a "F>M plant"; a female plant that will produce male flowers.

After the F>M plant dries move it into 12/12 immediately. This is usually done three to four weeks prior to the date that the target (to be pollinated) plants will be ready to pollinate. Response times may vary slightly depending upon the strain. More specific times can be determined by trial with your own individual strains. In my trials it took 26 days for the first pollen. 30-35 days seems optimum for planning purposes.

So, assuming that a target plant needs 3-4 weeks to produce fully mature seeds, a strain that takes 8 weeks to mature should be moved into flower at about the same time as the female>male plant. A target plant that finishes flowering in 6 weeks needs to be moved into flower later (10 days or so) so that it doesn't finish before the seeds can fully mature.

A seeded individual branch can be left to mature on a plant for a bit longer, while harvesting the other seedless buds if they finish first. Just leave enough leaves on for the plant for it to stay healthy.

Effects:
Within days I noticed a yellowing of the leaves on the F>M plants. This effect persisted for two weeks or so; after this they became green again, except for a few of the larger fans. The plants otherwise seemed healthy. No burning was observed. Growth stopped dead for the first ten days, and then resumed slowly. No stretch was ever seen. After two weeks the F>M plants were obviously forming male flower clusters. Not just a few clusters of balls, but complete male flower tops. One plant still formed some pistillate flowers, but overall it was predominantly male.

It is strange indeed to see an old girlfriend that you know like the back of your hand go through a sex change. I'll admit that things were awkward between us at first.

When the F>M plants look like they may soon open and release pollen, ( 3-1/2 to 4 weeks) move them from the main flower room into another unventilated room or closet with lighting on a 12/12 timer. Don't worry too much about watts per square foot; it will only be temporary.

When the pollen flies, move your target plants into the closet and pollinate.

A more controlled approach is to isolate the F>M plants in a third remote closet (no light is necessary in this one, as they are releasing pollen now and are nearly finished anyway). In this remote other closet the pollen is very carefully collected in a plastic produce bag or newspaper sleeve and then brought back to the lighted closet, where the target plants are now located. If this is done, be careful to not mix pollen types by letting the F>Ms dust each other. Avoid movement, or use yet another closet.

Take special care to not let pollen gather on the outside of this bag- a static charge is sometimes present. Drop small open clusters of blooms inside and then close the bag at the mouth and shake. Important: next, step outside and slowly release the excess air from the bag, collapsing it completely, so that pollen doesn't get released accidently. Point downwind; don't let it get on your hands or clothes.

This collapsed pollinated bag is now very carefully slipped over only one branch and is then tied off tightly at the mouth around the branch stem with a twist tie or tape, sealing the pollen inside. Let the bag inflate slightly with air again before sealing it off, so the branch can breathe. This technique keeps the entire plant from seeding. Agitate the bag a bit after tying it off to distribute the pollen. Don't forget to label the branch so you know which seeds are which. Other branches on this same plant can be hit with different pollen sources.

If no lighted closet is available, the plant can be moved back into the main room, but- be very carefulollen is sneaky. After 4-5 days, the bag is gently removed and the plant completes it's flowering cycle.

Yet another method has worked well for me. I position the target plants in a non-ventilated lighted closet, and then I collect pollen on a piece of mirror or glass. This is then carefully applied to the pistils of one pre-labeled branch by using a very fine watercolor paintbrush. Care is taken to not agitate the branch or the pollen. No sneezing. The plant needs to be in place first; moving it after pollination can shake pollen free and blow this technique.

Regardless of technique, at completion you will have feminized seeds. Let them dry for 2-4 weeks.

About the chemicals:
Silver nitrate is a white crystalline light-sensitive chemical that is commonly used in photography. It is also used in babies' eyes at birth to prevent blindness. It can cause mild skin irritation, and it stains brown. Avoid breathing. I didn't notice any smell or fumes, but ventilation is recommended. Be sure to wash the spray bottle well before you use it elsewhere; better yet: devote a bottle to STS use. A half gram is a surprisingly small amount; it would fit inside a gel capsule.

A Google search will bring up more information if needed.

Sodium thiosulfate is also a white crystalline chemical commonly used in photography; it is used in photographic fixers. Same general cautions apply, minus the staining. This formula uses the anhydrous type. Non-hazardous.

Have fun experimenting with this technique. Use it responsibly. There are a few good threads here at CW that go into the pros and cons of transsexual agents and feminized seeds. Read them. And most importantly, use STS with quality F1 strains developed by professional breeders for the most consistent results.

A huge thanks to Fet from Spice Brothers Seeds for his help and advice in using this technique. I simply brought together available information from previous posts and tried my own recipe. I'm thrilled to share the results. Future tests will be done to adjust the formula so the molar ratios of the chemicals are correct, as specified by Gobgoober (thanks, Gob) but the formula posted here is completely effective.

amazon.com for chemicals they have everything
 

acespicoli

Well-known member
Bio Protoc. 2021 Jan 5; 11(1): e3875.
Published online 2021 Jan 5. doi: 10.21769/BioProtoc.3875
PMCID: PMC7952943
PMID: 33732764


Development and Standardization of Rapid and Efficient​

Seed Germination Protocol for Cannabis sativa


Alternating layers of paper towel and perlite ??? 💡
 
Last edited:

acespicoli

Well-known member
Post-Harvest

After harvesting cannabis, it is manicured, cured, dried, and stored. Fresh cannabis material typically contains 78-80% moisture [39] and drying is necessary for handling, storage, and avoiding degradation of major cannabinoids before chemical examination. The Office of Medicinal Cannabis of the Dutch Government specifies that the water content of cannabis must be between 5% - 10% directly after packing [57]. Drying crops directly on the ground or under direct sunshine must be avoided [21]. Plants dry within 24 hours to 15% ± 2% moisture when spread evenly to a depth of approximately 15 cm at 40˚C [35]. Moisture content can be checked by measuring weight loss after drying for 24 hours at 105˚C. If the plants are hung to dry, the mean times taken to achieve 15% moisture were 36, 18, and 11 hours at 30˚C, 40˚C, and 50˚C, respectively [35]. When stored in paper bags to dry at 21˚C and 40% RH, fresh floral material cut from stems reached 11% ± 1% moisture in 5 days [47]. The dried material was then cured at 18˚C and 60% RH for 14 days before determining the floral dry weight [47]. Drying at temperature higher than 37˚C for 24 hours may decarboxylate cannabinoid acids [58]. The effect of high drying temperatures on cannabinoids and terpenes requires further investigation. To minimize loss of volatile terpenes during heating, another method for cannabinoid and terpene preservation is freezing by sublimation, which takes 10 to 20 days.

As oxidation occurs with the presence of light, heat, and oxygen, degradation of major cannabinoids is minimized after drying by storage in cool and dark places. Fresh products must be stored between 1˚C and 5˚C and frozen products must be kept at −18˚C to −20˚C for long-term storage [21]. The content of THC stored at −18˚C, 4˚C, and 22˚C ± 1˚C decomposed at rates of 3.83%, 5.38%, and 6.92% per year, respectively [59]. Samples can be stored at −18˚C or 4˚C for about 30 weeks before concentrations of THCA and THC change, however, samples stored at 22˚C ± 1˚C showed some immediate decomposition. Dried samples stored at 50˚C for 24 hours showed slight decarboxylation while those stored at 100˚C and 150˚C showed significant decarboxylation of THCA and decomposition of THC within two hours [60]. The effect of freeze-drying on terpenes has not been well-studied, but reportedly fails to preserve the profile of the fresh plant by changing terpene concentrations [61].


Drying Seed......
1707928214600.png

works for hemp seed :thinking:
 
Last edited:

acespicoli

Well-known member

DIY SOIL MOISTURE SENSOR CHEAP YET ACCURATE !​

By ParthK2 in CircuitsArduino
41,499
45
33

Introduction: DIY SOIL MOISTURE SENSOR CHEAP YET ACCURATE !​

DIY SOIL MOISTURE SENSOR CHEAP YET  ACCURATE !
I am a plant lover and tech head. Recently I decided to grow some plants on my balcony. I decided to automate the watering system as I may forget to water them I didn't want to take any chance with my beautiful flower plants. so decided to get soil moisture sensor and water the plants accordingly for that matter I'll be using microcontroller I prefer Arduino nano as it is compact you may use another microcontroller.I found a lot of commercial soil moisture sensor which weren't cheap by any means as the idea behind this is pretty simple so in this instructable I take you through the steps of making this soil moisture sensor at cheap and readily available parts a home. I'll also be explaining the science behind the working of the resistive soil moisture sensor that we will be making.
So without any further ado let's get started

Step 1: Gathering the Parts and Tools​

Gathering the Parts and Tools

Required parts:-​

  1. galvanized nails 2" - 2piece
  2. A bottle cap 1" wide - 1 piece
  3. 10k ohm 1/4 watt resistor
  4. few female jumper wires

Required tools:-​

  1. Soldering Iron
  2. hot glue gun
  3. solder wire

Step 2: MAKING THE SENSOR​

MAKING THE SENSOR
  1. After gathering all the required parts and tools lets get started with our making of a sensor.
  2. grab to nails and punch them through bottle cap 1 inch apart that's necessary the distance between the nails may affect your reading of moisture.
  3. hot glue them on the place.
  4. solder two wire to each nail/probe.
  5. fill the opening of the cap with the hot glue to make it sturdy so we could insert them in the soil.
  6. connect the 10kohm resistor between A0 and GND pin of nano connect it to probe 1 / nail 1 and connect probe 2 / nail2 to a 5v pin of an Arduino.
OOOH YES, THAT'S ALL ABOUT THE SENSOR PART ISNT IT EASY!

Step 3: INTERFACING THE SENSOR WITH AN ARDUINO​


  1. upload the code which I have made into your Arduino board
  2. Open the serial monitor and whoola you will see the sensor reading
  3. Now you would modify the code, you may take the variable that has the sensor value and can switch on or off any external components such as water pump and or some other thing just by making the pin high which the sensor value variable is below a certain threshold.

IF YOU WANT ME TO MAKE A INSTRUCTABLE ON THE COMPLETE GARDEN AUTOMATION USING A SUBMERSIBLE MOTOR WHICH IS AGAIN DIY AND TEMP SENSOR DTH11 WITH TRACKING THE STATUS WITH ANDROID APP. PLS LET ME KNOW IN COMMENTS, PLS LIKE AND FOLLOW FOR FURTHER INSTRUCTABLES. COMMENT IF YOU HAVE A QUESTION OR PROBLEMS ILL DEFINITELY HELP YOU!

Attachments​

Step 4: SCIENCE BEHIND THE WORKING OF THE SENSOR​

SCIENCE BEHIND THE WORKING OF THE SENSOR
So as you had made the sensor I think its very essential to know the science behind the working of the sensor.
so, the 2 probe that we have created are energized with 5volts and other one grounded so when we will be dipped the sensor into the soil the medium between the 2 probes(soil)will be conductive in the sense the probes receive some electron. but we aren't calculating the current received as calculating is tendious and measuring the resistance between to probes is a lot easier than measuring current and the code is written accordingly to measure the resistance between 2 probes and that will determine the amount of moisture in soil and you may react accordingly be sure to use galvanized nail as it will not corrode easily . The 10kohm resistor between the pins A0 and gnd creates a reference resistance for us to calculate. SO THAT'S IT NOW YOU HAVE CREATED YOUR KNOW MOISTURE DETECTING SENSOR AND NOT JUST THAT YOU KNOW THE SCIENCE THE BEHIND THE ACTUAL WORKING OF THE SENSOR AND THATS A GREAT DEAL SO YOU COULD GIVE YOUR SELF THE TITLE OF TITLE SCIENTIST BUT ITS A LONG WAY TO GO FURTHER LET ME KNOW VIEW ABOUT MY INSTRUCTABLES IN COMMENT DOWN BELow
 

acespicoli

Well-known member
 

acespicoli

Well-known member

How to prevent the death of cannabis seeds and seedlings​


List of contents​


  1. Causes of death in cannabis plants
  2. Seeds dying before germination
    1. What to do with leftover seeds or unopened seed packs
  3. Death during the germination of cannabis seeds
    1. Death by drowning the seed during germination
    2. Seeds dying due to lack of moisture
  4. Death of the plants during the growth period

Causes of death in cannabis plants​

Every grower, almost without exception, will have occasionally suffered the death of a plant during cultivation, just when it seemed that everything was going along nicely. In this article, we'll focus on the main reasons why seeds may not germinate properly, or why seedlings may end up dead in the first weeks of life.

Seeds dying before germination​

Cannabis seeds can die even before we start to grow them, in which case, when the grower comes to germinate them, they won't open up and sprout at all.
The seeds of the cannabis plant, like many other types of seeds, must always be kept in the correct conditions, especially if you want to save the leftover seeds for later use and ensure that they germinate well in the future.
The same goes for unopened whole packs of seeds that have been purchased to store for later use. Sometimes, certain varieties are in high demand and there is limited stock, so the more astute growers will make sure they grab a few packs to keep in the vault until they find the time to germinate the cannabis seeds.
Cannabis seeds must be stored in the correct conditions

What to do with leftover seeds or unopened seed packs​

Cannabis seeds need very low relative humidity and relatively low temperature for their proper storage, so the best plan is to keep them in a "no frost" refrigerator, in which both the humidity and temperature are maintained at very low levels for better conservation of food.
If we want to keep a seed package that's still sealed, simply put the whole unopened pack into the fridge. The best place for its conservation is usually the small shelf where the eggs or butter are kept, although really any part of the fridge is ideal for storage.
If we want to save the leftover seeds from a pack for later use, we recommend storing them in the original Eppendorf tube or container used by the bank. In the original packaging, these Eppendorf tubes hold the seeds and usually also contain a few small silica gel balls, included to maintain very low humidity (10 to 20%) and help to ensure that the seed does not lose any germination viability.
If, however, we leave the seeds for a long period of time in any corner of the house it is possible that over time their viability to germinate will decrease, and when we plant them they may take a long time to germinate or indeed not germinate at all. it is also important to protect them from sunlight.
So if you wish to save the seeds in the best conditions, always keep them in the refrigerator, well protected from air, light and moisture.
How can we store leftover seeds to grow in the future?
How do we store leftover seeds to grow at a later date?

Death during the germination of cannabis seeds​

Death during the germination of cannabis seeds is one of the most frequent failures suffered by every grower over the course of his or her cultivation career. There are several possible reasons that can lead to the seeds dying before they even open and begin to grow, which we'll examine here.
Not all seeds have the same resistance to the errors that may occur during the germination process. Just as not all siblings are not all equal, neither are all seeds. By this, we mean that in the case of one seed germinating and the rest of them not doing so, it doesn't necessarily mean that those that didn't germinate were not strong or resistant, but simply that they were less so than the one that did germinate. If this occurs, we must ask ourselves why they did not germinate and look for any possible failings in the process.

Death by drowning the seed during germination​

We start from the basic premise that the seeds require moisture, oxygen and a suitable temperature for germination; If one of the three aspects is not taken into account, it is quite likely that the seeds won't end up germinating.
Putting the cannabis seeds in a glass of water and waiting 24 to 48 hours for their germination can be a fatal error for them. Re-hydrating the seeds in water is a good idea as long as they are not out of contact with the air for long, as they will be deprived of oxygen and most of the time they will end up dying; so if we use this method, we only leave them to re-to hydrate in water for a few minutes, although, preferably we will avoid any previous soaking or re-hydration (which in any case is not necessary).
We must ensure the correct levels of humidity for germination
We must maintain suitable levels of humidity for germination
The reason for this is that tap water contains chlorine, which sterilises the water to make it suitable for domestic use. However, this chlorine disappears by evaporation after a few hours, so if the water then gets contaminated, the seed can be attacked by any number of pathogens and eventually die. This example also illustrates why we must always touch the seeds with clean hands; If the seeds are handled with dirty fingers, it can lead a fungal or bacterial infection to contaminate them and severely compromise their development.
The same can happen in other germination media such as jiffy plugs, where the most common mistake is usually not draining away the excess water after re-hydrating the compressed peat. To this error, we can add that of burying the seed at more than twice its own depth, in which case it may not emerge despite having germinated perfectly well, but instead, simply end up rotting due to excess water and lack of oxygen. This error is also frequent in growers who germinate directly in the soil because when they first irrigate, the seed can be washed down into the soil resulting in them being buried too deeply, which makes it difficult for the seedling to reach the surface. It is always better to wet the substrate first, before sowing any seeds.
If you want to sow the seed directly into the soil and do it properly, when growing outdoors you must also act to prevent seed predators. Ants, birds, and many other animals or insects are another common cause of seed failure during germination. In the case of ants, they eat the small, delicate root, leaving the plant unable to develop and condemning it to imminent death.
Placing the seeds between moist serviettes/paper towels is one of the best germination methods for beginner growers. Since you can easily see if the seed has taken root or not. But we must also bear in mind that the germination medium, the kitchen paper, is made of cellulose, meaning it is an organic material that will decompose and rot, just like any product of this type.
Planting the germinated seed is also a vitally important moment
Planting the germinated seed is also a crucial moment
It is, therefore, obligatory to change the napkins every day and a half, more or less, to avoid the seeds being contaminated by the pathogens that can appear as the napkins begin to rot. For this reason, we recommend placing the napkins in a deep plate and covering it with another one, leaving a small gap between the two so that air can enter, oxygenate the microclimate that is created during the germination of the seeds and avoiding them rotting.

Seeds dying due to lack of moisture​

Just as excess water is one of the most common causes of germination problems, the lack of moisture is equally detrimental to the process.
If outdoor temperatures are around 20 to 24ºC, then we shouldn't need do much more than start the seeds to germinate and wait for them to open, following the precautions already discussed. But in case of having warmer or cooler temperatures, we must act to raise or lower the environmental temperature for optimal germination, and find the best location for germination to be successful.
If it is winter, the plates holding the seeds are often placed on top of a low heat source to raise the temperature. We must, however, be careful: if this heat source emits hot air, the paper towels will dry out and the seeds will run out of moisture, affecting germination. If you realise this in time, you can re-hydrate the seeds and they will usually recover from and continue to germinate, although it is also possible that there will be consequences that may affect the subsequent development of the plant during its cultivation.
Not long after sowing the seed, we will see our little plant emerge from the soil
If we haven't noticed soon enough that the seeds have been left without moisture, we can assume that they will have dried up completely, with their consequent death, and this is even more likely if the seeds had already opened up to show the root. This can also happen very easily if we germinate during summer when temperatures are high and humidity is usually very low compared to other times of the year.

Death of the plants during the growth period​

The start of the growth period is a very important stage in a plant's life, so several aspects must be taken into account so that it does not die of any of a number of causes.
One of the most frequent problems is root rot due to excess irrigation and lack of oxygen in the substrate. Up till now, this has been one of the most common causes of plant death during the growth period, especially with beginner gardeners who lack previous cultivation experience. In addition, the likelihood of this happening increases considerably in crops with auto-flowering varieties; we'll explain what to do here.
When the plant emerges from the substrate, leaving behind its germination stage, it is crucial to take care with any excess water and the lack of humidity in its aerial parts such as leaves, stems and branches.
The proper conditions guarantee good germinación
When the plant is young and only has a very small root, its needs are few, it feeds and drinks very little. If we saturate the substrate with too much water, apart from halting the growth of the root (leading to little or no growth in the aerial parts), it creates the ideal conditions for the small roots to slowly rot. If the plant loses a part or all of its tiny root system in its first stage of life, it is almost guaranteed that it will die within a few days.
If we use a small 0.5L to 1L plant pot for the first part of vegetative growth, before transplanting them to a bigger pot, we will be covering our backs in case of any excess of irrigation, since the substrate will dry out again much faster than in larger pots. For this reason, this issue is very common for novice growers who are cultivating auto-flowering cannabis plants, where the use of 20L pots is recommended from the start.
It is often said that you must irrigate with an appropriate amount of water and nutrients for the size of the plant. As this is often complicated to carry out, as a rough guide we can irrigate the plants with an amount not more than 10 or 20% of the plant pot's capacity. So, if they are 1L pots we will water from 100 to 200ml as long as it is not an auto-flowering plant.
If the plan is to grow automatic varieties, then during the first two weeks we water with 100 to 350ml per irrigation, every 1 or 2 days. Remember that the substrate must maintain a minimum of humidity to allow the plant to feed and continue to develop normally. If it is raining and the plants are outdoors, it's a good idea to move or cover them, to prevent the substrate from getting soaked, which could easily lead to root zone problems.
The first stages of growth survived with success!
We hope that this information will be useful and help to stop your seeds and seedlings dying. Don't hesitate to leave any comments or questions, we'll be pleased to help.
Happy growing

-Alchemica


Well whats your take on this post, ?
 

acespicoli

Well-known member

Temperature and Moisture Content for Storage Maintenance of Germination Capacity of Seeds of Industrial Hemp, Marijuana, and Ditchweed Forms of Cannabis sativa

Ernest Small
&
Brenda Brookes
Pages 240-255 | Published online: 11 Dec 2012


Abstract​

Cannabis sativa seeds of three industrial hemp cultivars, a medicinal strain of marijuana, and a ruderal strain were subjected to combinations of four temperatures (20°C, 5°C, −20°C, and −80°C) and three seed moisture contents (approximately 11%, 6%, and 4%) for 66 months. Storage of seeds with a moisture content of 11% at 20°C reduced the germinability of seeds of all varieties to zero in less than 18 months. Either reducing the temperature to at least 5°C or reducing the seed moisture content to at least 6% had a huge beneficial effect on maintaining seed viability. Additional reduction of temperature, but not additional reduction of moisture content had a small supplementary beneficial effect. No apparent benefit was noticed from oxygen-free seed storage
 

acespicoli

Well-known member


I built an isolation chamber with pollen filters on intake and outtake and a 140mm PC fan for air circulation

20150903 115124


20150903 115217


Toaster79
 

Attachments

  • 1708474705323.gif
    1708474705323.gif
    42 bytes · Views: 17

acespicoli

Well-known member
1708475332532.png

1708475405937.png

1708475513232.png

1708475648904.png

HEPA filters capture pollen, dirt, dust, moisture, bacteria (0.2–2.0 μm), virus (0.02–0.3 μm), and submicron liquid aerosol (0.02–0.5 μm).[9][10][11] Some microorganisms, for example, Aspergillus niger, Penicillium citrinum, Staphylococcus epidermidis, and Bacillus subtilis are captured by HEPA filters with photocatalytic oxidation (PCO). A HEPA filter is also able to capture some viruses and bacteria which are ≤0.3 μm.[12] A HEPA filter is also able to capture floor dust which contains bacteroidia, clostridia, and bacilli.[13]
UsageClassPerformancePerformance testParticulate size
approaching 100% retention
Test Standard
Coarse filters
(used as
Primary)
G165%Average value>5 μmBS EN779
G265–80%Average value>5 μmBS EN779
G380–90%Average value>5 μmBS EN779
G490%–Average value>5 μmBS EN779
Fine filters
(used as
Secondary)
M540–60%Average value>5 μmBS EN779
M660–80%Average value>2 μmBS EN779
F780–90%Average value>2 μmBS EN779
F890–95%Average value>1 μmBS EN779
F995%–Average value>1 μmBS EN779
Semi HEPAE1085%Minimum value>1 μmBS EN1822
E1195%Minimum value>0.5 μmBS EN1822
E1299.5%Minimum value>0.5 μmBS EN1822
HEPAH1399.95%Minimum value>0.3 μmBS EN1822
H1499.995%Minimum value>0.3 μmBS EN1822
ULPAU1599.9995%Minimum value>0.3 μmBS EN1822
U1699.99995%Minimum value>0.3 μmBS EN1822
U1799.999995%Minimum value>0.3 μmBS EN1822

1708476091516.png

portable hepa unit
 
Last edited:

Latest posts

Latest posts

Top